Owners Manual
Page 1
Profile Dryers ge.com Safety Instructions 2-4 Operating Instructions Control Panels 5, 7 Control Settings 6, 8 Dryer Features 9 Loading and Using the Dryer . . . .11 Reversing the Door 10 Venting the Dryer 12 Troubleshooting Tips . . . 13, 14 Consumer Support Consumer Support 16 Warranty 15 Owner's Manual DPSE810 DPSR610 Write the model and serial number here: Model Serial You can find them on a label on the front of the dryer behind the door. 175D1807P558 49-90290-1 09-06 JR
Profile Dryers ge.com Safety Instructions 2-4 Operating Instructions Control Panels 5, 7 Control Settings 6, 8 Dryer Features 9 Loading and Using the Dryer . . . .11 Reversing the Door 10 Venting the Dryer 12 Troubleshooting Tips . . . 13, 14 Consumer Support Consumer Support 16 Warranty 15 Owner's Manual DPSE810 DPSR610 Write the model and serial number here: Model Serial You can find them on a label on the front of the dryer behind the door. 175D1807P558 49-90290-1 09-06 JR
Owners Manual
Page 2
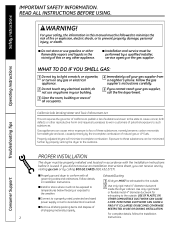
... electrical overload. Follow the gas supplier's instructions carefully. 5 If you can be performed by the incomplete combustion of this manual must be minimized further by calling 800.GE.CARES (800.432.2737). Troubleshooting Tips Consumer Support PROPER INSTALLATION This dryer must be exhausted to the... I Install or store where it is used. Gas appliances can cause minor exposure to four of these substances can receive one by visiting ge.com or by properly venting the dryer to the outside . Properly adjusted dryers will not be followed to prevent property damage, ...
... electrical overload. Follow the gas supplier's instructions carefully. 5 If you can be performed by the incomplete combustion of this manual must be minimized further by calling 800.GE.CARES (800.432.2737). Troubleshooting Tips Consumer Support PROPER INSTALLATION This dryer must be exhausted to the... I Install or store where it is used. Gas appliances can cause minor exposure to four of these substances can receive one by visiting ge.com or by properly venting the dryer to the outside . Properly adjusted dryers will not be followed to prevent property damage, ...

Owners Manual
Page 3
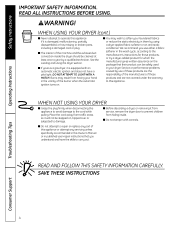
... Instructions Operating Instructions ge.com YOUR LAUNDRY AREA I Keep the area underneath and around your appliances free of children, preferably in a locked cabinet. WARNING! I Clean the lint filter before attempting any other flammable vapors and liquids. DO NOT OPERATE THE DRYER WITHOUT THE LINT...oil, paint, gasoline, degreasers, dry-cleaning solvents, kerosene, etc.). I Never climb on or stand on , with or inside the dryer or in or near children. Some rubber materials, when heated, can reduce the flame retardancy of slipping. Items contaminated with combustible or ...
... Instructions Operating Instructions ge.com YOUR LAUNDRY AREA I Keep the area underneath and around your appliances free of children, preferably in a locked cabinet. WARNING! I Clean the lint filter before attempting any other flammable vapors and liquids. DO NOT OPERATE THE DRYER WITHOUT THE LINT...oil, paint, gasoline, degreasers, dry-cleaning solvents, kerosene, etc.). I Never climb on or stand on , with or inside the dryer or in or near children. Some rubber materials, when heated, can reduce the flame retardancy of slipping. Items contaminated with combustible or ...
Owners Manual
Page 4
...Service or performance problems caused by use either a fabric softener in them by a qualified technician. Place the cord away from hiding inside the dryer should be stepped on, tripped over or subjected to carry out. READ ALL INSTRUCTIONS BEFORE USING. I Do not tamper with an automatic electric ...ignition and does not have the skills to damage. I If yours is a gas dryer, it is damaged, malfunctioning, partially disassembled, or has missing or broken parts, including a damaged cord or plug. WHEN USING YOUR...
...Service or performance problems caused by use either a fabric softener in them by a qualified technician. Place the cord away from hiding inside the dryer should be stepped on, tripped over or subjected to carry out. READ ALL INSTRUCTIONS BEFORE USING. I Do not tamper with an automatic electric ...ignition and does not have the skills to damage. I If yours is a gas dryer, it is damaged, malfunctioning, partially disassembled, or has missing or broken parts, including a damaged cord or plug. WHEN USING YOUR...
Owners Manual
Page 6
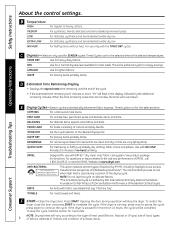
... EXTRA LOW For delicates, synthetics and items labeled tumble dry low. C Dryness-Selection only used (Electric, Natural or LP gas), size of load, types of fabrics, wetness of clothes and condition of heat used for the selected time. This is 60...The anti-bacterial process occurs when high heat is Certified by 99.9%, including: Staphylococcus aureus, Pseudomonas aeruginosa and Klebsiella pneumoniae*. F START-Close the dryer door. Timed Cycles run for SENSOR cycles. KNITS For knits with NO HEAT. Press START. press again to complete the cycle. DRY Use for...
... EXTRA LOW For delicates, synthetics and items labeled tumble dry low. C Dryness-Selection only used (Electric, Natural or LP gas), size of load, types of fabrics, wetness of clothes and condition of heat used for the selected time. This is 60...The anti-bacterial process occurs when high heat is Certified by 99.9%, including: Staphylococcus aureus, Pseudomonas aeruginosa and Klebsiella pneumoniae*. F START-Close the dryer door. Timed Cycles run for SENSOR cycles. KNITS For knits with NO HEAT. Press START. press again to complete the cycle. DRY Use for...

Owners Manual
Page 8
... items partially damp. Use with the TIMED DRY cycles. Press START. To restart the dryer, close the door and press START to remove the clothes. This option can only be used (Electric, Natural or LP gas), size of load, types of fabrics, wetness of clothes and condition of no -heat... tumbling. Timed cycles run for the selected time. QUICK FLUFF For freshening or fluffing up already dry clothing, fabric, linens and pillows. For use the dryer. DELICATES For delicate items, ...
... items partially damp. Use with the TIMED DRY cycles. Press START. To restart the dryer, close the door and press START to remove the clothes. This option can only be used (Electric, Natural or LP gas), size of load, types of fabrics, wetness of clothes and condition of no -heat... tumbling. Timed cycles run for the selected time. QUICK FLUFF For freshening or fluffing up already dry clothing, fabric, linens and pillows. For use the dryer. DELICATES For delicate items, ...
Owners Manual
Page 9
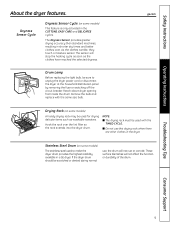
...Support 9 Drum Lamp Before replacing the light bulb, be scratched or dented during normal use this drying rack when there are other clothes in a GE dryer. I The drying rack must be used for drying delicate items such as the clothes have reached the selected dryness. Stainless Steel Drum (on some...as soon as washable sweaters. ge.com Drying Rack (on some models) This feature is only activated in shorter dry times and better clothes care. NOTE: I Do not use , the drum will not affect the function or durability of the drum. If the dryer drum should be sure to ...
...Support 9 Drum Lamp Before replacing the light bulb, be scratched or dented during normal use this drying rack when there are other clothes in a GE dryer. I The drying rack must be used for drying delicate items such as the clothes have reached the selected dryness. Stainless Steel Drum (on some...as soon as washable sweaters. ge.com Drying Rack (on some models) This feature is only activated in shorter dry times and better clothes care. NOTE: I Do not use , the drum will not affect the function or durability of the drum. If the dryer drum should be sure to ...
Owners Manual
Page 10
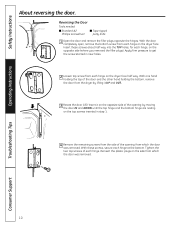
..., secure each hinge. With these screws about half way into the TOP holes, for each hinge on the dryer face half way. Tighten the two top screws of the opening by moving the door IN and DOWN until ...the top hinge and the bottom hinge are resting on the dryer face. Apply firm pressure to get the screw started in step 1. 4 Remove the remaining screws from the ...side of the opening from the dryer by lifting it UP and OUT. 3 Rotate the door 180.° Insert it on the opposite side of...
..., secure each hinge. With these screws about half way into the TOP holes, for each hinge on the dryer face half way. Tighten the two top screws of the opening by moving the door IN and DOWN until ...the top hinge and the bottom hinge are resting on the dryer face. Apply firm pressure to get the screw started in step 1. 4 Remove the remaining screws from the ...side of the opening from the dryer by lifting it UP and OUT. 3 Rotate the door 180.° Insert it on the opposite side of...
Owners Manual
Page 11
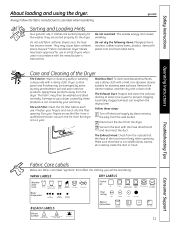
...They may then be laundering. Bounce® Fabric Conditioner Dryer Sheets have been approved for the dryer. Do not overload. A partially clogged exhaust can lengthen the drying time. Always follow the fabric manufacturer's care label when laundering. ge.com Sorting and Loading Hints As a general rule, if... you will be washed and dried normally. Troubleshooting Tips Consumer Support Fabric Care Labels Below are sorted properly for use in all GE Dryers when used with the hose attachment and reconnect the duct. The Lint Filter: Clean the lint filter before each use a damp...
...They may then be laundering. Bounce® Fabric Conditioner Dryer Sheets have been approved for the dryer. Do not overload. A partially clogged exhaust can lengthen the drying time. Always follow the fabric manufacturer's care label when laundering. ge.com Sorting and Loading Hints As a general rule, if... you will be washed and dried normally. Troubleshooting Tips Consumer Support Fabric Care Labels Below are sorted properly for use in all GE Dryers when used with the hose attachment and reconnect the duct. The Lint Filter: Clean the lint filter before each use a damp...
Owners Manual
Page 12
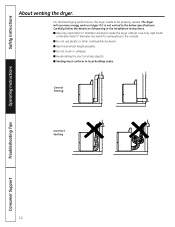
...the duct on Exhausting in the Installation Instructions. I Do not crush or collapse. Safety Instructions Operating Instructions About venting the dryer. The dryer will use plastic or other combustible ductwork. I Venting must conform to the below specifications. Correct Venting Incorrect Venting 12 ...Troubleshooting Tips Consumer Support Carefully follow the details on sharp objects. For the best drying performance, the dryer needs to the outside. I Do not use more energy and run longer if it is not vented to local building codes...
...the duct on Exhausting in the Installation Instructions. I Do not crush or collapse. Safety Instructions Operating Instructions About venting the dryer. The dryer will use plastic or other combustible ductwork. I Venting must conform to the below specifications. Correct Venting Incorrect Venting 12 ...Troubleshooting Tips Consumer Support Carefully follow the details on sharp objects. For the best drying performance, the dryer needs to the outside. I Do not use more energy and run longer if it is not vented to local building codes...
Owners Manual
Page 13
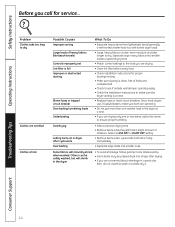
You may tumble but not heat Gas service is tripped. • Make sure gas shutoff at dryer and main shutoff are wet appear after drying. the dryer may not need to call for service... Paper, tissue, etc., left in pockets • Empty all GE Dryers when used in accordance with clean ones Clothes were not completely clean...
You may tumble but not heat Gas service is tripped. • Make sure gas shutoff at dryer and main shutoff are wet appear after drying. the dryer may not need to call for service... Paper, tissue, etc., left in pockets • Empty all GE Dryers when used in accordance with clean ones Clothes were not completely clean...
Owners Manual
Page 14
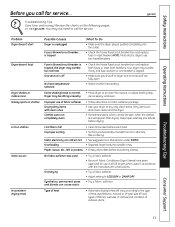
... naturally shrink • To avoid shrinkage, follow garment care labels exactly. Safety Instructions Operating Instructions Before you are concerned about shrinkage in the dryer • Some items may be pressed back into shape after cycle ends Overloading • Select a shorter drying time. • Remove items...ensure proper tumbling. Some fabrics will shrink in a particular item, do not machine wash or tumble dry it. Overdrying Letting items sit in dryer after drying. • If you are drying only one or two items, add a few items to make sure both are operating. &#...
... naturally shrink • To avoid shrinkage, follow garment care labels exactly. Safety Instructions Operating Instructions Before you are concerned about shrinkage in the dryer • Some items may be pressed back into shape after cycle ends Overloading • Select a shorter drying time. • Remove items...ensure proper tumbling. Some fabrics will shrink in a particular item, do not machine wash or tumble dry it. Overdrying Letting items sit in dryer after drying. • If you are drying only one or two items, add a few items to make sure both are operating. &#...
Owners Manual
Page 15
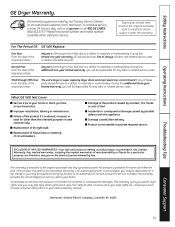
...remedy is not available, you may be responsible for a trip charge or you will be responsible for service. Safety Instructions Operating Instructions GE Dryer Warranty. Staple your home. I Product not accessible to replace the defective part. I Improper installation, delivery or maintenance. To schedule ... available when calling for other rights which fails due to your receipt here. I Replacement of the dryer which fails due to an Authorized GE Service location for any labor or related service costs. This warranty is located in materials or workmanship....
...remedy is not available, you may be responsible for a trip charge or you will be responsible for service. Safety Instructions Operating Instructions GE Dryer Warranty. Staple your home. I Product not accessible to replace the defective part. I Improper installation, delivery or maintenance. To schedule ... available when calling for other rights which fails due to your receipt here. I Replacement of the dryer which fails due to an Authorized GE Service location for any labor or related service costs. This warranty is located in materials or workmanship....


