Owners Manual
Page 1
Profile Dryers ge.com Safety Instructions 2-4 Operating Instructions Control Panels 5, 7 Control Settings 6, 8 Dryer Features 9 Loading and Using the Dryer . . . .11 Reversing the Door 10 Venting the Dryer 12 Troubleshooting Tips . . . 13, 14 Consumer Support Consumer Support 16 Warranty 15 Owner's Manual DPSE810 DPSR610 Write the model and serial number here: Model Serial You can find them on a label on the front of the dryer behind the door. 175D1807P558 49-90290-1 09-06 JR
Profile Dryers ge.com Safety Instructions 2-4 Operating Instructions Control Panels 5, 7 Control Settings 6, 8 Dryer Features 9 Loading and Using the Dryer . . . .11 Reversing the Door 10 Venting the Dryer 12 Troubleshooting Tips . . . 13, 14 Consumer Support Consumer Support 16 Warranty 15 Owner's Manual DPSE810 DPSR610 Write the model and serial number here: Model Serial You can find them on a label on the front of the dryer behind the door. 175D1807P558 49-90290-1 09-06 JR
Owners Manual
Page 2
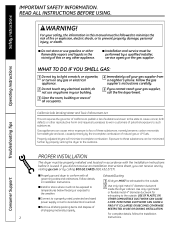
... gas or electrical appliance. 2 Do not touch any other appliance. Follow the gas supplier's instructions carefully. 5 If you can receive one by visiting ge.com or by properly venting the dryer to the outside . Follow details in accordance with all Exhaust/Ducting: governing codes and ordinances. Use only rigid metal or flexible metal 4″ diameter ductwork for exhausting to the outdoors. Safety Instructions Operating Instructions WARNING! I Remove...
... gas or electrical appliance. 2 Do not touch any other appliance. Follow the gas supplier's instructions carefully. 5 If you can receive one by visiting ge.com or by properly venting the dryer to the outside . Follow details in accordance with all Exhaust/Ducting: governing codes and ordinances. Use only rigid metal or flexible metal 4″ diameter ductwork for exhausting to the outdoors. Safety Instructions Operating Instructions WARNING! I Remove...

Owners Manual
Page 3
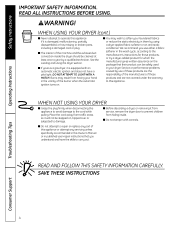
... I Keep the area underneath and around your appliances free of combustible materials (lint, paper, rags, etc.), gasoline, chemicals and other appliance. I Keep the floor around your appliances clean and dry to an off the circuit breaker before each load to avoid injury. I Garments labeled Dry Away from the power supply or disconnect the dryer at the household distribution panel by clothing during operation.
... I Keep the area underneath and around your appliances free of combustible materials (lint, paper, rags, etc.), gasoline, chemicals and other appliance. I Keep the floor around your appliances clean and dry to an off the circuit breaker before each load to avoid injury. I Garments labeled Dry Away from the power supply or disconnect the dryer at the household distribution panel by clothing during operation.
Owners Manual
Page 4
... the exhaust duct connection inside . I You may result from hiding inside the dryer should be stepped on . DO NOT ATTEMPT TO LIGHT WITH A MATCH. We recommend you use of these products are not covered under the warranty to this Owner's Manual or in published user-repair instructions that their product can be safely used in this appliance. I Do not attempt to repair or replace any servicing unless specifically...
... the exhaust duct connection inside . I You may result from hiding inside the dryer should be stepped on . DO NOT ATTEMPT TO LIGHT WITH A MATCH. We recommend you use of these products are not covered under the warranty to this Owner's Manual or in published user-repair instructions that their product can be safely used in this appliance. I Do not attempt to repair or replace any servicing unless specifically...
Owners Manual
Page 5
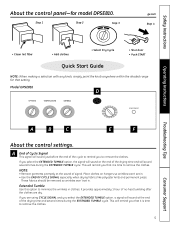
... 't set in. • Use the END OF CYCLE SIGNAL especially when drying fabrics like polyester knits and permanent press. If you are dry. NOTE: • Remove garments promptly at the end of the drying time and several times during the EXTENDED TUMBLE cycle. It provides approximately 1 hour of signal. Step 1 Step 2 Step 3 ge.com Step 4 • Clean lint filter • Add clothes • Select Dry Cycle • Shut door...
... 't set in. • Use the END OF CYCLE SIGNAL especially when drying fabrics like polyester knits and permanent press. If you are dry. NOTE: • Remove garments promptly at the end of the drying time and several times during the EXTENDED TUMBLE cycle. It provides approximately 1 hour of signal. Step 1 Step 2 Step 3 ge.com Step 4 • Clean lint filter • Add clothes • Select Dry Cycle • Shut door...
Owners Manual
Page 6
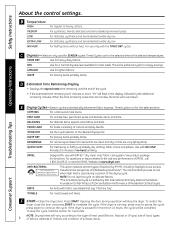
... most loads. MIXED LOAD For loads consisting of no-heat tumbling. TIMED DRY Set the Cycle Selector at www.dryel.com. DEWRINKLE For removing wrinkles from items that are very lightly damp. Provides 10 minutes of cottons and poly-blends. NOTE: Do not use and performance of exhaust ducts. To restart the dryer, close the door and press START to continue the cycle. press again to complete the cycle. Timed Cycles run...
... most loads. MIXED LOAD For loads consisting of no-heat tumbling. TIMED DRY Set the Cycle Selector at www.dryel.com. DEWRINKLE For removing wrinkles from items that are very lightly damp. Provides 10 minutes of cottons and poly-blends. NOTE: Do not use and performance of exhaust ducts. To restart the dryer, close the door and press START to continue the cycle. press again to complete the cycle. Timed Cycles run...
Owners Manual
Page 7
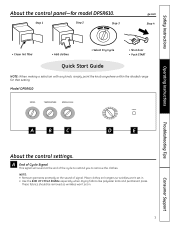
Model DPSR610 Operating Instructions Troubleshooting Tips A B C D E About the control settings. These fabrics should be removed so wrinkles won 't set in . • Use the END OF CYCLE SIGNAL especially when drying fabrics like polyester knits and permanent press. Place clothes on hangers so wrinkles won 't set in . 7 Consumer Support Step 1 Step 2 Step 3 ge.com Step 4 • Clean lint filter • Add clothes • Select Dry Cycle • Shut door • Push START Quick Start Guide NOTE: When making a selection with...
Model DPSR610 Operating Instructions Troubleshooting Tips A B C D E About the control settings. These fabrics should be removed so wrinkles won 't set in . • Use the END OF CYCLE SIGNAL especially when drying fabrics like polyester knits and permanent press. Place clothes on hangers so wrinkles won 't set in . 7 Consumer Support Step 1 Step 2 Step 3 ge.com Step 4 • Clean lint filter • Add clothes • Select Dry Cycle • Shut door • Push START Quick Start Guide NOTE: When making a selection with...

Owners Manual
Page 8
... Instructions Operating Instructions About the control settings. This will sound at the end of no -heat tumbling. TIMED DRY Set the Cycle Selector at the end of exhaust ducts. Use with the COTTONS, EASY CARE and DELICATES cycles. Opening the door during the WRINKLE CARE cycle. DAMP DRY For leaving items partially damp. This option can only be used (Electric, Natural or LP gas), size of load, types of fabrics, wetness of clothes and condition of the drying cycle. D Drying Cycles-Automatic cycles automatically...
... Instructions Operating Instructions About the control settings. This will sound at the end of no -heat tumbling. TIMED DRY Set the Cycle Selector at the end of exhaust ducts. Use with the COTTONS, EASY CARE and DELICATES cycles. Opening the door during the WRINKLE CARE cycle. DAMP DRY For leaving items partially damp. This option can only be used (Electric, Natural or LP gas), size of load, types of fabrics, wetness of clothes and condition of the drying cycle. D Drying Cycles-Automatic cycles automatically...
Owners Manual
Page 9
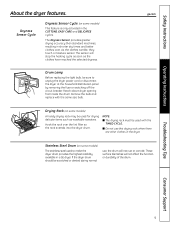
... lint filter so the rack extends into the dryer drum. Troubleshooting Tips Consumer Support 9 ge.com Drying Rack (on some models) A handy drying rack may be used with the same size bulb. The sensor will stop the heating cycle as soon as washable sweaters. Remove the bulb and replace with the TIMED CYCLE. I The drying rack must be used to unplug the dryer power cord or disconnect the dryer at the household distribution panel by removing the fuse or switching off the circuit breaker. Drum Lamp Before replacing the light bulb...
... lint filter so the rack extends into the dryer drum. Troubleshooting Tips Consumer Support 9 ge.com Drying Rack (on some models) A handy drying rack may be used with the same size bulb. The sensor will stop the heating cycle as soon as washable sweaters. Remove the bulb and replace with the TIMED CYCLE. I The drying rack must be used to unplug the dryer power cord or disconnect the dryer at the household distribution panel by removing the fuse or switching off the circuit breaker. Drum Lamp Before replacing the light bulb...
Owners Manual
Page 10
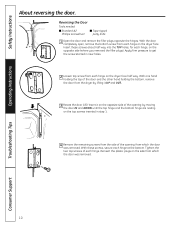
... holes. 2 Loosen top screw from which the door was removed. Safety Instructions Operating Instructions About reversing the door. With the door completely open, remove the bottom screw from the dryer by lifting it UP and OUT. 3 Rotate the door 180.° Insert it on the dryer face. Apply firm pressure to get the screw started in step 1. 4 Remove the remaining screws from the side of...
... holes. 2 Loosen top screw from which the door was removed. Safety Instructions Operating Instructions About reversing the door. With the door completely open, remove the bottom screw from the dryer by lifting it UP and OUT. 3 Rotate the door 180.° Insert it on the dryer face. Apply firm pressure to get the screw started in step 1. 4 Remove the remaining screws from the side of...
Owners Manual
Page 11
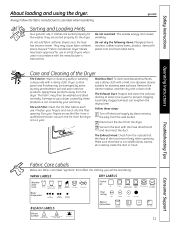
...-filled items. Care and Cleaning of the hood move freely when operating. The Exhaust Hood: Check from the dryer. 3 Vacuum the duct with a damp cloth. Safety Instructions Operating Instructions About loading and using the dryer. Do not add fabric softener sheets once the load has become warm. Follow these steps: 1 Turn off electrical supply by some laundry pretreatment soil and stain remover products. This wastes energy and causes wrinkling. Damage to...
...-filled items. Care and Cleaning of the hood move freely when operating. The Exhaust Hood: Check from the dryer. 3 Vacuum the duct with a damp cloth. Safety Instructions Operating Instructions About loading and using the dryer. Do not add fabric softener sheets once the load has become warm. Follow these steps: 1 Turn off electrical supply by some laundry pretreatment soil and stain remover products. This wastes energy and causes wrinkling. Damage to...
Owners Manual
Page 12
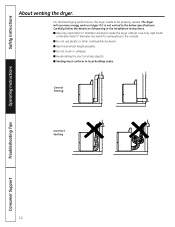
... best drying performance, the dryer needs to the below specifications. Carefully follow the details on sharp objects. I Do not crush or collapse. I Use only rigid metal 4 ″ diameter ductwork inside the dryer cabinet. I Venting must conform to the outside. Correct Venting Incorrect Venting 12 Troubleshooting Tips Consumer Support I Avoid resting the duct on Exhausting in the Installation Instructions. Safety Instructions Operating Instructions About venting the dryer. I Use the shortest length possible. The dryer will use...
... best drying performance, the dryer needs to the below specifications. Carefully follow the details on sharp objects. I Do not crush or collapse. I Use only rigid metal 4 ″ diameter ductwork inside the dryer cabinet. I Venting must conform to the outside. Correct Venting Incorrect Venting 12 Troubleshooting Tips Consumer Support I Avoid resting the duct on Exhausting in the Installation Instructions. Safety Instructions Operating Instructions About venting the dryer. I Use the shortest length possible. The dryer will use...
Owners Manual
Page 13
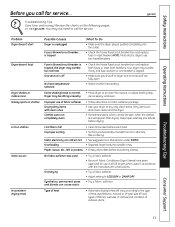
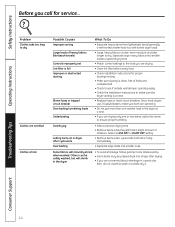
...). Lint filter is off No heat temperature selected • Check the house fuse/circuit breaker box and replace both fuses or reset both breakers. Your dryer may tumble but not heat Gas service is full • Clean lint screen before drying. Safety Instructions Operating Instructions Before you call for service... Review the charts on the following pages, or visit ge.com. Troubleshooting Tips Consumer Support 13 Use proper washing procedures before each load. Overloading • Separate large loads into the outlet. • Check...
...). Lint filter is off No heat temperature selected • Check the house fuse/circuit breaker box and replace both fuses or reset both breakers. Your dryer may tumble but not heat Gas service is full • Clean lint screen before drying. Safety Instructions Operating Instructions Before you call for service... Review the charts on the following pages, or visit ge.com. Troubleshooting Tips Consumer Support 13 Use proper washing procedures before each load. Overloading • Separate large loads into the outlet. • Check...
Owners Manual
Page 14
... control settings to the load you are drying. • Clean lint filter before every load. • Check installation instructions for service... Overdrying Letting items sit in dryer after drying. • If you are concerned about shrinkage in the dryer at a time. • If you call for proper ducting/venting. • Make sure ducting is clean, free of kinks and unobstructed. • Check to see if outside wall damper operates easily. • Check the Installation Instructions to...
... control settings to the load you are drying. • Clean lint filter before every load. • Check installation instructions for service... Overdrying Letting items sit in dryer after drying. • If you are concerned about shrinkage in the dryer at a time. • If you call for proper ducting/venting. • Make sure ducting is clean, free of kinks and unobstructed. • Check to see if outside wall damper operates easily. • Check the Installation Instructions to...
Owners Manual
Page 15
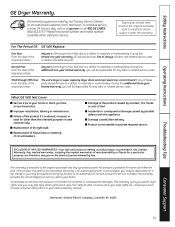
... charge, all labor and related service costs to use within the USA. In Alaska, the warranty excludes the cost of the light bulb. During this Limited Warranty. I Replacement of shipping or service calls to an Authorized GE Service location for service. If the product is located in materials or workmanship. This warranty gives you specific legal rights, and you will be required to bring the product to...
... charge, all labor and related service costs to use within the USA. In Alaska, the warranty excludes the cost of the light bulb. During this Limited Warranty. I Replacement of shipping or service calls to an Authorized GE Service location for service. If the product is located in materials or workmanship. This warranty gives you specific legal rights, and you will be required to bring the product to...
Owners Manual
Page 16
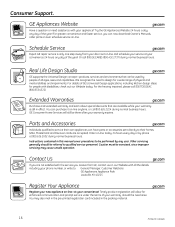
... manual cover procedures to be referred to : General Manager, Customer Relations GE Appliances, Appliance Park Louisville, KY 40225 ge.com Register Your Appliance Register your convenience! Consumer Support. You can now download Owner's Manuals, order parts or even schedule service on -line and schedule your service at your warranty expires. GE Appliances Website ge.com Have a question or need to their own appliances can be used by any user...
... manual cover procedures to be referred to : General Manager, Customer Relations GE Appliances, Appliance Park Louisville, KY 40225 ge.com Register Your Appliance Register your convenience! Consumer Support. You can now download Owner's Manuals, order parts or even schedule service on -line and schedule your service at your warranty expires. GE Appliances Website ge.com Have a question or need to their own appliances can be used by any user...


