Owners Manual
Page 1
....com Safety Instructions 2-5 Operating Instructions Controls 6-8 Cycle Options 9-10 Dryer Features 11 Loading and Using the Dryer 12, 13 Installation Instructions Before You Begin 14-16 Connecting a Gas Dryer 17-20 Connecting an Electric Dryer 21-23 Exhausting the Dryer 24-28 Final Setup 29, 30 Reversing the Door Swing . . . . . .31, 32 Troubleshooting Tips 33 Consumer Support Consumer Support 36 Warranty (Canada 35 Warranty (U.S 34 Owner's Manual and Installation Instructions DPGT650 UPGT650 Printed in Korea Write the model and serial numbers here: Model Serial They are...
....com Safety Instructions 2-5 Operating Instructions Controls 6-8 Cycle Options 9-10 Dryer Features 11 Loading and Using the Dryer 12, 13 Installation Instructions Before You Begin 14-16 Connecting a Gas Dryer 17-20 Connecting an Electric Dryer 21-23 Exhausting the Dryer 24-28 Final Setup 29, 30 Reversing the Door Swing . . . . . .31, 32 Troubleshooting Tips 33 Consumer Support Consumer Support 36 Warranty (Canada 35 Warranty (U.S 34 Owner's Manual and Installation Instructions DPGT650 UPGT650 Printed in Korea Write the model and serial numbers here: Model Serial They are...

Owners Manual
Page 2
Follow the gas supplier's instructions carefully. 5 If you cannot reach your gas supplier from a neighbor's phone. Installation Instructions Consumer Support Troubleshooting Tips 2 Operating Instructions Safety Instructions IMPORTANT SAFETY INFORMATION. California Safe Drinking Water and Toxic Enforcement Act This act requires the governor of California to publish a list of substances known to the state to cause cancer, birth defects or other appliance. ■ Installation and service must be...
Follow the gas supplier's instructions carefully. 5 If you cannot reach your gas supplier from a neighbor's phone. Installation Instructions Consumer Support Troubleshooting Tips 2 Operating Instructions Safety Instructions IMPORTANT SAFETY INFORMATION. California Safe Drinking Water and Toxic Enforcement Act This act requires the governor of California to publish a list of substances known to the state to cause cancer, birth defects or other appliance. ■ Installation and service must be...
Owners Manual
Page 3
... weather. ■ Connect to a properly rated, protected and sized power supply circuit to avoid electrical overload. ■ Remove the colored protective film from both the control panel and the door. ■ Remove all sharp packing items and dispose of the dryer (on some models). ■ Pull the protector out and down to its lowest position and connect the exhaust duct to conform with the Installation Instructions before it...
... weather. ■ Connect to a properly rated, protected and sized power supply circuit to avoid electrical overload. ■ Remove the colored protective film from both the control panel and the door. ■ Remove all sharp packing items and dispose of the dryer (on some models). ■ Pull the protector out and down to its lowest position and connect the exhaust duct to conform with the Installation Instructions before it...

Owners Manual
Page 4
... cleaning cloths, mops, towels used a cleaning solvent or that may be put in your dryer. ■ Do not dry fiberglass articles in the room. Do not add these substances around your washer or dryer during subsequent dryer uses. ■ To minimize the possibility of fabrics. There are many highly flammable items used by removing the fuse or switching off the circuit breaker before each load to prevent lint...
... cleaning cloths, mops, towels used a cleaning solvent or that may be put in your dryer. ■ Do not dry fiberglass articles in the room. Do not add these substances around your washer or dryer during subsequent dryer uses. ■ To minimize the possibility of fabrics. There are many highly flammable items used by removing the fuse or switching off the circuit breaker before each load to prevent lint...
Owners Manual
Page 5
... covered under the warranty to this appliance to avoid damage to the cord while pulling. See the Loading and Using the Dryer section. ■ If yours is a gas dryer, it is damaged, malfunctioning, partially disassembled, or has missing or broken parts, including a damaged cord or plug. ■ The interior of the machine and the exhaust duct connection inside . ■ Do not tamper with an automatic electric...
... covered under the warranty to this appliance to avoid damage to the cord while pulling. See the Loading and Using the Dryer section. ■ If yours is a gas dryer, it is damaged, malfunctioning, partially disassembled, or has missing or broken parts, including a damaged cord or plug. ■ The interior of the machine and the exhaust duct connection inside . ■ Do not tamper with an automatic electric...

Owners Manual
Page 7
... fabrics. MIXED LOAD For loads consisting of the drying process. VERY DRY MORE DRY NORMAL LESS DRY DAMP DRY Use for small loads. WRINKLE FREE For wrinkle-free and permanent press items. ACTIVE WEAR Clothing worn for most linens. DEWRINKLE For removing wrinkles from the power supply. 2 Cycles The cycle controls the length and tumble speed of cottons and poly-blends. Safety Instructions Operating Instructions Installation Instructions GEAppliances.com 1 Power Press to tumble items without heat. TIME DRY is also...
... fabrics. MIXED LOAD For loads consisting of the drying process. VERY DRY MORE DRY NORMAL LESS DRY DAMP DRY Use for small loads. WRINKLE FREE For wrinkle-free and permanent press items. ACTIVE WEAR Clothing worn for most linens. DEWRINKLE For removing wrinkles from the power supply. 2 Cycles The cycle controls the length and tumble speed of cottons and poly-blends. Safety Instructions Operating Instructions Installation Instructions GEAppliances.com 1 Power Press to tumble items without heat. TIME DRY is also...
Owners Manual
Page 9
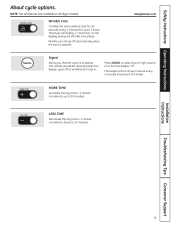
..." on all dryer models. Safety Instructions Operating Instructions About cycle options. Press SIGNAL to select low or high volume, or to 3 hours. MORE TIME Increases the dry time in 1-minute increments, up to turn the beeper off automatically when the door is complete. Wrinkle Care Tumbles the drum without heat for 10 seconds every 5 minutes for up to sound every 2 minutes (maximum of 4 times). Installation Instructions Troubleshooting Tips Consumer Support 9
..." on all dryer models. Safety Instructions Operating Instructions About cycle options. Press SIGNAL to select low or high volume, or to 3 hours. MORE TIME Increases the dry time in 1-minute increments, up to turn the beeper off automatically when the door is complete. Wrinkle Care Tumbles the drum without heat for 10 seconds every 5 minutes for up to sound every 2 minutes (maximum of 4 times). Installation Instructions Troubleshooting Tips Consumer Support 9
Owners Manual
Page 10
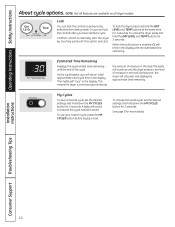
... 3 seconds. To lock the dryer, press and hold down the MY CYCLES button for 3 seconds. A beep will calculate and display the approximate time remaining. To use your custom cycle, press the MY CYCLES button before drying a load. The lights will "race" in the load. To change the saved cycle, set the desired settings and hold the DRY LEVEL and TEMP buttons for 3 seconds. Operating Instructions Safety Instructions About cycle options. Estimated Time Remaining Displays the...
... 3 seconds. To lock the dryer, press and hold down the MY CYCLES button for 3 seconds. A beep will calculate and display the approximate time remaining. To use your custom cycle, press the MY CYCLES button before drying a load. The lights will "race" in the load. To change the saved cycle, set the desired settings and hold the DRY LEVEL and TEMP buttons for 3 seconds. Operating Instructions Safety Instructions About cycle options. Estimated Time Remaining Displays the...

Owners Manual
Page 11
... distribution panel by removing the fuse or switching off the circuit breaker. Screw Changing the Drum Lamp Before replacing the drum lamp, be used with a 15-watt, 120-volt candelabra-base bulb. 4 Replace the lamp shield and screw. Hook the rack over the lint filter so the rack extends into the dryer drum. NOTE: • The drying rack should only be used for drying delicate items such as washable sweaters. Safety Instructions Operating Instructions Dryer features. GEAppliances.com Installation Instructions Troubleshooting...
... distribution panel by removing the fuse or switching off the circuit breaker. Screw Changing the Drum Lamp Before replacing the drum lamp, be used with a 15-watt, 120-volt candelabra-base bulb. 4 Replace the lamp shield and screw. Hook the rack over the lint filter so the rack extends into the dryer drum. NOTE: • The drying rack should only be used for drying delicate items such as washable sweaters. Safety Instructions Operating Instructions Dryer features. GEAppliances.com Installation Instructions Troubleshooting...
Owners Manual
Page 13
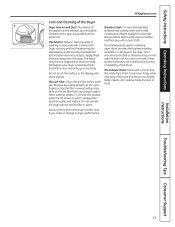
... remover products. If the dryer drum should be cleaned once a year by your warranty. The Exhaust Hood: Check with a mirror that there is not covered by qualified service personnel. Do not operate the dryer without the lint filter in warm, soapy water. The stainless steel used to your fingers across the filter. Safety Instructions Operating Instructions GEAppliances.com Care and Cleaning of the Dryer Dryer Interior and Duct: The interior of the appliance and exhaust duct...
... remover products. If the dryer drum should be cleaned once a year by your warranty. The Exhaust Hood: Check with a mirror that there is not covered by qualified service personnel. Do not operate the dryer without the lint filter in warm, soapy water. The stainless steel used to your fingers across the filter. Safety Instructions Operating Instructions GEAppliances.com Care and Cleaning of the Dryer Dryer Interior and Duct: The interior of the appliance and exhaust duct...
Owners Manual
Page 14
... by a licensed plumber or gas fitter. • When using ball-type gas shut-off the ground and protected by a barrier from vehicles. • Save these instructions. (Installers: Be sure to improper installation is not covered under the Warranty. • Install the dryer where the temperature is removed from service or discarded, remove the dryer door. • Service information and the wiring diagram are known to collapse, be exhausted to the outdoors. •...
... by a licensed plumber or gas fitter. • When using ball-type gas shut-off the ground and protected by a barrier from vehicles. • Save these instructions. (Installers: Be sure to improper installation is not covered under the Warranty. • Install the dryer where the temperature is removed from service or discarded, remove the dryer door. • Service information and the wiring diagram are known to collapse, be exhausted to the outdoors. •...

Owners Manual
Page 16
... closet with the NATIONAL ELECTRICAL CODE, ANSI/NFPA NO. 70 (for electric dryers) or NATIONAL FUEL GAS CODE, ANSI Z223 (for installation in the absence of open area equally distributed. BATHROOM OR BEDROOM INSTALLATION • The dryer MUST be vented to the outdoors. Installation Instructions LOCATION OF YOUR DRYER (cont.) REQUIREMENTS FOR ALCOVE OR CLOSET INSTALLATION • Your dryer is 52″. • Closet doors must conform with local...
... closet with the NATIONAL ELECTRICAL CODE, ANSI/NFPA NO. 70 (for electric dryers) or NATIONAL FUEL GAS CODE, ANSI Z223 (for installation in the absence of open area equally distributed. BATHROOM OR BEDROOM INSTALLATION • The dryer MUST be vented to the outdoors. Installation Instructions LOCATION OF YOUR DRYER (cont.) REQUIREMENTS FOR ALCOVE OR CLOSET INSTALLATION • Your dryer is 52″. • Closet doors must conform with local...
Owners Manual
Page 18
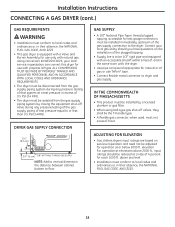
... operation at a rate of test pressure equal to floor. IN THE COMMONWEALTH OF MASSACHUSETTS • This product must not exceed 3 feet. Contact your local service organization can convert this dryer for natural or LP gas or use with an accessible shutoff within 6 feet of the gas supply connection to dryer and gas supply. ADJUSTING FOR ELEVATION • Gas clothes dryers input ratings are based on the installation of the plugged...
... operation at a rate of test pressure equal to floor. IN THE COMMONWEALTH OF MASSACHUSETTS • This product must not exceed 3 feet. Contact your local service organization can convert this dryer for natural or LP gas or use with an accessible shutoff within 6 feet of the gas supply connection to dryer and gas supply. ADJUSTING FOR ELEVATION • Gas clothes dryers input ratings are based on the installation of the plugged...

Owners Manual
Page 20
...: • Do not use an extension cord or an adapter plug with a three-prong (grounding) plug for leaks with 120V, 60Hz, and connected to a properly grounded branch circuit, protected by attaching to the green ground screw on the rear of local codes, in accordance with the NATIONAL ELECTRICAL CODE, ANSI/NFPA NO. 70. Installation Instructions CONNECTING A GAS DRYER (cont.) TEST FOR LEAKS WARNING - Never use . If leaks are...
...: • Do not use an extension cord or an adapter plug with a three-prong (grounding) plug for leaks with 120V, 60Hz, and connected to a properly grounded branch circuit, protected by attaching to the green ground screw on the rear of local codes, in accordance with the NATIONAL ELECTRICAL CODE, ANSI/NFPA NO. 70. Installation Instructions CONNECTING A GAS DRYER (cont.) TEST FOR LEAKS WARNING - Never use . If leaks are...

Owners Manual
Page 21
... needed for cord strain relief) ❒ #2 Phillips-head screwdriver (for gas dryers) TOOLS AND MATERIALS YOU WILL NEED FOR CONNECTING THE ELECTRICAL SUPPLY ❒ Flat- To reduce the risk of local codes, in accordance with the NATIONAL ELECTRICAL CODE, ANSI/NFPA NO. 70. 21 Installation Instructions CONNECTING AN ELECTRIC DRYER (skip for terminal connections) FOR YOUR SAFETY: WARNING Before making the electrical connection, turn off the circuit breaker(s) or remove the dryer's circuit fuse(s) at the electrical...
... needed for cord strain relief) ❒ #2 Phillips-head screwdriver (for gas dryers) TOOLS AND MATERIALS YOU WILL NEED FOR CONNECTING THE ELECTRICAL SUPPLY ❒ Flat- To reduce the risk of local codes, in accordance with the NATIONAL ELECTRICAL CODE, ANSI/NFPA NO. 70. 21 Installation Instructions CONNECTING AN ELECTRIC DRYER (skip for terminal connections) FOR YOUR SAFETY: WARNING Before making the electrical connection, turn off the circuit breaker(s) or remove the dryer's circuit fuse(s) at the electrical...
Owners Manual
Page 24
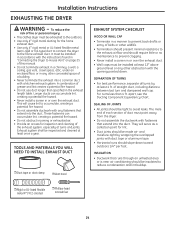
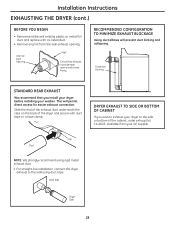
... can accumulate lint, creating a potential fire hazard. • Never install a screen in or over the exhaust duct. • Wall caps must point away from the dryer. • Do not assemble the ductwork with duct tape or aluminum tape. • Horizontal runs should be installed in accordance with the instructions found in "Connecting the Dryer to prevent clogging. • Never install a screen in the exhaust length table. SEALING...
... can accumulate lint, creating a potential fire hazard. • Never install a screen in or over the exhaust duct. • Wall caps must point away from the dryer. • Do not assemble the ductwork with duct tape or aluminum tape. • Horizontal runs should be installed in accordance with the instructions found in "Connecting the Dryer to prevent clogging. • Never install a screen in the exhaust length table. SEALING...
Owners Manual
Page 28
... MINIMIZE EXHAUST BLOCKAGE Using duct elbows will permit direct access for easier exhaust connection. DRYER EXHAUST TO SIDE OR BOTTOM OF CABINET If you install your dryer before installing your GE supplier. Internal Duct Opening Wall Check that you wish to exhaust your dryer to the wall using rigid metal exhaust duct. • For straight-line installation, connect the dryer exhaust to the side or bottom of the dryer and secure with UL-listed duct. • Remove any lint from your washer...
... MINIMIZE EXHAUST BLOCKAGE Using duct elbows will permit direct access for easier exhaust connection. DRYER EXHAUST TO SIDE OR BOTTOM OF CABINET If you install your dryer before installing your GE supplier. Internal Duct Opening Wall Check that you wish to exhaust your dryer to the wall using rigid metal exhaust duct. • For straight-line installation, connect the dryer exhaust to the side or bottom of the dryer and secure with UL-listed duct. • Remove any lint from your washer...
Owners Manual
Page 33
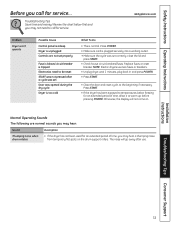
...: Electric dryers use . The noise will not come on the drum support rollers. Troubleshooting Tips Save time and money! Otherwise, the display will go away after a cycle was set Door was set properly Fuse is blown/circuit breaker is normal. Installation Instructions Troubleshooting Tips Consumer Support 33 GEAppliances.com Problem Dryer won't operate Possible Cause Control panel is asleep Dryer is unplugged Controls are normal sounds you may hear: Sound Description Thumping noise when drum rotates • If the dryer...
...: Electric dryers use . The noise will not come on the drum support rollers. Troubleshooting Tips Save time and money! Otherwise, the display will go away after a cycle was set Door was set properly Fuse is blown/circuit breaker is normal. Installation Instructions Troubleshooting Tips Consumer Support 33 GEAppliances.com Problem Dryer won't operate Possible Cause Control panel is asleep Dryer is unplugged Controls are normal sounds you may hear: Sound Description Thumping noise when drum rotates • If the dryer...
Owners Manual
Page 34
...: We Will Replace: One Year From the date of the original purchase Second Year From the date of the original purchase Second through Fifth Year From the date of the original purchase Any part of incidental or consequential damages. During this Limited Warranty. Warrantor: General Electric Company. Louisville, KY 40225 Consumer Support Troubleshooting Tips 34 Operating Instructions Safety Instructions Installation Instructions GE Dryer Warranty. (For...
...: We Will Replace: One Year From the date of the original purchase Second Year From the date of the original purchase Second through Fifth Year From the date of the original purchase Any part of incidental or consequential damages. During this Limited Warranty. Warrantor: General Electric Company. Louisville, KY 40225 Consumer Support Troubleshooting Tips 34 Operating Instructions Safety Instructions Installation Instructions GE Dryer Warranty. (For...
Owners Manual
Page 35
... the light bulb after delivery. ■ Product not accessible to provide required service. The extra-large or super-capacity dryer drum and main electronic control board if any of the original purchase date is extended to the original purchaser and any succeeding owner for products purchased in Canada for other rights which fails due to a defect in materials or workmanship. Safety Instructions Operating Instructions GE Dryer Warranty...
... the light bulb after delivery. ■ Product not accessible to provide required service. The extra-large or super-capacity dryer drum and main electronic control board if any of the original purchase date is extended to the original purchaser and any succeeding owner for products purchased in Canada for other rights which fails due to a defect in materials or workmanship. Safety Instructions Operating Instructions GE Dryer Warranty...


