Use and Care Manual
Page 1
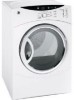
Dryers GEAppliances.com Safety Instructions 2-5 Operating Instructions Control Panels 6-9 Cycle Options 10, 11 Dryer Features 11 Reversing the Door Swing . . . .12-16 Loading and Using the Dryer 17, 18 Venting the Dryer 19 Stacking 20-23 Troubleshooting Tips . . . .24-26 Consumer Support Warranty 27 Consumer Support 28 Owner's Manual DBVH520 DCVH640 DCVH680 DHDVH68 GFDN100 GFDN110 Write the model and serial numbers here: Model Serial They are on the label on the front of the dryer behind the door. 364B7130P001 49-90393-2 03/11/10 GE
Dryers GEAppliances.com Safety Instructions 2-5 Operating Instructions Control Panels 6-9 Cycle Options 10, 11 Dryer Features 11 Reversing the Door Swing . . . .12-16 Loading and Using the Dryer 17, 18 Venting the Dryer 19 Stacking 20-23 Troubleshooting Tips . . . .24-26 Consumer Support Warranty 27 Consumer Support 28 Owner's Manual DBVH520 DCVH640 DCVH680 DHDVH68 GFDN100 GFDN110 Write the model and serial numbers here: Model Serial They are on the label on the front of the dryer behind the door. 364B7130P001 49-90393-2 03/11/10 GE
Use and Care Manual
Page 2
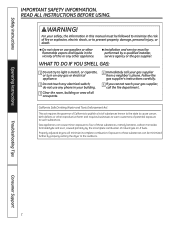
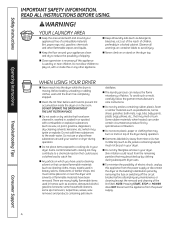
WHAT TO DO IF yOu SMEll GAS: 1 Do not try to light a match, or cigarette, or turn on any gas or electrical appliance. 2 Do not touch any phone in your building. 3 Clear the room, building or area of all occupants. 4 Immediately call your gas supplier, ...the state to minimize the risk of this manual must be minimized further by a qualified installer, service agency or the gas supplier. Properly adjusted dryers will minimize incomplete combustion. Troubleshooting Tips Consumer Support 2 WARNING! Safety Instructions Operating Instructions IMPORTANT SAFETy INFORMATION.
WHAT TO DO IF yOu SMEll GAS: 1 Do not try to light a match, or cigarette, or turn on any gas or electrical appliance. 2 Do not touch any phone in your building. 3 Clear the room, building or area of all occupants. 4 Immediately call your gas supplier, ...the state to minimize the risk of this manual must be minimized further by a qualified installer, service agency or the gas supplier. Properly adjusted dryers will minimize incomplete combustion. Troubleshooting Tips Consumer Support 2 WARNING! Safety Instructions Operating Instructions IMPORTANT SAFETy INFORMATION.
Use and Care Manual
Page 3
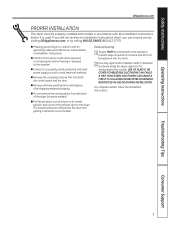
... all governing codes and ordinances. Operating Instructions Troubleshooting Tips Consumer Support 3 n Pull the protector out and down to its lowest position and connect the exhaust duct to avoid electrical overload. For complete details, follow the Installation Instructions. Safety Instructions GEAppliances.com PROPER INSTALLATION This dryer must be properly installed and located in Installation... where it is used. If you did not receive an Installation Instructions sheet, you can receive one by visiting GEAppliances.com, or by calling 800.GE.CARES (800.432.2737).
... all governing codes and ordinances. Operating Instructions Troubleshooting Tips Consumer Support 3 n Pull the protector out and down to its lowest position and connect the exhaust duct to avoid electrical overload. For complete details, follow the Installation Instructions. Safety Instructions GEAppliances.com PROPER INSTALLATION This dryer must be properly installed and located in Installation... where it is used. If you did not receive an Installation Instructions sheet, you can receive one by visiting GEAppliances.com, or by calling 800.GE.CARES (800.432.2737).
Use and Care Manual
Page 4
...manufacturer's care instructions. Some rubber materials, when heated, can reduce the flame retardancy of electric shock, unplug this appliance is moving. WARNING! WHEN USING YOUR DRYER n Never reach into the dryer while the drum is used a cleaning solvent or that have been removed. n Do...that may melt or burn. Do not use or place these substances to cooking oils in your dryer. Troubleshooting Tips Consumer Support 4 n Keep all warnings on the dryer top. n Close supervision is necessary if this appliance from the power supply. Items contaminated with cooking...
...manufacturer's care instructions. Some rubber materials, when heated, can reduce the flame retardancy of electric shock, unplug this appliance is moving. WARNING! WHEN USING YOUR DRYER n Never reach into the dryer while the drum is used a cleaning solvent or that have been removed. n Do...that may melt or burn. Do not use or place these substances to cooking oils in your dryer. Troubleshooting Tips Consumer Support 4 n Keep all warnings on the dryer top. n Close supervision is necessary if this appliance from the power supply. Items contaminated with cooking...
Use and Care Manual
Page 5
...in the vicinity of the machine and the exhaust duct connection inside . SAVE THESE INSTRuCTIONS Troubleshooting Tips Consumer Support 5 We recommend you understand and have a pilot light. WHEN NOT USING YOUR DRYER n Grasp the plug firmly when disconnecting this appliance to avoid damage to soften your... be safely used in your laundered fabrics or reduce the static electricity in them by use either a fabric softener in the wash cycle, according to the manufacturer's instructions for those products, or try a dryer-added product for which the manufacturer gives written assurance on the...
...in the vicinity of the machine and the exhaust duct connection inside . SAVE THESE INSTRuCTIONS Troubleshooting Tips Consumer Support 5 We recommend you understand and have a pilot light. WHEN NOT USING YOUR DRYER n Grasp the plug firmly when disconnecting this appliance to avoid damage to soften your... be safely used in your laundered fabrics or reduce the static electricity in them by use either a fabric softener in the wash cycle, according to the manufacturer's instructions for those products, or try a dryer-added product for which the manufacturer gives written assurance on the...
Use and Care Manual
Page 6
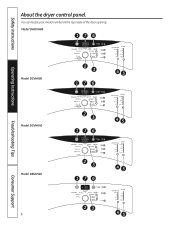
Model DHDVH68 176 Operating Instructions Model DCVH680 2 3 45 176 Troubleshooting Tips Model DCVH640 2 3 45 176 Consumer Support Model DBVH520 6 2 3 45 176 23 45 You can locate your model number at the top inside of the door opening. Safety Instructions About the dryer control panel.
Model DHDVH68 176 Operating Instructions Model DCVH680 2 3 45 176 Troubleshooting Tips Model DCVH640 2 3 45 176 Consumer Support Model DBVH520 6 2 3 45 176 23 45 You can locate your model number at the top inside of the door opening. Safety Instructions About the dryer control panel.
Use and Care Manual
Page 8
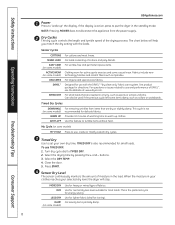
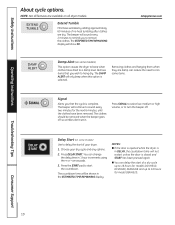
...Provides 10 minutes of warming time to use , create or modify custom dry cycles. 3 Timed Dry Use to set your selected dry level, the dryer will help you match the dry setting with the DRYEL™ "dry clean only" fabric care system. My Cycle (on some items damp, such ... Press to tumble items without heat. If the display is not recommended for directions. For small loads that are needed in the standby mode. Troubleshooting Tips Consumer Support 8 See product package for delicate fabrics. This cycle is active, press to TIMED DRy. 2. Turn dry cycle dial to put ...
...Provides 10 minutes of warming time to use , create or modify custom dry cycles. 3 Timed Dry Use to set your selected dry level, the dryer will help you match the dry setting with the DRYEL™ "dry clean only" fabric care system. My Cycle (on some items damp, such ... Press to tumble items without heat. If the display is not recommended for directions. For small loads that are needed in the standby mode. Troubleshooting Tips Consumer Support 8 See product package for delicate fabrics. This cycle is active, press to TIMED DRy. 2. Turn dry cycle dial to put ...

Use and Care Manual
Page 9
...activated. Select any drying OPTIONS you have already cleaned the filter (before drying a load. This message will light up your dry cycle. Troubleshooting Tips Consumer Support 9 This option reduces certain types of bacteria by NSF International (formerly National Sanitation Foundation) to start a dry cycle.... will sound and the pad will disappear after the POWER button has been pressed), the "ClEAN lINT FIlTER" message will pause the dryer. For synthetics, blends and items labeled permanent press. To store a My CyClE combination of settings and save them here for three ...
...activated. Select any drying OPTIONS you have already cleaned the filter (before drying a load. This message will light up your dry cycle. Troubleshooting Tips Consumer Support 9 This option reduces certain types of bacteria by NSF International (formerly National Sanitation Foundation) to start a dry cycle.... will sound and the pad will disappear after the POWER button has been pressed), the "ClEAN lINT FIlTER" message will pause the dryer. For synthetics, blends and items labeled permanent press. To store a My CyClE combination of settings and save them here for three ...
Use and Care Manual
Page 10
... clothes and hanging them when they are dry. The clothes should be shown in 1 hour increments using the + or - arrow pads. 3. Troubleshooting Tips Consumer Support 10 EXTEND TUMBLE Extend Tumble Minimizes wrinkles by adding approximately 60 minutes of your dry cycle and any options. 2. NOTES: n ...If the door is opened while the dryer is closed and START has been pressed again. Remove items that you that the cycle is selected. GEAppliances.com DAMP ALERT Damp Alert ...
... clothes and hanging them when they are dry. The clothes should be shown in 1 hour increments using the + or - arrow pads. 3. Troubleshooting Tips Consumer Support 10 EXTEND TUMBLE Extend Tumble Minimizes wrinkles by adding approximately 60 minutes of your dry cycle and any options. 2. NOTES: n ...If the door is opened while the dryer is closed and START has been pressed again. Remove items that you that the cycle is selected. GEAppliances.com DAMP ALERT Damp Alert ...
Use and Care Manual
Page 11
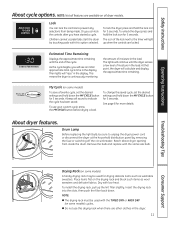
... DAMP COOL DOW N DELAY CLENA LINT FTIELR HOLD 3 SEC TO STORE M Y CYCLE Estimated Time Remaining Displays the approximate time remaining until the dryer senses a low level of the cycle. The lights will "race" in the load. A beep will sound to the timer will calculate and ... remaining. See page 8 for drying delicate items such as wool sweaters and delicate fabrics. Reach above dryer opening from being made. Remove the bulb and replace with low heat. Troubleshooting Tips Consumer Support Drying Rack (on some models) A handy drying rack may be used for more details...
... DAMP COOL DOW N DELAY CLENA LINT FTIELR HOLD 3 SEC TO STORE M Y CYCLE Estimated Time Remaining Displays the approximate time remaining until the dryer senses a low level of the cycle. The lights will "race" in the load. A beep will sound to the timer will calculate and ... remaining. See page 8 for drying delicate items such as wool sweaters and delicate fabrics. Reach above dryer opening from being made. Remove the bulb and replace with low heat. Troubleshooting Tips Consumer Support Drying Rack (on some models) A handy drying rack may be used for more details...
Use and Care Manual
Page 12
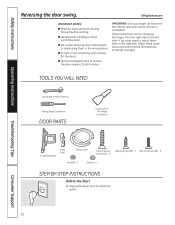
...begin, do not move the cabinet until door-swing reversal is 30-60 minutes. These instructions are for the doors. Unplug the dryer from the right side to reverse the door swing is completed. n Handle parts carefully to switch them in the wrong places....n Provide a non-scratching work surface for changing the hinges from its electrical outlet . 12 TOOLS YOU WILL NEED Adjustable Crescent Wrench Phillips Head Screwdriver DOOR PARTS Putty Knife or Thin-Blade Screwdriver Troubleshooting Tips Consumer Support Hinge Assembly Hinge Cover Plastic Cover Large Tapping Screw (#10...
...begin, do not move the cabinet until door-swing reversal is 30-60 minutes. These instructions are for the doors. Unplug the dryer from the right side to reverse the door swing is completed. n Handle parts carefully to switch them in the wrong places....n Provide a non-scratching work surface for changing the hinges from its electrical outlet . 12 TOOLS YOU WILL NEED Adjustable Crescent Wrench Phillips Head Screwdriver DOOR PARTS Putty Knife or Thin-Blade Screwdriver Troubleshooting Tips Consumer Support Hinge Assembly Hinge Cover Plastic Cover Large Tapping Screw (#10...
Use and Care Manual
Page 16
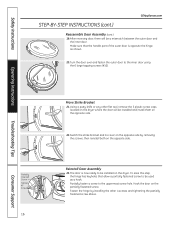
Operating Instructions Troubleshooting Tips Partially Inserted Screw Tighten All Screws 16 Move Strike Bracket 21. Switch the...reinstall both on the opposite side by installing the other flat tool, remove the 5 plastic screw caps located on the dryer where the door will be installed and install them on the partially fastened screw. Partially fasten a screw to be used...the hinge by removing the screws; Turn the door over and fasten the outer door to be installed on the dryer. To ease this step, the hinge has keyholes that the handle part of the outer door is now ready to...
Operating Instructions Troubleshooting Tips Partially Inserted Screw Tighten All Screws 16 Move Strike Bracket 21. Switch the...reinstall both on the opposite side by installing the other flat tool, remove the 5 plastic screw caps located on the dryer where the door will be installed and install them on the partially fastened screw. Partially fasten a screw to be used...the hinge by removing the screws; Turn the door over and fasten the outer door to be installed on the dryer. To ease this step, the hinge has keyholes that the handle part of the outer door is now ready to...
Use and Care Manual
Page 17
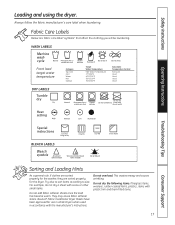
...lABElS Tumble dry Dry Heat setting High Normal Permanent Press/ Gentle/ wrinkle resistant delicate Do not dry Do not tumble dry (used in all GE Dryers when used with do not dry a sheet with socks or other small items. Do not add fabric softener sheets once the load has become...Fabric Care Labels Below are sorted properly for the dryer. Try also to sort items according to dry Drip dry Dry at BlEACH lABElS Bleach symbols Any bleach (when needed) Only non-chlorine bleach (when needed) Do not bleach In the shade Troubleshooting Tips Consumer Support Sorting and Loading Hints As ...
...lABElS Tumble dry Dry Heat setting High Normal Permanent Press/ Gentle/ wrinkle resistant delicate Do not dry Do not tumble dry (used in all GE Dryers when used with do not dry a sheet with socks or other small items. Do not add fabric softener sheets once the load has become...Fabric Care Labels Below are sorted properly for the dryer. Try also to sort items according to dry Drip dry Dry at BlEACH lABElS Bleach symbols Any bleach (when needed) Only non-chlorine bleach (when needed) Do not bleach In the shade Troubleshooting Tips Consumer Support Sorting and Loading Hints As ...
Use and Care Manual
Page 18
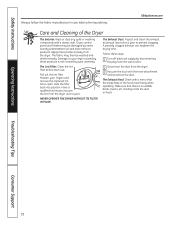
... damaged by your fingers and remove the captured lint. Apply these steps: 1 Turn off electrical supply by disconnecting the plug from the wall socket. 2 Disconnect the duct from the dryer once a year. Make sure that the inside the duct or hood. The lint Filter:... partially clogged exhaust can lengthen the drying time. GEAppliances.com Care and Cleaning of the hood move freely when operating. Operating Instructions Troubleshooting Tips Consumer Support 18 The Exhaust Hood: Check with a mirror that there is not covered by some laundry pretreatment soil and stain...
... damaged by your fingers and remove the captured lint. Apply these steps: 1 Turn off electrical supply by disconnecting the plug from the wall socket. 2 Disconnect the duct from the dryer once a year. Make sure that the inside the duct or hood. The lint Filter:... partially clogged exhaust can lengthen the drying time. GEAppliances.com Care and Cleaning of the hood move freely when operating. Operating Instructions Troubleshooting Tips Consumer Support 18 The Exhaust Hood: Check with a mirror that there is not covered by some laundry pretreatment soil and stain...
Use and Care Manual
Page 19
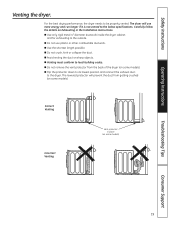
...). n Venting must conform to the outside. n Use only rigid metal 4″ diameter ductwork inside the dryer cabinet and for exhausting to local building codes. n Avoid resting the duct on Exhausting in place (on some models) Troubleshooting Tips Consumer Support 19 n Flip the protector down to its lowest position and connect the exhaust...
...). n Venting must conform to the outside. n Use only rigid metal 4″ diameter ductwork inside the dryer cabinet and for exhausting to local building codes. n Avoid resting the duct on Exhausting in place (on some models) Troubleshooting Tips Consumer Support 19 n Flip the protector down to its lowest position and connect the exhaust...
Use and Care Manual
Page 20
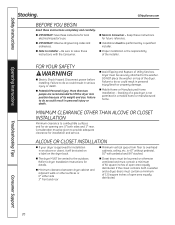
... cabinets, ceiling, etc. FOR YOUR SAFETY WARNING! n Electric Shock Hazard. Dryer must be stated on a label on top of the dryer. Stacking of the installer. n Minimum vertical space from floor to Installer - Refer to dryer Installation Instructions for installation and service. n IMPORTANT: Observe all...equally distributed. n The dryer MUST be given to do so could result in personal injury or death. Failure to provide adequate clearance for details. Consideration must contain a minimum of 120 square inches of Utility Services. Troubleshooting Tips Consumer Support 20 ...
... cabinets, ceiling, etc. FOR YOUR SAFETY WARNING! n Electric Shock Hazard. Dryer must be stated on a label on top of the dryer. Stacking of the installer. n Minimum vertical space from floor to Installer - Refer to dryer Installation Instructions for installation and service. n IMPORTANT: Observe all...equally distributed. n The dryer MUST be given to do so could result in personal injury or death. Failure to provide adequate clearance for details. Consideration must contain a minimum of 120 square inches of Utility Services. Troubleshooting Tips Consumer Support 20 ...
Use and Care Manual
Page 21
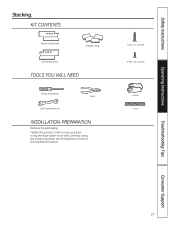
Continue using the carton to lay the dryer down on its side. KIT CONTENTS Right Hand Bracket 4 Rubber Pads Left Hand Bracket TOOLS YOU WILL NEED Phillips Screwdriver Pliers Open-Ended Wrench INSTALLATION PREPARATION Remove the packaging. Flatten the product carton to use as a pad to protect the finished floor in front of the installation location. 4 #12 x 1" Screws 4 #8 x 1/2" Screws Gloves Level Troubleshooting Tips Consumer Support 21 Safety Instructions Operating Instructions Stacking.
Continue using the carton to lay the dryer down on its side. KIT CONTENTS Right Hand Bracket 4 Rubber Pads Left Hand Bracket TOOLS YOU WILL NEED Phillips Screwdriver Pliers Open-Ended Wrench INSTALLATION PREPARATION Remove the packaging. Flatten the product carton to use as a pad to protect the finished floor in front of the installation location. 4 #12 x 1" Screws 4 #8 x 1/2" Screws Gloves Level Troubleshooting Tips Consumer Support 21 Safety Instructions Operating Instructions Stacking.

Use and Care Manual
Page 22
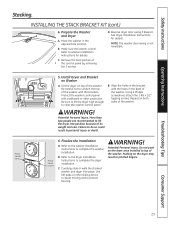
... Operating Instructions Troubleshooting Tips Back out and remove all 4 leveling legs 2. Install Bracket to remove the dryer leveling legs. Repeat the above step with the holes in the parts package. B. Use an open-end wrench or pliers to Dryer A. Use a Phillips screwdriver to set the dryer on the...Locate the 4 rubber pads in the bottom left bracket with the right bracket on a piece of the dryer. Set the dryer upright. Install Rubber Pads to the bottom of the dryer. B. C. Remove the adhesive backing and firmly place over on the bracket where you don't scratch the...
... Operating Instructions Troubleshooting Tips Back out and remove all 4 leveling legs 2. Install Bracket to remove the dryer leveling legs. Repeat the above step with the holes in the parts package. B. Use an open-end wrench or pliers to Dryer A. Use a Phillips screwdriver to set the dryer on the...Locate the 4 rubber pads in the bottom left bracket with the right bracket on a piece of the dryer. Set the dryer upright. Install Rubber Pads to the bottom of the dryer. B. C. Remove the adhesive backing and firmly place over on the bracket where you don't scratch the...
Use and Care Manual
Page 23
... fingers. Align the holes in the back of the washer. Place hands here Place hand s here 6. Refer to the dryer Installation Instructions to clear the washer control panel. D. Protect the washer control panel with the holes in the bracket with cardboard... and to lift the dryer into place. Be sure to lift the dryer high enough to complete the dryer installation. Potential Personal Injury. INSTALLING THE STACK BRACKET KIT (cont.) 4. Place the washer in personal injury or death. Potential Personal Injury. WARNING! Troubleshooting Tips Consumer Support 23 ...
... fingers. Align the holes in the back of the washer. Place hands here Place hand s here 6. Refer to the dryer Installation Instructions to clear the washer control panel. D. Protect the washer control panel with the holes in the bracket with cardboard... and to lift the dryer into place. Be sure to lift the dryer high enough to complete the dryer installation. Potential Personal Injury. INSTALLING THE STACK BRACKET KIT (cont.) 4. Place the washer in personal injury or death. Potential Personal Injury. WARNING! Troubleshooting Tips Consumer Support 23 ...
Use and Care Manual
Page 24
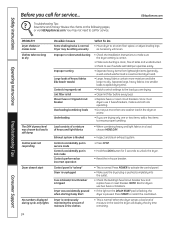
... box and replace fuse or reset breaker. Press START to ensure proper tumbling. GEAppliances.com Operating Instructions Troubleshooting Tips PROBlEM Dryer shakes or makes noise Clothes take longer to the load you are drying. • Clean lint filter...Electric dryers use 2 fuses/breakers, make sure the dryer venting is correct. • Make sure ducting is clean, free of heavy and light fabrics • When combining heavy and light fabrics in -house breaker. • This is paused. Review the charts on the DElAy START pad is flashing, the dryer is normal. Troubleshooting...
... box and replace fuse or reset breaker. Press START to ensure proper tumbling. GEAppliances.com Operating Instructions Troubleshooting Tips PROBlEM Dryer shakes or makes noise Clothes take longer to the load you are drying. • Clean lint filter...Electric dryers use 2 fuses/breakers, make sure the dryer venting is correct. • Make sure ducting is clean, free of heavy and light fabrics • When combining heavy and light fabrics in -house breaker. • This is paused. Review the charts on the DElAy START pad is flashing, the dryer is normal. Troubleshooting...


