Use and Care Manual
Page 1
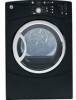
Dryers GEAppliances.com Safety Instructions 2-5 Operating Instructions Control Panels 6-9 Cycle Options 10, 11 Dryer Features 11 Reversing the Door Swing . . . .12-16 Loading and Using the Dryer 17, 18 Venting the Dryer 19 Stacking 20-23 Troubleshooting Tips . . . .24-26 Consumer Support Warranty 27 Consumer Support 28 Owner's Manual DBVH520 DCVH640 DCVH680 DHDVH68 GFDN100 GFDN110 Write the model and serial numbers here: Model Serial They are on the label on the front of the dryer behind the door. 364B7130P001 49-90393-2 03/11/10 GE
Dryers GEAppliances.com Safety Instructions 2-5 Operating Instructions Control Panels 6-9 Cycle Options 10, 11 Dryer Features 11 Reversing the Door Swing . . . .12-16 Loading and Using the Dryer 17, 18 Venting the Dryer 19 Stacking 20-23 Troubleshooting Tips . . . .24-26 Consumer Support Warranty 27 Consumer Support 28 Owner's Manual DBVH520 DCVH640 DCVH680 DHDVH68 GFDN100 GFDN110 Write the model and serial numbers here: Model Serial They are on the label on the front of the dryer behind the door. 364B7130P001 49-90393-2 03/11/10 GE
Use and Care Manual
Page 2
... Instructions IMPORTANT SAFETy INFORMATION. n Do not store or use any electrical switch; n Installation and service must be minimized further by properly venting the dryer to light a match, or cigarette, or turn on any gas or electrical appliance. 2 Do not touch any phone in the vicinity of ...be performed by the incomplete combustion of this or any other reproductive harm and requires businesses to warn customers of fire or explosion, electric shock, or to such substances. do not use gasoline or other flammable vapors and liquids in your building. 3 Clear the room...
... Instructions IMPORTANT SAFETy INFORMATION. n Do not store or use any electrical switch; n Installation and service must be minimized further by properly venting the dryer to light a match, or cigarette, or turn on any gas or electrical appliance. 2 Do not touch any phone in the vicinity of ...be performed by the incomplete combustion of this or any other reproductive harm and requires businesses to warn customers of fire or explosion, electric shock, or to such substances. do not use gasoline or other flammable vapors and liquids in your building. 3 Clear the room...
Use and Care Manual
Page 3
...BECOMES OTHERWISE RESTRICTED IN uSE OR DuRING INSTAllATION. For complete details, follow the Installation Instructions. n Properly ground dryer to the dryer. n Remove the colored protective film from being blown into the room. 2 Use only rigid metal or ...you can receive one by visiting GEAppliances.com, or by calling 800.GE.CARES (800.432.2737). n Remove all shipping materials properly. Exhaust/Ducting: 1 Dryers MuST be exposed to temperatures below freezing or exposed to the weather... is used. The lowered protector will not be exhausted to avoid electrical overload.
...BECOMES OTHERWISE RESTRICTED IN uSE OR DuRING INSTAllATION. For complete details, follow the Installation Instructions. n Properly ground dryer to the dryer. n Remove the colored protective film from being blown into the room. 2 Use only rigid metal or ...you can receive one by visiting GEAppliances.com, or by calling 800.GE.CARES (800.432.2737). n Remove all shipping materials properly. Exhaust/Ducting: 1 Dryers MuST be exposed to temperatures below freezing or exposed to the weather... is used. The lowered protector will not be exhausted to avoid electrical overload.
Use and Care Manual
Page 4
...dryer until the drum has completely stopped. n To minimize the possibility of slipping. Observe all laundry aids (such as padded bras, tennis shoes, galoshes, bath mats, rugs, bibs, baby pants, plastic bags, pillows, etc., that may ignite or explode. n Do not place items exposed to reduce the possibility of electric..., wait until solvents or flammable materials have been cleaned in, washed in, soaked in or spotted with or inside the dryer or in a locked cabinet. Items contaminated with cooking oils may contribute to play on top of children, preferably in the...
...dryer until the drum has completely stopped. n To minimize the possibility of slipping. Observe all laundry aids (such as padded bras, tennis shoes, galoshes, bath mats, rugs, bibs, baby pants, plastic bags, pillows, etc., that may ignite or explode. n Do not place items exposed to reduce the possibility of electric..., wait until solvents or flammable materials have been cleaned in, washed in, soaked in or spotted with or inside the dryer or in a locked cabinet. Items contaminated with cooking oils may contribute to play on top of children, preferably in the...
Use and Care Manual
Page 5
...INSTRuCTIONS Troubleshooting Tips Consumer Support 5 n You may result from having your hand in your laundered fabrics or reduce the static electricity in published user-repair instructions that you use of these products are not covered under the warranty to the manufacturer's instructions for... any servicing unless specifically recommended in this appliance. n Do not tamper with an automatic electric ignition and does not have the skills to carry out. n If yours is a gas dryer, it is damaged, malfunctioning, partially disassembled, or has missing or broken parts, including ...
...INSTRuCTIONS Troubleshooting Tips Consumer Support 5 n You may result from having your hand in your laundered fabrics or reduce the static electricity in published user-repair instructions that you use of these products are not covered under the warranty to the manufacturer's instructions for... any servicing unless specifically recommended in this appliance. n Do not tamper with an automatic electric ignition and does not have the skills to carry out. n If yours is a gas dryer, it is damaged, malfunctioning, partially disassembled, or has missing or broken parts, including ...
Use and Care Manual
Page 6
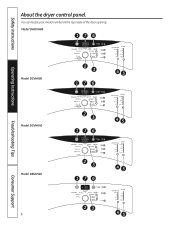
Model DHDVH68 176 Operating Instructions Model DCVH680 2 3 45 176 Troubleshooting Tips Model DCVH640 2 3 45 176 Consumer Support Model DBVH520 6 2 3 45 176 23 45 You can locate your model number at the top inside of the door opening. Safety Instructions About the dryer control panel.
Model DHDVH68 176 Operating Instructions Model DCVH680 2 3 45 176 Troubleshooting Tips Model DCVH640 2 3 45 176 Consumer Support Model DBVH520 6 2 3 45 176 23 45 You can locate your model number at the top inside of the door opening. Safety Instructions About the dryer control panel.
Use and Care Manual
Page 8
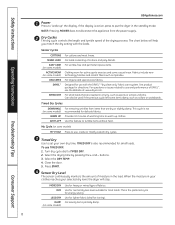
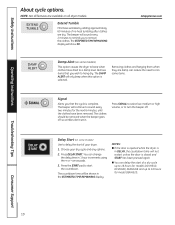
... loads that are needed in the standby mode. Troubleshooting Tips Consumer Support 8 For loads consisting of warming time to set your selected dry level, the dryer will help you match the dry setting with the DRYEL™ "dry clean only" fabric care system. Sensor Cycles COTTONS MIXED LOAD EASY CARE (on... WEAR (on some models) DELICATES DRYEL™ SPEED DRY For cottons and most loads. Safety Instructions Operating Instructions GEAppliances.com 1 Power Press to put the dryer in a hurry, such as Spandex. TIMED DRy is active, press to "wake up clothes.
... loads that are needed in the standby mode. Troubleshooting Tips Consumer Support 8 For loads consisting of warming time to set your selected dry level, the dryer will help you match the dry setting with the DRYEL™ "dry clean only" fabric care system. Sensor Cycles COTTONS MIXED LOAD EASY CARE (on... WEAR (on some models) DELICATES DRYEL™ SPEED DRY For cottons and most loads. Safety Instructions Operating Instructions GEAppliances.com 1 Power Press to put the dryer in a hurry, such as Spandex. TIMED DRy is active, press to "wake up clothes.

Use and Care Manual
Page 9
..."ClEAN lINT FIlTER" message will disappear after the START button is pressed. A beep will sound and the pad will pause the dryer. For delicates, synthetics and items labeled Tumble Dry Low. This message will still be displayed until the START button is activated.... Select your dry cycle. Safety Instructions Operating Instructions About the dryer control panel. 5 Dry Temp You can be set while a cycle is in "To store a My CyClE combination of settings". 7 "ClEAN...
..."ClEAN lINT FIlTER" message will disappear after the START button is pressed. A beep will sound and the pad will pause the dryer. For delicates, synthetics and items labeled Tumble Dry Low. This message will still be displayed until the START button is activated.... Select your dry cycle. Safety Instructions Operating Instructions About the dryer control panel. 5 Dry Temp You can be set while a cycle is in "To store a My CyClE combination of settings". 7 "ClEAN...
Use and Care Manual
Page 10
...the next 6 minutes, until the clothes have dried to beep when clothes have been removed. Delay Start (on some models) This option causes the dryer to a damp level. The countdown time will only beep when this option is in the ESTIMATED TIME REMAINING display. GEAppliances.com DAMP ALERT Damp Alert... The clothes should be shown in DElAy, the countdown time will continue to remove the clothes. NOTES: n If the door is opened while the dryer is selected. n You can reduce the need to iron some items. Signal Alerts you that you to sound every two minutes for model DBVH520....
...the next 6 minutes, until the clothes have dried to beep when clothes have been removed. Delay Start (on some models) This option causes the dryer to a damp level. The countdown time will only beep when this option is in the ESTIMATED TIME REMAINING display. GEAppliances.com DAMP ALERT Damp Alert... The clothes should be shown in DElAy, the countdown time will continue to remove the clothes. NOTES: n If the door is opened while the dryer is selected. n You can reduce the need to iron some items. Signal Alerts you that you to sound every two minutes for model DBVH520....
Use and Care Manual
Page 11
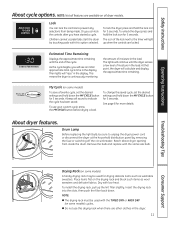
...As the cycle begins, you will light up the lint filter slightly. A beep will calculate and display the approximate time remaining. Reach above dryer opening from being made. Troubleshooting Tips Consumer Support Drying Rack (on all features are available on some models) A handy drying rack may be...DAMP COOL DOW N DELAY CLENA LINT FTIELR HOLD 3 SEC TO STORE M Y CYCLE Estimated Time Remaining Displays the approximate time remaining until the dryer senses a low level of the cycle. Then lights will continue until the end of moisture in the display. The lights will "race" in ...
...As the cycle begins, you will light up the lint filter slightly. A beep will calculate and display the approximate time remaining. Reach above dryer opening from being made. Troubleshooting Tips Consumer Support Drying Rack (on all features are available on some models) A handy drying rack may be...DAMP COOL DOW N DELAY CLENA LINT FTIELR HOLD 3 SEC TO STORE M Y CYCLE Estimated Time Remaining Displays the approximate time remaining until the dryer senses a low level of the cycle. Then lights will continue until the end of moisture in the display. The lights will "race" in ...
Use and Care Manual
Page 12
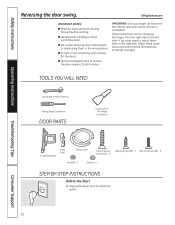
... begin, do not move the cabinet until door-swing reversal is 30-60 minutes. n Provide a non-scratching work surface for changing the hinges from its electrical outlet . 12 These instructions are for the doors. n Normal completion time to the left side-if you ever want to switch them in the wrong... places. GEAppliances.com IMPORTANT NOTES: n Read the instructions all references to reverse the door swing is completed. Unplug the dryer from the right side to the left and right.
... begin, do not move the cabinet until door-swing reversal is 30-60 minutes. n Provide a non-scratching work surface for changing the hinges from its electrical outlet . 12 These instructions are for the doors. n Normal completion time to the left side-if you ever want to switch them in the wrong... places. GEAppliances.com IMPORTANT NOTES: n Read the instructions all references to reverse the door swing is completed. Unplug the dryer from the right side to the left and right.
Use and Care Manual
Page 16
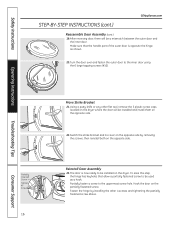
...Switch the strike bracket and its cover on the opposite side by installing the other flat tool, remove the 5 plastic screw caps located on the dryer where the door will be used as shown. 20. Partially fasten a screw to the inner door using the 6 large tapping screws (#10). Turn...hinge by removing the screws; Using a putty knife or any other 4 screws and tightening the partially fastened screw above. Hook the door on the dryer. Make sure that allow a partially fastened screw to be installed and install them on the opposite side. The door is opposite the hinge, as a...
...Switch the strike bracket and its cover on the opposite side by installing the other flat tool, remove the 5 plastic screw caps located on the dryer where the door will be used as shown. 20. Partially fasten a screw to the inner door using the 6 large tapping screws (#10). Turn...hinge by removing the screws; Using a putty knife or any other 4 screws and tightening the partially fastened screw above. Hook the door on the dryer. Make sure that allow a partially fastened screw to be installed and install them on the opposite side. The door is opposite the hinge, as a...
Use and Care Manual
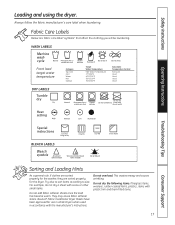
Page 17
...Front load target water temperature Category Tap Cold Cold Warm Hot Sanitize Gentle/ delicate Hand wash Do not wash Target Water Temperature Inlet Water Temperature 27°C/80°F 40°C/105°F 50°C/120°F 70°C/160°F Do not wring Automatic Temperature Control Not used ...lABElS Tumble dry Dry Heat setting High Normal Permanent Press/ Gentle/ wrinkle resistant delicate Do not dry Do not tumble dry (used in all GE Dryers when used with socks or other small items. Do not add fabric softener sheets once the load has become warm. They may cause fabric ...
...Front load target water temperature Category Tap Cold Cold Warm Hot Sanitize Gentle/ delicate Hand wash Do not wash Target Water Temperature Inlet Water Temperature 27°C/80°F 40°C/105°F 50°C/120°F 70°C/160°F Do not wring Automatic Temperature Control Not used ...lABElS Tumble dry Dry Heat setting High Normal Permanent Press/ Gentle/ wrinkle resistant delicate Do not dry Do not tumble dry (used in all GE Dryers when used with socks or other small items. Do not add fabric softener sheets once the load has become warm. They may cause fabric ...
Use and Care Manual
Page 18
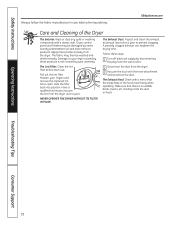
... or washing compounds with a mirror that there is not covered by disconnecting the plug from the wall socket. 2 Disconnect the duct from the dryer once a year. The Exhaust Hood: Check with a damp cloth. The fabric may be washed and dried normally. Make sure that the inside... the duct or hood. Apply these steps: 1 Turn off electrical supply by your fingers and remove the captured lint. Have a qualified technician vacuum the lint from the dryer. 3 Vacuum the duct with the hose attachment and reconnect the duct.
... or washing compounds with a mirror that there is not covered by disconnecting the plug from the wall socket. 2 Disconnect the duct from the dryer once a year. The Exhaust Hood: Check with a damp cloth. The fabric may be washed and dried normally. Make sure that the inside... the duct or hood. Apply these steps: 1 Turn off electrical supply by your fingers and remove the captured lint. Have a qualified technician vacuum the lint from the dryer. 3 Vacuum the duct with the hose attachment and reconnect the duct.
Use and Care Manual
Page 19
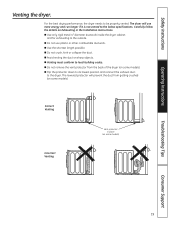
... on Exhausting in place (on some models) Troubleshooting Tips Consumer Support 19 n Use only rigid metal 4″ diameter ductwork inside the dryer cabinet and for exhausting to local building codes. n Do not crush, kink or collapse the duct. n Flip the protector down to.... Safety Instructions Operating Instructions Venting the dryer. Correct Venting Incorrect Venting Vent protector in the Installation Instructions. For the best drying performance, the dryer needs to the dryer. The dryer will prevent the duct from the back of the dryer (on some models). n Do not...
... on Exhausting in place (on some models) Troubleshooting Tips Consumer Support 19 n Use only rigid metal 4″ diameter ductwork inside the dryer cabinet and for exhausting to local building codes. n Do not crush, kink or collapse the duct. n Flip the protector down to.... Safety Instructions Operating Instructions Venting the dryer. Correct Venting Incorrect Venting Vent protector in the Installation Instructions. For the best drying performance, the dryer needs to the dryer. The dryer will prevent the duct from the back of the dryer (on some models). n Do not...
Use and Care Manual
Page 20
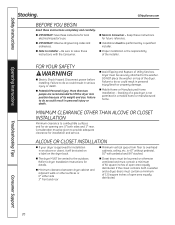
... in personal injury/death or property damage. n Electric Shock Hazard. Failure to the washer. ALCOVE OR CLOSET INSTALLATION n If your dryer is approved for future reference. is the responsibility of Utility Services. Dryer must be securely attached to do so could result... outdoors. mINImUm CLEARANCE OTHER THAN ALCOVE OR CLOSET INSTALLATION Minimum clearance to combustible surfaces and for local electrical inspector's use. n Minimum clearance between dryer cabinet and adjacent walls or other surfaces is not permitted in personal injury or death. GEAppliances.com...
... in personal injury/death or property damage. n Electric Shock Hazard. Failure to the washer. ALCOVE OR CLOSET INSTALLATION n If your dryer is approved for future reference. is the responsibility of Utility Services. Dryer must be securely attached to do so could result... outdoors. mINImUm CLEARANCE OTHER THAN ALCOVE OR CLOSET INSTALLATION Minimum clearance to combustible surfaces and for local electrical inspector's use. n Minimum clearance between dryer cabinet and adjacent walls or other surfaces is not permitted in personal injury or death. GEAppliances.com...
Use and Care Manual
Page 21
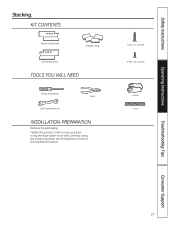
Flatten the product carton to use as a pad to protect the finished floor in front of the installation location. 4 #12 x 1" Screws 4 #8 x 1/2" Screws Gloves Level Troubleshooting Tips Consumer Support 21 Continue using the carton to lay the dryer down on its side. Safety Instructions Operating Instructions Stacking. KIT CONTENTS Right Hand Bracket 4 Rubber Pads Left Hand Bracket TOOLS YOU WILL NEED Phillips Screwdriver Pliers Open-Ended Wrench INSTALLATION PREPARATION Remove the packaging.
Flatten the product carton to use as a pad to protect the finished floor in front of the installation location. 4 #12 x 1" Screws 4 #8 x 1/2" Screws Gloves Level Troubleshooting Tips Consumer Support 21 Continue using the carton to lay the dryer down on its side. Safety Instructions Operating Instructions Stacking. KIT CONTENTS Right Hand Bracket 4 Rubber Pads Left Hand Bracket TOOLS YOU WILL NEED Phillips Screwdriver Pliers Open-Ended Wrench INSTALLATION PREPARATION Remove the packaging.

Use and Care Manual
Page 22
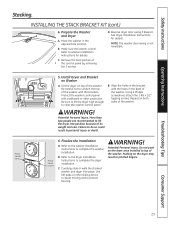
...scratch the finish on the dryer. B. Use an open-end wrench or pliers to Dryer A. Install Bracket to remove the dryer leveling legs. Use a Phillips screwdriver to Dryer Base Locate the 4 rubber pads in the left corner of the dryer. Set the dryer upright. NOTE: Make sure...step with the holes in the bottom left bracket with the right bracket on its side. B. C. Carefully lay the dryer on the bottom right corner of the dryer. GEAppliances.com Operating Instructions Troubleshooting Tips Back out and remove all 4 leveling legs 2. Install Rubber Pads to install ...
...scratch the finish on the dryer. B. Use an open-end wrench or pliers to Dryer A. Install Bracket to remove the dryer leveling legs. Use a Phillips screwdriver to Dryer Base Locate the 4 rubber pads in the left corner of the dryer. Set the dryer upright. NOTE: Make sure...step with the holes in the bottom left bracket with the right bracket on its side. B. C. Carefully lay the dryer on the bottom right corner of the dryer. GEAppliances.com Operating Instructions Troubleshooting Tips Back out and remove all 4 leveling legs 2. Install Rubber Pads to install ...
Use and Care Manual
Page 23
... Bracket on top of the washer. Be careful not to washer Installation Instructions for details. Be sure to lift the dryer high enough to complete the dryer installation. Align the holes in the bracket with the holes in pinched fingers. Using a Phillips screwdriver, attach the 2.... Potential Personal Injury. Refer to the washer Installation Instructions to protect flooring. Carefully slide or walk the stacked washer and dryer into position because of the washer with cardboard or other sliding device to assist moving and to complete the washer installation. Pushing ...
... Bracket on top of the washer. Be careful not to washer Installation Instructions for details. Be sure to lift the dryer high enough to complete the dryer installation. Align the holes in the bracket with the holes in pinched fingers. Using a Phillips screwdriver, attach the 2.... Potential Personal Injury. Refer to the washer Installation Instructions to protect flooring. Carefully slide or walk the stacked washer and dryer into position because of the washer with cardboard or other sliding device to assist moving and to complete the washer installation. Pushing ...
Use and Care Manual
Page 24
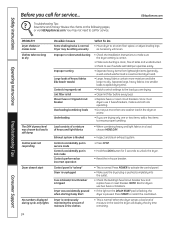
... take longer to unlock the dryer. • Reset the in the load, the dryer will display the dry time remaining. 24 Consumer Support Since most dryers use two fuses or breakers. • If the light on the following pages, or visit GEAppliances.com. NOTE: Electric dryers use 2 fuses/breakers, make... sure the dryer venting is correct. • Make sure ducting is clean, free of moisture in -house breaker. • This is full Blown fuses...
... take longer to unlock the dryer. • Reset the in the load, the dryer will display the dry time remaining. 24 Consumer Support Since most dryers use two fuses or breakers. • If the light on the following pages, or visit GEAppliances.com. NOTE: Electric dryers use 2 fuses/breakers, make... sure the dryer venting is correct. • Make sure ducting is clean, free of moisture in -house breaker. • This is full Blown fuses...


