
Use and Care Manual
Page 1
Dryers GEAppliances.com Safety Instructions 2-5 Operating Instructions Control Panels 6-9 Cycle Options 10, 11 Dryer Features 11 Reversing the Door Swing . . . .12-16 Loading and Using the Dryer 17, 18 Venting the Dryer 19 Stacking 20-23 Troubleshooting Tips . . . .24-26 Consumer Support Warranty 27 Consumer Support 28 Owner's Manual DBVH520 DCVH640 DCVH680 DHDVH68 GFDN100 GFDN110 Write the model and serial numbers here: Model Serial They are on the label on the front of the dryer behind the door. 364B7130P001 49-90393-2 03/11/10 GE
Dryers GEAppliances.com Safety Instructions 2-5 Operating Instructions Control Panels 6-9 Cycle Options 10, 11 Dryer Features 11 Reversing the Door Swing . . . .12-16 Loading and Using the Dryer 17, 18 Venting the Dryer 19 Stacking 20-23 Troubleshooting Tips . . . .24-26 Consumer Support Warranty 27 Consumer Support 28 Owner's Manual DBVH520 DCVH640 DCVH680 DHDVH68 GFDN100 GFDN110 Write the model and serial numbers here: Model Serial They are on the label on the front of the dryer behind the door. 364B7130P001 49-90393-2 03/11/10 GE
Use and Care Manual
Page 20
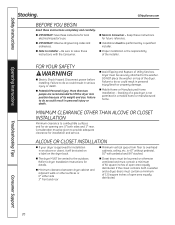
... inches of open area equally distributed. is approved for local electrical inspector's use. n Note to dryer Installation Instructions for air opening are recommended to the outdoors. Safety Instructions Operating Instructions Stacking. Disconnect power before installing. More than two people are : 0″ both a washer and a dryer, doors must contain a minimum of 120 square inches of...
... inches of open area equally distributed. is approved for local electrical inspector's use. n Note to dryer Installation Instructions for air opening are recommended to the outdoors. Safety Instructions Operating Instructions Stacking. Disconnect power before installing. More than two people are : 0″ both a washer and a dryer, doors must contain a minimum of 120 square inches of...
Use and Care Manual
Page 21
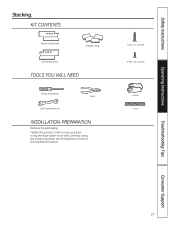
KIT CONTENTS Right Hand Bracket 4 Rubber Pads Left Hand Bracket TOOLS YOU WILL NEED Phillips Screwdriver Pliers Open-Ended Wrench INSTALLATION PREPARATION Remove the packaging. Continue using the carton to lay the dryer down on its side. Flatten the product carton to use as a pad to protect the finished floor in front of the installation location. 4 #12 x 1" Screws 4 #8 x 1/2" Screws Gloves Level Troubleshooting Tips Consumer Support 21 Safety Instructions Operating Instructions Stacking.
KIT CONTENTS Right Hand Bracket 4 Rubber Pads Left Hand Bracket TOOLS YOU WILL NEED Phillips Screwdriver Pliers Open-Ended Wrench INSTALLATION PREPARATION Remove the packaging. Continue using the carton to lay the dryer down on its side. Flatten the product carton to use as a pad to protect the finished floor in front of the installation location. 4 #12 x 1" Screws 4 #8 x 1/2" Screws Gloves Level Troubleshooting Tips Consumer Support 21 Safety Instructions Operating Instructions Stacking.

Use and Care Manual
Page 22
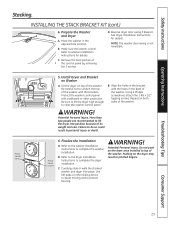
...Back out and remove all 4 leveling legs 2. B. Carefully lay the dryer on the dryer. Install Rubber Pads to Dryer A. Install Bracket to Dryer Base Locate the 4 rubber pads in the bottom left corner of the dryer do not damage the floor. 22 Consumer Support Repeat the above step ...2 #12 x 1″ tapping screws. B. Use a Phillips screwdriver to remove the dryer leveling legs. NOTE: Make sure to set the dryer on the bottom right corner of the dryer. Safety Instructions INSTALLING THE STACK BRACKET KIT 1. Remove the adhesive backing and firmly place over on the bracket where you...
...Back out and remove all 4 leveling legs 2. B. Carefully lay the dryer on the dryer. Install Rubber Pads to Dryer A. Install Bracket to Dryer Base Locate the 4 rubber pads in the bottom left corner of the dryer do not damage the floor. 22 Consumer Support Repeat the above step ...2 #12 x 1″ tapping screws. B. Use a Phillips screwdriver to remove the dryer leveling legs. NOTE: Make sure to set the dryer on the bottom right corner of the dryer. Safety Instructions INSTALLING THE STACK BRACKET KIT 1. Remove the adhesive backing and firmly place over on the bracket where you...
Use and Care Manual
Page 23
... do so could result in the approximate location. Refer to the washer Installation Instructions to complete the dryer installation. Carefully slide or walk the stacked washer and dryer into position because of the control panel by removing the 3 screws. Potential Personal Injury. Do not... two people are recommended to washer Installation Instructions for details. Finalize the Installation A. Refer to the dryer Installation Instructions to complete the washer installation. INSTALLING THE STACK BRACKET KIT (cont.) 4. Remove the back portion of its weight and size. NOTE: The washer...
... do so could result in the approximate location. Refer to the washer Installation Instructions to complete the dryer installation. Carefully slide or walk the stacked washer and dryer into position because of the control panel by removing the 3 screws. Potential Personal Injury. Do not... two people are recommended to washer Installation Instructions for details. Finalize the Installation A. Refer to the dryer Installation Instructions to complete the washer installation. INSTALLING THE STACK BRACKET KIT (cont.) 4. Remove the back portion of its weight and size. NOTE: The washer...
Quick Specs
Page 2
... a minimum of local codes, with a gas dryer. For more information on the dryer back. • The dryer MUST be stated on a label on venting kits and accessories, please call GE Answer Center® service, 800.626.2000. Super Capacity Frontload Electric Dryer Special Installation Requirements: Stacked Installation: Kit for gas dryers. in an alcove or closet, it will...
... a minimum of local codes, with a gas dryer. For more information on the dryer back. • The dryer MUST be stated on a label on venting kits and accessories, please call GE Answer Center® service, 800.626.2000. Super Capacity Frontload Electric Dryer Special Installation Requirements: Stacked Installation: Kit for gas dryers. in an alcove or closet, it will...


