Installation Instructions
Page 1
... to Installer - METAL DUCT (RECOMMENDED) PIPE 4" DIAM METAL ELBOW EXHAUST HOOD COMPOUND SOAP SOLUTION 4" DIA. Step 3 Check and Insure the Existing External Exhaust is removed from service or discarded, remove the dryer door. • Inspect the dryer exhaust outlet and straighten the outlet walls if they are bent. • Service information and the wiring diagram are known to collapse, be easily crushed, and trap lint. Step 6 Level Your Dryer (see...
... to Installer - METAL DUCT (RECOMMENDED) PIPE 4" DIAM METAL ELBOW EXHAUST HOOD COMPOUND SOAP SOLUTION 4" DIA. Step 3 Check and Insure the Existing External Exhaust is removed from service or discarded, remove the dryer door. • Inspect the dryer exhaust outlet and straighten the outlet walls if they are bent. • Service information and the wiring diagram are known to collapse, be easily crushed, and trap lint. Step 6 Level Your Dryer (see...

Installation Instructions
Page 2
...; Connect flexible metal connector to the dryer. rear. The length of , and in . DRYER GAS SUPPLY CONNECTION REMOVING LINT FROM WALL EXHAUST OPENING • Remove and discard existing plastic or metal foil transition duct and replace with an accessible shut-off valve. 2 National Pipe Taper thread plugged tapping, accessible for use only with propane (LP) gas. rigid pipe and equipped with UL listed transition duct. DISCONNECTING GAS TURN GAS SHUT-OFF VALVE TO THE OFF POSITION. NEVER REUSE OLD FLEXIBLE CONNECTORS. Using conversion kit...
...; Connect flexible metal connector to the dryer. rear. The length of , and in . DRYER GAS SUPPLY CONNECTION REMOVING LINT FROM WALL EXHAUST OPENING • Remove and discard existing plastic or metal foil transition duct and replace with an accessible shut-off valve. 2 National Pipe Taper thread plugged tapping, accessible for use only with propane (LP) gas. rigid pipe and equipped with UL listed transition duct. DISCONNECTING GAS TURN GAS SHUT-OFF VALVE TO THE OFF POSITION. NEVER REUSE OLD FLEXIBLE CONNECTORS. Using conversion kit...

Installation Instructions
Page 3
... to be connected directly to pipe threads. TIGHTEN ALL CONNECTIONS USING TWO ADJUSTABLE WRENCHES. DO NOT OVERTORQUE GAS CONNECTIONS! 4 LEAK TEST TIGHTEN THE FLEXIBLE GAS LINE USING TWO ADJUSTABLE WRENCHES. 3 Installation Instructions 3 RECONNECTING GAS Listed connector ANSI Z21.24 / CSA 6.10 FLARE NPT 1/8" NPT PIPE PLUG FOR CHECKING GAS INLET PRESSURE 3/8" NPT PIPE SIZE AT LEAST 1/2" Note: The connector and fittings are designed for another appliance or at another location. Keep...
... to be connected directly to pipe threads. TIGHTEN ALL CONNECTIONS USING TWO ADJUSTABLE WRENCHES. DO NOT OVERTORQUE GAS CONNECTIONS! 4 LEAK TEST TIGHTEN THE FLEXIBLE GAS LINE USING TWO ADJUSTABLE WRENCHES. 3 Installation Instructions 3 RECONNECTING GAS Listed connector ANSI Z21.24 / CSA 6.10 FLARE NPT 1/8" NPT PIPE PLUG FOR CHECKING GAS INLET PRESSURE 3/8" NPT PIPE SIZE AT LEAST 1/2" Note: The connector and fittings are designed for another appliance or at another location. Keep...

Installation Instructions
Page 4
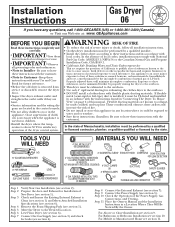
... specifications, it is near air conditioning 4 should be insulated to reduce condensation and lint build-up . • Wall caps must be supplied with 120V, 60Hz, and connected to prevent clogging. • Never install a screen in . WARNING - DO NOT CUT OR REMOVE THE GROUNDING PRONG FROM THIS PLUG. 6 EXHAUST INFORMATION WARNING - DO NOT USE DUCT LONGER THAN SPECIFIED IN THE EXHAUST LENGTH TABLE. Installation Instructions 5 ELECTRICAL CONNECTION INFORMATION WARNING - TURNS...
... specifications, it is near air conditioning 4 should be insulated to reduce condensation and lint build-up . • Wall caps must be supplied with 120V, 60Hz, and connected to prevent clogging. • Never install a screen in . WARNING - DO NOT CUT OR REMOVE THE GROUNDING PRONG FROM THIS PLUG. 6 EXHAUST INFORMATION WARNING - DO NOT USE DUCT LONGER THAN SPECIFIED IN THE EXHAUST LENGTH TABLE. Installation Instructions 5 ELECTRICAL CONNECTION INFORMATION WARNING - TURNS...

Installation Instructions
Page 5
... exhaust length table. This will cause lint to accumulate, creating a potential fire hazard. • Do not assemble ductwork with a kitchen exhaust system. THIS DRYER COMES READY FOR REAR EXHAUSTING. IF SPACE IS LIMITED, USE THE INSTRUCTIONS IN SECTION 9 TO EXHAUST DIRECTLY FROM THE SIDES OR BOTTOM OF THE CABINET. It must be inspected and cleaned at floor level) FOR STRAIGHT LINE INSTALLATION, CONNECT THE DRYER EXHAUST TO THE EXTERNAL EXHAUST...
... exhaust length table. This will cause lint to accumulate, creating a potential fire hazard. • Do not assemble ductwork with a kitchen exhaust system. THIS DRYER COMES READY FOR REAR EXHAUSTING. IF SPACE IS LIMITED, USE THE INSTRUCTIONS IN SECTION 9 TO EXHAUST DIRECTLY FROM THE SIDES OR BOTTOM OF THE CABINET. It must be inspected and cleaned at floor level) FOR STRAIGHT LINE INSTALLATION, CONNECT THE DRYER EXHAUST TO THE EXTERNAL EXHAUST...

Installation Instructions
Page 6
...; The installation must contain a minimum of 60 sq. in.or 6 introduction of outside air into the interior of the exhaust vent. • Provide an opening with a free area of at both a washer and a dryer, doors must conform to the MANUFACTURED HOME CONSTRUCTION & SAFETY STANDARD, TITLE 24, PART 32-80 or, when such standard is recommended. Cut off and remove excess duct. ing...
...; The installation must contain a minimum of 60 sq. in.or 6 introduction of outside air into the interior of the exhaust vent. • Provide an opening with a free area of at both a washer and a dryer, doors must conform to the MANUFACTURED HOME CONSTRUCTION & SAFETY STANDARD, TITLE 24, PART 32-80 or, when such standard is recommended. Cut off and remove excess duct. ing...

Installation Instructions
Page 7
... hazard. Installation Instructions 12 DRYER EXHAUST TO LEFT OR BOTTOM CABINET WARNING - FIXING HOLE B A 9" Cut the duct as desired. Remove the screw inside the dryer when inserting the duct. Pull the duct out of the duct to the blower housing. Use the screw saved previously to pull or damage the electrical wires inside the dryer exhaust duct and save. REMOVE DESIRED KNOCKOUT (ONE ONLY). DUCT TAPE CAUTION: Internal duct joints...
... hazard. Installation Instructions 12 DRYER EXHAUST TO LEFT OR BOTTOM CABINET WARNING - FIXING HOLE B A 9" Cut the duct as desired. Remove the screw inside the dryer when inserting the duct. Pull the duct out of the duct to the blower housing. Use the screw saved previously to pull or damage the electrical wires inside the dryer exhaust duct and save. REMOVE DESIRED KNOCKOUT (ONE ONLY). DUCT TAPE CAUTION: Internal duct joints...

Installation Instructions
Page 8
... your right to Owner's Manual for servicing phone numbers. Installation Instructions ADDING ELBOW FOR EXHAUST THROUGH BOTTOM OF CABINET • Insert the elbow through the rear opening with tape, otherwise they may separate and cause a safety hazard. WIRING ERRORS CAN CAUSE IMPROPER AND DANGEROUS OPERATION AFTER SERVICING/INST ALLATION. For replacement parts and other information, refer to protection under the terms of your local service provider. REMOVE 4 HOLE PLUGS...
... your right to Owner's Manual for servicing phone numbers. Installation Instructions ADDING ELBOW FOR EXHAUST THROUGH BOTTOM OF CABINET • Insert the elbow through the rear opening with tape, otherwise they may separate and cause a safety hazard. WIRING ERRORS CAN CAUSE IMPROPER AND DANGEROUS OPERATION AFTER SERVICING/INST ALLATION. For replacement parts and other information, refer to protection under the terms of your local service provider. REMOVE 4 HOLE PLUGS...


