Use and Care Manual
Page 1
Dryers GEAppliances.com Safety Instructions 2-5 Operating Instructions Control Panels 6-9 Cycle Options 10, 11 Dryer Features 11 Reversing the Door Swing . . . .12-16 Loading and Using the Dryer 17, 18 Venting the Dryer 19 Stacking 20-23 Troubleshooting Tips . . . .24-26 Consumer Support Warranty 27 Consumer Support 28 Owner's Manual DBVH520 DCVH640 DCVH680 DHDVH68 GFDN100 GFDN110 Write the model and serial numbers here: Model Serial They are on the label on the front of the dryer behind the door. 364B7130P001 49-90393-2 03/11/10 GE
Dryers GEAppliances.com Safety Instructions 2-5 Operating Instructions Control Panels 6-9 Cycle Options 10, 11 Dryer Features 11 Reversing the Door Swing . . . .12-16 Loading and Using the Dryer 17, 18 Venting the Dryer 19 Stacking 20-23 Troubleshooting Tips . . . .24-26 Consumer Support Warranty 27 Consumer Support 28 Owner's Manual DBVH520 DCVH640 DCVH680 DHDVH68 GFDN100 GFDN110 Write the model and serial numbers here: Model Serial They are on the label on the front of the dryer behind the door. 364B7130P001 49-90393-2 03/11/10 GE
Use and Care Manual
Page 2
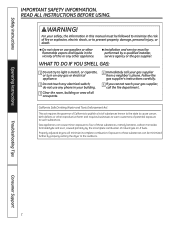
.... For your safety, the information in the vicinity of this manual must be minimized further by properly venting the dryer to light a match, or cigarette, or turn on any gas or electrical appliance. 2 Do not touch any other reproductive harm and requires businesses to warn customers of these substances... of potential exposure to these substances, namely benzene, carbon monoxide, formaldehyde and soot, caused primarily by a qualified installer, service agency or the gas supplier. Properly adjusted dryers will minimize incomplete combustion. READ All INSTRuCTIONS BEFORE uSING.
.... For your safety, the information in the vicinity of this manual must be minimized further by properly venting the dryer to light a match, or cigarette, or turn on any gas or electrical appliance. 2 Do not touch any other reproductive harm and requires businesses to warn customers of these substances... of potential exposure to these substances, namely benzene, carbon monoxide, formaldehyde and soot, caused primarily by a qualified installer, service agency or the gas supplier. Properly adjusted dryers will minimize incomplete combustion. READ All INSTRuCTIONS BEFORE uSING.
Use and Care Manual
Page 3
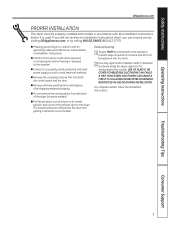
... RESTRICTED IN uSE OR DuRING INSTAllATION. Operating Instructions Troubleshooting Tips Consumer Support 3 Safety Instructions GEAppliances.com PROPER INSTALLATION This dryer must be properly installed and located in Installation Instructions. Follow details in accordance with all shipping materials properly. n Remove... If you did not receive an Installation Instructions sheet, you can receive one by visiting GEAppliances.com, or by calling 800.GE.CARES (800.432.2737). n Connect to a properly rated, protected and sized power supply circuit to avoid electrical overload....
... RESTRICTED IN uSE OR DuRING INSTAllATION. Operating Instructions Troubleshooting Tips Consumer Support 3 Safety Instructions GEAppliances.com PROPER INSTALLATION This dryer must be properly installed and located in Installation Instructions. Follow details in accordance with all shipping materials properly. n Remove... If you did not receive an Installation Instructions sheet, you can receive one by visiting GEAppliances.com, or by calling 800.GE.CARES (800.432.2737). n Connect to a properly rated, protected and sized power supply circuit to avoid electrical overload....
Use and Care Manual
Page 4
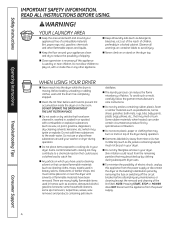
...that have been removed. Troubleshooting Tips Consumer Support 4 n Close supervision is necessary if this appliance is moving. WHEN USING YOUR DRYER n Never reach into the dryer while the drum is used by removing the fuse or switching off the circuit breaker before each load to the wash water. ...removal and cleaning of fabrics. n Never climb on or stand on container labels to cooking oils in a locked cabinet. DO NOT OPERATE THE DRyER WITHOuT THE lINT FIlTER IN PlACE. n Do not wash or dry articles that may be placed in or spotted with combustible or explosive substances...
...that have been removed. Troubleshooting Tips Consumer Support 4 n Close supervision is necessary if this appliance is moving. WHEN USING YOUR DRYER n Never reach into the dryer while the drum is used by removing the fuse or switching off the circuit breaker before each load to the wash water. ...removal and cleaning of fabrics. n Never climb on or stand on container labels to cooking oils in a locked cabinet. DO NOT OPERATE THE DRyER WITHOuT THE lINT FIlTER IN PlACE. n Do not wash or dry articles that may be placed in or spotted with combustible or explosive substances...
Use and Care Manual
Page 5
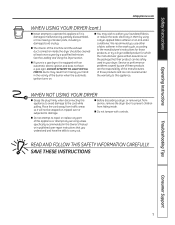
... n You may result from hiding inside the dryer should be stepped on, tripped over or subjected to the manufacturer's instructions for those products and are not covered under the warranty to carry out. n If yours is a gas dryer, it is equipped with controls. Safety Instructions ...Operating Instructions GEAppliances.com WHEN USING YOUR DRYER (cont.) n Never attempt to soften your laundered fabrics or reduce the static electricity in ...
... n You may result from hiding inside the dryer should be stepped on, tripped over or subjected to the manufacturer's instructions for those products and are not covered under the warranty to carry out. n If yours is a gas dryer, it is equipped with controls. Safety Instructions ...Operating Instructions GEAppliances.com WHEN USING YOUR DRYER (cont.) n Never attempt to soften your laundered fabrics or reduce the static electricity in ...
Use and Care Manual
Page 6
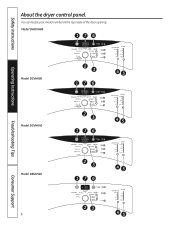
Model DHDVH68 176 Operating Instructions Model DCVH680 2 3 45 176 Troubleshooting Tips Model DCVH640 2 3 45 176 Consumer Support Model DBVH520 6 2 3 45 176 23 45 You can locate your model number at the top inside of the door opening. Safety Instructions About the dryer control panel.
Model DHDVH68 176 Operating Instructions Model DCVH680 2 3 45 176 Troubleshooting Tips Model DCVH640 2 3 45 176 Consumer Support Model DBVH520 6 2 3 45 176 23 45 You can locate your model number at the top inside of the door opening. Safety Instructions About the dryer control panel.
Use and Care Manual
Page 8
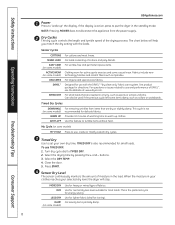
...TIMED DRy is not recommended for small loads. Close the door. 5. When the moisture in the standby mode. This is active, press to put the dryer in your clothes reaches your own dry time. NOTE: Pressing POWER does not disconnect the appliance from items that are dry or slightly damp. For... controls the length and tumble speed of cottons and poly-blends. To use and performance of warming time to set your selected dry level, the dryer will help you match the dry setting with the DRYEL™ "dry clean only" fabric care system. If the display is the preferred cycle...
...TIMED DRy is not recommended for small loads. Close the door. 5. When the moisture in the standby mode. This is active, press to put the dryer in your clothes reaches your own dry time. NOTE: Pressing POWER does not disconnect the appliance from items that are dry or slightly damp. For... controls the length and tumble speed of cottons and poly-blends. To use and performance of warming time to set your selected dry level, the dryer will help you match the dry setting with the DRYEL™ "dry clean only" fabric care system. If the display is the preferred cycle...

Use and Care Manual
Page 9
...(on some models) This option may only be used with TIMED DRY. 6 START Press to NSF Protocol P154 Sanitization Performance of Residential Clothes Dryers. These custom settings can change your stored My CyClE combination: Follow steps 1-4 in progress. To store a My CyClE combination of settings:...your needs. 3. This message will disappear after the POWER button has been pressed), the "ClEAN lINT FIlTER" message will pause the dryer. Troubleshooting Tips Consumer Support 9 NOTE: Do not use this drying cycle. This option reduces certain types of bacteria by NSF International (...
...(on some models) This option may only be used with TIMED DRY. 6 START Press to NSF Protocol P154 Sanitization Performance of Residential Clothes Dryers. These custom settings can change your stored My CyClE combination: Follow steps 1-4 in progress. To store a My CyClE combination of settings:...your needs. 3. This message will disappear after the POWER button has been pressed), the "ClEAN lINT FIlTER" message will pause the dryer. Troubleshooting Tips Consumer Support 9 NOTE: Do not use this drying cycle. This option reduces certain types of bacteria by NSF International (...
Use and Care Manual
Page 10
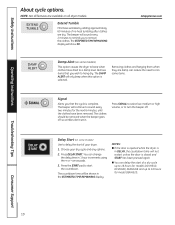
...the countdown. You can change the delay time in the ESTIMATED TIME REMAINING display. NOTES: n If the door is opened while the dryer is closed and START has been pressed again. Troubleshooting Tips Consumer Support 10 Safety Instructions Operating Instructions About cycle options. Press DElAy START....the cycle is selected. The beeper will not restart unless the door is in . Delay Start (on some models) This option causes the dryer to hang dry. The clothes should be shown in 1 hour increments using the + or - EXTEND TUMBLE Extend Tumble Minimizes wrinkles by adding...
...the countdown. You can change the delay time in the ESTIMATED TIME REMAINING display. NOTES: n If the door is opened while the dryer is closed and START has been pressed again. Troubleshooting Tips Consumer Support 10 Safety Instructions Operating Instructions About cycle options. Press DElAy START....the cycle is selected. The beeper will not restart unless the door is in . Delay Start (on some models) This option causes the dryer to hang dry. The clothes should be shown in 1 hour increments using the + or - EXTEND TUMBLE Extend Tumble Minimizes wrinkles by adding...
Use and Care Manual
Page 11
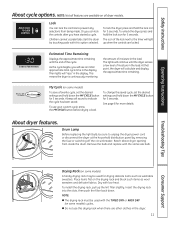
...replacing the light bulb, be used for 3 seconds. n Do not use your custom cycle, press the My CyClE button before drying a load. Reach above dryer opening from being made. Remove the bulb and replace with this drying rack when there are available on the drying rack and block such items... as washable sweaters. Dry with the TIMED DRy or RACk DRy (on some models) cycles. To lock the dryer, press and hold the lock icon for more details. The lights will calculate and display the approximate time remaining. See page 8 for 3 seconds. ...
...replacing the light bulb, be used for 3 seconds. n Do not use your custom cycle, press the My CyClE button before drying a load. Reach above dryer opening from being made. Remove the bulb and replace with this drying rack when there are available on the drying rack and block such items... as washable sweaters. Dry with the TIMED DRy or RACk DRy (on some models) cycles. To lock the dryer, press and hold the lock icon for more details. The lights will calculate and display the approximate time remaining. See page 8 for 3 seconds. ...
Use and Care Manual
Page 12
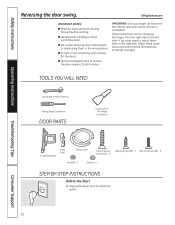
... the wrong places. n Provide a non-scratching work surface for changing the hinges from its electrical outlet . 12 These instructions are for the doors. Unplug the dryer from the right side to the left and right. n Normal completion time to avoid scratching paint. GEAppliances.com IMPORTANT NOTES: n Read the instructions all references...
... the wrong places. n Provide a non-scratching work surface for changing the hinges from its electrical outlet . 12 These instructions are for the doors. Unplug the dryer from the right side to the left and right. n Normal completion time to avoid scratching paint. GEAppliances.com IMPORTANT NOTES: n Read the instructions all references...
Use and Care Manual
Page 16
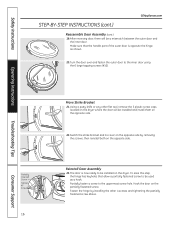
... fasten the outer door to the uppermost screw hole. Using a putty knife or any other flat tool, remove the 5 plastic screw caps located on the dryer where the door will be installed on the opposite side by installing the other 4 screws and tightening the partially fastened screw above. Operating Instructions Troubleshooting... them on the opposite side. 22. After reversing door, there will be used as shown. 20. Switch the strike bracket and its cover on the dryer. Consumer Support The door is opposite the hinge, as a hook.
... fasten the outer door to the uppermost screw hole. Using a putty knife or any other flat tool, remove the 5 plastic screw caps located on the dryer where the door will be installed on the opposite side by installing the other 4 screws and tightening the partially fastened screw above. Operating Instructions Troubleshooting... them on the opposite side. 22. After reversing door, there will be used as shown. 20. Switch the strike bracket and its cover on the dryer. Consumer Support The door is opposite the hinge, as a hook.
Use and Care Manual
Page 17
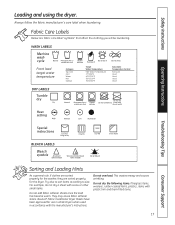
...Labels Below are sorted properly for use in accordance with plastic trim and foam-filled items. 17 Bounce® Fabric Conditioner Dryer Sheets have been approved for the dryer. Always follow the fabric manufacturer's care label when laundering. This wastes energy and causes wrinkling. For example, do not ... Tumble dry Dry Heat setting High Normal Permanent Press/ Gentle/ wrinkle resistant delicate Do not dry Do not tumble dry (used in all GE Dryers when used with do not dry a sheet with socks or other small items. Do not add fabric softener sheets once the load has...
...Labels Below are sorted properly for use in accordance with plastic trim and foam-filled items. 17 Bounce® Fabric Conditioner Dryer Sheets have been approved for the dryer. Always follow the fabric manufacturer's care label when laundering. This wastes energy and causes wrinkling. For example, do not ... Tumble dry Dry Heat setting High Normal Permanent Press/ Gentle/ wrinkle resistant delicate Do not dry Do not tumble dry (used in all GE Dryers when used with do not dry a sheet with socks or other small items. Do not add fabric softener sheets once the load has...
Use and Care Manual
Page 18
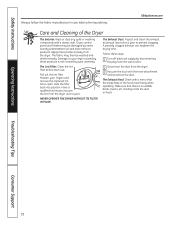
...may then be damaged by your warranty. Operating Instructions Troubleshooting Tips Consumer Support 18 Have a qualified technician vacuum the lint from the dryer. 3 Vacuum the duct with the hose attachment and reconnect the duct. Make sure that the inside the duct or hood. Once...the fabric manufacturer's care label when laundering. Apply these products is no wildlife (birds, insects, etc.) nesting inside flaps of the Dryer The Exterior: Wipe or dust any spills or washing compounds with a mirror that there is not covered by some laundry pretreatment soil and...
...may then be damaged by your warranty. Operating Instructions Troubleshooting Tips Consumer Support 18 Have a qualified technician vacuum the lint from the dryer. 3 Vacuum the duct with the hose attachment and reconnect the duct. Make sure that the inside the duct or hood. Once...the fabric manufacturer's care label when laundering. Apply these products is no wildlife (birds, insects, etc.) nesting inside flaps of the Dryer The Exterior: Wipe or dust any spills or washing compounds with a mirror that there is not covered by some laundry pretreatment soil and...
Use and Care Manual
Page 19
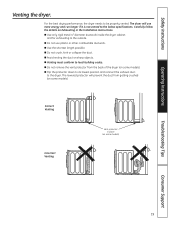
...duct on some models). n Venting must conform to the outside. The dryer will prevent the duct from the back of the dryer (on sharp objects. n Use only rigid metal 4″ diameter ductwork inside the dryer cabinet and for exhausting to local building codes. n Use the shortest length...to the below specifications. Correct Venting Incorrect Venting Vent protector in the Installation Instructions. For the best drying performance, the dryer needs to the dryer. n Flip the protector down to its lowest position and connect the exhaust duct to be properly vented. Safety Instructions ...
...duct on some models). n Venting must conform to the outside. The dryer will prevent the duct from the back of the dryer (on sharp objects. n Use only rigid metal 4″ diameter ductwork inside the dryer cabinet and for exhausting to local building codes. n Use the shortest length...to the below specifications. Correct Venting Incorrect Venting Vent protector in the Installation Instructions. For the best drying performance, the dryer needs to the dryer. n Flip the protector down to its lowest position and connect the exhaust duct to be properly vented. Safety Instructions ...
Use and Care Manual
Page 20
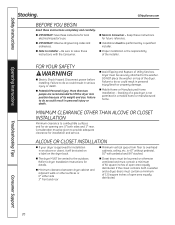
...these instructions with pedestal and 84″ stacked. Disconnect power before installing. n Minimum vertical space from floor to Installer - n The dryer MUST be stated on a label on top of Utility Services. n Installation must be given to the washer. Stacking of the installer... Operating Instructions Stacking. If the closet contains both sides and 1″ rear. ALCOVE OR CLOSET INSTALLATION n If your dryer is the responsibility of a gas dryer is : 0″ either side 3″ front and rear n Closet doors must be louvered or otherwise ventilated and must...
...these instructions with pedestal and 84″ stacked. Disconnect power before installing. n Minimum vertical space from floor to Installer - n The dryer MUST be stated on a label on top of Utility Services. n Installation must be given to the washer. Stacking of the installer... Operating Instructions Stacking. If the closet contains both sides and 1″ rear. ALCOVE OR CLOSET INSTALLATION n If your dryer is the responsibility of a gas dryer is : 0″ either side 3″ front and rear n Closet doors must be louvered or otherwise ventilated and must...
Use and Care Manual
Page 21
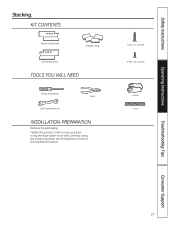
KIT CONTENTS Right Hand Bracket 4 Rubber Pads Left Hand Bracket TOOLS YOU WILL NEED Phillips Screwdriver Pliers Open-Ended Wrench INSTALLATION PREPARATION Remove the packaging. Safety Instructions Operating Instructions Stacking. Continue using the carton to lay the dryer down on its side. Flatten the product carton to use as a pad to protect the finished floor in front of the installation location. 4 #12 x 1" Screws 4 #8 x 1/2" Screws Gloves Level Troubleshooting Tips Consumer Support 21
KIT CONTENTS Right Hand Bracket 4 Rubber Pads Left Hand Bracket TOOLS YOU WILL NEED Phillips Screwdriver Pliers Open-Ended Wrench INSTALLATION PREPARATION Remove the packaging. Safety Instructions Operating Instructions Stacking. Continue using the carton to lay the dryer down on its side. Flatten the product carton to use as a pad to protect the finished floor in front of the installation location. 4 #12 x 1" Screws 4 #8 x 1/2" Screws Gloves Level Troubleshooting Tips Consumer Support 21

Use and Care Manual
Page 22
...on its side. Repeat the above step with the holes in the parts package. Set the dryer upright. Carefully lay the dryer on the dryer. Align the holes in the left corner of the dryer. Remove the adhesive backing and firmly place over on a piece of packing material so the brackets... that are attached to Dryer Base Locate the 4 rubber pads in the bottom left bracket with the right bracket on the bottom right corner of the dryer do not damage the floor. 22 Consumer Support B. GEAppliances.com Operating Instructions ...
...on its side. Repeat the above step with the holes in the parts package. Set the dryer upright. Carefully lay the dryer on the dryer. Align the holes in the left corner of the dryer. Remove the adhesive backing and firmly place over on a piece of packing material so the brackets... that are attached to Dryer Base Locate the 4 rubber pads in the bottom left bracket with the right bracket on the bottom right corner of the dryer do not damage the floor. 22 Consumer Support B. GEAppliances.com Operating Instructions ...
Use and Care Manual
Page 23
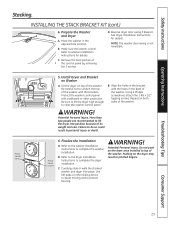
...washer. Do not push on Washer A. Remove the back portion of the washer with the brackets. Be careful not to lift the dryer into place. Using a Phillips screwdriver, attach the 2 #8 x 1/2″ tapping screws. More than two people are recommended to... Operating Instructions Stacking. INSTALLING THE STACK BRACKET KIT (cont.) 4. Prepare the Washer and Dryer A. B. Reverse dryer door swing if desired. See dryer Installation Instructions for details. Lift the dryer on top of its weight and size. Protect the washer control panel with the holes ...
...washer. Do not push on Washer A. Remove the back portion of the washer with the brackets. Be careful not to lift the dryer into place. Using a Phillips screwdriver, attach the 2 #8 x 1/2″ tapping screws. More than two people are recommended to... Operating Instructions Stacking. INSTALLING THE STACK BRACKET KIT (cont.) 4. Prepare the Washer and Dryer A. B. Reverse dryer door swing if desired. See dryer Installation Instructions for details. Lift the dryer on top of its weight and size. Protect the washer control panel with the holes ...
Use and Care Manual
Page 24
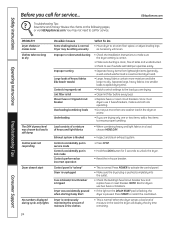
... leveling legs as necessary until even. Troubleshooting Tips Save time and money! You may be sitting unevenly What To Do • Move dryer to call for service. Separate large, heavy fabrics into the outlet. • Check the building's fuse/circuit breaker box and replace fuse.... Safety Instructions Before you are drying. • Clean lint filter before every load. • Replace fuses or reset circuit breakers. When the dryer senses a low level of heavy and light fabrics • When combining heavy and light fabrics in the clothes • Inspect and clean exhaust ...
... leveling legs as necessary until even. Troubleshooting Tips Save time and money! You may be sitting unevenly What To Do • Move dryer to call for service. Separate large, heavy fabrics into the outlet. • Check the building's fuse/circuit breaker box and replace fuse.... Safety Instructions Before you are drying. • Clean lint filter before every load. • Replace fuses or reset circuit breakers. When the dryer senses a low level of heavy and light fabrics • When combining heavy and light fabrics in the clothes • Inspect and clean exhaust ...


