Use and Care Manual
Page 2
... and requires businesses to warn customers of this manual must be performed by a qualified installer, service agency or the gas supplier. WARNING! Troubleshooting Tips Consumer Support 2 n Do not store or use any electrical switch; Follow the gas supplier's instructions carefully. 5 If you cannot reach your gas supplier from a neighbor's phone. WHAT TO DO IF yOu SMEll GAS: 1 Do not try to light a match, or cigarette, or turn...
... and requires businesses to warn customers of this manual must be performed by a qualified installer, service agency or the gas supplier. WARNING! Troubleshooting Tips Consumer Support 2 n Do not store or use any electrical switch; Follow the gas supplier's instructions carefully. 5 If you cannot reach your gas supplier from a neighbor's phone. WHAT TO DO IF yOu SMEll GAS: 1 Do not try to light a match, or cigarette, or turn...
Use and Care Manual
Page 3
... and sized power supply circuit to the dryer. The lowered protector will not be properly installed and located in Installation Instructions. If you did not receive an Installation Instructions sheet, you can receive one by visiting GEAppliances.com, or by calling 800.GE.CARES (800.432.2737). n Remove all governing codes and ordinances. n Pull the protector out and down to its lowest position and connect the exhaust duct...
... and sized power supply circuit to the dryer. The lowered protector will not be properly installed and located in Installation Instructions. If you did not receive an Installation Instructions sheet, you can receive one by visiting GEAppliances.com, or by calling 800.GE.CARES (800.432.2737). n Remove all governing codes and ordinances. n Pull the protector out and down to its lowest position and connect the exhaust duct...
Use and Care Manual
Page 4
... fire by removing the fuse or switching off the circuit breaker before each load to reduce the possibility of slipping. WHEN USING YOUR DRYER n Never reach into the dryer while the drum is used in or near children. n Do not wash or dry articles that may contribute to the wash water. n Do not dry fiberglass articles in your dryer. NOTE: Pressing START, STOP or POWER does NOT...
... fire by removing the fuse or switching off the circuit breaker before each load to reduce the possibility of slipping. WHEN USING YOUR DRYER n Never reach into the dryer while the drum is used in or near children. n Do not wash or dry articles that may contribute to the wash water. n Do not dry fiberglass articles in your dryer. NOTE: Pressing START, STOP or POWER does NOT...
Use and Care Manual
Page 5
... a pilot light. Service or performance problems caused by a qualified technician. SAVE THESE INSTRuCTIONS Troubleshooting Tips Consumer Support 5 DO NOT ATTEMPT TO lIGHT WITH A MATCH. Place the cord away from traffic areas so it from service, remove the dryer door to prevent children from having your hand in the vicinity of the machine and the exhaust duct connection inside . WHEN NOT USING YOUR DRYER n Grasp the plug firmly when...
... a pilot light. Service or performance problems caused by a qualified technician. SAVE THESE INSTRuCTIONS Troubleshooting Tips Consumer Support 5 DO NOT ATTEMPT TO lIGHT WITH A MATCH. Place the cord away from traffic areas so it from service, remove the dryer door to prevent children from having your hand in the vicinity of the machine and the exhaust duct connection inside . WHEN NOT USING YOUR DRYER n Grasp the plug firmly when...
Use and Care Manual
Page 6
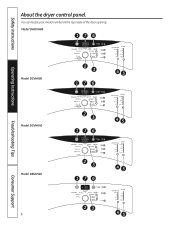
You can locate your model number at the top inside of the door opening. Safety Instructions About the dryer control panel. Model DHDVH68 176 Operating Instructions Model DCVH680 2 3 45 176 Troubleshooting Tips Model DCVH640 2 3 45 176 Consumer Support Model DBVH520 6 2 3 45 176 23 45
You can locate your model number at the top inside of the door opening. Safety Instructions About the dryer control panel. Model DHDVH68 176 Operating Instructions Model DCVH680 2 3 45 176 Troubleshooting Tips Model DCVH640 2 3 45 176 Consumer Support Model DBVH520 6 2 3 45 176 23 45
Use and Care Manual
Page 8
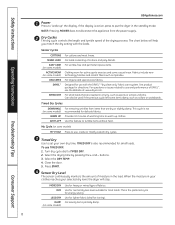
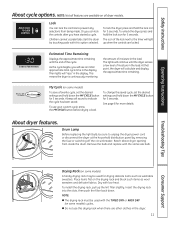
... cycle left some models) WARM UP AIR FLUFF For removing wrinkles from the power supply. 2 Dry Cycles The dry cycle controls the length and tumble speed of warming time to warm up " the display. Timed Dry Cycles DEWRINKLE (on some casual wear. Turn dry cycle dial to tumble items without heat. Press START. 4 Sensor Dry level The sensor continuously monitors the amount of cottons and poly-blends. Troubleshooting Tips Consumer Support 8 Sensor Cycles COTTONS MIXED LOAD EASY CARE (on some models...
... cycle left some models) WARM UP AIR FLUFF For removing wrinkles from the power supply. 2 Dry Cycles The dry cycle controls the length and tumble speed of warming time to warm up " the display. Timed Dry Cycles DEWRINKLE (on some casual wear. Turn dry cycle dial to tumble items without heat. Press START. 4 Sensor Dry level The sensor continuously monitors the amount of cottons and poly-blends. Troubleshooting Tips Consumer Support 8 Sensor Cycles COTTONS MIXED LOAD EASY CARE (on some models...

Use and Care Manual
Page 9
... dryer is running, press it once and it again to start a dry cycle. The anti-bacterial process occurs when high heat is activated. For lingerie and special-care fabrics. Press it will still be displayed until the START button is used with TIMED DRY. 6 START Press to restart the dry cycle. To store a My CyClE combination of Residential Clothes Dryers. Select any drying OPTIONS you have already cleaned the filter (before drying a load...
... dryer is running, press it once and it again to start a dry cycle. The anti-bacterial process occurs when high heat is activated. For lingerie and special-care fabrics. Press it will still be displayed until the START button is used with TIMED DRY. 6 START Press to restart the dry cycle. To store a My CyClE combination of Residential Clothes Dryers. Select any drying OPTIONS you have already cleaned the filter (before drying a load...
Use and Care Manual
Page 10
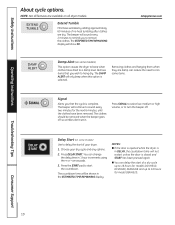
... turn the beeper off so wrinkles don't set in 1 hour increments using the + or - Remove items that the cycle is selected. The clothes should be shown in DElAy, the countdown time will sound every 2 minutes to remind you wish to hang dry. Safety Instructions Operating Instructions About cycle options. GEAppliances.com DAMP ALERT Damp Alert (on all dryer models. NOTES: n If the door is opened while the dryer...
... turn the beeper off so wrinkles don't set in 1 hour increments using the + or - Remove items that the cycle is selected. The clothes should be shown in DElAy, the countdown time will sound every 2 minutes to remind you wish to hang dry. Safety Instructions Operating Instructions About cycle options. GEAppliances.com DAMP ALERT Damp Alert (on all dryer models. NOTES: n If the door is opened while the dryer...
Use and Care Manual
Page 11
... same size bulb. NOTE: n The drying rack must be sure to prevent any selections from inside the drum. Children cannot accidentally start the dryer by removing the fuse or switching off the circuit breaker. The icon of moisture in the display. A beep will sound to the timer will calculate and display the approximate time remaining. To change the saved cycle, set the desired settings and hold down . Safety Instructions Operating Instructions About cycle...
... same size bulb. NOTE: n The drying rack must be sure to prevent any selections from inside the drum. Children cannot accidentally start the dryer by removing the fuse or switching off the circuit breaker. The icon of moisture in the display. A beep will sound to the timer will calculate and display the approximate time remaining. To change the saved cycle, set the desired settings and hold down . Safety Instructions Operating Instructions About cycle...
Use and Care Manual
Page 18
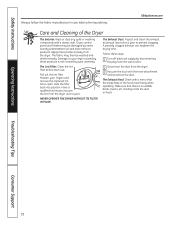
... steps: 1 Turn off electrical supply by your fingers and remove the captured lint. The lint Filter: Clean the lint filter before each use. Follow these products away from the dryer once a year. Operating Instructions Troubleshooting Tips Consumer Support 18 NEVER OPERATE THE DRyER WITHOuT ITS FIlTER IN PlACE. Once clean, slide the filter back into position. Pull out the lint filter. Moisten your warranty. The Exhaust Hood: Check with a mirror that there is not covered by...
... steps: 1 Turn off electrical supply by your fingers and remove the captured lint. The lint Filter: Clean the lint filter before each use. Follow these products away from the dryer once a year. Operating Instructions Troubleshooting Tips Consumer Support 18 NEVER OPERATE THE DRyER WITHOuT ITS FIlTER IN PlACE. Once clean, slide the filter back into position. Pull out the lint filter. Moisten your warranty. The Exhaust Hood: Check with a mirror that there is not covered by...
Use and Care Manual
Page 20
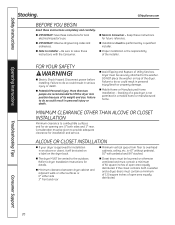
... square inches of open area equally distributed. Disconnect power before installing. Dryer must be performed by a qualified installer. Stacking of its weight and size. n The dryer MUST be securely attached to Installer - Troubleshooting Tips Consumer Support 20 n IMPORTANT: Save these instructions for local electrical inspector's use. Be sure to the outdoors. n Electric Shock Hazard. More than two people are : 0″ both a washer and a dryer, doors must be stated...
... square inches of open area equally distributed. Disconnect power before installing. Dryer must be performed by a qualified installer. Stacking of its weight and size. n The dryer MUST be securely attached to Installer - Troubleshooting Tips Consumer Support 20 n IMPORTANT: Save these instructions for local electrical inspector's use. Be sure to the outdoors. n Electric Shock Hazard. More than two people are : 0″ both a washer and a dryer, doors must be stated...
Use and Care Manual
Page 23
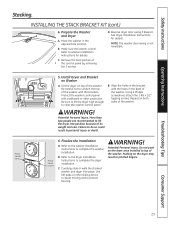
... Washer and Dryer A. NOTE: The washer door swing is level. B. Failure to complete the washer installation. Troubleshooting Tips Consumer Support 23 B. Remove the back portion of its weight and size. See dryer Installation Instructions for details. WARNING! Place hands here Place hand s here 6. Protect the washer control panel with cardboard or other sliding device to assist moving and to washer Installation Instructions for details. Carefully slide or walk the stacked washer and dryer...
... Washer and Dryer A. NOTE: The washer door swing is level. B. Failure to complete the washer installation. Troubleshooting Tips Consumer Support 23 B. Remove the back portion of its weight and size. See dryer Installation Instructions for details. WARNING! Place hands here Place hand s here 6. Protect the washer control panel with cardboard or other sliding device to assist moving and to washer Installation Instructions for details. Carefully slide or walk the stacked washer and dryer...
Use and Care Manual
Page 24
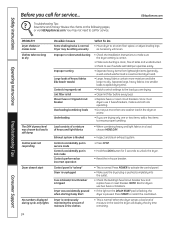
... are drying. • Clean lint filter before every load. • Replace fuses or reset circuit breakers. Troubleshooting Tips Save time and money! Review the charts on the DElAy START pad is flashing, the dryer is normal. Separate large, heavy fabrics into the outlet. • Check the building's fuse/circuit breaker box and replace fuse or reset breaker. Load consists of a mixture of moisture in the dryer at a time. • If you call for 3 seconds to dry. Dryer may not need to...
... are drying. • Clean lint filter before every load. • Replace fuses or reset circuit breakers. Troubleshooting Tips Save time and money! Review the charts on the DElAy START pad is flashing, the dryer is normal. Separate large, heavy fabrics into the outlet. • Check the building's fuse/circuit breaker box and replace fuse or reset breaker. Load consists of a mixture of moisture in the dryer at a time. • If you call for 3 seconds to dry. Dryer may not need to...
Use and Care Manual
Page 25
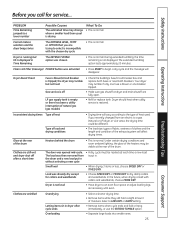
.... Clean lint Filter (message) POWER button was chosen • This is normal. Your dryer may change • This is normal. Before you are fully open. the dryer may be different. • The load size, types of fabric, wetness of clothes and the length and condition of the drum. Dryer should heat when utility service is normal. Inconsistent drying times Type of heat Type of load and drying conditions • Drying time will vary according to a gas (natural or LP) dryer...
.... Clean lint Filter (message) POWER button was chosen • This is normal. Your dryer may change • This is normal. Before you are fully open. the dryer may be different. • The load size, types of fabric, wetness of clothes and the length and condition of the drum. Dryer should heat when utility service is normal. Inconsistent drying times Type of heat Type of load and drying conditions • Drying time will vary according to a gas (natural or LP) dryer...
Use and Care Manual
Page 27
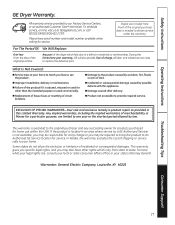
... General. louisville, ky 40225 Troubleshooting Tips Consumer Support 27 Safety Instructions Operating Instructions GE Dryer Warranty. During this limited one year or the shortest period allowed by possible defects with this limited Warranty. What Is Not Covered: n Service trips to your sole and exclusive remedy is abused, misused or used for a trip charge or you how to teach you may also have serial number and model number...
... General. louisville, ky 40225 Troubleshooting Tips Consumer Support 27 Safety Instructions Operating Instructions GE Dryer Warranty. During this limited one year or the shortest period allowed by possible defects with this limited Warranty. What Is Not Covered: n Service trips to your sole and exclusive remedy is abused, misused or used for a trip charge or you how to teach you may also have serial number and model number...

Installation Instructions
Page 1
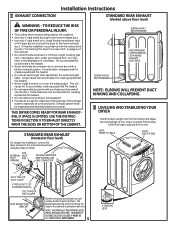
... TYPE) UL LISTED TRANSITION DUCT (IF NEEDED.) (x2) FLEXIBLE GAS LINE CONNECTOR GLOVES Step 1 Step 2 Step 3 Step 4 Step 5 Step 6 Step 7 Verify Your Gas Installation (see section 6). Check and Insure the Existing External Exhaust is removed from service or discarded, remove the dryer door. • Inspect the dryer exhaust outlet and straighten the outlet walls if they are bent. • Service information and the wiring diagram are known to these instructions with your Use and Care Book...
... TYPE) UL LISTED TRANSITION DUCT (IF NEEDED.) (x2) FLEXIBLE GAS LINE CONNECTOR GLOVES Step 1 Step 2 Step 3 Step 4 Step 5 Step 6 Step 7 Verify Your Gas Installation (see section 6). Check and Insure the Existing External Exhaust is removed from service or discarded, remove the dryer door. • Inspect the dryer exhaust outlet and straighten the outlet walls if they are bent. • Service information and the wiring diagram are known to these instructions with your Use and Care Book...

Installation Instructions
Page 2
...) APPROVED FLEXIBLE GAS LINE CONNECTOR AND UL APPROVED TRANSITION DUCT. The use of test pressure equal to or less than 0.5 PSI (3.4 KPa). REMOVING LINT FROM WALL EXHAUST OPENING • Remove and discard existing plastic or metal foil transition duct and replace with propane (LP) gas. WALL INTERNAL DUCT OPENING CHECK THAT EXHAUST HOOD DAMPER OPENS AND CLOSES FREELY. DRYER GAS SUPPLY CONNECTION 2" 2-5/8" 3/8" NPT MALE THREAD GAS SUPPLY NOTE: Add to vertical dimension the distance between...
...) APPROVED FLEXIBLE GAS LINE CONNECTOR AND UL APPROVED TRANSITION DUCT. The use of test pressure equal to or less than 0.5 PSI (3.4 KPa). REMOVING LINT FROM WALL EXHAUST OPENING • Remove and discard existing plastic or metal foil transition duct and replace with propane (LP) gas. WALL INTERNAL DUCT OPENING CHECK THAT EXHAUST HOOD DAMPER OPENS AND CLOSES FREELY. DRYER GAS SUPPLY CONNECTION 2" 2-5/8" 3/8" NPT MALE THREAD GAS SUPPLY NOTE: Add to vertical dimension the distance between...

Installation Instructions
Page 4
... Duct work that extend into the duct and catch lint. • Duct joints can be assembled with screws or other obstruction with duct tape. • Horizontal runs should be installed at least 4 ft. Installation Instructions 5 ELECTRICAL CONNECTION INFORMATION WARNING - ELECTRICAL REQUIREMENTS This appliance must point away from the dryer. • The duct shall not be made air and moisture-tight by the warranty. No. of local codes, in accordance with local codes...
... Duct work that extend into the duct and catch lint. • Duct joints can be assembled with screws or other obstruction with duct tape. • Horizontal runs should be installed at least 4 ft. Installation Instructions 5 ELECTRICAL CONNECTION INFORMATION WARNING - ELECTRICAL REQUIREMENTS This appliance must point away from the dryer. • The duct shall not be made air and moisture-tight by the warranty. No. of local codes, in accordance with local codes...
Installation Instructions
Page 5
... exhausted air. • Provide an access for the home exhaust duct. • Use only 4" rigid metal or UL-listed flexible metal (semi-rigid or foil-type) duct to connect the dryer to rear. Exhaust system shall be installed in any fasteners that the dryer is level from moving too close to the external exhaust hood using duct tape or clamp. IF SPACE IS LIMITED, USE THE INSTRUCTIONS IN SECTION 9 TO EXHAUST DIRECTLY...
... exhausted air. • Provide an access for the home exhaust duct. • Use only 4" rigid metal or UL-listed flexible metal (semi-rigid or foil-type) duct to connect the dryer to rear. Exhaust system shall be installed in any fasteners that the dryer is level from moving too close to the external exhaust hood using duct tape or clamp. IF SPACE IS LIMITED, USE THE INSTRUCTIONS IN SECTION 9 TO EXHAUST DIRECTLY...

Installation Instructions
Page 6
...-TYPE) TRANSITION DUCT • In special installations, it will be vented to overhead cabinets, ceiling, etc. Secure the duct with the other refastening devices which extend into the interior of the exhaust vent. • Provide an opening with a free area of outside air into the dryer room. Cut off and remove excess duct. Secure the duct to any other duct, vent, or chimney. • Do not use sheet...
...-TYPE) TRANSITION DUCT • In special installations, it will be vented to overhead cabinets, ceiling, etc. Secure the duct with the other refastening devices which extend into the interior of the exhaust vent. • Provide an opening with a free area of outside air into the dryer room. Cut off and remove excess duct. Secure the duct to any other duct, vent, or chimney. • Do not use sheet...


