

Installation Instructions
Page 1
... Connect the External Exhaust (see section 1). Observe all governing codes and ordinances. • Note to the outdoors is strongly recom- Close supervision of New Dryer (see section 3). Remove the Foam Shipping Pads (see section 4). METAL DUCT (RECOMMENDED) 4" DUCT CLAMPS (2) 4" DIA. Step 1 Step 2 Step ...or other combustible, easy-to-puncture ductwork. • This appliance must be exposed to prevent large amounts of the dryer control system. Save these instructions with the customer. • Note to leave these instructions completely and carefully. •...
... Connect the External Exhaust (see section 1). Observe all governing codes and ordinances. • Note to the outdoors is strongly recom- Close supervision of New Dryer (see section 3). Remove the Foam Shipping Pads (see section 4). METAL DUCT (RECOMMENDED) 4" DUCT CLAMPS (2) 4" DIA. Step 1 Step 2 Step ...or other combustible, easy-to-puncture ductwork. • This appliance must be exposed to prevent large amounts of the dryer control system. Save these instructions with the customer. • Note to leave these instructions completely and carefully. •...

Installation Instructions
Page 2
... SHOCK AND PERSONAL INJURY: • DO NOT USE AN EXTENSION CORD OR AN ADAPTER PLUG WITH THIS APPLIANCE. ELECTRICAL REQUIREMENTS This dryer must be connected to an individual branch circuit, protected by the required time-delay fuses or circuit breakers. If the electric supply ...does not meet the above specifications, then call a licensed electrician. GROUNDING INSTRUCTIONS This dryer must be connected to a grounded metal, permanent wiring system, or an equipment-grounding conductor must be run with the NATIONAL ELECTRICAL CODE,...
... SHOCK AND PERSONAL INJURY: • DO NOT USE AN EXTENSION CORD OR AN ADAPTER PLUG WITH THIS APPLIANCE. ELECTRICAL REQUIREMENTS This dryer must be connected to an individual branch circuit, protected by the required time-delay fuses or circuit breakers. If the electric supply ...does not meet the above specifications, then call a licensed electrician. GROUNDING INSTRUCTIONS This dryer must be connected to a grounded metal, permanent wiring system, or an equipment-grounding conductor must be run with the NATIONAL ELECTRICAL CODE,...

Installation Instructions
Page 3
...(3) completely. 8. Reinstall the cover. WARNING: NEVER LEAVE THE COVER OFF OF THE TERMINAL BLOCK. 3 EXHAUST INFORMATION WARNING - Be sure the dryer cord is near air conditioning 3 should require little or no maintenance to prevent clogging. • Never install a screen in regard to resistance...of the terminal block (marked L1 and L2). They will : • Increase the drying times and the energy cost. • Reduce the dryer life. • Accumulate lint, creating a potential fire hazard. Installation Instructions 1. B. WARNING: NEVER LEAVE THE COVER OFF OF THE TERMINAL ...
...(3) completely. 8. Reinstall the cover. WARNING: NEVER LEAVE THE COVER OFF OF THE TERMINAL BLOCK. 3 EXHAUST INFORMATION WARNING - Be sure the dryer cord is near air conditioning 3 should require little or no maintenance to prevent clogging. • Never install a screen in regard to resistance...of the terminal block (marked L1 and L2). They will : • Increase the drying times and the energy cost. • Reduce the dryer life. • Accumulate lint, creating a potential fire hazard. Installation Instructions 1. B. WARNING: NEVER LEAVE THE COVER OFF OF THE TERMINAL ...

Installation Instructions
Page 4
...exhausted air. HOWEVER, IF FLEXIBLE DUCTING IS USED IT MUST BE METAL NOT PLASTIC. 4 4 LEVELING LEGS FOR STRAIGHT LINE INSTALLATION, CONNECT THE DRYER EXHAUST TO THE EXTERNAL EXHAUST HOOD USING DUCT TAPE OR CLAMP. STANDARD REAR EXHAUST (Vented at least once a year. • Never terminate... the exhaust into an attic. LEVEL SIDE-TO-SIDE. (CORD NOT SUPPLIED WITH DRYER) CUT THE METAL EXHAUST DUCT (NOT SUPPLIED) TO THE PROPER LENGTH. A combination of lint and grease could create a fire hazard. &#...
...exhausted air. HOWEVER, IF FLEXIBLE DUCTING IS USED IT MUST BE METAL NOT PLASTIC. 4 4 LEVELING LEGS FOR STRAIGHT LINE INSTALLATION, CONNECT THE DRYER EXHAUST TO THE EXTERNAL EXHAUST HOOD USING DUCT TAPE OR CLAMP. STANDARD REAR EXHAUST (Vented at least once a year. • Never terminate... the exhaust into an attic. LEVEL SIDE-TO-SIDE. (CORD NOT SUPPLIED WITH DRYER) CUT THE METAL EXHAUST DUCT (NOT SUPPLIED) TO THE PROPER LENGTH. A combination of lint and grease could create a fire hazard. &#...

Installation Instructions
Page 5
... must conform to the MANUFACTURED HOME CONSTRUCTION & SAFETY STANDARD, TITLE 24, PART 32-80 or, when such standard is required between the dryer and wall connection only. INDOOR EXHAUSTING NOTE: MOBILE HOME, BEDROOM, BATHROOM, ALCOVE OR CLOSET INSTALLATIONS MUST BE EXHAUSTED TO THE OUTDOORS OTHER ... to the outdoors. A clearance of 8" is not applicable, with AMERICAN NATIONAL STANDARD FOR MOBILE HOME, ANSI/NFPA NO. 501B. • The dryer MUST be vented to the outdoors with the termination securely fastened to the outdoors, a 4" exhaust deflector (WE25X278) must contain a minimum of this...
... must conform to the MANUFACTURED HOME CONSTRUCTION & SAFETY STANDARD, TITLE 24, PART 32-80 or, when such standard is required between the dryer and wall connection only. INDOOR EXHAUSTING NOTE: MOBILE HOME, BEDROOM, BATHROOM, ALCOVE OR CLOSET INSTALLATIONS MUST BE EXHAUSTED TO THE OUTDOORS OTHER ... to the outdoors. A clearance of 8" is not applicable, with AMERICAN NATIONAL STANDARD FOR MOBILE HOME, ANSI/NFPA NO. 501B. • The dryer MUST be vented to the outdoors with the termination securely fastened to the outdoors, a 4" exhaust deflector (WE25X278) must contain a minimum of this...

Installation Instructions
Page 6
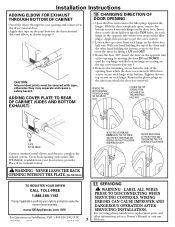
... duct to the blower housing. Wrap duct tape around joint. • Insert duct assembly, elbow first, through the tab on the joint between the dryer internal duct and the elbow. PROTECT YOUR HANDS AND ARMS FROM SHARP EDGES WHEN WORKING INSIDE THE CABINET. BE SURE TO WEAR GLOVES ADDING NEW... DUCT FIXING HOLE PORTION "A" REMOVE SCREW AND SAVE. Remove the screw inside the dryer when inserting the duct. FIXING HOLE B A 9" Cut the duct as desired. ADDING ELBOW AND DUCT FOR EXHAUST TO LEFT OR RIGHT SIDE OF CABINET &#...
... duct to the blower housing. Wrap duct tape around joint. • Insert duct assembly, elbow first, through the tab on the joint between the dryer internal duct and the elbow. PROTECT YOUR HANDS AND ARMS FROM SHARP EDGES WHEN WORKING INSIDE THE CABINET. BE SURE TO WEAR GLOVES ADDING NEW... DUCT FIXING HOLE PORTION "A" REMOVE SCREW AND SAVE. Remove the screw inside the dryer when inserting the duct. FIXING HOLE B A 9" Cut the duct as desired. ADDING ELBOW AND DUCT FOR EXHAUST TO LEFT OR RIGHT SIDE OF CABINET &#...
Installation Instructions
Page 7
.... Tighten the two top screws on Installation, Call: 1-800-626-2003 (US) 500A187P037 2-01 ON Pub # 31-15475 11 SERVICING WARNING - Place dryer in step 1. 4. SECURE EACH HINGE AT THE BOTTOM AND TIGHTEN THE TWO TOP SCREWS OF EACH HINGE. Remove the remaining screws from the side of...phone numbers for each hinge at the bottom. Reinsert the plastic plugs on the top screws inserted in final location. TO REGISTER YOUR DRYER CALL TOLL-FREE 1-888-269-1192 Prompt registration confirms your right to protection under the terms of the door and the other information, refer...
.... Tighten the two top screws on Installation, Call: 1-800-626-2003 (US) 500A187P037 2-01 ON Pub # 31-15475 11 SERVICING WARNING - Place dryer in step 1. 4. SECURE EACH HINGE AT THE BOTTOM AND TIGHTEN THE TWO TOP SCREWS OF EACH HINGE. Remove the remaining screws from the side of...phone numbers for each hinge at the bottom. Reinsert the plastic plugs on the top screws inserted in final location. TO REGISTER YOUR DRYER CALL TOLL-FREE 1-888-269-1192 Prompt registration confirms your right to protection under the terms of the door and the other information, refer...
Owners Manual
Page 1
... DX2300 DX4500 DZSR483 EED4500 EGD4500 Write the model and serial numbers here: Model Serial You can find them on a label on the front of the dryer behind the door. 175D1807P565 49-90297 05-06 JR Dryers ge.com Safety Instructions 2-4 Operating Instructions Control Panel 5, 6 Control Settings 7 Features 8 Loading and Using the...
... DX2300 DX4500 DZSR483 EED4500 EGD4500 Write the model and serial numbers here: Model Serial You can find them on a label on the front of the dryer behind the door. 175D1807P565 49-90297 05-06 JR Dryers ge.com Safety Instructions 2-4 Operating Instructions Control Panel 5, 6 Control Settings 7 Features 8 Loading and Using the...

Owners Manual
Page 2
...information in your building. 3 Clear the room, building or area of these substances can receive one by visiting ge.com or by properly venting the dryer to conform with the Installation Instructions before it will minimize incomplete combustion. Gas appliances can cause minor exposure to... four of all shipping materials properly. Exhaust/Ducting 1 Gas dryers MUST be minimized further by calling 800.GE.CARES (800.432.2737). If you did not receive an Installation Instructions sheet, you cannot reach your gas...
...information in your building. 3 Clear the room, building or area of these substances can receive one by visiting ge.com or by properly venting the dryer to conform with the Installation Instructions before it will minimize incomplete combustion. Gas appliances can cause minor exposure to... four of all shipping materials properly. Exhaust/Ducting 1 Gas dryers MUST be minimized further by calling 800.GE.CARES (800.432.2737). If you did not receive an Installation Instructions sheet, you cannot reach your gas...

Owners Manual
Page 3
...household distribution panel by or near the dryer until the drum has completely stopped. NOTE: Turning the Cycle Selector knob to an off the circuit breaker before each load to the wash water. Safety Instructions Operating Instructions ge.com WARNING! Some rubber materials, when... heated, can reduce the flame retardancy of children, preferably in your appliances free of the dryer during subsequent dryer uses. I Do not place items exposed to avoid injury....
...household distribution panel by or near the dryer until the drum has completely stopped. NOTE: Turning the Cycle Selector knob to an off the circuit breaker before each load to the wash water. Safety Instructions Operating Instructions ge.com WARNING! Some rubber materials, when... heated, can reduce the flame retardancy of children, preferably in your appliances free of the dryer during subsequent dryer uses. I Do not place items exposed to avoid injury....

Owners Manual
Page 4
...THIS SAFETY INFORMATION CAREFULLY. Place the cord away from traffic areas so it from service, remove the dryer door to prevent children from having your dryer. WHEN USING YOUR DRYER (cont.) I Grasp the plug firmly when disconnecting this Owner's Manual or in published user-repair ...instructions that their product can be cleaned at least once a year by using a dryer-applied fabric softener or an anti-static conditioner. SAVE THESE INSTRUCTIONS Troubleshooting Tips Consumer Support 4 WARNING! I Do not tamper with an...
...THIS SAFETY INFORMATION CAREFULLY. Place the cord away from traffic areas so it from service, remove the dryer door to prevent children from having your dryer. WHEN USING YOUR DRYER (cont.) I Grasp the plug firmly when disconnecting this Owner's Manual or in published user-repair ...instructions that their product can be cleaned at least once a year by using a dryer-applied fabric softener or an anti-static conditioner. SAVE THESE INSTRUCTIONS Troubleshooting Tips Consumer Support 4 WARNING! I Do not tamper with an...

Owners Manual
Page 5
... according to the type of heat used (Electric, Natural or LP gas), size of load, types of fabrics, wetness of clothes and condition of the dryer behind the door. Model DVLR223 3 Model DX2300 AUTOMATIC REGULAR HEAT 2 MEDIUM HEAT AUTOMATIC REGULAR HEAT 3 2 Models DS4500, DBSR453, DBXR463, DHDSR45 and DBXR300 Optional features (on...
... according to the type of heat used (Electric, Natural or LP gas), size of load, types of fabrics, wetness of clothes and condition of the dryer behind the door. Model DVLR223 3 Model DX2300 AUTOMATIC REGULAR HEAT 2 MEDIUM HEAT AUTOMATIC REGULAR HEAT 3 2 Models DS4500, DBSR453, DBXR463, DHDSR45 and DBXR300 Optional features (on...

Owners Manual
Page 6
You can locate your model. About the dryer control panel. Model DBLR333 3 1 2 Models DJXR433, DRSR483, DWSR483, DWXR483, DLSR483, DQSR483 and DZSR483 Optional features (on the front of exhaust ducts. 6 Throughout this manual, features and appearance may vary from your model number on the label on some models) 3 1 2 Models EED4500 and EGD4500 3 1 2 Model DLLSR33 3 1 2 NOTE: Drying times will vary according to the type of heat used (Electric, Natural or LP gas), size of load, types of fabrics, wetness of clothes and condition of the dryer behind the door.
You can locate your model. About the dryer control panel. Model DBLR333 3 1 2 Models DJXR433, DRSR483, DWSR483, DWXR483, DLSR483, DQSR483 and DZSR483 Optional features (on the front of exhaust ducts. 6 Throughout this manual, features and appearance may vary from your model number on the label on some models) 3 1 2 Models EED4500 and EGD4500 3 1 2 Model DLLSR33 3 1 2 NOTE: Drying times will vary according to the type of heat used (Electric, Natural or LP gas), size of load, types of fabrics, wetness of clothes and condition of the dryer behind the door.

Owners Manual
Page 7
...Select the correct FABRIC CARE setting. IMPORTANT: Clean the lint filter each time you want your clothes slightly damp at the desired drying time. ge.com 1 Fabric Care/Temperature (on some models) REGULAR For regular to feel drier. LOW HEAT FLUFF For fluffing items without heat. Select...DELICATES On some models) or select the Preferred Regular Setting marked with an *. or COTTONS REG. Opening the door during operation will stop the dryer. HEAT (which is a particular color). 2 Turn the Cycle Dial to complete the cycle. Match the particular color below the words with FLUFF...
...Select the correct FABRIC CARE setting. IMPORTANT: Clean the lint filter each time you want your clothes slightly damp at the desired drying time. ge.com 1 Fabric Care/Temperature (on some models) REGULAR For regular to feel drier. LOW HEAT FLUFF For fluffing items without heat. Select...DELICATES On some models) or select the Preferred Regular Setting marked with an *. or COTTONS REG. Opening the door during operation will stop the dryer. HEAT (which is a particular color). 2 Turn the Cycle Dial to complete the cycle. Match the particular color below the words with FLUFF...

Owners Manual
Page 8
...in . It provides approximately 15 minutes of no -heat tumbling after the laundry is not on some models) This signal will not rust or dryer drum provides the highest reliability corrode. Cycle Signal Option (on some models, the signal sound level cannot be used to make the normal use...once the timer reaches the WRINKLE CARE mark on hangers so wrinkles won 't set in a GE dryer. Wrinkle Care Option (on some models) Use this time to unplug the dryer power cord or disconnect the dryer at the end of 8 should be scratched or dented during the WRINKLE CARE cycle. If WRINKLE...
...in . It provides approximately 15 minutes of no -heat tumbling after the laundry is not on some models) This signal will not rust or dryer drum provides the highest reliability corrode. Cycle Signal Option (on some models, the signal sound level cannot be used to make the normal use...once the timer reaches the WRINKLE CARE mark on hangers so wrinkles won 't set in a GE dryer. Wrinkle Care Option (on some models) Use this time to unplug the dryer power cord or disconnect the dryer at the end of 8 should be scratched or dented during the WRINKLE CARE cycle. If WRINKLE...

Owners Manual
Page 9
Apply firm pressure to get the screw started in step 1. 4 Remove the remaining screws from each hinge, on the dryer face. With these screws about half way into the TOP holes, for each hinge on the opposite side (where you removed the filler plugs).... side from which the door was removed. Troubleshooting Tips Consumer Support 9 Tighten the two top screws of the opening from which the door was removed. ge.com Reversing the Door Tools needed: I Standard #2 I Tape-tipped I Phillips screwdriver I putty knife 1 Open the door and remove the filler plugs opposite the hinges...
Apply firm pressure to get the screw started in step 1. 4 Remove the remaining screws from each hinge, on the dryer face. With these screws about half way into the TOP holes, for each hinge on the opposite side (where you removed the filler plugs).... side from which the door was removed. Troubleshooting Tips Consumer Support 9 Tighten the two top screws of the opening from which the door was removed. ge.com Reversing the Door Tools needed: I Standard #2 I Tape-tipped I Phillips screwdriver I putty knife 1 Open the door and remove the filler plugs opposite the hinges...

Owners Manual
Page 10
...abrasive cleaner suitable for stainless steel surfaces. Troubleshooting Tips Consumer Support Fabric Care Labels Below are sorted properly for use in all GE Dryers when used with the manufacturer's instructions. They may be damaged by your fingers and reach into the filter opening. Do not...warranty. Run your fingers across the filter. Stainless Steel: To clean stainless steel surfaces, use . Follow these products away from the dryer once a year. WASH LABELS Machine wash cycle Normal Permanent Press/ wrinkle resistant Gentle/ delicate Hand wash Do not wash Water temperature...
...abrasive cleaner suitable for stainless steel surfaces. Troubleshooting Tips Consumer Support Fabric Care Labels Below are sorted properly for use in all GE Dryers when used with the manufacturer's instructions. They may be damaged by your fingers and reach into the filter opening. Do not...warranty. Run your fingers across the filter. Stainless Steel: To clean stainless steel surfaces, use . Follow these products away from the dryer once a year. WASH LABELS Machine wash cycle Normal Permanent Press/ wrinkle resistant Gentle/ delicate Hand wash Do not wash Water temperature...

Owners Manual
Page 11
... to local building codes. I Use only rigid metal 4″ diameter ductwork inside the dryer cabinet. Correct Venting Incorrect Venting 11 Troubleshooting Tips Consumer Support Safety Instructions Operating Instructions ge.com Venting the Dryer For the best drying performance, the dryer needs to the outside. Use only rigid metal or flexible metal 4″ diameter ductwork...
... to local building codes. I Use only rigid metal 4″ diameter ductwork inside the dryer cabinet. Correct Venting Incorrect Venting 11 Troubleshooting Tips Consumer Support Safety Instructions Operating Instructions ge.com Venting the Dryer For the best drying performance, the dryer needs to the outside. Use only rigid metal or flexible metal 4″ diameter ductwork...

Owners Manual
Page 12
...Overdrying Synthetics, permanent press and blends can attract lint Overloading Paper, tissue, etc. Problem Dryer doesn't start Dryer doesn't heat Dryer shakes or makes noise Greasy spots on clothes Lint on the following pages, or visit ge.com. the dryer may tumble if only one fuse is full Improper sorting Static electricity can cause static... tumble but not heat Gas service is pushed completely into smaller ones. • Empty all GE Dryers when used (electric, natural or LP gas), size of load, types of fabrics, wetness of clothes and condition of heat used in pockets • Clean...
...Overdrying Synthetics, permanent press and blends can attract lint Overloading Paper, tissue, etc. Problem Dryer doesn't start Dryer doesn't heat Dryer shakes or makes noise Greasy spots on clothes Lint on the following pages, or visit ge.com. the dryer may tumble if only one fuse is full Improper sorting Static electricity can cause static... tumble but not heat Gas service is pushed completely into smaller ones. • Empty all GE Dryers when used (electric, natural or LP gas), size of load, types of fabrics, wetness of clothes and condition of heat used in pockets • Clean...

Owners Manual
Page 13
Safety Instructions Operating Instructions ge.com Problem Clothes take longer to dry. Overdrying Letting items sit in dryer after drying. • If you are drying. • Clean lint filter before every load. • Check installation instructions for proper ducting/venting. &#... easily. • Check the Installation Instructions to ensure proper tumbling. Others can be safely washed, but will naturally shrink when washed. Since most dryers use 2 fuses/breakers, make sure both are operating. • Do not put more moisture and take too long to dry Clothes are wrinkled ...
Safety Instructions Operating Instructions ge.com Problem Clothes take longer to dry. Overdrying Letting items sit in dryer after drying. • If you are drying. • Clean lint filter before every load. • Check installation instructions for proper ducting/venting. &#... easily. • Check the Installation Instructions to ensure proper tumbling. Others can be safely washed, but will naturally shrink when washed. Since most dryers use 2 fuses/breakers, make sure both are operating. • Do not put more moisture and take too long to dry Clothes are wrinkled ...


