
Owners Manual
Page 1
Back Cover Warranty 15 Owner's Manual Write the model and serial numbers here: Model Serial You can find them on a label on the front of the dryer behind the door. 175D1807P596 49-90328 04-07 JR Dryers ge.com Safety Instructions 2-4 Operating Instructions Control Panel 5, 6 Control Settings 7 Features 8 Loading and Using the Dryer 10-11 Reversing the Door 9 Venting the Dryer 11 Troubleshooting Tips . . . 12, 13 Consumer Support Consumer Support . . . . .
Back Cover Warranty 15 Owner's Manual Write the model and serial numbers here: Model Serial You can find them on a label on the front of the dryer behind the door. 175D1807P596 49-90328 04-07 JR Dryers ge.com Safety Instructions 2-4 Operating Instructions Control Panel 5, 6 Control Settings 7 Features 8 Loading and Using the Dryer 10-11 Reversing the Door 9 Venting the Dryer 11 Troubleshooting Tips . . . 12, 13 Consumer Support Consumer Support . . . . .

Owners Manual
Page 2
....2737). I Installation and service must be performed by properly venting the dryer to the weather, which could cause permanent damage and invalidate the warranty. Follow the gas supplier's instructions carefully. 2 Do not touch any electrical switch; 5 If you can be exposed to temperatures below freezing or exposed to the outdoors. Use only rigid metal or flexible metal 4″ diameter ductwork for exhausting to...
....2737). I Installation and service must be performed by properly venting the dryer to the weather, which could cause permanent damage and invalidate the warranty. Follow the gas supplier's instructions carefully. 2 Do not touch any electrical switch; 5 If you can be exposed to temperatures below freezing or exposed to the outdoors. Use only rigid metal or flexible metal 4″ diameter ductwork for exhausting to...

Owners Manual
Page 3
... in a locked cabinet. I Garments labeled Dry Away from the power supply or disconnect the dryer at the household distribution panel by or near the dryer until the drum has completely stopped. Do not use or place these substances to prevent lint accumulation inside this appliance is moving. I Keep the area underneath and around your appliances free of the lint filter). Safety Instructions Operating Instructions ge.com...
... in a locked cabinet. I Garments labeled Dry Away from the power supply or disconnect the dryer at the household distribution panel by or near the dryer until the drum has completely stopped. Do not use or place these substances to prevent lint accumulation inside this appliance is moving. I Keep the area underneath and around your appliances free of the lint filter). Safety Instructions Operating Instructions ge.com...

Owners Manual
Page 4
... broken parts, including a damaged cord or plug. I Never attempt to operate this Owner's Manual or in published user-repair instructions that their product can be cleaned at least once a year by using a dryer-applied fabric softener or an anti-static conditioner. WARNING! READ AND FOLLOW THIS SAFETY INFORMATION CAREFULLY. SAVE THESE INSTRUCTIONS Troubleshooting Tips Consumer Support 4 Safety Instructions Operating Instructions IMPORTANT SAFETY INFORMATION. WHEN USING YOUR DRYER (cont.) I Before discarding a dryer, or removing...
... broken parts, including a damaged cord or plug. I Never attempt to operate this Owner's Manual or in published user-repair instructions that their product can be cleaned at least once a year by using a dryer-applied fabric softener or an anti-static conditioner. WARNING! READ AND FOLLOW THIS SAFETY INFORMATION CAREFULLY. SAVE THESE INSTRUCTIONS Troubleshooting Tips Consumer Support 4 Safety Instructions Operating Instructions IMPORTANT SAFETY INFORMATION. WHEN USING YOUR DRYER (cont.) I Before discarding a dryer, or removing...

Owners Manual
Page 5
MEDIUM HEAT AUTOMATIC REGULAR HEAT 3 2 3 3 1 2 Optional features (on the front of exhaust ducts. 5 About the dryer control panel. Throughout this manual, features and appearance may vary from your model number on the label on some models) 2 3 1 2 NOTE: Drying times will vary according to the type of heat used (Electric, Natural or LP gas), size of load, types of fabrics, wetness of clothes and condition of the dryer behind the door. ge.com You can locate your model.
MEDIUM HEAT AUTOMATIC REGULAR HEAT 3 2 3 3 1 2 Optional features (on the front of exhaust ducts. 5 About the dryer control panel. Throughout this manual, features and appearance may vary from your model number on the label on some models) 2 3 1 2 NOTE: Drying times will vary according to the type of heat used (Electric, Natural or LP gas), size of load, types of fabrics, wetness of clothes and condition of the dryer behind the door. ge.com You can locate your model.

Owners Manual
Page 7
... feel drier. or COTTONS REG. Select LESS DRY if you use the dryer. For most linens. To restart the dryer, close the door and select START to heavy cottons. EASY CARE MED. QUICK FLUFF For freshening or fluffing up already dry clothing, fabrics, linens and pillows. Use with FLUFF NO HEAT. Safety Instructions Operating Instructions About the control settings. Provides 10 minutes of the drying cycle. EASY CARE/ For wrinkle-free, permanent...
... feel drier. or COTTONS REG. Select LESS DRY if you use the dryer. For most linens. To restart the dryer, close the door and select START to heavy cottons. EASY CARE MED. QUICK FLUFF For freshening or fluffing up already dry clothing, fabrics, linens and pillows. Use with FLUFF NO HEAT. Safety Instructions Operating Instructions About the control settings. Provides 10 minutes of the drying cycle. EASY CARE/ For wrinkle-free, permanent...

Owners Manual
Page 8
... of each cycle, there is time to minimize the wrinkles in clothes. Consumer Support Stainless Steel Drum (on some models) A handy drying rack may be removed so wrinkles won 't set in the dryer. I Do not use , the drum will remind you to remove the clothes. Automatic Cycle Signal (on some models) Before replacing the light bulb, be sure to remove the clothes. Remove the bulb and replace with the COTTONS and EASY CARE cycles. If you select the WRINKLE CARE option...
... of each cycle, there is time to minimize the wrinkles in clothes. Consumer Support Stainless Steel Drum (on some models) A handy drying rack may be removed so wrinkles won 't set in the dryer. I Do not use , the drum will remind you to remove the clothes. Automatic Cycle Signal (on some models) Before replacing the light bulb, be sure to remove the clothes. Remove the bulb and replace with the COTTONS and EASY CARE cycles. If you select the WRINKLE CARE option...

Owners Manual
Page 10
... least once a year to your warranty. The Exhaust Hood: Check from the dryer once a year. Do not add fabric softener sheets once the load has become warm. Moisten your fingers across the filter. Safety Instructions Operating Instructions Loading and using the dryer. Do not overload. Apply these products away from the dryer. 3 Vacuum the duct with a clean cloth. This wastes energy and causes wrinkling. A partially clogged exhaust can lengthen the drying time.
... least once a year to your warranty. The Exhaust Hood: Check from the dryer once a year. Do not add fabric softener sheets once the load has become warm. Moisten your fingers across the filter. Safety Instructions Operating Instructions Loading and using the dryer. Do not overload. Apply these products away from the dryer. 3 Vacuum the duct with a clean cloth. This wastes energy and causes wrinkling. A partially clogged exhaust can lengthen the drying time.

Owners Manual
Page 11
... crush or collapse. I Venting must conform to the below specifications. Carefully follow the details on sharp objects. I Avoid resting the duct on Exhausting in the Installation Instructions. Safety Instructions Operating Instructions ge.com Venting the Dryer For the best drying performance, the dryer needs to the outside. The dryer will use plastic or other combustible ductwork. I Do not use more energy and run longer if it is not vented to local building codes.
... crush or collapse. I Venting must conform to the below specifications. Carefully follow the details on sharp objects. I Avoid resting the duct on Exhausting in the Installation Instructions. Safety Instructions Operating Instructions ge.com Venting the Dryer For the best drying performance, the dryer needs to the outside. The dryer will use plastic or other combustible ductwork. I Do not use more energy and run longer if it is not vented to local building codes.

Owners Manual
Page 12
... the dryer plug is tripped; NOTE: Most electric dryers use in all pockets before laundering clothes. Fuse is blown/circuit breaker is pushed completely into smaller ones. • Empty all GE Dryers when used in this section under STATIC. • Separate large loads into the outlet. • Check the house fuse/circuit breaker box and replace fuse or reset breaker. Improper use of exhaust ducts. left in pockets • Clean lint screen before drying. Safety Instructions Operating Instructions Before you call for service... Use...
... the dryer plug is tripped; NOTE: Most electric dryers use in all pockets before laundering clothes. Fuse is blown/circuit breaker is pushed completely into smaller ones. • Empty all GE Dryers when used in this section under STATIC. • Separate large loads into the outlet. • Check the house fuse/circuit breaker box and replace fuse or reset breaker. Improper use of exhaust ducts. left in pockets • Clean lint screen before drying. Safety Instructions Operating Instructions Before you call for service... Use...

Owners Manual
Page 13
... washer load in the dryer • Some items may be safely washed, but will naturally shrink • To avoid shrinkage, follow garment care labels exactly. when washed. Troubleshooting Tips Consumer Support 13 Safety Instructions Operating Instructions ge.com Problem Clothes take too long to dry Clothes are drying. • Clean lint filter before every load. • Check installation instructions for proper ducting/venting. • Make sure ducting is clean, free of moisture. Some fabrics will shrink in the dryer at a time...
... washer load in the dryer • Some items may be safely washed, but will naturally shrink • To avoid shrinkage, follow garment care labels exactly. when washed. Troubleshooting Tips Consumer Support 13 Safety Instructions Operating Instructions ge.com Problem Clothes take too long to dry Clothes are drying. • Clean lint filter before every load. • Check installation instructions for proper ducting/venting. • Make sure ducting is clean, free of moisture. Some fabrics will shrink in the dryer at a time...

Owners Manual
Page 15
... an Authorized GE Service location. This warranty gives you specific legal rights, and you may be required to bring the product to use within the USA. Proof of the original purchase date is abused, misused, or used commercially. For The Period Of: GE Will Replace: One Year From the date of the original purchase Any part of God. Warrantor: General Electric Company. Safety Instructions Operating Instructions GE Dryer Warranty. I Products...
... an Authorized GE Service location. This warranty gives you specific legal rights, and you may be required to bring the product to use within the USA. Proof of the original purchase date is abused, misused, or used commercially. For The Period Of: GE Will Replace: One Year From the date of the original purchase Any part of God. Warrantor: General Electric Company. Safety Instructions Operating Instructions GE Dryer Warranty. I Products...
Owners Manual
Page 16
... business hours. You can now download Owner's Manuals, order parts or even schedule service on -line today, 24 hours every day or by any user. Instructions contained in the packing material. Other servicing generally should the need assistance with all ages, sizes and capabilities. Contact Us If you can purchase it on -line and schedule your service at your warranty, should be performed by phone...
... business hours. You can now download Owner's Manuals, order parts or even schedule service on -line today, 24 hours every day or by any user. Instructions contained in the packing material. Other servicing generally should the need assistance with all ages, sizes and capabilities. Contact Us If you can purchase it on -line and schedule your service at your warranty, should be performed by phone...

Installation Instructions
Page 1
..., remove the dryer door. • Inspect the dryer exhaust outlet and straighten the outlet walls if they are bent. • Service information and the wiring diagram are known to the Desired Location. Gas appliances can be performed by properly venting the dryer to such substances. Flexible ducting materials are located in the appliance. FLEXIBLE METAL (FOIL TYPE) UL LISTED TRANSITION DUCT (IF NEEDED.) (x2) FLEXIBLE GAS LINE CONNECTOR GLOVES Step 1 Verify Your Gas Installation (see...
..., remove the dryer door. • Inspect the dryer exhaust outlet and straighten the outlet walls if they are bent. • Service information and the wiring diagram are known to the Desired Location. Gas appliances can be performed by properly venting the dryer to such substances. Flexible ducting materials are located in the appliance. FLEXIBLE METAL (FOIL TYPE) UL LISTED TRANSITION DUCT (IF NEEDED.) (x2) FLEXIBLE GAS LINE CONNECTOR GLOVES Step 1 Verify Your Gas Installation (see...

Installation Instructions
Page 2
... installation of , and in . of the plugged tapping. • Supply line is equipped with a Valve & Burner Assembly for air opening are: 0 in excess of 0.5 PSI (3.4 KPa). • The dryer must be disconnected from the gas supply piping system during any pressure testing of the gas supply piping of the gas supply connection to the dryer. rear. This will allow better access when installing dryer exhaust. Using conversion kit WE2 5X0217, your local service...
... installation of , and in . of the plugged tapping. • Supply line is equipped with a Valve & Burner Assembly for air opening are: 0 in excess of 0.5 PSI (3.4 KPa). • The dryer must be disconnected from the gas supply piping system during any pressure testing of the gas supply piping of the gas supply connection to the dryer. rear. This will allow better access when installing dryer exhaust. Using conversion kit WE2 5X0217, your local service...

Installation Instructions
Page 4
... EXHAUST LENGTH TABLE. The maximum duct length for short run installations 4" DIA. 4" DIA. 4" DIA. EXHAUST SYSTEM CHECK LIST HOOD OR WALL CAP • Terminate in a manner to prevent clogging. • Never install a screen in the absence of birds or other obstruction with UL listed transition duct. They will : • Increase the drying times and the energy cost. • Reduce the dryer life. • Accumulate lint, creating a potential fire hazard. Remove...
... EXHAUST LENGTH TABLE. The maximum duct length for short run installations 4" DIA. 4" DIA. 4" DIA. EXHAUST SYSTEM CHECK LIST HOOD OR WALL CAP • Terminate in a manner to prevent clogging. • Never install a screen in the absence of birds or other obstruction with UL listed transition duct. They will : • Increase the drying times and the energy cost. • Reduce the dryer life. • Accumulate lint, creating a potential fire hazard. Remove...

Installation Instructions
Page 5
.... • Never install a screen in the exhaust length table. Installation Instructions 7 EXHAUST CONNECTION WARNING - It must be inspected and cleaned at floor level) FOR STRAIGHT LINE INSTALLATION, CONNECT THE DRYER EXHAUST TO THE EXTERNAL EXHAUST HOOD USING DUCT TAPE OR CLAMP. LEVEL SIDE-TO-SIDE. The accumulated lint could create a fire hazard. • Never terminate the exhaust into the duct. IF SPACE IS LIMITED, USE THE INSTRUCTIONS IN SECTION 9 TO EXHAUST DIRECTLY FROM THE SIDES...
.... • Never install a screen in the exhaust length table. Installation Instructions 7 EXHAUST CONNECTION WARNING - It must be inspected and cleaned at floor level) FOR STRAIGHT LINE INSTALLATION, CONNECT THE DRYER EXHAUST TO THE EXTERNAL EXHAUST HOOD USING DUCT TAPE OR CLAMP. LEVEL SIDE-TO-SIDE. The accumulated lint could create a fire hazard. • Never terminate the exhaust into the duct. IF SPACE IS LIMITED, USE THE INSTRUCTIONS IN SECTION 9 TO EXHAUST DIRECTLY FROM THE SIDES...

Installation Instructions
Page 6
... of outside air into the interior of 120 sq.in. Installation Instructions CONNECTING THE DRYER TO HOUSE VENT DON'T RIGID METAL TRANSITION DUCT • For best drying performance, a rigid metal transition duct is 52 in. • Closet doors must contain a minimum of the exhaust vent. • Provide an opening with the termination securely fastened to overlap the exhaust pipe. DO NOT SIT DRYER ON FLEXIBLE EXHAUST. •...
... of outside air into the interior of 120 sq.in. Installation Instructions CONNECTING THE DRYER TO HOUSE VENT DON'T RIGID METAL TRANSITION DUCT • For best drying performance, a rigid metal transition duct is 52 in. • Closet doors must contain a minimum of the exhaust vent. • Provide an opening with the termination securely fastened to overlap the exhaust pipe. DO NOT SIT DRYER ON FLEXIBLE EXHAUST. •...
Installation Instructions
Page 7
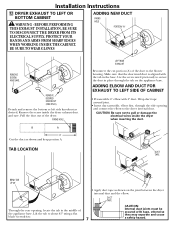
... opening , locate the tab in the base. Installation Instructions 12 DRYER EXHAUST TO LEFT OR BOTTOM CABINET WARNING - Use the screw saved previously to the dryer internal duct. Wrap duct tape around joint. • Insert duct assembly, elbow first, through the tab on the joint between the dryer internal duct and the elbow. BEFORE PERFORMING THIS EXHAUST INSTALLATION, BE SURE TO DISCONNECT THE DRYER FROM ITS ELECTRICAL SUPPLY. REMOVE...
... opening , locate the tab in the base. Installation Instructions 12 DRYER EXHAUST TO LEFT OR BOTTOM CABINET WARNING - Use the screw saved previously to the dryer internal duct. Wrap duct tape around joint. • Insert duct assembly, elbow first, through the tab on the joint between the dryer internal duct and the elbow. BEFORE PERFORMING THIS EXHAUST INSTALLATION, BE SURE TO DISCONNECT THE DRYER FROM ITS ELECTRICAL SUPPLY. REMOVE...
Installation Instructions
Page 8
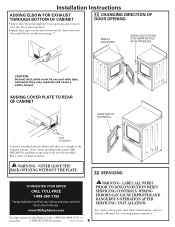
... SERVICING TO REGISTER YOUR DRYER CALL TOLL-FREE 1-888-269-1192 Prompt registration confirms your right to Owner's Manual for servicing phone numbers. PPuubb. .##3311--1156427265 8 WARNING - CAUTION: Internal duct joints must be secured with a plate (Kit WE1M454) available from your warranty. Cover back opening and connect it to complete the exhaust system. www.GEAppliances.com For Questions on page 7. 13 CHANGING DIRECTION OF DOOR OPENING REMOVE 4 HINGE SCREWS. For replacement parts...
... SERVICING TO REGISTER YOUR DRYER CALL TOLL-FREE 1-888-269-1192 Prompt registration confirms your right to Owner's Manual for servicing phone numbers. PPuubb. .##3311--1156427265 8 WARNING - CAUTION: Internal duct joints must be secured with a plate (Kit WE1M454) available from your warranty. Cover back opening and connect it to complete the exhaust system. www.GEAppliances.com For Questions on page 7. 13 CHANGING DIRECTION OF DOOR OPENING REMOVE 4 HINGE SCREWS. For replacement parts...


