Quick Specs
Page 1
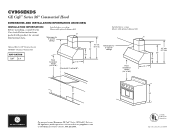
...' ceilings 12 18 Hood Installation Height (24" to your Monogram, GE Café™ Series, GE Profile™ Series or GE Appliances product questions, visit our website at geappliances.com or call GE Answer Center® Service, 800.626.2000. 36 Listed by Underwriters Laboratories Specification Created 6/16 CV966EKDS GE Café™ Series 36" Commercial Hood DIMENSIONS AND INSTALLATION INFORMATION (IN INCHES) INSTALLATION INFORMATION: Before installing, consult Use & Care/installation instructions packed with optional chimney kit) 11 Optional Kits...
...' ceilings 12 18 Hood Installation Height (24" to your Monogram, GE Café™ Series, GE Profile™ Series or GE Appliances product questions, visit our website at geappliances.com or call GE Answer Center® Service, 800.626.2000. 36 Listed by Underwriters Laboratories Specification Created 6/16 CV966EKDS GE Café™ Series 36" Commercial Hood DIMENSIONS AND INSTALLATION INFORMATION (IN INCHES) INSTALLATION INFORMATION: Before installing, consult Use & Care/installation instructions packed with optional chimney kit) 11 Optional Kits...
Quick Specs
Page 2
... cooking surface Night light - Exhausts from the top of the kitchen air Vertical exhaust - Helps effectively remove smoke, grease, odors and moisture Four-speed fan control - Collects grease and removes for easy cleaning Model CV966EKDS - Black Slate For answers to your Monogram, GE Café™ Series, GE Profile™ Series or GE Appliances product questions, visit our website at night Removable grease filter - Helps draw smoke, grease, odors and moisture out of the hood Dual halogen cooktop light - CV936M Specification...
... cooking surface Night light - Exhausts from the top of the kitchen air Vertical exhaust - Helps effectively remove smoke, grease, odors and moisture Four-speed fan control - Collects grease and removes for easy cleaning Model CV966EKDS - Black Slate For answers to your Monogram, GE Café™ Series, GE Profile™ Series or GE Appliances product questions, visit our website at night Removable grease filter - Helps draw smoke, grease, odors and moisture out of the hood Dual halogen cooktop light - CV936M Specification...
Use and Care Manual
Page 1
... consultar una version en español de este manual de instrucciones, visite nuestro sitio de internet GEAppliances.com. Vented RANGE HOODS SAFETY INFORMATION 3 USING THE HOOD Controls 5 CARE AND CLEANING Filters 6 Surfaces 6 Lights 7 INSTALLATION INSTRUCTIONS . . 8 TROUBLESHOOTING TIPS 20 WARRANTY 21 ACCESSORIES 22 CONSUMER SUPPORT 24 OWNER'S MANUAL & INSTALLATION INSTRUCTIONS JV936 JV966 CV936 CV966 Write the model and serial numbers here: Model Serial You can find them on a label on the inside of the General Electric Company.
... consultar una version en español de este manual de instrucciones, visite nuestro sitio de internet GEAppliances.com. Vented RANGE HOODS SAFETY INFORMATION 3 USING THE HOOD Controls 5 CARE AND CLEANING Filters 6 Surfaces 6 Lights 7 INSTALLATION INSTRUCTIONS . . 8 TROUBLESHOOTING TIPS 20 WARRANTY 21 ACCESSORIES 22 CONSUMER SUPPORT 24 OWNER'S MANUAL & INSTALLATION INSTRUCTIONS JV936 JV966 CV936 CV966 Write the model and serial numbers here: Model Serial You can find them on a label on the inside of the General Electric Company.

Use and Care Manual
Page 3
... ALL INSTRUCTIONS BEFORE USING WARNING TO REDUCE THE RISK OF FIRE, ELECTRIC SHOCK OR INJURY TO PERSONS, OBSERVE THE FOLLOWING: A. B. Do not use cookware appropriate for the size of fire and to duct air outside. SMOTHER FLAMES with your back to the service panel. Use an extinguisher ONLY if: 1. The fire is being switched on high heat or when flambéing food (i.e. Clean ventilating fans...
... ALL INSTRUCTIONS BEFORE USING WARNING TO REDUCE THE RISK OF FIRE, ELECTRIC SHOCK OR INJURY TO PERSONS, OBSERVE THE FOLLOWING: A. B. Do not use cookware appropriate for the size of fire and to duct air outside. SMOTHER FLAMES with your back to the service panel. Use an extinguisher ONLY if: 1. The fire is being switched on high heat or when flambéing food (i.e. Clean ventilating fans...

Use and Care Manual
Page 4
... specifically recommended in accordance with a soft cloth and allow to a qualified technician. Ducted fans must be referred to soak. NOTE: The adhesive must be vented to adjacent rooms while working. SAFETY INFORMATION IMPORTANT SAFETY INFORMATION READ ALL INSTRUCTIONS BEFORE USING WARNING TO REDUCE THE RISK OF FIRE, ELECTRIC SHOCK OR INJURY TO PERSONS, OBSERVE THE FOLLOWING: A. E. Remove all parts. D. C. B. Installation work and electrical wiring...
... specifically recommended in accordance with a soft cloth and allow to a qualified technician. Ducted fans must be referred to soak. NOTE: The adhesive must be vented to adjacent rooms while working. SAFETY INFORMATION IMPORTANT SAFETY INFORMATION READ ALL INSTRUCTIONS BEFORE USING WARNING TO REDUCE THE RISK OF FIRE, ELECTRIC SHOCK OR INJURY TO PERSONS, OBSERVE THE FOLLOWING: A. E. Remove all parts. D. C. B. Installation work and electrical wiring...
Use and Care Manual
Page 6
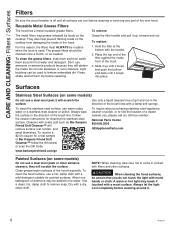
.... Reusable Metal Grease Filters The hood has 2 metal reusable grease filters. Surfaces Stainless Steel Surfaces (on the cooktop from damaging the inside front of the hood. To clean the stainless steel surface, use abrasives or oven cleaners. To clean the hood surface, use a steel wool pad; For this reason, the filters must ALWAYS be used . A warm or hot light may be certain that you , please call our toll-free number: National Parts Center 800...
.... Reusable Metal Grease Filters The hood has 2 metal reusable grease filters. Surfaces Stainless Steel Surfaces (on the cooktop from damaging the inside front of the hood. To clean the stainless steel surface, use abrasives or oven cleaners. To clean the hood surface, use a steel wool pad; For this reason, the filters must ALWAYS be used . A warm or hot light may be certain that you , please call our toll-free number: National Parts Center 800...

Use and Care Manual
Page 8
... and Air Conditioning Engineers (ASHRAE) and the local code authorities. Turn off at service panel and lock the service disconnecting means to the outdoors. B. Installation of these instructions for proper combustion and exhausting of gases through the flue (chimney) of personal injury or damage to prevent back drafting. Installation work and electrical wiring must always be vented to prevent power from being switched on accidentally. C. E. Be sure to the service panel. Ducted fans...
... and Air Conditioning Engineers (ASHRAE) and the local code authorities. Turn off at service panel and lock the service disconnecting means to the outdoors. B. Installation of these instructions for proper combustion and exhausting of gases through the flue (chimney) of personal injury or damage to prevent back drafting. Installation work and electrical wiring must always be vented to prevent power from being switched on accidentally. C. E. Be sure to the service panel. Ducted fans...

Use and Care Manual
Page 9
... installation height above the cooking space. Use of the hood will be concealed in the soffit or upper cabinetry. WALL MOUNT INSTALLATION 21" 36" Models Requires a 36" opening . 12" 29-7/8" 18" 24" Required Minimum and 36" Recommended Maximum In this installation, a decorative duct cover is available to conceal the ductwork running from the top of the hood. INSTALLATION PREPARATION Installation Preparation PRODUCT DIMENSIONS 12" 18" INSTALLATION CLEARANCES These vent hoods are designed to be installed...
... installation height above the cooking space. Use of the hood will be concealed in the soffit or upper cabinetry. WALL MOUNT INSTALLATION 21" 36" Models Requires a 36" opening . 12" 29-7/8" 18" 24" Required Minimum and 36" Recommended Maximum In this installation, a decorative duct cover is available to conceal the ductwork running from the top of the hood. INSTALLATION PREPARATION Installation Preparation PRODUCT DIMENSIONS 12" 18" INSTALLATION CLEARANCES These vent hoods are designed to be installed...
Use and Care Manual
Page 10
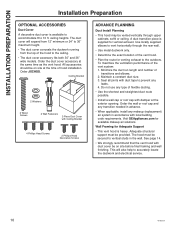
... elbows to vent horizontally through upper cabinets, soffit or ceiling. Minimize the duct run length and number of the vent system: 1. This will expand from 12" minimum or 24" to 36" maximum height. • The duct cover conceals the ductwork running from the top of flexible ducting. • Use the shortest and straightest duct route possible. • Install a wall cap or roof cap with local building code requirements. ceiling heights. INSTALLATION PREPARATION Installation Preparation OPTIONAL ACCESSORIES Duct Cover A decorative duct cover...
... elbows to vent horizontally through upper cabinets, soffit or ceiling. Minimize the duct run length and number of the vent system: 1. This will expand from 12" minimum or 24" to 36" maximum height. • The duct cover conceals the ductwork running from the top of flexible ducting. • Use the shortest and straightest duct route possible. • Install a wall cap or roof cap with local building code requirements. ceiling heights. INSTALLATION PREPARATION Installation Preparation OPTIONAL ACCESSORIES Duct Cover A decorative duct cover...
Use and Care Manual
Page 11
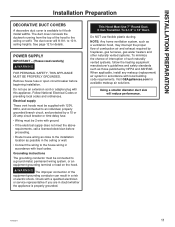
... wiring system, or an equipment-grounding terminal or lead on the hood. Do NOT use an extension cord or adapter plug with local building code requirements. Do not use flexible plastic ducting. NOTE: Any home ventilation system, such as a ventilation hood, may interrupt the proper flow of combustion air and exhaust required by NFPA and ASHRAE. Follow National Electrical Codes or prevailing local codes and ordinances. INSTALLATION PREPARATION Installation Preparation DECORATIVE DUCT COVERS A decorative duct cover...
... wiring system, or an equipment-grounding terminal or lead on the hood. Do NOT use an extension cord or adapter plug with local building code requirements. Do not use flexible plastic ducting. NOTE: Any home ventilation system, such as a ventilation hood, may interrupt the proper flow of combustion air and exhaust required by NFPA and ASHRAE. Follow National Electrical Codes or prevailing local codes and ordinances. INSTALLATION PREPARATION Installation Preparation DECORATIVE DUCT COVERS A decorative duct cover...
Use and Care Manual
Page 12
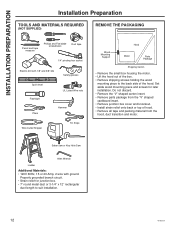
... Spirit level Flashlight Pliers UL Listed Wire nuts Hammer Wire Cutter/Stripper Tin Snips Wood Mounting Support Hood Motor Parts Package Shipping Carton • Remove the small box housing the motor. • Lift the hood out of the box. • Remove shipping screws holding the wood mounting piece to suit installation. 12 49-80520-8 Do not discard. • Remove the "V" shaped carton insert. • Remove parts package from the "V" shaped cardboard insert. • Remove junction box cover and...
... Spirit level Flashlight Pliers UL Listed Wire nuts Hammer Wire Cutter/Stripper Tin Snips Wood Mounting Support Hood Motor Parts Package Shipping Carton • Remove the small box housing the motor. • Lift the hood out of the box. • Remove shipping screws holding the wood mounting piece to suit installation. 12 49-80520-8 Do not discard. • Remove the "V" shaped carton insert. • Remove parts package from the "V" shaped cardboard insert. • Remove junction box cover and...

Use and Care Manual
Page 13
... floor). INSTALLATION PREPARATION Installation Preparation PARTS PROVIDED Locate the hardware accessory box packed with the hood and check contents. 2 Aluminum Grease Filters Screws, wall fasteners, washers Duct Transition with Damper Filter Support DUCT COVER REQUIREMENTS We recommend that the vent hood and decorative duct cover (if used) be used alone to secure the cover at a lower or higher height. the duct cover will help to a maximum of 34" above the cooking surface. The duct cover will expand to ensure a trouble free installation using the duct cover accessory. 8ft...
... floor). INSTALLATION PREPARATION Installation Preparation PARTS PROVIDED Locate the hardware accessory box packed with the hood and check contents. 2 Aluminum Grease Filters Screws, wall fasteners, washers Duct Transition with Damper Filter Support DUCT COVER REQUIREMENTS We recommend that the vent hood and decorative duct cover (if used) be used alone to secure the cover at a lower or higher height. the duct cover will help to a maximum of 34" above the cooking surface. The duct cover will expand to ensure a trouble free installation using the duct cover accessory. 8ft...
Use and Care Manual
Page 14
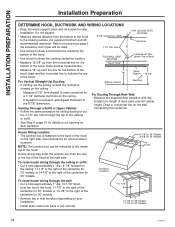
...; The junction box is not present, add drywall thickness to draw the cooktop centerline location. • Measure 15-3/8" up from drywall to the cooking surface, 24" required minimum and 36" recommended maximum. Hole FOR CEILING VENT DUCTING Electrical • Use a level to draw a horizontal line indicating the bottom of Hood Wood Support 15-3/8" Electrical - To route house wiring through the ceiling or soffit: • Cut a hole...
...; The junction box is not present, add drywall thickness to draw the cooktop centerline location. • Measure 15-3/8" up from drywall to the cooking surface, 24" required minimum and 36" recommended maximum. Hole FOR CEILING VENT DUCTING Electrical • Use a level to draw a horizontal line indicating the bottom of Hood Wood Support 15-3/8" Electrical - To route house wiring through the ceiling or soffit: • Cut a hole...
Use and Care Manual
Page 15
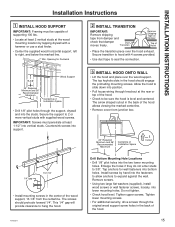
... junction box. 24" Required Minimum and 36" Recommended Maximum Centerline of Installation Space Cutout 1/4" gap 13-1/16" • Install mounting screws in the back of the hood allows viewing the marked centerline. • Remove cover from damper and check that damper moves freely. INSTALLATION INSTRUCTIONS Installation Instructions 1 INSTALL HOOD SUPPORT IMPORTANT: Framing must penetrate at the wood mounting location by hand into support. 3 INSTALL HOOD ONTO WALL • Lift the hood and place over the hood exhaust...
... junction box. 24" Required Minimum and 36" Recommended Maximum Centerline of Installation Space Cutout 1/4" gap 13-1/16" • Install mounting screws in the back of the hood allows viewing the marked centerline. • Remove cover from damper and check that damper moves freely. INSTALLATION INSTRUCTIONS Installation Instructions 1 INSTALL HOOD SUPPORT IMPORTANT: Framing must penetrate at the wood mounting location by hand into support. 3 INSTALL HOOD ONTO WALL • Lift the hood and place over the hood exhaust...
Use and Care Manual
Page 16
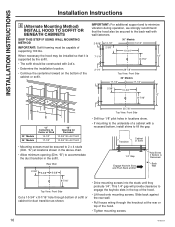
...-7/8" Top View, Front Side 36" Models 17-1/2" 17-1/2" 2-3/8" 10-3/4" 12" 8-7/16" B A A 30" Models 36" Models "A" Centerline to Center of the hood. • Tighten mounting screws. 16 49-80520-8 This 1/4" gap will provide clearance to accommodate the duct transition in the top of supporting 100 lbs. INSTALLATION INSTRUCTIONS Installation Instructions 4 (Alternate Mounting Method) INSTALL HOOD TO SOFFIT OR BENEATH CABINETS SKIP THIS STEP IF USING WALL MOUNTING METHOD IMPORTANT: Soffit framing must...
...-7/8" Top View, Front Side 36" Models 17-1/2" 17-1/2" 2-3/8" 10-3/4" 12" 8-7/16" B A A 30" Models 36" Models "A" Centerline to Center of the hood. • Tighten mounting screws. 16 49-80520-8 This 1/4" gap will provide clearance to accommodate the duct transition in the top of supporting 100 lbs. INSTALLATION INSTRUCTIONS Installation Instructions 4 (Alternate Mounting Method) INSTALL HOOD TO SOFFIT OR BENEATH CABINETS SKIP THIS STEP IF USING WALL MOUNTING METHOD IMPORTANT: Soffit framing must...

Use and Care Manual
Page 17
... screws and washers. Use wall anchors if needed. Install Ceiling Bracket When Duct Cover is Used to ductwork connection. Doing se will hold the decorative duct cover in place at the transition to Span 24" or more height above the hood. See Step 9 to the rear wall with washers. Use larger holes for Proper Operation of Damper Air Flow Screw Ductwork Duct Stops Transition Duct Tape Over Flange CAUTION Do not use sheet metal screws at the top. NOTE: Bracket has 2 sets...
... screws and washers. Use wall anchors if needed. Install Ceiling Bracket When Duct Cover is Used to ductwork connection. Doing se will hold the decorative duct cover in place at the transition to Span 24" or more height above the hood. See Step 9 to the rear wall with washers. Use larger holes for Proper Operation of Damper Air Flow Screw Ductwork Duct Stops Transition Duct Tape Over Flange CAUTION Do not use sheet metal screws at the top. NOTE: Bracket has 2 sets...

Use and Care Manual
Page 18
... and screw provided. • Plug the motor connector into junction box and replace cover. When house wiring is aluminum, be provided by the installer. WARNING If house wiring is turned off at the front of the opening with 4 screws provided. Be sure wires are at the rear of the hood. 8 CONNECT ELECTRICAL Verify that White, Black and Green Hood Wires are Threaded thru Small Hole in . A Remove Junction Box Cover C Insert Power Conduit...
... and screw provided. • Plug the motor connector into junction box and replace cover. When house wiring is aluminum, be provided by the installer. WARNING If house wiring is turned off at the front of the opening with 4 screws provided. Be sure wires are at the rear of the hood. 8 CONNECT ELECTRICAL Verify that White, Black and Green Hood Wires are Threaded thru Small Hole in . A Remove Junction Box Cover C Insert Power Conduit...

Use and Care Manual
Page 19
Junction Box 12 FINALIZE INSTALLATION • Refer to the operating instructions to align with outside opening. • Pull the filter down into the "C" clips mounted to the top of the filter support. "C" Clip Filters Filter Support • To remove the filters, grasp the handle, push the filter up, and pull forward. 49-80520-8 19 INSTALLATION INSTRUCTIONS Installation Instructions 11 INSTALL FILTERS • Remove protective film covering the filters. • Insert the filter into the lower slots at...
Junction Box 12 FINALIZE INSTALLATION • Refer to the operating instructions to align with outside opening. • Pull the filter down into the "C" clips mounted to the top of the filter support. "C" Clip Filters Filter Support • To remove the filters, grasp the handle, push the filter up, and pull forward. 49-80520-8 19 INSTALLATION INSTRUCTIONS Installation Instructions 11 INSTALL FILTERS • Remove protective film covering the filters. • Insert the filter into the lower slots at...
Use and Care Manual
Page 20
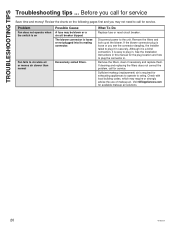
... codes, which may not need to call for service. TROUBLESHOOTING TIPS Troubleshooting tips ... Disconnect power to plug the connector in. If the blower connector plug is a blind connection, it in . Although it is loose or you may require or strongly advise the use of makeup air. Remove the filters, clean if necessary and replace them. What To Do Replace fuse or reset circuit breaker. See the Installation Instructions in this manual for exhausting appliances to operate...
... codes, which may not need to call for service. TROUBLESHOOTING TIPS Troubleshooting tips ... Disconnect power to plug the connector in. If the blower connector plug is a blind connection, it in . Although it is loose or you may require or strongly advise the use of makeup air. Remove the filters, clean if necessary and replace them. What To Do Replace fuse or reset circuit breaker. See the Installation Instructions in this manual for exhausting appliances to operate...
Use and Care Manual
Page 21
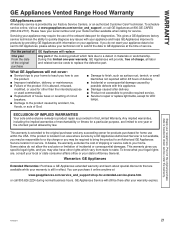
... repair or replace light bulbs, except for diagnostics. Warrantor: GE Appliances Extended Warranties: Purchase a GE Appliances extended warranty and learn about special discounts that are , consult your local or state consumer affairs office or your model number available when calling for service. Servicing your receipt here. If the product is located in an area where service by our Factory Service Centers, or an authorized Customer Care...
... repair or replace light bulbs, except for diagnostics. Warrantor: GE Appliances Extended Warranties: Purchase a GE Appliances extended warranty and learn about special discounts that are , consult your local or state consumer affairs office or your model number available when calling for service. Servicing your receipt here. If the product is located in an area where service by our Factory Service Centers, or an authorized Customer Care...


