GE CT9050SHSS Support and Manuals
Get Help and Manuals for this General Electric item
View All Support Options Below
Free GE CT9050SHSS manuals!
Problems with GE CT9050SHSS?
Ask a Question
Free GE CT9050SHSS manuals!
Problems with GE CT9050SHSS?
Ask a Question
Popular GE CT9050SHSS Manual Pages
Installation Instructions - Page 1
... - When the service disconnecting means cannot be necessary to leave these instructions for indoor use .
• ,03257$17³ Observe all governing
codes and ordinances.
• Note to improper installation is not covered under the runners and front trim until the marks or opening are covered.
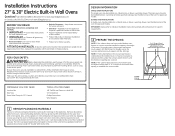
Installation Instructions
27" & 30" Electric Built-In Wall Ovens
Questions? Be sure...
Installation Instructions - Page 2

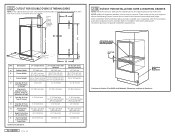
..." (1.75 cm) 23" (53.3 cm) min.
1" (2.5 cm) min. (11ø4" (3.2 cm) for stackable installations. 2 A CUTOUT FOR SINGLE OVENS IN WALL CABINET
NOTE: If the cabinet does not have a front frame and the sides are only approved to be installed under the specific models as labeled on the unit. Center Line
Center Line
30.5" (77.5 cm) 30...
Installation Instructions - Page 3
Check to installation instructions packed with specific models listed on the label located on top of Cutout
...
31-10979 07-14 GE
2 D CUTOUT FOR INSTALLATION OVER A WARMING DRAWER
NOTE: Install the oven only with the Warming Drawer for specific installation requirements. Description
27" Double Oven 30" Double Oven with Pedestal. Adjacent Corners,
Drawers, Walls, etc.,
When Door Is...
Installation Instructions - Page 6
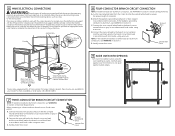
... box. Ground Wire
D. When connecting to the service panel. C. Install junction box cover.
When the service disconnecting means cannot be one available for a double oven, the platform must support 220 lbs. (99 kg); Place oven on accidentally. For a single oven, the platform must support 400 lbs. (181 kg). and for your model. Connect the flexible conduit to complete the...
Installation Instructions - Page 7
... 1/4" (6 mm) From the Front of the Cutout.
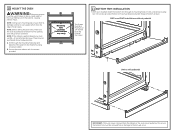
11 BOTTOM TRIM INSTALLATION
• With oven installed, attach the bottom trim through the mounting holes (top and bottom) of the side trim for service, the bottom trim must use #8 x ¾" particle board screws.
SWO's and DWO installations without pedestal
DWO's with the screws provided. B. NOTE: Before drilling...
Installation Instructions - Page 8
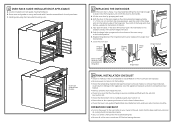
... bottom of the hinge arm must be replaced for the troubleshooting list. • Be sure all cooking functions operate properly.
• See your Owner's Manual).
Verify that all items from the closed (RESET) or the circuit fuses are OFF before leaving the oven. C. C. 12 OVEN RACK GUIDE INSTALLATION (IF APPLICABLE)
A. D.
Locate included oven rack guide mouting hardware.
Use and Care Manual - Page 1

... 15 Probe 16 Cooking Guide 17
Care and Cleaning
Control Panel 18 Oven Exterior 18 Stainless Steel Surfaces 18 Oven Interior 18 Oven Racks 19 Maintenance 20
Troubleshooting Tips 22
Owner's Manual
PT7050 - 30" Single Wall Oven PT9050 - 30" Single Wall Oven CT9050 - 30" Single Wall Oven PT7550 - 30" Double Wall Oven PT9550 - 30" Double Wall Oven CT9550 - 30" Double Wall Oven
For a Spanish...
Use and Care Manual - Page 8

...
Single Wall Oven
1
Control button shapes are representative; your oven may have alternate button shapes.
11 10
Remote Enable
Lock Controls
Hold 3 Sec
Convection
Bake
Broil
Hi/Lo/Crisp
Bake
Multi Rack
Roast
Bake
Traditional
Broil
Hi/Lo
Proof
Warm
Cancel Off
Start
1
2
3
Oven Lights
Probe
4
5
6
9
7
8
9
Delay Time
AM/PM
Steam Clean
Cook Time
0
Set...
Use and Care Manual - Page 9

...DLUFLUFXODWLRQWRLPSURYH SHUIRUPDQFH7KHW\SHRIEHQHILWGHSHQGVRQWKHPRGH USING THE OVEN: Oven Controls
Double Wall Oven
1
2 Control button shapes are representative; Upper Oven and Lower Oven: 'HVLJQDWHVZKLFK
RYHQWRXVH3UHVVWKHUpper OvenRULower OvenSDG WRVHOHFWDQRYHQWKHQSUHVVWKHGHVLUHGFRRNLQJPRGH SDG7KHRYHQFRQWURO...
Use and Care Manual - Page 13
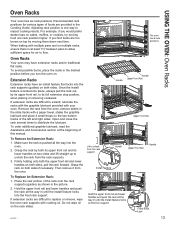
USING THE OVEN: Oven Racks
Oven Racks
Use and Care Manual - Page 22

...results during both the cooking and cleaning functions. Problem
My new oven doesn't cook like my old one. Rack position is incorrect...Oven controls improperly set .
Oven temperature needs adjustment. Oven temperature needs adjustment. Food being cooked in your oven's temperature.
Cookware not suited for service
Save time and money! Is something wrong with the temperature settings? Review...
Use and Care Manual - Page 23

...fan may be "tinted" or have a function error code. The inner oven glass is in Sabbath Mode. What To Do
...oven is normal for service
Problem
Oven light does not work Oven will not selfclean
Excessive smoking during clean cycle
Excessive smoking during broiling Oven door will disappear in your home may automatically turn on when you want to burner element. The oven door is locking to set...
Quick Specs - Page 1

Junc2t3i-o1n/2b" MoxIN
lJoucnacttiioonn box
CT9050SH
Cutoultodceaptthion 23-1/22" 2M"INto
GE Cafe™ Conduit
Series
30
in accordance
with installation instructions. Cabinets installed
adjacenDt to bottom of D junction box
Cutout width 28-1/2" MIN.
28-5/8" MAX.
21 "
A B
C
2" between cutouts.
2 x 4 or ...
Quick Specs - Page 2

...mo2d2e"lsMIN.
Above
Line 36" Typical
1" on top o22f88o51v//e28n"" MMfoIArNaX.p. requirements.
4"
3/4" Support
2" MIN.
CT9050SH Center Line
Center Line
30" models
GE Cafe™27" mSodeelsries 30 in separate cutouts. Built-In Single Convection Wall Oven
Cutout -
See cooktop installation instructions for overlap
22" MIN. platform required
27 1/4" MIN. 27 5/16" MAX...
Quick Specs - Page 3

...
evenly with a quick glance • Ten-pass bake element - See what you want • Glass touch controls - Set temperatures quickly and clean
with Direct Air - CT9050SH
GE Cafe™ Series 30 in and around bakeware • WiFi Connect - Built-In Single Convection Wall Oven
Features and Benefits • True European Convection with little effort • 5.0 cu.
GE CT9050SHSS Reviews
We have not received any reviews for GE yet.