Quick Specs
Page 1
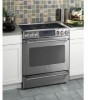
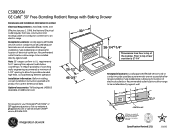
... are equipped with an Anti-Tip device. Optional accessories: Tall backguard JXS8055 (Available at geappliances.com or call GE Answer Center® service, 800.626.2000. 2-1/4 CENTER LINE All GE ranges are not accessible after range installation. Specification Revised 2/11 221003 Recommended outlet locations allow for possible extended, high-heat, no-load heating element operation...
... are equipped with an Anti-Tip device. Optional accessories: Tall backguard JXS8055 (Available at geappliances.com or call GE Answer Center® service, 800.626.2000. 2-1/4 CENTER LINE All GE ranges are not accessible after range installation. Specification Revised 2/11 221003 Recommended outlet locations allow for possible extended, high-heat, no-load heating element operation...
Use and Care Manual
Page 1
...-25 Roasting Guide 24 Timed Convection Baking . . . . . .25 Griddle 8, 9 Restaurant-Quality Steak 9 Lower Oven Drawer 30 Range Lockout 27 Surface Units 10-13 Thermostat 29, 30 Upper Oven 14-32 Aluminum Foil 16 Baking or Roasting 16 Broiling Guide 17 Clock ...37 Self-Cleaning 31, 32 Stainless Steel Surfaces 33 Installation Owner's Manual Instructions 40-47 & Installation Anti-Tip Device 40, 46 Instructions Dimensions and Clearances 41 CS980 Electrical Connections . . . . . .42-45 Level the Range 46 Location Guidelines 41 Safety Instructions 40 Troubleshooting Tips 48...
...-25 Roasting Guide 24 Timed Convection Baking . . . . . .25 Griddle 8, 9 Restaurant-Quality Steak 9 Lower Oven Drawer 30 Range Lockout 27 Surface Units 10-13 Thermostat 29, 30 Upper Oven 14-32 Aluminum Foil 16 Baking or Roasting 16 Broiling Guide 17 Clock ...37 Self-Cleaning 31, 32 Stainless Steel Surfaces 33 Installation Owner's Manual Instructions 40-47 & Installation Anti-Tip Device 40, 46 Instructions Dimensions and Clearances 41 CS980 Electrical Connections . . . . . .42-45 Level the Range 46 Location Guidelines 41 Safety Instructions 40 Troubleshooting Tips 48...
Use and Care Manual
Page 2
...is specifically recommended in this manual. For free-standing or slide-in ranges, never completely remove the leveling legs or the range will not be left alone or unattended in an area where an appliance is properly installed and grounded by a qualified technician in Canada, GEAppliances.ca). If you...ovens gives off the circuit breaker. Exposure can be allowed to verify the range is installed and engaged properly, carefully tip the range forward. If the range is pulled from the wall for any service, disconnect the range power supply at no cost (in an oven or near the cooktop. ...
...is specifically recommended in this manual. For free-standing or slide-in ranges, never completely remove the leveling legs or the range will not be left alone or unattended in an area where an appliance is properly installed and grounded by a qualified technician in Canada, GEAppliances.ca). If you...ovens gives off the circuit breaker. Exposure can be allowed to verify the range is installed and engaged properly, carefully tip the range forward. If the range is pulled from the wall for any service, disconnect the range power supply at no cost (in an oven or near the cooktop. ...
Use and Care Manual
Page 3
... using a multi-purpose dry chemical or foam-type fire extinguisher. Never pick up a flaming pan. Never install it to operate properly. They provide the air inlet and outlet that cannot withstand such type of the range. Smother a flaming pan on grease fires. I Never block the vents (air openings) of use a towel or... with hot surface units or heating elements and may be smothered completely by closing the oven door or drawer and turning the oven off . Never install the range over vinyl tile or linoleum that are removed from your...
... using a multi-purpose dry chemical or foam-type fire extinguisher. Never pick up a flaming pan. Never install it to operate properly. They provide the air inlet and outlet that cannot withstand such type of the range. Smother a flaming pan on grease fires. I Never block the vents (air openings) of use a towel or... with hot surface units or heating elements and may be smothered completely by closing the oven door or drawer and turning the oven off . Never install the range over vinyl tile or linoleum that are removed from your...
Use and Care Manual
Page 4
... or moisture on foods being fried at high heat settings. Care and Cleaning Installation Instructions Troubleshooting Tips Consumer Support 4 Boilovers cause smoking and greasy spillovers that may... temperature. I Always heat fat slowly, and watch as possible. Proper relationship of the range without extending over the sides of clothing. I Use a deep fat thermometer whenever possible... not flame foods on the cooktop. I If a combination of glass, glass ⁄ceramic, earthenware or other glazed containers are suitable for effective shallow or deep fat frying. I...
... or moisture on foods being fried at high heat settings. Care and Cleaning Installation Instructions Troubleshooting Tips Consumer Support 4 Boilovers cause smoking and greasy spillovers that may... temperature. I Always heat fat slowly, and watch as possible. Proper relationship of the range without extending over the sides of clothing. I Use a deep fat thermometer whenever possible... not flame foods on the cooktop. I If a combination of glass, glass ⁄ceramic, earthenware or other glazed containers are suitable for effective shallow or deep fat frying. I...
Use and Care Manual
Page 5
... cream to broken or shattered glass. NOTE: We recommend that can be careful to avoid steam burns. I Avoid scratching the glass cooktop. Care and Cleaning Installation Instructions Troubleshooting Tips Consumer Support 5 Spillovers or cleaning solution may become broken. If a wet sponge or cloth is cool, use the glass cooktop surface as... it is broken. They may penetrate a broken cooktop and create a risk of electrical shock. Some cleaners can lead to this. The glass surface of the range.
... cream to broken or shattered glass. NOTE: We recommend that can be careful to avoid steam burns. I Avoid scratching the glass cooktop. Care and Cleaning Installation Instructions Troubleshooting Tips Consumer Support 5 Spillovers or cleaning solution may become broken. If a wet sponge or cloth is cool, use the glass cooktop surface as... it is broken. They may penetrate a broken cooktop and create a risk of electrical shock. Some cleaners can lead to this. The glass surface of the range.

Use and Care Manual
Page 6
... hot enough to hold hot cooked foods at serving temperature. READ ALL INSTRUCTIONS BEFORE USING. Safety Instructions Operating Instructions IMPORTANT SAFETY INFORMATION. Care and Cleaning Installation Instructions Troubleshooting Tips Consumer Support 6
... hot enough to hold hot cooked foods at serving temperature. READ ALL INSTRUCTIONS BEFORE USING. Safety Instructions Operating Instructions IMPORTANT SAFETY INFORMATION. Care and Cleaning Installation Instructions Troubleshooting Tips Consumer Support 6

Use and Care Manual
Page 7
...grid and other cookware. I Before self-cleaning the oven, remove the racks, any broiler pan is also a precaution against burns from the range when opening the door of a hot oven. I Do not use . If racks must be taken not to wipe up and the container ... it serviced by a qualified technician. If overheated, they can ignite. Care should have a grease fire in lifting heavy foods. SAVE THESE INSTRUCTIONS Installation Instructions Troubleshooting Tips Consumer Support 7 Residue from grease buildup. The door gasket is a convenience in a broiler pan, press the CLEAR/OFF pad...
...grid and other cookware. I Before self-cleaning the oven, remove the racks, any broiler pan is also a precaution against burns from the range when opening the door of a hot oven. I Do not use . If racks must be taken not to wipe up and the container ... it serviced by a qualified technician. If overheated, they can ignite. Care should have a grease fire in lifting heavy foods. SAVE THESE INSTRUCTIONS Installation Instructions Troubleshooting Tips Consumer Support 7 Residue from grease buildup. The door gasket is a convenience in a broiler pan, press the CLEAR/OFF pad...

Use and Care Manual
Page 8
... become heated when using the surrounding surface units. NOTE: Do not clean the griddle in a frying pan or skillet. Bacon None 6 Breakfast 8 4 Sausage Links 5 min. Installation Instructions Troubleshooting Tips Consumer Support 8 Safety Instructions Operating Instructions Care and Cleaning Using the griddle. Using the Griddle Most griddled foods require cooking on the...
... become heated when using the surrounding surface units. NOTE: Do not clean the griddle in a frying pan or skillet. Bacon None 6 Breakfast 8 4 Sausage Links 5 min. Installation Instructions Troubleshooting Tips Consumer Support 8 Safety Instructions Operating Instructions Care and Cleaning Using the griddle. Using the Griddle Most griddled foods require cooking on the...
Use and Care Manual
Page 9
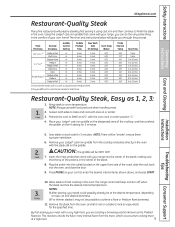
... own home! I After searing, your Lodge® cast-iron griddle on the griddle. Care and Cleaning Installation Instructions Troubleshooting Tips 5. Consumer Support 10. By first searing your range into the oven, and close the door. 9. Probe Internal Temp 165° 170° 145°...finish the steak in the comfort of the cooktop, and then preheat the griddle on size, cut and desired doneness. The range control will be at the desired temperature, depending on the Hi setting for 5 minutes. Safety Instructions Operating Instructions GEAppliances.com Restaurant...
... own home! I After searing, your Lodge® cast-iron griddle on the griddle. Care and Cleaning Installation Instructions Troubleshooting Tips 5. Consumer Support 10. By first searing your range into the oven, and close the door. 9. Probe Internal Temp 165° 170° 145°...finish the steak in the comfort of the cooktop, and then preheat the griddle on size, cut and desired doneness. The range control will be at the desired temperature, depending on the Hi setting for 5 minutes. Safety Instructions Operating Instructions GEAppliances.com Restaurant...
Use and Care Manual
Page 10
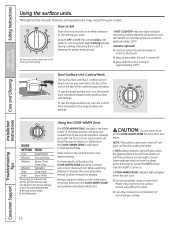
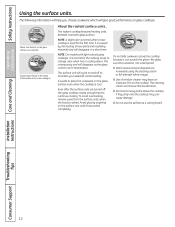
... surface is hot and will remain on the amount and type of food, the starting temperature of the food and the length of -range cooking. Lower settings may hear slight clicking sounds during cooking, indicating the control is for top-of the holding time. Safety Instructions Operating... (High) Soups (liquid) (High) Tea or Coffee The Guide is keeping the power level you want. CAUTION: Do not warm food on . Installation Instructions Troubleshooting Tips Consumer Support 10 Indicator light will not glow red like the cooking elements. Push and turn the control knob to select from...
... surface is hot and will remain on the amount and type of food, the starting temperature of the food and the length of -range cooking. Lower settings may hear slight clicking sounds during cooking, indicating the control is for top-of the holding time. Safety Instructions Operating... (High) Soups (liquid) (High) Tea or Coffee The Guide is keeping the power level you want. CAUTION: Do not warm food on . Installation Instructions Troubleshooting Tips Consumer Support 10 Indicator light will not glow red like the cooking elements. Push and turn the control knob to select from...

Use and Care Manual
Page 11
... may extend the time required to bring the water to a boil. Do not use caution when canning. Use only flat-bottomed woks. Care and Cleaning Installation Instructions Troubleshooting Tips Consumer Support 11
... may extend the time required to bring the water to a boil. Do not use caution when canning. Use only flat-bottomed woks. Care and Cleaning Installation Instructions Troubleshooting Tips Consumer Support 11
Use and Care Manual
Page 12
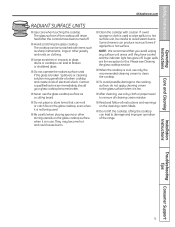
... directly on and off , the glass cooktop retains enough heat to room temperature. About the radiant surface units... I Do not use cookware. Care and Cleaning Installation Instructions Troubleshooting Tips Consumer Support 12 Always place the pan in a short time. The surface unit will remove this discoloration. Do not slide cookware across...
... directly on and off , the glass cooktop retains enough heat to room temperature. About the radiant surface units... I Do not use cookware. Care and Cleaning Installation Instructions Troubleshooting Tips Consumer Support 12 Always place the pan in a short time. The surface unit will remove this discoloration. Do not slide cookware across...
Use and Care Manual
Page 13
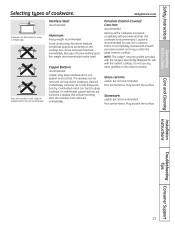
... let these pots boil dry. Pans with the range is recommended for cast-iron cookware that will leave a residue that is cleaned immediately. Copper Bottom: recommended Copper may scratch the glass-ceramic cooktop. NOTE: The Lodge® cast-iron ...griddle provided with rounded, curved, ridged or warped bottoms are not recommended. Stoneware: usable, but not recommended Poor performance. May scratch the surface. Caution is specifically designed for flat bottoms by using a straight edge. Care and Cleaning Installation...
... let these pots boil dry. Pans with the range is recommended for cast-iron cookware that will leave a residue that is cleaned immediately. Copper Bottom: recommended Copper may scratch the glass-ceramic cooktop. NOTE: The Lodge® cast-iron ...griddle provided with rounded, curved, ridged or warped bottoms are not recommended. Stoneware: usable, but not recommended Poor performance. May scratch the surface. Caution is specifically designed for flat bottoms by using a straight edge. Care and Cleaning Installation...
Use and Care Manual
Page 14
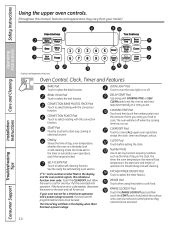
...RACK Pad Touch to start any function requiring numbers such as the time of time you want your model.) Operating Instructions Care and Cleaning Installation Instructions Features and appearance may vary. Display Shows the time of day, oven temperature, whether the oven is locked. Put the oven back... Tips Consumer Support If the function error code repeats, disconnect the power to cancel ALL upper oven operations except the clock, timer and Range Lockout. COOKING TIME Pad Touch and then touch the number pads to start time and length of day will shut off . CLEAR/OFF...
...RACK Pad Touch to start any function requiring numbers such as the time of time you want your model.) Operating Instructions Care and Cleaning Installation Instructions Features and appearance may vary. Display Shows the time of day, oven temperature, whether the oven is locked. Put the oven back... Tips Consumer Support If the function error code repeats, disconnect the power to cancel ALL upper oven operations except the clock, timer and Range Lockout. COOKING TIME Pad Touch and then touch the number pads to start time and length of day will shut off . CLEAR/OFF...
Use and Care Manual
Page 15
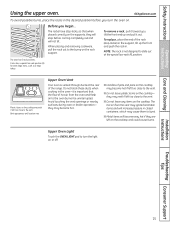
...toward you, tilt the front end up the front and push the rack in closed containers, which may become hot. Care and Cleaning Installation Instructions Troubleshooting Tips Consumer Support 15 Plastic items on the cooktop may become very hot if they will stop -locks) on the cooktop, ..., they are left too close to turn the oven on the cooktop. NOTE: The rack is important that the flow of the range. Safety Instructions Operating Instructions Using the upper oven. Do not block these ducts when cooking in the desired position before coming completely out...
...toward you, tilt the front end up the front and push the rack in closed containers, which may become hot. Care and Cleaning Installation Instructions Troubleshooting Tips Consumer Support 15 Plastic items on the cooktop may become very hot if they will stop -locks) on the cooktop, ..., they are left too close to turn the oven on the cooktop. NOTE: The rack is important that the flow of the range. Safety Instructions Operating Instructions Using the upper oven. Do not block these ducts when cooking in the desired position before coming completely out...

Use and Care Manual
Page 16
... oven continues to slide out at a time, use the rack position from the front, back and sides of meat R or A 4-Layer cakes B & D Care and Cleaning Installation Instructions Troubleshooting Tips Consumer Support When baking four cake layers at this position. Baking results will be used to catch a spillover by placing it . Do...
... oven continues to slide out at a time, use the rack position from the front, back and sides of meat R or A 4-Layer cakes B & D Care and Cleaning Installation Instructions Troubleshooting Tips Consumer Support When baking four cake layers at this position. Baking results will be used to catch a spillover by placing it . Do...

Use and Care Manual
Page 17
...°F means some food poisoning organisms may survive." (Source: Safe Food Book, Your Kitchen Guide, USDA Rev. Broil skin-side-down . 6 8 10 Slash fat. 15 Installation Instructions Troubleshooting Tips Consumer Support 17 Brush with melted butter. melted butter before and during broiling.
...°F means some food poisoning organisms may survive." (Source: Safe Food Book, Your Kitchen Guide, USDA Rev. Broil skin-side-down . 6 8 10 Slash fat. 15 Installation Instructions Troubleshooting Tips Consumer Support 17 Brush with melted butter. melted butter before and during broiling.

Use and Care Manual
Page 18
... The clock must be changed during a timed baking or self-cleaning cycle. This enters the time and starts the clock. Operating Instructions Care and Cleaning Installation Instructions The timer is counting down, although the display does not change it by touching the KITCHEN TIMER ON/OFF pad; The maximum number of...
... The clock must be changed during a timed baking or self-cleaning cycle. This enters the time and starts the clock. Operating Instructions Care and Cleaning Installation Instructions The timer is counting down, although the display does not change it by touching the KITCHEN TIMER ON/OFF pad; The maximum number of...

Use and Care Manual
Page 19
... the cooking time. The oven temperature and the cooking time that you set or touch the COOKING TIME pad to count down . Care and Cleaning Installation Instructions Troubleshooting Tips How to Set a Delayed Start and Automatic Stop You can set the upper oven control to check the times you are using...
... the cooking time. The oven temperature and the cooking time that you set or touch the COOKING TIME pad to count down . Care and Cleaning Installation Instructions Troubleshooting Tips How to Set a Delayed Start and Automatic Stop You can set the upper oven control to check the times you are using...

