
Use and Care Manual
Page 4
...cooking frozen foods with a well-fitting lid, cookie sheet or flat tray . Clothing in close proximity to burners or hot surfaces may result in cabinets above the range and be turned toward the center of fire . ■ When disabling Control Lockout, make sure it is matched to cover the grates ...or line any part of the burner . Turn the controls off . Select cookware that could spread to accumulate on...
...cooking frozen foods with a well-fitting lid, cookie sheet or flat tray . Clothing in close proximity to burners or hot surfaces may result in cabinets above the range and be turned toward the center of fire . ■ When disabling Control Lockout, make sure it is matched to cover the grates ...or line any part of the burner . Turn the controls off . Select cookware that could spread to accumulate on...
Use and Care Manual
Page 5
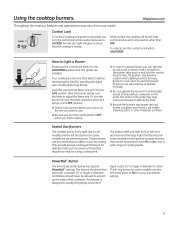
... be used with constantly burning flames . After the burner ignites, turn the control knob to adjust the flame size . Burners in and turn the knob to the LITE position . PowerBoil™ Burner The extra large center burner has special PowerBoil™ settings . Sealed Gas Burners The smallest burner in the UNLOCKED position and all models) and the...
... be used with constantly burning flames . After the burner ignites, turn the control knob to adjust the flame size . Burners in and turn the knob to the LITE position . PowerBoil™ Burner The extra large center burner has special PowerBoil™ settings . Sealed Gas Burners The smallest burner in the UNLOCKED position and all models) and the...
Use and Care Manual
Page 6
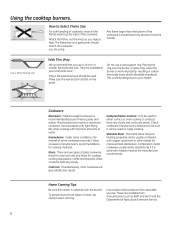
... coffee and tea pots) . Make sure the wok bottom sits flat on a gas cooktop . Cookware Aluminum: Medium-weight cookware is centered over the burner or grate may melt . Glass conducts heat very slowly . Stainless Steel: This metal alone has poor heating properties and is wasted and ...knob, as the manufacturer recommends . Any flame larger than the bottom of some cookware may cause the burner to your local retail store. Using the cooktop burners. Placing the ring over the burner . This could be used . It conducts heat very slowly and cools very slowly . Use a flat...
... coffee and tea pots) . Make sure the wok bottom sits flat on a gas cooktop . Cookware Aluminum: Medium-weight cookware is centered over the burner or grate may melt . Glass conducts heat very slowly . Stainless Steel: This metal alone has poor heating properties and is wasted and ...knob, as the manufacturer recommends . Any flame larger than the bottom of some cookware may cause the burner to your local retail store. Using the cooktop burners. Placing the ring over the burner . This could be used . It conducts heat very slowly and cools very slowly . Use a flat...
Use and Care Manual
Page 10
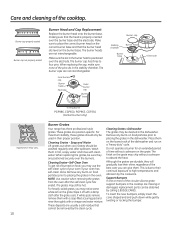
...the grates from the oven after the grate cools . Cleaning Grates-Dishwasher The grates may vary . 10 Tri-Ring Burner PGP986, CGP650, PGP963, CGP350 (Center burner only) Burner Grates Your range has three professional-style grates . Although the grates are durable, they are missing or damaged, ...grates are not interchangeable . Grates should only be obtained by calling 1 .800 .GE .CARES . Wash them with a soap-filled scouring pad and rinse thoroughly with clean water . Remove any burnt-on the burner base . This is due to high temperatures and abrasion by the clean cycle ...
...the grates from the oven after the grate cools . Cleaning Grates-Dishwasher The grates may vary . 10 Tri-Ring Burner PGP986, CGP650, PGP963, CGP350 (Center burner only) Burner Grates Your range has three professional-style grates . Although the grates are durable, they are missing or damaged, ...grates are not interchangeable . Grates should only be obtained by calling 1 .800 .GE .CARES . Wash them with a soap-filled scouring pad and rinse thoroughly with clean water . Remove any burnt-on the burner base . This is due to high temperatures and abrasion by the clean cycle ...
Installation Instructions
Page 7
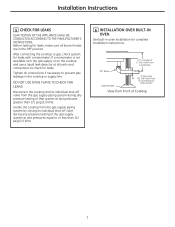
...greater than 1/2 psig (3.5 kPa). 6 INSTALLATION OVER BUILT-IN OVEN See built-in oven installation for complete installation instructions. 5″ To Center of 2″ Dia. Installation Instructions 5 CHECK FOR LEAKS LEAK TESTING OF THE APPLIANCE SHALL BE CONDUCTED ACCORDING TO THE MANUFACTURER'S INSTRUCTIONS. ...Isolate the cooktop from Front of the gas supply system at all burner knobs are in the cooktop or supply line. Hole From Countertop 90° Elbow Cabinet Sides 2″ Dia. Before testing...
...greater than 1/2 psig (3.5 kPa). 6 INSTALLATION OVER BUILT-IN OVEN See built-in oven installation for complete installation instructions. 5″ To Center of 2″ Dia. Installation Instructions 5 CHECK FOR LEAKS LEAK TESTING OF THE APPLIANCE SHALL BE CONDUCTED ACCORDING TO THE MANUFACTURER'S INSTRUCTIONS. ...Isolate the cooktop from Front of the gas supply system at all burner knobs are in the cooktop or supply line. Hole From Countertop 90° Elbow Cabinet Sides 2″ Dia. Before testing...
Installation Instructions
Page 13
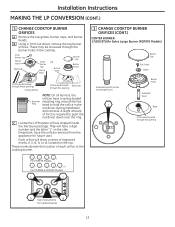
... the literature package. These marks denote the location of each orifice to the cooktop burner. 3 CHANGE COOKTOP BURNER ORIFICES (CONT.) CENTER BURNER 17,000 BTU/hr Extra Large Burner (PGP976 Models) Extended spud for center extra large burner IV Burner Cap Set Screw Choke Burner Head Extended Spud Base Orifice spud located through this opening I x1 II x2 III...
... the literature package. These marks denote the location of each orifice to the cooktop burner. 3 CHANGE COOKTOP BURNER ORIFICES (CONT.) CENTER BURNER 17,000 BTU/hr Extra Large Burner (PGP976 Models) Extended spud for center extra large burner IV Burner Cap Set Screw Choke Burner Head Extended Spud Base Orifice spud located through this opening I x1 II x2 III...
Installation Instructions
Page 14
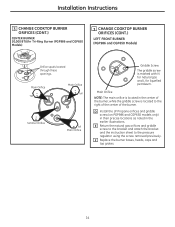
... and the instruction sheet to the right of the center of the burner. Installation Instructions 3 CHANGE COOKTOP BURNER ORIFICES (CONT.) CENTER BURNER 20,000 BTU/hr Tri-Ring Burner (PGP986 and CGP650 Models) 3 CHANGE COOKTOP BURNER ORIFICES (CONT.) LEFT FRONT BURNER (PGP986 and CGP650 Models) Orifice spuds located through these...LP Propane orifices and griddle screw (on PGP986 and CGP650 models only) in their precise locations as noted in the center of the burner, while the griddle screw is located to the pressure regulator using the screw removed previously. Main Orifice NOTE: The main...
... and the instruction sheet to the right of the center of the burner. Installation Instructions 3 CHANGE COOKTOP BURNER ORIFICES (CONT.) CENTER BURNER 20,000 BTU/hr Tri-Ring Burner (PGP986 and CGP650 Models) 3 CHANGE COOKTOP BURNER ORIFICES (CONT.) LEFT FRONT BURNER (PGP986 and CGP650 Models) Orifice spuds located through these...LP Propane orifices and griddle screw (on PGP986 and CGP650 models only) in their precise locations as noted in the center of the burner, while the griddle screw is located to the pressure regulator using the screw removed previously. Main Orifice NOTE: The main...


