Use and Care Manual
Page 1
...7 PowerBoil™ Burner 5 Sealed Gas Burners 5 Care and Cleaning Burners and Cooktop Electrodes 9 Burner Bases 9 Burner Grates 10 Burner Head and Cap Replacement 10 Control Knobs 8 Griddle 11 Porcelain Enamel Cooktop 8 Shipping Film and Tape 8 Stainless Steel Surfaces 8 Troubleshooting Tips 12 Consumer Support Consumer Support 18 Ownership Registration for ... United States Write the model and serial numbers here: Model Serial You can find them on Recycled Paper 49-80636 07-11 GE Owner's Manual CGP350 CGP650 PGP953 PGP959 PGP976 PGP986 Printed on a label under the cooktop.
...7 PowerBoil™ Burner 5 Sealed Gas Burners 5 Care and Cleaning Burners and Cooktop Electrodes 9 Burner Bases 9 Burner Grates 10 Burner Head and Cap Replacement 10 Control Knobs 8 Griddle 11 Porcelain Enamel Cooktop 8 Shipping Film and Tape 8 Stainless Steel Surfaces 8 Troubleshooting Tips 12 Consumer Support Consumer Support 18 Ownership Registration for ... United States Write the model and serial numbers here: Model Serial You can find them on Recycled Paper 49-80636 07-11 GE Owner's Manual CGP350 CGP650 PGP953 PGP959 PGP976 PGP986 Printed on a label under the cooktop.
Use and Care Manual
Page 8
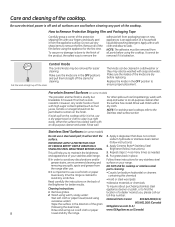
... the instructions on some models) The porcelain enamel finish is acidresistant . Remove all -purpose cleaner after use a steel wool pad; Replace the knobs in the OFF positions and pull them straight off the stems for the first time . For other spills such as fat spatterings,...ensure proper placement . sodium hydroxide or stainless steel cleaner IMPORTANT: APPLY A PROTECTIVE COAT (follow instructions) . removing any part of the film before replacing . DO NOT USE for easier cleaning. Remove grates . 2. Rinse and wring out a soft cloth or paper • Caustic lye (sodium ...
... the instructions on some models) The porcelain enamel finish is acidresistant . Remove all -purpose cleaner after use a steel wool pad; Replace the knobs in the OFF positions and pull them straight off the stems for the first time . For other spills such as fat spatterings,...ensure proper placement . sodium hydroxide or stainless steel cleaner IMPORTANT: APPLY A PROTECTIVE COAT (follow instructions) . removing any part of the film before replacing . DO NOT USE for easier cleaning. Remove grates . 2. Rinse and wring out a soft cloth or paper • Caustic lye (sodium ...
Use and Care Manual
Page 12
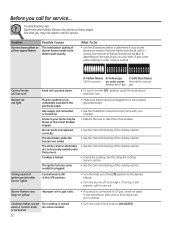
... push the knob down and then turn . See the Using the cooktop burners section . • See the Care and cleaning of burner flames needs to UNLOCKED . If ticking is locked. With LP gas, some yellow tipping on outer cones is still in your cooktop . • Replace the fuse or...gas, check all steps in the electrical outlet. A fuse in the LITE position. • Turn the knob out of the cooktop section . • Unlock the cooktop . Burner parts not replaced correctly. Ticking sound of gas you may be determined visually. Burner flames very large or yellow Improper air to...
... push the knob down and then turn . See the Using the cooktop burners section . • See the Care and cleaning of burner flames needs to UNLOCKED . If ticking is locked. With LP gas, some yellow tipping on outer cones is still in your cooktop . • Replace the fuse or...gas, check all steps in the electrical outlet. A fuse in the LITE position. • Turn the knob out of the cooktop section . • Unlock the cooktop . Burner parts not replaced correctly. Ticking sound of gas you may be determined visually. Burner flames very large or yellow Improper air to...

Installation Instructions
Page 15
Engage adjustment screw in valve switch. E Testing Flame Stability: Test 1 - Temporarily replace knobs. If the flame goes out at the "HI" position. Test 2 - F Flame ...flames were too small or fluttered, open and close the valve more than the original setting. Turn the knob from LP, please remove the sticker so others in operation on and check the flames. If the ... stem plugs as the valve is complete and checked ok, replace valve stem plugs and knobs, and fill out the LP sticker. B Turn the cooktop burner knob to LO when making this will soon disappear. This prevents ...
Engage adjustment screw in valve switch. E Testing Flame Stability: Test 1 - Temporarily replace knobs. If the flame goes out at the "HI" position. Test 2 - F Flame ...flames were too small or fluttered, open and close the valve more than the original setting. Turn the knob from LP, please remove the sticker so others in operation on and check the flames. If the ... stem plugs as the valve is complete and checked ok, replace valve stem plugs and knobs, and fill out the LP sticker. B Turn the cooktop burner knob to LO when making this will soon disappear. This prevents ...


