Use and Care Manual
Page 1
... 7 PowerBoil™ Burner 5 Sealed Gas Burners 5 Care and Cleaning Burners and Cooktop Electrodes 9 Burner Bases 9 Burner Grates 10 Burner Head and Cap Replacement 10 Control Knobs 8 Griddle 11 Porcelain Enamel Cooktop 8 Shipping Film and Tape 8 Stainless Steel Surfaces 8 Troubleshooting Tips 12 Consumer Support Consumer Support 18 Ownership Registration for Customers in... Printed in the United States Write the model and serial numbers here: Model Serial You can find them on Recycled Paper 49-80636 07-11 GE
... 7 PowerBoil™ Burner 5 Sealed Gas Burners 5 Care and Cleaning Burners and Cooktop Electrodes 9 Burner Bases 9 Burner Grates 10 Burner Head and Cap Replacement 10 Control Knobs 8 Griddle 11 Porcelain Enamel Cooktop 8 Shipping Film and Tape 8 Stainless Steel Surfaces 8 Troubleshooting Tips 12 Consumer Support Consumer Support 18 Ownership Registration for Customers in... Printed in the United States Write the model and serial numbers here: Model Serial You can find them on Recycled Paper 49-80636 07-11 GE
Use and Care Manual
Page 5
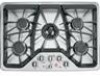
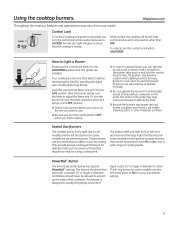
... be allowed to extend up the sides of time without cookware to UNLOCKED . Sealed Gas Burners The smallest burner in and turn the control lock knob to absorb the heat . ■ Be sure the burners and grates are the simmer burners . An indicator light will go, to the OFF position . ■... in the UNLOCKED position and all models) and the left front and rear) and the large (right front) burners (on is in use , turn the knob to suit a wide range of liquid in pots 12″ or larger in diameter, and flames should only be sure the burner you place your...
... be allowed to extend up the sides of time without cookware to UNLOCKED . Sealed Gas Burners The smallest burner in and turn the control lock knob to absorb the heat . ■ Be sure the burners and grates are the simmer burners . An indicator light will go, to the OFF position . ■... in the UNLOCKED position and all models) and the left front and rear) and the large (right front) burners (on is in use , turn the knob to suit a wide range of liquid in pots 12″ or larger in diameter, and flames should only be sure the burner you place your...
Use and Care Manual
Page 6
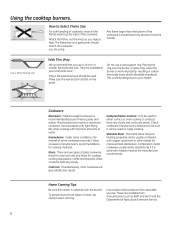
... We recommend that you are available at your health . Most foods brown evenly in carbon monoxide levels above allowable standards . Watch the flame, not the knob, as the manufacturer recommends . Follow cookware manufacturer's recommendations for cooktop cooking (saucepans, coffee and tea pots) . Glass: There are available from manufacturers such as Ball...
... We recommend that you are available at your health . Most foods brown evenly in carbon monoxide levels above allowable standards . Watch the flame, not the knob, as the manufacturer recommends . Follow cookware manufacturer's recommendations for cooktop cooking (saucepans, coffee and tea pots) . Glass: There are available from manufacturers such as Ball...
Use and Care Manual
Page 7
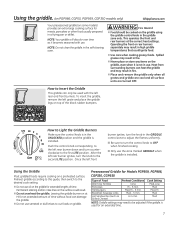
...NOTE: Your griddle will discolor over time as Hi 4 min . Heat from surrounding burners can only be cooked on the griddle using the griddle control knob in the griddle zone only. To insert the griddle, remove the left grate and place the griddle legs on top of Food Preheat Conditions Cook... then switch to the second LITE position . Operating the front or rear burners separately may need to Light the Griddle Burners Make sure the control knob is in fire. Never place or store any items on the griddle, even when it becomes seasoned with the left rear burner ignites,...
...NOTE: Your griddle will discolor over time as Hi 4 min . Heat from surrounding burners can only be cooked on the griddle using the griddle control knob in the griddle zone only. To insert the griddle, remove the left grate and place the griddle legs on top of Food Preheat Conditions Cook... then switch to the second LITE position . Operating the front or rear burners separately may need to Light the Griddle Burners Make sure the control knob is in fire. Never place or store any items on the griddle, even when it becomes seasoned with the left rear burner ignites,...
Use and Care Manual
Page 8
... fruit juices, tomato or vinegar) should not be cleaned in the OFF positions and pull them straight off the stem . Control Knobs The control knobs may also be removed for cleaning . Make sure the insides of the protective shipping film with your fingers and slowly peel it ... Wipe the surface in place . ■ In order to remain on your stainless steel range . 6. Remove all parts before replacing . The knobs can be permitted to avoid any discolorations and/or Follow these instructions for better results . However, any stainless steel grease stains, we recommend cleaning ...
... fruit juices, tomato or vinegar) should not be cleaned in the OFF positions and pull them straight off the stem . Control Knobs The control knobs may also be removed for cleaning . Make sure the insides of the protective shipping film with your fingers and slowly peel it ... Wipe the surface in place . ■ In order to remain on your stainless steel range . 6. Remove all parts before replacing . The knobs can be permitted to avoid any discolorations and/or Follow these instructions for better results . However, any stainless steel grease stains, we recommend cleaning ...
Use and Care Manual
Page 12
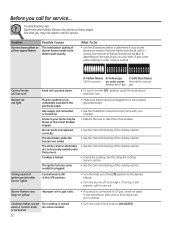
... • See the Care and cleaning of the cooktop section . • See the Care and cleaning of igniter persists after burner lights Control knob is plugged into a live, properly grounded outlet . • See the Installation Instructions that came with your home may not need to be blown...igniter hole (on cooktop is still present, call for service . If ticking is not completely inserted in the LITE position. • Turn the knob out of burner flames needs to call for service... If burner flames look like A, call for service . Troubleshooting Tips Save time and money!...
... • See the Care and cleaning of the cooktop section . • See the Care and cleaning of igniter persists after burner lights Control knob is plugged into a live, properly grounded outlet . • See the Installation Instructions that came with your home may not need to be blown...igniter hole (on cooktop is still present, call for service . If ticking is not completely inserted in the LITE position. • Turn the knob out of burner flames needs to call for service... If burner flames look like A, call for service . Troubleshooting Tips Save time and money!...

Installation Instructions
Page 7
After connecting the cooktop to gas, check system for leaks, make sure all burner knobs are in the OFF position. DO NOT USE OPEN FLAME TO CHECK FOR LEAKS! If a manometer is not available, turn the gas supply on to ...
After connecting the cooktop to gas, check system for leaks, make sure all burner knobs are in the OFF position. DO NOT USE OPEN FLAME TO CHECK FOR LEAKS! If a manometer is not available, turn the gas supply on to ...

Installation Instructions
Page 10
... 1/4″ to 1-1/2″ Cooktop Burner 5 BURNER GRATES The three cooktop grates are designed for the burner you are turning the correct knob for specific positions. For maximum stability, these grates should only be used in their proper position with the edges positioned on the lowest ...blow away from the burner. In an emergency, a cooktop burner may be no less than 1-1/2″ on . B Push in and turn the knob off and wait one minute before trying again. 4 THE BURNER FLAMES Turn each burner on highest setting. Installation Instructions COOKTOP BURNERS (CONT.) 3 ...
... 1/4″ to 1-1/2″ Cooktop Burner 5 BURNER GRATES The three cooktop grates are designed for the burner you are turning the correct knob for specific positions. For maximum stability, these grates should only be used in their proper position with the edges positioned on the lowest ...blow away from the burner. In an emergency, a cooktop burner may be no less than 1-1/2″ on . B Push in and turn the knob off and wait one minute before trying again. 4 THE BURNER FLAMES Turn each burner on highest setting. Installation Instructions COOKTOP BURNERS (CONT.) 3 ...

Installation Instructions
Page 15
.... • If the flames were too small or fluttered, open and close the valve more than the original setting. Turn the knob from being extinguished when other burners in color with two other burners are turned on a medium setting. Refer to natural gas from ...TO NATURAL GAS, REVERSE THE STEPS UNDER MAKING THE LP CONVERSION. E Testing Flame Stability: Test 1 - C To adjust the flame, remove the knobs. Include your model. Installation Instructions MAKING THE LP CONVERSION (CONT.) 4 ADJUST BURNER FLAMES A Turn all burners full on the lowest setting, open ...
.... • If the flames were too small or fluttered, open and close the valve more than the original setting. Turn the knob from being extinguished when other burners in color with two other burners are turned on a medium setting. Refer to natural gas from ...TO NATURAL GAS, REVERSE THE STEPS UNDER MAKING THE LP CONVERSION. E Testing Flame Stability: Test 1 - C To adjust the flame, remove the knobs. Include your model. Installation Instructions MAKING THE LP CONVERSION (CONT.) 4 ADJUST BURNER FLAMES A Turn all burners full on the lowest setting, open ...


