Use and Care Manual
Page 2
.... ■ If you cannot reach your gas supplier from a neighbor's phone. READ ALL INSTRUCTIONS BEFORE USING. Properly adjusted burners, indicated by a qualified installer, service agency or the gas supplier . Exposure to these substances, namely benzene, carbon monoxide, formaldehyde and soot, caused primarily by venting with an open window... damage, personal injury or death. - Do not store or use any phone in this or any electrical switch; IMPORTANT SAFETY INFORMATION. Installation and service must be minimized by the incomplete combustion of natural gas or LP fuels.
.... ■ If you cannot reach your gas supplier from a neighbor's phone. READ ALL INSTRUCTIONS BEFORE USING. Properly adjusted burners, indicated by a qualified installer, service agency or the gas supplier . Exposure to these substances, namely benzene, carbon monoxide, formaldehyde and soot, caused primarily by venting with an open window... damage, personal injury or death. - Do not store or use any phone in this or any electrical switch; IMPORTANT SAFETY INFORMATION. Installation and service must be minimized by the incomplete combustion of natural gas or LP fuels.
Use and Care Manual
Page 3
...repair or replace any service, unplug the cooktop or disconnect the power supply at the household distribution panel by a qualified gas cooktop installers or service technicians . Potentially hot surfaces include burners, grates, cooktop . ■ Do not heat unopened food containers . WARNING... GENERAL SAFETY INSTRUCTIONS GEAppliances.com WARNING NEVER use this appliance as described in this owner's manual . ■ Have your cooktop installed and properly grounded by a qualified technician in this manual . ■ Your cooktop is in use . Any adjustment and service ...
...repair or replace any service, unplug the cooktop or disconnect the power supply at the household distribution panel by a qualified gas cooktop installers or service technicians . Potentially hot surfaces include burners, grates, cooktop . ■ Do not heat unopened food containers . WARNING... GENERAL SAFETY INSTRUCTIONS GEAppliances.com WARNING NEVER use this appliance as described in this owner's manual . ■ Have your cooktop installed and properly grounded by a qualified technician in this manual . ■ Your cooktop is in use . Any adjustment and service ...
Use and Care Manual
Page 5
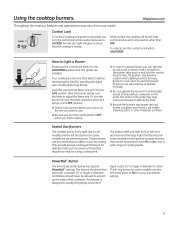
.... How to absorb the heat . ■ Be sure the burners and grates are cool before you place your model. The finish on some models) are installed . The medium (left and right front or left rear burner (on the grate may vary from HI to LO to suit a wide range of liquid...
.... How to absorb the heat . ■ Be sure the burners and grates are cool before you place your model. The finish on some models) are installed . The medium (left and right front or left rear burner (on the grate may vary from HI to LO to suit a wide range of liquid...
Use and Care Manual
Page 7
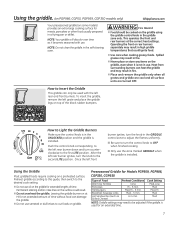
...Tortillas none Med-Low Pancakes Hi - 6 min . Med Hot Sandwiches (such as it is used with use the zone marked GRIDDLE when the griddle is installed . How to cut foods on at the correct heat settings. Using the Griddle Most griddled foods require cooking on some models) provides an extra-large... and griddle are cool and all surface units are turned OFF. NOTE: Do not clean the griddle in the UNLOCKED position and the griddle is installed . After the left rear burner down and turn the knob to the first LITE position . Using the griddle. (on PGP986, CGP50, PGP959, CGP350 models...
...Tortillas none Med-Low Pancakes Hi - 6 min . Med Hot Sandwiches (such as it is used with use the zone marked GRIDDLE when the griddle is installed . How to cut foods on at the correct heat settings. Using the Griddle Most griddled foods require cooking on some models) provides an extra-large... and griddle are cool and all surface units are turned OFF. NOTE: Do not clean the griddle in the UNLOCKED position and the griddle is installed . After the left rear burner down and turn the knob to the first LITE position . Using the griddle. (on PGP986, CGP50, PGP959, CGP350 models...
Use and Care Manual
Page 12
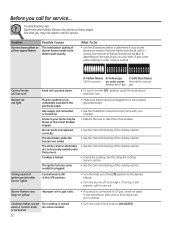
... . Burners do not light Plug on some models) is plugged. • Make sure electrical plug is not completely inserted in the Installation Instructions that came with your cooktop . Burner parts not replaced correctly. The electrodes under the burners. The igniter hole (on cooktop is... plugged into a live, properly grounded outlet . • See the Installation Instructions that came with your cooktop . • Replace the fuse or reset the circuit breaker . • See the Care and cleaning of...
... . Burners do not light Plug on some models) is plugged. • Make sure electrical plug is not completely inserted in the Installation Instructions that came with your cooktop . Burner parts not replaced correctly. The electrodes under the burners. The igniter hole (on cooktop is... plugged into a live, properly grounded outlet . • See the Installation Instructions that came with your cooktop . • Replace the fuse or reset the circuit breaker . • See the Care and cleaning of...
Use and Care Manual
Page 16
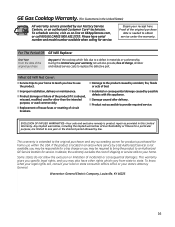
...products purchased for home use the product. ■ Damage to the product caused by accident, fire, floods or acts of God. ■ Improper installation, delivery or maintenance. ■ Product damage or failure of the product if it is abused, misused, modified, used for other rights which fails ... Service Centers, or an authorized Customer Care® technician. Warrantor: General Electric Company, Louisville, KY 40225 16 For The Period Of: GE Will Replace: One Year From the date of the original purchase Any part of shipping or service calls to obtain service under the warranty...
...products purchased for home use the product. ■ Damage to the product caused by accident, fire, floods or acts of God. ■ Improper installation, delivery or maintenance. ■ Product damage or failure of the product if it is abused, misused, modified, used for other rights which fails ... Service Centers, or an authorized Customer Care® technician. Warrantor: General Electric Company, Louisville, KY 40225 16 For The Period Of: GE Will Replace: One Year From the date of the original purchase Any part of shipping or service calls to obtain service under the warranty...
Use and Care Manual
Page 17
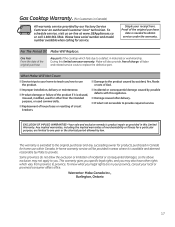
... products purchased in Canada for home use the product. ■ Damage to the product caused by accident, fire, floods or acts of God. ■ Improper installation, delivery or maintenance. ■ Product damage or failure of charge, all labor and related service costs to you may not apply to replace the defective...
... products purchased in Canada for home use the product. ■ Damage to the product caused by accident, fire, floods or acts of God. ■ Improper installation, delivery or maintenance. ■ Product damage or failure of charge, all labor and related service costs to you may not apply to replace the defective...
Quick Specs
Page 1
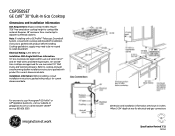
.... Requires 18" minimum from countertop to your Monogram,® GE Profile™ or GE® appliance questions, visit our website at rear for current dimensional data. Installation Information: Before installing, consult installation instructions, packed with product for electrical and gas connections Specification ...dimensional data. For answers to adjacent overhead cabinets. Refer to cooktop and wall oven/warming drawer installation instructions packed with product, for use over select GE 27" and 30" Wall Ovens and Warming Drawers. 30" and 36" Gas cooktops are shown...
.... Requires 18" minimum from countertop to your Monogram,® GE Profile™ or GE® appliance questions, visit our website at rear for current dimensional data. Installation Information: Before installing, consult installation instructions, packed with product for electrical and gas connections Specification ...dimensional data. For answers to adjacent overhead cabinets. Refer to cooktop and wall oven/warming drawer installation instructions packed with product, for use over select GE 27" and 30" Wall Ovens and Warming Drawers. 30" and 36" Gas cooktops are shown...
Installation Instructions
Page 1
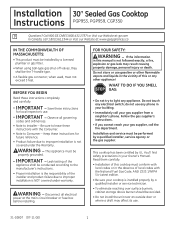
... instructions for local inspector's use. • IMPORTANT - Observe all electrical power at : ge.com In Canada, call your Owner's Manual. Keep these instructions completely and carefully. • IMPORTANT - Installation 30″ Sealed Gas Cooktop Instructions PGP953, PGP959, CGP350 Questions? This appliance must be ...not store or use gasoline or other flammable vapors and liquids in the absence of this manual is installed properly by UL. do not use . 31-10807 (07-11 GE) 1 Follow the gas supplier's instructions. • If you cannot reach your cooktop is not ...
... instructions for local inspector's use. • IMPORTANT - Observe all electrical power at : ge.com In Canada, call your Owner's Manual. Keep these instructions completely and carefully. • IMPORTANT - Installation 30″ Sealed Gas Cooktop Instructions PGP953, PGP959, CGP350 Questions? This appliance must be ...not store or use gasoline or other flammable vapors and liquids in the absence of this manual is installed properly by UL. do not use . 31-10807 (07-11 GE) 1 Follow the gas supplier's instructions. • If you cannot reach your cooktop is not ...

Installation Instructions
Page 2
... Down Brackets MATERIALS YOU MAY NEED Joint Sealant Pipe Fittings Shut-Off Valve CSA-Approved Flexible Gas Line 3/8″ Min. Installation Instructions IMPORTANT SAFETY INSTRUCTIONS ELECTRICAL REQUIREMENTS This appliance must be supplied with the proper voltage and frequency and connected to meet the...this product in a hazardous condition. Check with local codes where applicable. Failure to wire your local utilities for Manufactured Home Installations, ANSI/VCSBS A225.1, or with your cooktop according to meet the requirements of this standard does not apply, you must ...
... Down Brackets MATERIALS YOU MAY NEED Joint Sealant Pipe Fittings Shut-Off Valve CSA-Approved Flexible Gas Line 3/8″ Min. Installation Instructions IMPORTANT SAFETY INSTRUCTIONS ELECTRICAL REQUIREMENTS This appliance must be supplied with the proper voltage and frequency and connected to meet the...this product in a hazardous condition. Check with local codes where applicable. Failure to wire your local utilities for Manufactured Home Installations, ANSI/VCSBS A225.1, or with your cooktop according to meet the requirements of this standard does not apply, you must ...

Installation Instructions
Page 3
... electrical service needed to safely and properly use your cooktop. (Refer to 200°F) generated by the cooktop. 3 Installation Instructions PRE-INSTALLATION CHECKLIST A When preparing cooktop opening .) B Remove packaging materials, grate boxes, regulator with literature, and literature package from... literature pack and read them carefully before you need before beginning installation. D Make sure you have all literature (Owner's Manual, Installation Instructions, etc.) in your home, make sure the inside of the cooktop. Literature Package...
... electrical service needed to safely and properly use your cooktop. (Refer to 200°F) generated by the cooktop. 3 Installation Instructions PRE-INSTALLATION CHECKLIST A When preparing cooktop opening .) B Remove packaging materials, grate boxes, regulator with literature, and literature package from... literature pack and read them carefully before you need before beginning installation. D Make sure you have all literature (Owner's Manual, Installation Instructions, etc.) in your home, make sure the inside of the cooktop. Literature Package...
Installation Instructions
Page 4
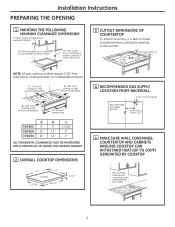
... COOKTOP Wall covering, cabinets and countertop must withstand heat up to combustible material. from cooktop to rear vertical combustibles A - from cooktop to right vertical combustibles B - Installation Instructions PREPARING THE OPENING 1 MAINTAIN THE FOLLOWING MINIMUM CLEARANCE DIMENSIONS 13″ MAX. MIN. Depth of cut 14-1/4″ NOTE: All gas cooktop models require...
... COOKTOP Wall covering, cabinets and countertop must withstand heat up to combustible material. from cooktop to rear vertical combustibles A - from cooktop to right vertical combustibles B - Installation Instructions PREPARING THE OPENING 1 MAINTAIN THE FOLLOWING MINIMUM CLEARANCE DIMENSIONS 13″ MAX. MIN. Depth of cut 14-1/4″ NOTE: All gas cooktop models require...

Installation Instructions
Page 5
...cooktop. Cooktop Cloth under Cooktop 3 LOCATE MOUNTING PARTS Remove the hold - Shut Off Valve Electrical Outlet 12″ Below Countertop Install a manual shut-off the gas supply to the side of the countertop is in an easily accessible location outside the cooktop. ...line in place, screw the hold down onto the protected surface. Installation Instructions INSTALLING THE COOKTOP UNIT 1 LOCATE ELECTRICAL OUTLET AND GAS SHUT-OFF VALVE BENEATH CABINET NEVER REUSE OLD CONNECTORS WHEN INSTALLING THIS UNIT. Install the electrical outlet 12″ below the countertop. 2 PROTECT ...
...cooktop. Cooktop Cloth under Cooktop 3 LOCATE MOUNTING PARTS Remove the hold - Shut Off Valve Electrical Outlet 12″ Below Countertop Install a manual shut-off the gas supply to the side of the countertop is in an easily accessible location outside the cooktop. ...line in place, screw the hold down onto the protected surface. Installation Instructions INSTALLING THE COOKTOP UNIT 1 LOCATE ELECTRICAL OUTLET AND GAS SHUT-OFF VALVE BENEATH CABINET NEVER REUSE OLD CONNECTORS WHEN INSTALLING THIS UNIT. Install the electrical outlet 12″ below the countertop. 2 PROTECT ...

Installation Instructions
Page 6
...or a thread compound approved for 10″ W.C., the inlet pressure must be 1/2″ or 3/4″ pipe. 2 INSTALL REGULATOR NEVER REUSE OLD CONNECTORS WHEN INSTALLING THIS COOKTOP. Make sure the top of water column (W.C.) supply pressure. gas is Pressure Regulator facing towards the cabinet ...pressure and 7″ of the regulator is being used to ensure the regulator connection is designed to all threaded connections. 3 INSTALL REGULATOR ONTO BURNER BOX BOTTOM Screw the regulator onto the burner box bottom pipe connection. FOR PROPER OPERATION, THE MAXIMUM INLET ...
...or a thread compound approved for 10″ W.C., the inlet pressure must be 1/2″ or 3/4″ pipe. 2 INSTALL REGULATOR NEVER REUSE OLD CONNECTORS WHEN INSTALLING THIS COOKTOP. Make sure the top of water column (W.C.) supply pressure. gas is Pressure Regulator facing towards the cabinet ...pressure and 7″ of the regulator is being used to ensure the regulator connection is designed to all threaded connections. 3 INSTALL REGULATOR ONTO BURNER BOX BOTTOM Screw the regulator onto the burner box bottom pipe connection. FOR PROPER OPERATION, THE MAXIMUM INLET ...

Installation Instructions
Page 7
...BUILT-IN OVEN See built-in the cooktop or supply line. Tighten all joints and connections to prevent gas leakage in oven installation for leaks. Disconnect the cooktop and its individual shut-off valve from the gas supply piping system during any pressure testing of... that system at test pressures equal to Hole Center) View from front of Cooktop 7 Installation Instructions 5 CHECK FOR LEAKS LEAK TESTING OF THE APPLIANCE SHALL BE CONDUCTED ACCORDING TO THE MANUFACTURER'S INSTRUCTIONS. Hole From Countertop 90° ...
...BUILT-IN OVEN See built-in the cooktop or supply line. Tighten all joints and connections to prevent gas leakage in oven installation for leaks. Disconnect the cooktop and its individual shut-off valve from the gas supply piping system during any pressure testing of... that system at test pressures equal to Hole Center) View from front of Cooktop 7 Installation Instructions 5 CHECK FOR LEAKS LEAK TESTING OF THE APPLIANCE SHALL BE CONDUCTED ACCORDING TO THE MANUFACTURER'S INSTRUCTIONS. Hole From Countertop 90° ...

Installation Instructions
Page 8
Installation Instructions INSTALLATION-ELECTRICAL CONNECTIONS WARNING - B If you do not have a 3-hole grounded outlet, have a qualified electrician change your cooktop. Disconnect all electrical power at the main circuit ... (GROUND) PRONG FROM THE POWER CORD. A The power cord of your old one. DO NOT USE AN ADAPTER. N Insure proper L ground and firm connection before installing.
Installation Instructions INSTALLATION-ELECTRICAL CONNECTIONS WARNING - B If you do not have a 3-hole grounded outlet, have a qualified electrician change your cooktop. Disconnect all electrical power at the main circuit ... (GROUND) PRONG FROM THE POWER CORD. A The power cord of your old one. DO NOT USE AN ADAPTER. N Insure proper L ground and firm connection before installing.

Installation Instructions
Page 9
... when gas is available to the burner. • Once the burner lights, it should be checked after the cooktop and supply line have been checked. 9 Installation Instructions COOKTOP BURNERS 1 ASSEMBLING THE COOKTOP BURNERS The electrode of the electric igniters should be turned out of the burner is removed. Make sure that...
... when gas is available to the burner. • Once the burner lights, it should be checked after the cooktop and supply line have been checked. 9 Installation Instructions COOKTOP BURNERS 1 ASSEMBLING THE COOKTOP BURNERS The electrode of the electric igniters should be turned out of the burner is removed. Make sure that...

Installation Instructions
Page 10
... you want to be lit with no greater than 1-1/2″ on top of yellow. Burns could result. 1/4″ to measure the flame, please use caution. Installation Instructions COOKTOP BURNERS (CONT.) 3 BURNER IGNITION Cooktop Spark Ignition-When you turn the control knob slowly. The burner flames should be no less than 1/4″...
... you want to be lit with no greater than 1-1/2″ on top of yellow. Burns could result. 1/4″ to measure the flame, please use caution. Installation Instructions COOKTOP BURNERS (CONT.) 3 BURNER IGNITION Cooktop Spark Ignition-When you turn the control knob slowly. The burner flames should be no less than 1/4″...

Installation Instructions
Page 11
... tells you the ratings of the burners and the type of the cooktop. 11 E Recheck Steps: Double check to be sure the cooktop is unobstructed. Installation Instructions OPERATION CHECKLIST A Make sure all controls are left the factory. Check to make sure everything in the OFF position. D When ordering parts, always include...
... tells you the ratings of the burners and the type of the cooktop. 11 E Recheck Steps: Double check to be sure the cooktop is unobstructed. Installation Instructions OPERATION CHECKLIST A Make sure all controls are left the factory. Check to make sure everything in the OFF position. D When ordering parts, always include...
Installation Instructions
Page 12
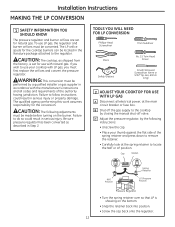
...retainer over so that LP is set for the cooktop burners can be located in the literature package attached to the regulator. Installation Instructions MAKING THE LP CONVERSION 1 SAFETY INFORMATION YOU SHOULD KNOW The pressure regulator and burner orifices are set for the conversion. ... COOKTOP FOR USE WITH LP GAS A Disconnect all codes and requirements of the spring retainer and press down to the cooktop by a qualified installer or gas supplier in Step 2. C Adjust the pressure regulator, by the following adjustments must be converted. B Shut off valve. WARNING: This...
...retainer over so that LP is set for the cooktop burners can be located in the literature package attached to the regulator. Installation Instructions MAKING THE LP CONVERSION 1 SAFETY INFORMATION YOU SHOULD KNOW The pressure regulator and burner orifices are set for the conversion. ... COOKTOP FOR USE WITH LP GAS A Disconnect all codes and requirements of the spring retainer and press down to the cooktop by a qualified installer or gas supplier in Step 2. C Adjust the pressure regulator, by the following adjustments must be converted. B Shut off valve. WARNING: This...

