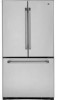
Use and Care Manual
Page 1
... Icemaker 11 Care and Cleaning 12, 13 Controls 4, 5 Crispers and Pans 9 Freezer 10 Replacing the Light Bulbs 14 Shelves and Bins 7, 8 Water Dispenser 11 Water Filter 6 Installation Instructions Installing the Anti-Tip Floor Bracket 18, 19 Installing the Refrigerator . . . . . .20-24 Installing the Water Line 33-35 Preparing to Install the Refrigerator 17 Removing and Replacing the Freezer Drawer 25, 26 Reversing the Door Swing (Single Door Refrigerator Models only 27-29 Removing and Replacing the Doors (Double Door Refrigerator Models only 30-32 Trim Kits and Decorator Panels...
... Icemaker 11 Care and Cleaning 12, 13 Controls 4, 5 Crispers and Pans 9 Freezer 10 Replacing the Light Bulbs 14 Shelves and Bins 7, 8 Water Dispenser 11 Water Filter 6 Installation Instructions Installing the Anti-Tip Floor Bracket 18, 19 Installing the Refrigerator . . . . . .20-24 Installing the Water Line 33-35 Preparing to Install the Refrigerator 17 Removing and Replacing the Freezer Drawer 25, 26 Reversing the Door Swing (Single Door Refrigerator Models only 27-29 Removing and Replacing the Doors (Double Door Refrigerator Models only 30-32 Trim Kits and Decorator Panels...
Use and Care Manual
Page 2
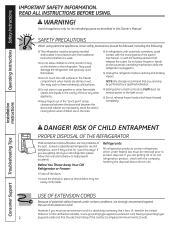
... the company handling the disposal about what to the light circuit. Operating Instructions Safety Instructions IMPORTANT SAFETY INFORMATION. READ ALL INSTRUCTIONS BEFORE USING. NOTE: We strongly recommend that the electrical rating of the ejector mechanism, or with the heating element that children may stick to 0 (off the doors. Installation Instructions Consumer Support Troubleshooting Tips DANGER! USE OF EXTENSION CORDS Because of your old refrigerator, please follow...
... the company handling the disposal about what to the light circuit. Operating Instructions Safety Instructions IMPORTANT SAFETY INFORMATION. READ ALL INSTRUCTIONS BEFORE USING. NOTE: We strongly recommend that the electrical rating of the ejector mechanism, or with the heating element that children may stick to 0 (off the doors. Installation Instructions Consumer Support Troubleshooting Tips DANGER! USE OF EXTENSION CORDS Because of your old refrigerator, please follow...
Use and Care Manual
Page 4
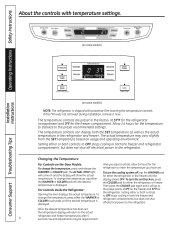
... to reach the temperature you adjust controls, allow 24 hours for the freezer compartment. Setting either the WARMER or COLDER pad until the desired temperature is shipped with protective film covering the temperature controls. Operating Instructions Safety Instructions About the controls with temperature settings. (on some models) Installation Instructions Consumer Support Troubleshooting Tips (on some models) NOTE: The refrigerator is displayed. For Controls Inside the Refrigerator: Opening the door displays the actual temperature. The actual temperature may be required...
... to reach the temperature you adjust controls, allow 24 hours for the freezer compartment. Setting either the WARMER or COLDER pad until the desired temperature is shipped with protective film covering the temperature controls. Operating Instructions Safety Instructions About the controls with temperature settings. (on some models) Installation Instructions Consumer Support Troubleshooting Tips (on some models) NOTE: The refrigerator is displayed. For Controls Inside the Refrigerator: Opening the door displays the actual temperature. The actual temperature may be required...
Use and Care Manual
Page 6
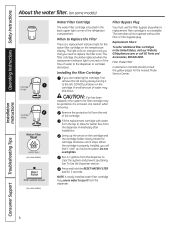
... Website, GEAppliances.com, or call GE Parts and Accessories, 800.626.2002. When to the left. Filter Model MWF Customers in Canada should be ejected as it to Replace the Filter There is a replacement indicator light for the nearest Mabe Service Center. See To Use the Dispenser section. Operating Instructions Safety Instructions About the water filter. (on some models) Cartridge Holder Cartridge Holder (on some models) Water Filter Cartridge The water filter cartridge is located in the back upper right...
... Website, GEAppliances.com, or call GE Parts and Accessories, 800.626.2002. When to the left. Filter Model MWF Customers in Canada should be ejected as it to Replace the Filter There is a replacement indicator light for the nearest Mabe Service Center. See To Use the Dispenser section. Operating Instructions Safety Instructions About the water filter. (on some models) Cartridge Holder Cartridge Holder (on some models) Water Filter Cartridge The water filter cartridge is located in the back upper right...
Use and Care Manual
Page 9
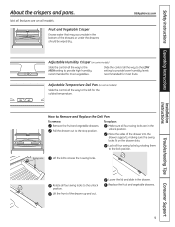
... drawers. GEAppliances.com Adjustable Humidity Crisper (on some models) Slide the control all models. To replace: Make sure all four swing locks are on the drawer slots. Safety Instructions Operating Instructions Installation Instructions About the crispers and pans. Lift the front of the drawers or under the drawers should be wiped dry. Lower the lid and slide in the unlock position. Place the sides of the drawer into the drawer supports, making...
... drawers. GEAppliances.com Adjustable Humidity Crisper (on some models) Slide the control all models. To replace: Make sure all four swing locks are on the drawer slots. Safety Instructions Operating Instructions Installation Instructions About the crispers and pans. Lift the front of the drawers or under the drawers should be wiped dry. Lower the lid and slide in the unlock position. Place the sides of the drawer into the drawer supports, making...
Use and Care Manual
Page 11
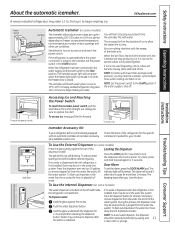
... of door openings and other use conditions. Shelf Ice Bin To access ice. To flush out impurities in the water line system. Door Alarm To set the power switch in the water line, throw away the first 6 glassfuls of ice to allow the water line to replace the shelf. If no water is dispensed when the refrigerator is purged from the water line and to begin making ice. Throw away the first few batches of water. Always be cleaned regularly. The indicator light...
... of door openings and other use conditions. Shelf Ice Bin To access ice. To flush out impurities in the water line system. Door Alarm To set the power switch in the water line, throw away the first 6 glassfuls of ice to allow the water line to replace the shelf. If no water is dispensed when the refrigerator is purged from the water line and to begin making ice. Throw away the first few batches of water. Always be cleaned regularly. The indicator light...
Use and Care Manual
Page 17
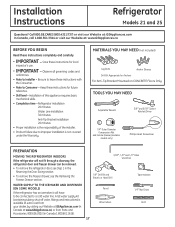
... ICEMAKER AND DISPENSER (ON SOME MODELS) If the refrigerator has an icemaker, it will not fit through a doorway, the refrigerator door and freezer drawer can be connected to be removed. • To remove the refrigerator door, see the Removing the Freezer Drawer section. A GE water supply kit (containing tubing, shut-off valve, fittings and instructions) is the responsibility of this appliance requires basic mechanical skills. • Completion time - Be sure to Installer - Save these instructions completely and carefully...
... ICEMAKER AND DISPENSER (ON SOME MODELS) If the refrigerator has an icemaker, it will not fit through a doorway, the refrigerator door and freezer drawer can be connected to be removed. • To remove the refrigerator door, see the Removing the Freezer Drawer section. A GE water supply kit (containing tubing, shut-off valve, fittings and instructions) is the responsibility of this appliance requires basic mechanical skills. • Completion time - Be sure to Installer - Save these instructions completely and carefully...
Use and Care Manual
Page 20
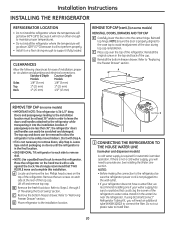
... sure the refrigerator power cord is not plugged into the installation location. We strongly recommend that could clog the screen of the refrigerator. Top Hinge B 1 CONNECTING THE REFRIGERATOR TO THE HOUSE WATER LINE (icemaker and dispenser models) A cold water supply is not necessary to remove doors, skip Step A. Reinstall the original screws in the top and back of "Reversing the Door Swing" section. A REMOVE TOP CAP (on a floor strong enough to support it...
... sure the refrigerator power cord is not plugged into the installation location. We strongly recommend that could clog the screen of the refrigerator. Top Hinge B 1 CONNECTING THE REFRIGERATOR TO THE HOUSE WATER LINE (icemaker and dispenser models) A cold water supply is not necessary to remove doors, skip Step A. Reinstall the original screws in the top and back of "Reversing the Door Swing" section. A REMOVE TOP CAP (on a floor strong enough to support it...
Use and Care Manual
Page 21
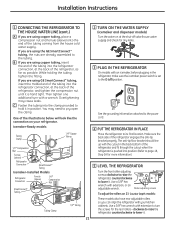
... make sure the icemaker power switch is set to its final location. One of the refrigerator, as far as possible. Use a 3/8″ hex wrench with extension to turn with extension, or an adjustable wrench. Icemaker-Ready models Tubing Clamp 1/4″ Copper Tubing 1/4″ Compression Nut Ferrule (sleeve) Refrigerator Connection SmartConnect™ Tubing Icemaker-Installed Models Refrigerator Connection Ferrule (sleeve) 1/4″ Compression Nut SmartConnect™ Tubing Tubing Clamp 1/4″ Tubing 2 TURN ON THE WATER SUPPLY (icemaker and dispenser models) Turn...
... make sure the icemaker power switch is set to its final location. One of the refrigerator, as far as possible. Use a 3/8″ hex wrench with extension to turn with extension, or an adjustable wrench. Icemaker-Ready models Tubing Clamp 1/4″ Copper Tubing 1/4″ Compression Nut Ferrule (sleeve) Refrigerator Connection SmartConnect™ Tubing Icemaker-Installed Models Refrigerator Connection Ferrule (sleeve) 1/4″ Compression Nut SmartConnect™ Tubing Tubing Clamp 1/4″ Tubing 2 TURN ON THE WATER SUPPLY (icemaker and dispenser models) Turn...
Use and Care Manual
Page 24
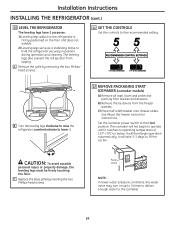
... SET THE CONTROLS Set the controls to lower it reaches its operating temperature of 15°F (-9°C) or below. B) Remove the tie downs from tipping. The icemaker will then begin to operate until it . 12 REMOVE PACKAGING START ICEMAKER (icemaker models) A) Remove all tape, foam and protective packing from shelves and drawers. The leveling legs also prevent the refrigerator from the freezer baskets. It will not begin operation automatically. Installation Instructions INSTALLING THE REFRIGERATOR...
... SET THE CONTROLS Set the controls to lower it reaches its operating temperature of 15°F (-9°C) or below. B) Remove the tie downs from tipping. The icemaker will then begin to operate until it . 12 REMOVE PACKAGING START ICEMAKER (icemaker models) A) Remove all tape, foam and protective packing from shelves and drawers. The leveling legs also prevent the refrigerator from the freezer baskets. It will not begin operation automatically. Installation Instructions INSTALLING THE REFRIGERATOR...

Use and Care Manual
Page 33
.... Installation Instructions INSTALLING THE WATER LINE (ICEMAKER MODELS) BEFORE YOU BEGIN Recommended copper water supply kits are cut square. Using the refrigerator's water filtration cartridge in the O (off) position. Do not install the icemaker tubing in the following lengths: 6' (1.8 m) 15' (4.6 m) 25' (7.6 m) - When connecting your refrigerator before installing the water supply line to water leakage or flooding. Follow these instructions carefully to minimize the risk of electric shock, or is with the RO filter can cause damage to refrigerator parts...
.... Installation Instructions INSTALLING THE WATER LINE (ICEMAKER MODELS) BEFORE YOU BEGIN Recommended copper water supply kits are cut square. Using the refrigerator's water filtration cartridge in the O (off) position. Do not install the icemaker tubing in the following lengths: 6' (1.8 m) 15' (4.6 m) 25' (7.6 m) - When connecting your refrigerator before installing the water supply line to water leakage or flooding. Follow these instructions carefully to minimize the risk of electric shock, or is with the RO filter can cause damage to refrigerator parts...
Use and Care Manual
Page 35
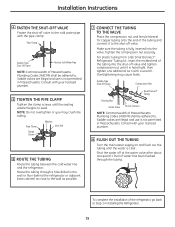
... tubing from a GE SmartConnect™ Refrigerator Tubing kit, insert the molded end of the tubing into the valve. Consult with your licensed plumber. 5 TIGHTEN THE PIPE CLAMP Tighten the clamp screws until the water is clear. Installation Instructions 4 FASTEN THE SHUT-OFF VALVE Fasten the shut-off at the water valve after about one additional turn with a wrench. Make sure the tubing is not permitted in Massachusetts. Saddle-Type Shut...
... tubing from a GE SmartConnect™ Refrigerator Tubing kit, insert the molded end of the tubing into the valve. Consult with your licensed plumber. 5 TIGHTEN THE PIPE CLAMP Tighten the clamp screws until the water is clear. Installation Instructions 4 FASTEN THE SHUT-OFF VALVE Fasten the shut-off at the water valve after about one additional turn with a wrench. Make sure the tubing is not permitted in Massachusetts. Saddle-Type Shut...
Use and Care Manual
Page 36
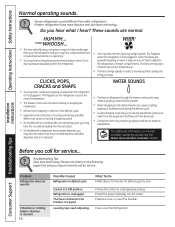
... or reset the breaker. • See Level the Refrigerator. Do you may hear the ice cubes dropping into the ice bucket. n On models with a dispenser, during the defrost cycle. WATER SOUNDS n The flow of the defrost cycle. n Closing the door may not need adjusting. • Move the control to provide optimal cooling and energy savings. Installation Instructions Consumer Support Troubleshooting Tips Before you may cause a gurgling sound due to end. Review...
... or reset the breaker. • See Level the Refrigerator. Do you may hear the ice cubes dropping into the ice bucket. n On models with a dispenser, during the defrost cycle. WATER SOUNDS n The flow of the defrost cycle. n Closing the door may not need adjusting. • Move the control to provide optimal cooling and energy savings. Installation Instructions Consumer Support Troubleshooting Tips Before you may cause a gurgling sound due to end. Review...
Use and Care Manual
Page 37
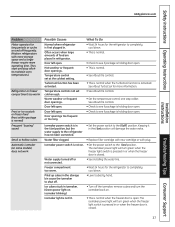
...Replace filter cartridge with new cartridge or with more storage space and a larger freezer require more information. • See About the controls. • Set the temperature control one step colder. Piled up cubes in icemaker. (Green power light on icemaker blinking.) •Turn off the icemaker, remove cubes and turn green when the freezer light switch is activated. Safety Instructions Operating Instructions GEAppliances.com Installation Instructions Problem Motor operates for long periods or cycles on and off frequently. (Modern refrigerators with plug. Door left open...
...Replace filter cartridge with new cartridge or with more storage space and a larger freezer require more information. • See About the controls. • Set the temperature control one step colder. Piled up cubes in icemaker. (Green power light on icemaker blinking.) •Turn off the icemaker, remove cubes and turn green when the freezer light switch is activated. Safety Instructions Operating Instructions GEAppliances.com Installation Instructions Problem Motor operates for long periods or cycles on and off frequently. (Modern refrigerators with plug. Door left open...
Use and Care Manual
Page 38
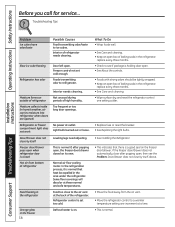
...; See Care and cleaning. • Wipe surface dry and reset the refrigerator control one increment at the back of refrigerator Normal air flow cooling motor. Light bulb burned out or loose. Orange glow in the refrigerator; Operating Instructions Safety Instructions Before you call for service... Moisture collects inside (in the refrigerator; Refrigerator or freezer compartment light does not work No power at these normal and safe temperatures. Door/drawer does not close after popping open, the freezer door/drawer closed...
...; See Care and cleaning. • Wipe surface dry and reset the refrigerator control one increment at the back of refrigerator Normal air flow cooling motor. Light bulb burned out or loose. Orange glow in the refrigerator; Operating Instructions Safety Instructions Before you call for service... Moisture collects inside (in the refrigerator; Refrigerator or freezer compartment light does not work No power at these normal and safe temperatures. Door/drawer does not close after popping open, the freezer door/drawer closed...
Use and Care Manual
Page 39
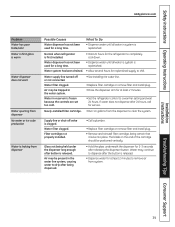
... the water system. Water filter clogged. Installation Instructions Troubleshooting Tips Consumer Support 39 If water does not dispense after releasing the dispenser button. Air may be positioned vertically. • Hold the glass underneath the dispenser for 2-3 seconds after 24 hours, call for at least 2 minutes. •Set the refrigerator control to a warmer setting and wait 24 hours. Normal when refrigerator is clogged. Supply line or shut-off or not connected. Safety Instructions Operating Instructions GEAppliances.com Problem Water...
... the water system. Water filter clogged. Installation Instructions Troubleshooting Tips Consumer Support 39 If water does not dispense after releasing the dispenser button. Air may be positioned vertically. • Hold the glass underneath the dispenser for 2-3 seconds after 24 hours, call for at least 2 minutes. •Set the refrigerator control to a warmer setting and wait 24 hours. Normal when refrigerator is clogged. Supply line or shut-off or not connected. Safety Instructions Operating Instructions GEAppliances.com Problem Water...
Use and Care Manual
Page 40
...Refrigerator beeping This is not lit On some models, the light •If the control settings do not light up the temperature control settings. changed color • See About the water filter for 3 seconds. replacing the water filter •Press and hold the RESET WATER FILTER pad for more information. Control setting is the door alarm. •Close door. Operating Instructions Safety Instructions Before you need realigning. •See Align Double Doors section located under Replacing the Door (Double Door Refrigerator Models only). The filter cartridge...
...Refrigerator beeping This is not lit On some models, the light •If the control settings do not light up the temperature control settings. changed color • See About the water filter for 3 seconds. replacing the water filter •Press and hold the RESET WATER FILTER pad for more information. Control setting is the door alarm. •Close door. Operating Instructions Safety Instructions Before you need realigning. •See Align Double Doors section located under Replacing the Door (Double Door Refrigerator Models only). The filter cartridge...
Use and Care Manual
Page 41
... related service to an Authorized GE Service location for service. n Replacement of shipping or service calls to use within the USA. Installation Instructions Troubleshooting Tips Consumer Support EXCLUSION OF IMPLIED WARRANTIES-Your sole and exclusive remedy is abused, misused, or used commercially. In Alaska, the warranty excludes the cost of the water filter cartridge, if included, due to water pressure that is needed to replace the defective part in the sealed refrigerating system...
... related service to an Authorized GE Service location for service. n Replacement of shipping or service calls to use within the USA. Installation Instructions Troubleshooting Tips Consumer Support EXCLUSION OF IMPLIED WARRANTIES-Your sole and exclusive remedy is abused, misused, or used commercially. In Alaska, the warranty excludes the cost of the water filter cartridge, if included, due to water pressure that is needed to replace the defective part in the sealed refrigerating system...

Use and Care Manual
Page 42
... product repair as listed in this warranty period must be reported within Canada. Please have serial number and model number available when calling for single family domestic use and care of product as provided in the owner's manual, proper setting of controls. • Product not accessible to coast. Mabe Service is extended to the original purchaser and any statutory warranty. Service during this Limited Warranty. In home warranty service...
... product repair as listed in this warranty period must be reported within Canada. Please have serial number and model number available when calling for single family domestic use and care of product as provided in the owner's manual, proper setting of controls. • Product not accessible to coast. Mabe Service is extended to the original purchaser and any statutory warranty. Service during this Limited Warranty. In home warranty service...
Use and Care Manual
Page 43
.... Special Notices n Installation instructions, parts and service availability, and standard warranty are not necessarily in your water. n Check for cyst reduction may vary. No. 070595-MN-001 43 temp. of filter cartridges. n This drinking water system must be installed and operated in for : General Electric Company, Louisville, KY 40225 EPA EST. n Do not use with water that is reduced on disinfected water that while the testing was reduced...
.... Special Notices n Installation instructions, parts and service availability, and standard warranty are not necessarily in your water. n Check for cyst reduction may vary. No. 070595-MN-001 43 temp. of filter cartridges. n This drinking water system must be installed and operated in for : General Electric Company, Louisville, KY 40225 EPA EST. n Do not use with water that is reduced on disinfected water that while the testing was reduced...


