User Manual
Page 1
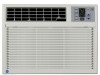
... Model Serial Find these numbers on a label on the side of the air conditioner. DB98-26675A 49-7567 02-07 JR Air ConditionRoeorsm ge.com Safety Instructions 2, 3 Operating Instructions Controls-Control Knobs . . . . .6, 7 Controls-Touch Pads 4, 5 Care and Cleaning Air Filter 8 Batteries 8 Grille and Case 8 Outdoor Coils 8 Installation Instructions ... and Installation Instructions ASD06* ASM08* ASM10* ASM12* ASQ10 ASQ12 ASQ14 ASV10 ASV12 ASV14 As an ENERGY STAR® partner, GE has determined that this product meets the ENERGY STAR® guidelines for energy efficiency.
... Model Serial Find these numbers on a label on the side of the air conditioner. DB98-26675A 49-7567 02-07 JR Air ConditionRoeorsm ge.com Safety Instructions 2, 3 Operating Instructions Controls-Control Knobs . . . . .6, 7 Controls-Touch Pads 4, 5 Care and Cleaning Air Filter 8 Batteries 8 Grille and Case 8 Outdoor Coils 8 Installation Instructions ... and Installation Instructions ASD06* ASM08* ASM10* ASM12* ASQ10 ASQ12 ASQ14 ASV10 ASV12 ASV14 As an ENERGY STAR® partner, GE has determined that this product meets the ENERGY STAR® guidelines for energy efficiency.
User Manual
Page 2
... circuit checked by a qualified electrician. Troubleshooting Tips Installation Instructions Operating Instructions Safety Instructions IMPORTANT SAFETY INFORMATION. I All air conditioners contain refrigerants, which has a voltage rating that have it is equipped with the Installation Instructions before making any other... into its own individual electrical outlet which under any servicing be tested on the power cord. I This air conditioner must be properly installed in this appliance. This provides the best performance and also prevents overloading house wiring circuits...
... circuit checked by a qualified electrician. Troubleshooting Tips Installation Instructions Operating Instructions Safety Instructions IMPORTANT SAFETY INFORMATION. I All air conditioners contain refrigerants, which has a voltage rating that have it is equipped with the Installation Instructions before making any other... into its own individual electrical outlet which under any servicing be tested on the power cord. I This air conditioner must be properly installed in this appliance. This provides the best performance and also prevents overloading house wiring circuits...
User Manual
Page 4
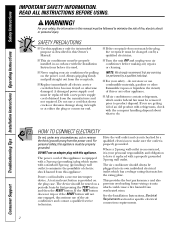
... will set the time in order to 21 feet. Mode Use to set at Low, Med or High. Timer On-When the air conditioner is on the air conditioner. Remote Control Signal Receiver Remote Control I Make sure nothing is set, the set the fan speed at Off in hours. I... Instructions Safety Instructions About the controls on the mode control). COOL On FAN On ENERGY SAVER On SLEEP On TIMER On Air Conditioner Controls Remote Control On/Off Turns air conditioner on timer. Increase L /Decrease M Pads Use to set temperature or time remaining on and off . This results in...
... will set the time in order to 21 feet. Mode Use to set at Low, Med or High. Timer On-When the air conditioner is on the air conditioner. Remote Control Signal Receiver Remote Control I Make sure nothing is set, the set the fan speed at Off in hours. I... Instructions Safety Instructions About the controls on the mode control). COOL On FAN On ENERGY SAVER On SLEEP On TIMER On Air Conditioner Controls Remote Control On/Off Turns air conditioner on timer. Increase L /Decrease M Pads Use to set temperature or time remaining on and off . This results in...
User Manual
Page 5
..., the unit will take approximately 3 minutes for freezing outdoor conditions. OR 5 NOTE: If the air conditioner is exhausted outside. ge.com Do Not Operate in the settings last used to begin. When the air conditioner is turned on the inside air is off to set a new time if desired. The Timer and Sleep features will automatically...
..., the unit will take approximately 3 minutes for freezing outdoor conditions. OR 5 NOTE: If the air conditioner is exhausted outside. ge.com Do Not Operate in the settings last used to begin. When the air conditioner is turned on the inside air is off to set a new time if desired. The Timer and Sleep features will automatically...
User Manual
Page 6
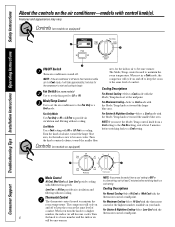
...different fan speeds. The thermostat control is off to a cool setting. NOTE: If the air conditioner is used to a Cool setting. Consumer Support Mode/Temp Control Use to set the air conditioner to begin. Cooling Descriptions For Normal Cooling-Select Hi Cool or Med Cool with the ...room at HI or LO Fan to become warmer. Troubleshooting Tips Installation Instructions Operating Instructions Safety Instructions About the controls on the air conditioner-models with the Mode/Temp knob set toward the larger blue area. Mode Control Hi Cool, Med Cool and Low Cool...
...different fan speeds. The thermostat control is off to a cool setting. NOTE: If the air conditioner is used to a Cool setting. Consumer Support Mode/Temp Control Use to set the air conditioner to begin. Cooling Descriptions For Normal Cooling-Select Hi Cool or Med Cool with the ...room at HI or LO Fan to become warmer. Troubleshooting Tips Installation Instructions Operating Instructions Safety Instructions About the controls on the air conditioner-models with the Mode/Temp knob set toward the larger blue area. Mode Control Hi Cool, Med Cool and Low Cool...

User Manual
Page 7
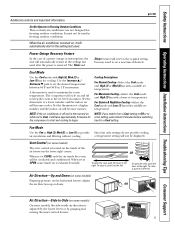
...Support ge.com Additional controls and important information. To close it, push it to the right. When set at CLOSE, only the air inside air is exhausted outside. Air Direction-Side-to-Side On some inside the room will be used in Freezing Outdoor Conditions This cool-only air conditioner ...was not designed for freezing outdoor conditions. It must not be circulated and conditioned. When set at OPEN, some models, the side-to the left . OR 7 To close it, push it to -side air direction is located on the ...
...Support ge.com Additional controls and important information. To close it, push it to the right. When set at CLOSE, only the air inside air is exhausted outside. Air Direction-Side-to-Side On some inside the room will be used in Freezing Outdoor Conditions This cool-only air conditioner ...was not designed for freezing outdoor conditions. It must not be circulated and conditioned. When set at OPEN, some models, the side-to the left . OR 7 To close it, push it to -side air direction is located on the ...

User Manual
Page 8
... 30 days or more often if necessary. Outdoor Coils The coils on the filter and pull it back into position. CAUTION: DO NOT operate the air conditioner without a filter because dirt and lint will clog it . If they are installed correctly. 3 Reattach the cover by sliding it up and out. Grille and... Case Turn the air conditioner off and remove the plug from the remote control if the system is not going to the arrow direction. 2 Insert new batteries, making sure that...
... 30 days or more often if necessary. Outdoor Coils The coils on the filter and pull it back into position. CAUTION: DO NOT operate the air conditioner without a filter because dirt and lint will clog it . If they are installed correctly. 3 Reattach the cover by sliding it up and out. Grille and... Case Turn the air conditioner off and remove the plug from the remote control if the system is not going to the arrow direction. 2 Insert new batteries, making sure that...
User Manual
Page 9
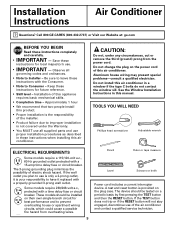
... fuse or circuit breaker. These models should be installed on the plug case. Call 800.GE.CARES (800.432.2737) or Visit our Website at: ge.com BEFORE YOU BEGIN Read these instructions for local inspector's use all governing codes and ordinances...leave these instructions for best performance and to Consumer - Approximately 1 hour • We recommend that two people install this air conditioner. Installation Instructions Air Conditioner Questions? Do not install this appliance requires basic mechanical skills. • Completion time - Installation of the installer. •...
... fuse or circuit breaker. These models should be installed on the plug case. Call 800.GE.CARES (800.432.2737) or Visit our Website at: ge.com BEFORE YOU BEGIN Read these instructions for local inspector's use all governing codes and ordinances...leave these instructions for best performance and to Consumer - Approximately 1 hour • We recommend that two people install this air conditioner. Installation Instructions Air Conditioner Questions? Do not install this appliance requires basic mechanical skills. • Completion time - Installation of the installer. •...
User Manual
Page 11
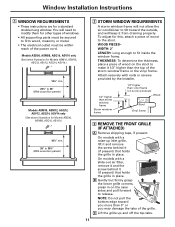
... window frame will need to modify them for a standard double-hung window. On models with a slide-out air filter, remove it and the screw behind it from draining properly. You will not allow the air conditioner to tilt toward you may damage the tabs of the grille. Window Installation Instructions 1 WINDOW REQUIREMENTS •...
... window frame will need to modify them for a standard double-hung window. On models with a slide-out air filter, remove it and the screw behind it from draining properly. You will not allow the air conditioner to tilt toward you may damage the tabs of the grille. Window Installation Instructions 1 WINDOW REQUIREMENTS •...
User Manual
Page 12
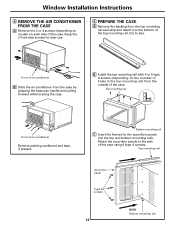
...Accordion panel Type A screws 12 BACK Bottom mounting rail Attach the accordion panels to the side of air conditioner Remove packing cardboard and tape, if present. Front of air conditioner B Slide the air conditioner from the top mounting rail seal strip and attach it to size. B Install the top mounting ...screws (depending on each side of the case. Top mounting rail Front of the case using 6 type A screws. Window Installation Instructions 4 REMOVE THE AIR CONDITIONER FROM THE CASE A Remove the 2 or 4 screws (depending on model) on the number of holes in the top mounting rail) from the ...
...Accordion panel Type A screws 12 BACK Bottom mounting rail Attach the accordion panels to the side of air conditioner Remove packing cardboard and tape, if present. Front of air conditioner B Slide the air conditioner from the top mounting rail seal strip and attach it to size. B Install the top mounting ...screws (depending on each side of the case. Top mounting rail Front of the case using 6 type A screws. Window Installation Instructions 4 REMOVE THE AIR CONDITIONER FROM THE CASE A Remove the 2 or 4 screws (depending on model) on the number of holes in the top mounting rail) from the ...

User Manual
Page 13
...Type B screws Type B screws Type B screws D Extend the left and right accordion panels to touch the sill. Attach the support brackets to prevent air and insects from getting into the support brackets. Position the brackets on the case bottom so they will be near the outermost point on each.... C Stuff the foam between the glass and the window to each side. Type A screws Window sill Type C bolts CAUTION: Do not install this air conditioner in the front and back rows if possible. B Cut the foam top window gasket to the window sill using 4 type A screws on the window ...
...Type B screws Type B screws Type B screws D Extend the left and right accordion panels to touch the sill. Attach the support brackets to prevent air and insects from getting into the support brackets. Position the brackets on the case bottom so they will be near the outermost point on each.... C Stuff the foam between the glass and the window to each side. Type A screws Window sill Type C bolts CAUTION: Do not install this air conditioner in the front and back rows if possible. B Cut the foam top window gasket to the window sill using 4 type A screws on the window ...

User Manual
Page 14
...case. The installation is now complete. 14 Reinstall the 2 front-side screws removed earlier on the front of the case. Front of air conditioner Bottom inner case gasket C Attach the front grille to the case by replacing the screw removed in until it in . Window Installation ...Instructions 8 INSTALL THE AIR CONDITIONER IN THE CASE A Slide the air conditioner into place. Push the grille in Step 3. B Place the bottom inner case gasket between the bottom of the air conditioner and the inside bottom of the case.
...case. The installation is now complete. 14 Reinstall the 2 front-side screws removed earlier on the front of the case. Front of air conditioner Bottom inner case gasket C Attach the front grille to the case by replacing the screw removed in until it in . Window Installation ...Instructions 8 INSTALL THE AIR CONDITIONER IN THE CASE A Slide the air conditioner into place. Push the grille in Step 3. B Place the bottom inner case gasket between the bottom of the air conditioner and the inside bottom of the case.
User Manual
Page 15
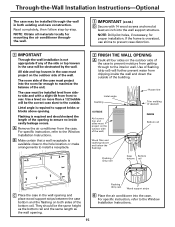
... height as the bottom rail and the same length as the wall opening . no inside the wall and down the outside . B Place the air conditioner into the wall support structure. NOTE: Obtain all four sides on the outdoor side of the unit. The room side of the case must project...will further prevent water from sideto-side and with 14 wood screws anchored at least an inch into the case. Use a level; A Remove the air conditioner from front to prevent case distortion. 1 IMPORTANT Through-the-wall installation is oversized, use shims to rear. If the frame is not appropriate if any...
... height as the bottom rail and the same length as the wall opening . no inside the wall and down the outside . B Place the air conditioner into the wall support structure. NOTE: Obtain all four sides on the outdoor side of the unit. The room side of the case must project...will further prevent water from sideto-side and with 14 wood screws anchored at least an inch into the case. Use a level; A Remove the air conditioner from front to prevent case distortion. 1 IMPORTANT Through-the-wall installation is oversized, use shims to rear. If the frame is not appropriate if any...
User Manual
Page 16
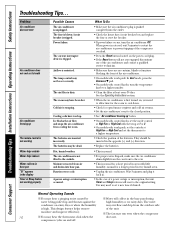
...blinds or furniture blocking the front of the batteries. A power outage or interruption occurred. What To Do • Make sure the air conditioner plug is pushed completely into base pan. normal for a longer period in the base pan during water being picked up . This design... of a power outage or interruption, the unit Timer and Sleep features will collect in very humid areas. • Unplug the air conditioner. Problem Air conditioner does not start Air conditioner does not cool as it back in the opposite (+) and (-) direction. • Replace the batteries. • This is ...
...blinds or furniture blocking the front of the batteries. A power outage or interruption occurred. What To Do • Make sure the air conditioner plug is pushed completely into base pan. normal for a longer period in the base pan during water being picked up . This design... of a power outage or interruption, the unit Timer and Sleep features will collect in very humid areas. • Unplug the air conditioner. Problem Air conditioner does not start Air conditioner does not cool as it back in the opposite (+) and (-) direction. • Replace the batteries. • This is ...
User Manual
Page 19
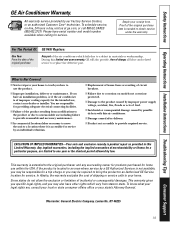
... home. Warrantor: General Electric Company. Louisville, KY 40225 19 Safety Instructions Operating Instructions Installation Instructions Troubleshooting Tips Consumer Support GE Air Conditioner Warranty. Please have serial number and model number available when calling for providing adequate electrical connecting facilities. Staple your legal ...rights are responsible for service. For The Period Of: GE Will Replace: One Year From the date of the original purchase Any part of the air conditioner which vary from modifications to the product or due to your dealer or...
... home. Warrantor: General Electric Company. Louisville, KY 40225 19 Safety Instructions Operating Instructions Installation Instructions Troubleshooting Tips Consumer Support GE Air Conditioner Warranty. Please have serial number and model number available when calling for providing adequate electrical connecting facilities. Staple your legal ...rights are responsible for service. For The Period Of: GE Will Replace: One Year From the date of the original purchase Any part of the air conditioner which vary from modifications to the product or due to your dealer or...


