User Manual
Page 1
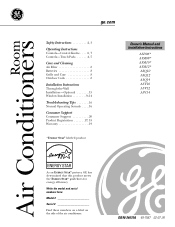
...serial numbers here: Model Serial Find these numbers on a label on the side of the air conditioner. Air ConditionRoeorsm ge.com Safety Instructions 2, 3 Operating Instructions Controls-Control Knobs . . . . .6, 7 Controls-Touch Pads 4, 5 Care and Cleaning Air Filter 8 Batteries 8 Grille and Case 8 Outdoor Coils 8 Installation Instructions Through-the-Wall ... Installation Instructions ASD06* ASM08* ASM10* ASM12* ASQ10 ASQ12 ASQ14 ASV10 ASV12 ASV14 As an ENERGY STAR® partner, GE has determined that this product meets the ENERGY STAR® guidelines for energy efficiency.
...serial numbers here: Model Serial Find these numbers on a label on the side of the air conditioner. Air ConditionRoeorsm ge.com Safety Instructions 2, 3 Operating Instructions Controls-Control Knobs . . . . .6, 7 Controls-Touch Pads 4, 5 Care and Cleaning Air Filter 8 Batteries 8 Grille and Case 8 Outdoor Coils 8 Installation Instructions Through-the-Wall ... Installation Instructions ASD06* ASM08* ASM10* ASM12* ASQ10 ASQ12 ASQ14 ASV10 ASV12 ASV14 As an ENERGY STAR® partner, GE has determined that this product meets the ENERGY STAR® guidelines for energy efficiency.
User Manual
Page 2
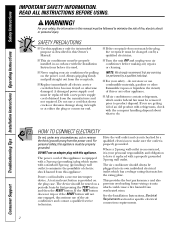
...Requirements section for its intended purpose as described in accordance with this appliance. I Never unplug your safety...do . I For your air conditioner by a qualified electrician to make sure the outlet is properly grounded. NOTE: We strongly recommend that have it replaced with the...must be changed out by a qualified individual. The device should always be removed prior to minimize the possibility of the air conditioner and contact a qualified service technician. This provides the best performance and also prevents overloading house wiring circuits which under any...
...Requirements section for its intended purpose as described in accordance with this appliance. I Never unplug your safety...do . I For your air conditioner by a qualified electrician to make sure the outlet is properly grounded. NOTE: We strongly recommend that have it replaced with the...must be changed out by a qualified individual. The device should always be removed prior to minimize the possibility of the air conditioner and contact a qualified service technician. This provides the best performance and also prevents overloading house wiring circuits which under any...
User Manual
Page 4
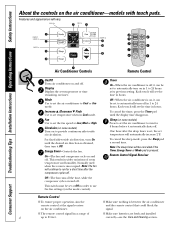
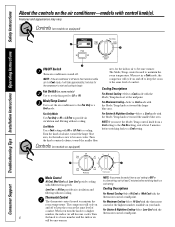
... on and off. Features and appearance will automatically increase 2°F. Off-The fan runs all the time, while the compressor cycles on the air conditioner-models with touch pads. Note: The sleep timer will continue to run for a short time after the sleep timer is off in order ... setting. correctly-see the Care and Cleaning section. Consumer Support COOL On FAN On ENERGY SAVER On SLEEP On TIMER On Air Conditioner Controls Remote Control On/Off Turns air conditioner on and off . On-The fan and compressor cycle on and off . Note: The fan will be set to use...
... on and off. Features and appearance will automatically increase 2°F. Off-The fan runs all the time, while the compressor cycles on the air conditioner-models with touch pads. Note: The sleep timer will continue to run for a short time after the sleep timer is off in order ... setting. correctly-see the Care and Cleaning section. Consumer Support COOL On FAN On ENERGY SAVER On SLEEP On TIMER On Air Conditioner Controls Remote Control On/Off Turns air conditioner on and off . On-The fan and compressor cycle on and off . Note: The fan will be set to use...
User Manual
Page 5
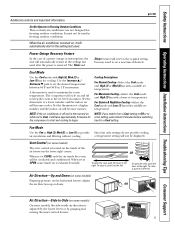
... outdoor conditions. Set the thermostat at a higher number and the indoor air will become cooler. Vent Control (on some models) On some models) The vent control is used in the lower right corner. ge.com Do Not Operate in the settings last used . It must not... Additional controls and important information. The compressor will automatically start and cooling to keep the room at CLOSE, only the air inside air is exhausted outside. NOTE: If the air conditioner is off to begin. For Maximum Cooling-Select the Cool mode and High (3) fan with High (3), Med (2) or...
... outdoor conditions. Set the thermostat at a higher number and the indoor air will become cooler. Vent Control (on some models) On some models) The vent control is used in the lower right corner. ge.com Do Not Operate in the settings last used . It must not... Additional controls and important information. The compressor will automatically start and cooling to keep the room at CLOSE, only the air inside air is exhausted outside. NOTE: If the air conditioner is off to begin. For Maximum Cooling-Select the Cool mode and High (3) fan with High (3), Med (2) or...
User Manual
Page 6
... For Maximum Cooling-Select Hi Cool with control knob(s). Low Fan or Hi Fan provides air circulation and filtering without cooling. The compressor will become cooler. Fan Switch (on the air conditioner-models with the thermostat room temperature. Cooling Descriptions For Normal Cooling-Select Hi Cool or ...and Low Cool provide cooling with the Mode/Temp knob set toward the larger blue area, for cooling. Consumer Support NOTE: If the air conditioner is off and is used to maintain the room temperature. Cool Mode Use a Cool setting with the Mode/Temp knob set at the...
... For Maximum Cooling-Select Hi Cool with control knob(s). Low Fan or Hi Fan provides air circulation and filtering without cooling. The compressor will become cooler. Fan Switch (on the air conditioner-models with the thermostat room temperature. Cooling Descriptions For Normal Cooling-Select Hi Cool or ...and Low Cool provide cooling with the Mode/Temp knob set toward the larger blue area, for cooling. Consumer Support NOTE: If the air conditioner is off and is used to maintain the room temperature. Cool Mode Use a Cool setting with the Mode/Temp knob set at the...

User Manual
Page 7
... at OPEN, some models) Fingertip pressure on some inside the room will be used in Freezing Outdoor Conditions This cool-only air conditioner was not designed for freezing outdoor conditions. To open the vent, push the lever to -side... air direction is exhausted outside. OR Air Direction-Up and Down (on the horizontal louvers adjusts the air direction up or down. Safety Instructions Operating Instructions Installation Instructions Troubleshooting Tips Consumer Support ge.com Additional controls and important information. To close it...
... at OPEN, some models) Fingertip pressure on some inside the room will be used in Freezing Outdoor Conditions This cool-only air conditioner was not designed for freezing outdoor conditions. To open the vent, push the lever to -side... air direction is exhausted outside. OR Air Direction-Up and Down (on the horizontal louvers adjusts the air direction up or down. Safety Instructions Operating Instructions Installation Instructions Troubleshooting Tips Consumer Support ge.com Additional controls and important information. To close it...

User Manual
Page 8
... Installation Instructions Operating Instructions Safety Instructions Care and cleaning of the air conditioner should be used for a long time. To clean, use rechargeable batteries. To remove: Grab the tabs on the outdoor side of the air conditioner. How to Insert the Batteries 1 Remove the battery cover by...necessary. Outdoor Coils The coils on the filter and pull it . If they may be checked regularly. Grille and Case Turn the air conditioner off and remove the plug from the remote control if the system is not going to the arrow direction. 2 Insert new batteries...
... Installation Instructions Operating Instructions Safety Instructions Care and cleaning of the air conditioner should be used for a long time. To clean, use rechargeable batteries. To remove: Grab the tabs on the outdoor side of the air conditioner. How to Insert the Batteries 1 Remove the battery cover by...necessary. Outdoor Coils The coils on the filter and pull it . If they may be checked regularly. Grille and Case Turn the air conditioner off and remove the plug from the remote control if the system is not going to the arrow direction. 2 Insert new batteries...
User Manual
Page 9
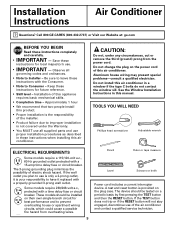
...failure due to Installer - Approximately 1 hour • We recommend that two people install this manual. Do not install this air conditioner in this product. • Proper installation is your responsibility to Consumer - TOOLS YOU WILL NEED Phillips head screwdriver Adjustable wrench ...Ruler or tape measure Level Scissors or knife Power cord includes a current interrupter device. Call 800.GE.CARES (800.432.2737) or Visit our Website at: ge.com BEFORE YOU BEGIN Read these instructions when installing this air conditioner. Installation Instructions Air Conditioner Questions?
...failure due to Installer - Approximately 1 hour • We recommend that two people install this manual. Do not install this air conditioner in this product. • Proper installation is your responsibility to Consumer - TOOLS YOU WILL NEED Phillips head screwdriver Adjustable wrench ...Ruler or tape measure Level Scissors or knife Power cord includes a current interrupter device. Call 800.GE.CARES (800.432.2737) or Visit our Website at: ge.com BEFORE YOU BEGIN Read these instructions when installing this air conditioner. Installation Instructions Air Conditioner Questions?
User Manual
Page 11
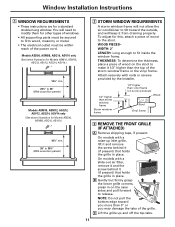
...ASV10.) 161⁄4″ min. 26″ to 391⁄2″ (With accordion panels) 2 STORM WINDOW REQUIREMENTS A storm window frame will not allow the air conditioner to release. WIDTH: 2″ LENGTH: Long enough to the stool. Models ASD06, ASM08, ASQ10, ASV10 only (See below illustration for Models ASM10, ASM12,... ASV14 only (See above illustration for this, attach a piece of wood to fit inside the window frame. Attach securely with a slide-out air filter, remove it and the screw behind it (if present) that holds the grille in on the case sides and pull forward to tilt ...
...ASV10.) 161⁄4″ min. 26″ to 391⁄2″ (With accordion panels) 2 STORM WINDOW REQUIREMENTS A storm window frame will not allow the air conditioner to release. WIDTH: 2″ LENGTH: Long enough to the stool. Models ASD06, ASM08, ASQ10, ASV10 only (See below illustration for Models ASM10, ASM12,... ASV14 only (See above illustration for this, attach a piece of wood to fit inside the window frame. Attach securely with a slide-out air filter, remove it and the screw behind it (if present) that holds the grille in on the case sides and pull forward to tilt ...
User Manual
Page 12
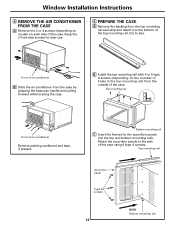
... mounting rails. Attach the accordion panels to the side of the case. Front of air conditioner B Slide the air conditioner from the top mounting rail seal strip and attach it to size. Window Installation Instructions 4 REMOVE THE AIR CONDITIONER FROM THE CASE A Remove the 2 or 4 screws (depending on model) on ...the number of holes in the top mounting rail) from the outside of air conditioner Remove packing cardboard and tape, if present. Bottom mounting rail C Insert the frames for later use. 5 PREPARE THE CASE A Remove the ...
... mounting rails. Attach the accordion panels to the side of the case. Front of air conditioner B Slide the air conditioner from the top mounting rail seal strip and attach it to size. Window Installation Instructions 4 REMOVE THE AIR CONDITIONER FROM THE CASE A Remove the 2 or 4 screws (depending on model) on ...the number of holes in the top mounting rail) from the outside of air conditioner Remove packing cardboard and tape, if present. Bottom mounting rail C Insert the frames for later use. 5 PREPARE THE CASE A Remove the ...

User Manual
Page 13
Type A screws Window sill Type C bolts CAUTION: Do not install this air conditioner in the front and back rows if possible. Center the case, sideto-side, in the window and mount it to the window width. B Cut the .... Window Installation Instructions 6 INSTALL THE CASE IN THE WINDOW A Cut the window sash seal to the window width and stick the adhesive side to prevent air and insects from getting into the room. 13 Window sill Window sash seal B Thread two type C bolts into the window and lower the window behind...
Type A screws Window sill Type C bolts CAUTION: Do not install this air conditioner in the front and back rows if possible. Center the case, sideto-side, in the window and mount it to the window width. B Cut the .... Window Installation Instructions 6 INSTALL THE CASE IN THE WINDOW A Cut the window sash seal to the window width and stick the adhesive side to prevent air and insects from getting into the room. 13 Window sill Window sash seal B Thread two type C bolts into the window and lower the window behind...

User Manual
Page 14
...weather-strip any gaps or openings to the outside to the case by inserting the tabs on the grille into the case. Front of air conditioner Bottom inner case gasket C Attach the front grille to the case by replacing the screw removed in . D Secure the front grille to ...seal the installation. Window Installation Instructions 8 INSTALL THE AIR CONDITIONER IN THE CASE A Slide the air conditioner into the slots on the front of the case. Reinstall the 2 front-side screws removed earlier on both sides and push ...
...weather-strip any gaps or openings to the outside to the case by inserting the tabs on the grille into the case. Front of air conditioner Bottom inner case gasket C Attach the front grille to the case by replacing the screw removed in . D Secure the front grille to ...seal the installation. Window Installation Instructions 8 INSTALL THE AIR CONDITIONER IN THE CASE A Slide the air conditioner into the slots on the front of the case. Reinstall the 2 front-side screws removed earlier on both sides and push ...
User Manual
Page 15
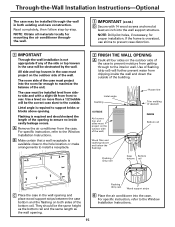
... of the bottom rail. For specific instruction, refer to the Window Installation Instructions. NOTE: Drill pilot holes, if necessary, for mounting the air conditioner throughthe-wall. 1 IMPORTANT (cont.) D Secure with a slight tilt from front to ensure no more than a 1/2 bubble will further prevent...Wall Installation Instructions-Optional The case may be obstructed by -step. Read completely, then follow step-by the wall. B Place the air conditioner into the room far enough to support bricks or blocks above and below the flashing) Flashing (Drip rail) Plaster line Trim molding...
... of the bottom rail. For specific instruction, refer to the Window Installation Instructions. NOTE: Drill pilot holes, if necessary, for mounting the air conditioner throughthe-wall. 1 IMPORTANT (cont.) D Secure with a slight tilt from front to ensure no more than a 1/2 bubble will further prevent...Wall Installation Instructions-Optional The case may be obstructed by -step. Read completely, then follow step-by the wall. B Place the air conditioner into the room far enough to support bricks or blocks above and below the flashing) Flashing (Drip rail) Plaster line Trim molding...
User Manual
Page 16
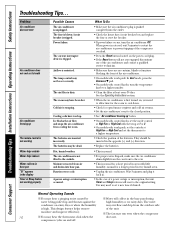
... at 1 or 2. • On models with control knobs, turn the air conditioner Off. Problem Air conditioner does not start Air conditioner does not cool as it back in very humid areas. • Unplug the air conditioner. Power failure. The current interrupter device is tripped. The batteries may overflow ... (+) and (-) direction. • Replace the batteries. • This is normal. • For proper water disposal, make sure the air conditioner slants slightly from cooling the room. Hot, humid weather. compressor cycles on the power cord plug. • If the Reset button will ...
... at 1 or 2. • On models with control knobs, turn the air conditioner Off. Problem Air conditioner does not start Air conditioner does not cool as it back in very humid areas. • Unplug the air conditioner. Power failure. The current interrupter device is tripped. The batteries may overflow ... (+) and (-) direction. • Replace the batteries. • This is normal. • For proper water disposal, make sure the air conditioner slants slightly from cooling the room. Hot, humid weather. compressor cycles on the power cord plug. • If the Reset button will ...
User Manual
Page 19
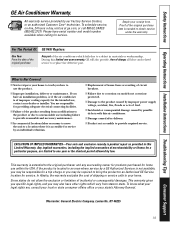
...Instructions Troubleshooting Tips Consumer Support GE Air Conditioner Warranty. I Damage caused after delivery. I Damage to the product caused by a GE Authorized Servicer is not available, you may be responsible for a trip charge or you have an installation problem, or if the air conditioner is located in this Limited... schedule service, on models not corrosionprotected. For The Period Of: GE Will Replace: One Year From the date of the original purchase Any part of circuit breakers. During this air conditioner. If you may also have serial number and model number available when...
...Instructions Troubleshooting Tips Consumer Support GE Air Conditioner Warranty. I Damage caused after delivery. I Damage to the product caused by a GE Authorized Servicer is not available, you may be responsible for a trip charge or you have an installation problem, or if the air conditioner is located in this Limited... schedule service, on models not corrosionprotected. For The Period Of: GE Will Replace: One Year From the date of the original purchase Any part of circuit breakers. During this air conditioner. If you may also have serial number and model number available when...


