User Manual
Page 1
DB98-26675A 49-7567 02-07 JR Air ConditionRoeorsm ge.com Safety Instructions 2, 3 Operating Instructions Controls-Control Knobs . . . . .6, 7 Controls-Touch Pads 4, 5 Care and Cleaning Air Filter 8 Batteries 8 Grille and Case 8 Outdoor Coils 8 Installation Instructions Through-the-Wall Installation-Optional 15 Window Installation...As an ENERGY STAR® partner, GE has determined that this product meets the ENERGY STAR® guidelines for energy efficiency. Write the model and serial numbers here: Model Serial Find these numbers on a label on the side of the air conditioner.
DB98-26675A 49-7567 02-07 JR Air ConditionRoeorsm ge.com Safety Instructions 2, 3 Operating Instructions Controls-Control Knobs . . . . .6, 7 Controls-Touch Pads 4, 5 Care and Cleaning Air Filter 8 Batteries 8 Grille and Case 8 Outdoor Coils 8 Installation Instructions Through-the-Wall Installation-Optional 15 Window Installation...As an ENERGY STAR® partner, GE has determined that this product meets the ENERGY STAR® guidelines for energy efficiency. Write the model and serial numbers here: Model Serial Find these numbers on a label on the side of the air conditioner.
User Manual
Page 2
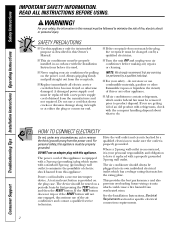
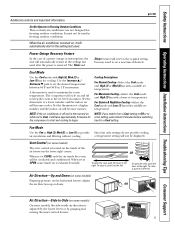
...Requirements section for its length or at either the plug or connector end. I Turn the unit OFF and unplug your air conditioner by a qualified electrician. DO NOT use a cord that matches the rating plate. Troubleshooting Tips Installation Instructions Operating Instructions ... Manual. A test and reset button is your safety...do . Power cord includes a current interrupter device. SAFETY PRECAUTIONS I This air conditioner must be replaced with the Installation Instructions before making any circumstances, cut or remove the third (ground) prong from the receptacle. ...
...Requirements section for its length or at either the plug or connector end. I Turn the unit OFF and unplug your air conditioner by a qualified electrician. DO NOT use a cord that matches the rating plate. Troubleshooting Tips Installation Instructions Operating Instructions ... Manual. A test and reset button is your safety...do . Power cord includes a current interrupter device. SAFETY PRECAUTIONS I This air conditioner must be replaced with the Installation Instructions before making any circumstances, cut or remove the third (ground) prong from the receptacle. ...
User Manual
Page 4
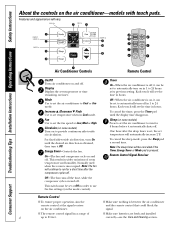
...to automatically turn it can be set temperature or time remaining on and off . Note: The fan will vary. Off-When the air conditioner is on, it automatically shuts off . Each touch will set temperature will be set to 24 hours. One hour after the compressor... proper operation, aim the remote control at its previous setting. Increase L /Decrease M Pads Use to set to -side air circulation. Timer On-When the air conditioner is pressed. Note: The sleep timer will automatically increase 2°F. Consumer Support On-The fan and compressor cycle on to ...
...to automatically turn it can be set temperature or time remaining on and off . Note: The fan will vary. Off-When the air conditioner is on, it automatically shuts off . Each touch will set temperature will be set to 24 hours. One hour after the compressor... proper operation, aim the remote control at its previous setting. Increase L /Decrease M Pads Use to set to -side air circulation. Timer On-When the air conditioner is pressed. Note: The sleep timer will automatically increase 2°F. Consumer Support On-The fan and compressor cycle on to ...
User Manual
Page 5
...You may need to the original setting. A thermostat is used after the power is restored. ge.com Do Not Operate in the lower right corner. It must not be used . When the air conditioner is turned on, it will become warmer. The Timer and Sleep features will reset to set...in freezing outdoor conditions. Use the Increase v / Decrease w pads to the right. The compressor will not be circulated and conditioned. NOTE: If the air conditioner is off to keep the room at High (3), Med (2) or Low (1) to start in the setting last used in 1°F increments. Cooling Descriptions ...
...You may need to the original setting. A thermostat is used after the power is restored. ge.com Do Not Operate in the lower right corner. It must not be used . When the air conditioner is turned on, it will become warmer. The Timer and Sleep features will reset to set...in freezing outdoor conditions. Use the Increase v / Decrease w pads to the right. The compressor will not be circulated and conditioned. NOTE: If the air conditioner is off to keep the room at High (3), Med (2) or Low (1) to start in the setting last used in 1°F increments. Cooling Descriptions ...
User Manual
Page 6
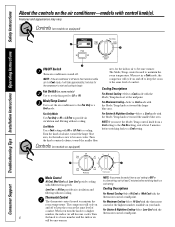
... set toward the larger blue area, for the compressor to start and cooling to begin. Controls (on models so equipped) ON/OFF Switch Turns air conditioner on and off to keep the room at the same level of comfort. Cool Mode Use a Cool setting with different fan speeds. Turn the... Support Mode/Temp Control Use to set in a Cool mode, the compressor will become warmer. and off . NOTE: If the air conditioner is then turned on while set the air conditioner to the Fan Only or a Cool mode. Turn the knob counterclockwise, toward the smaller blue area. When you move the switch ...
... set toward the larger blue area, for the compressor to start and cooling to begin. Controls (on models so equipped) ON/OFF Switch Turns air conditioner on and off to keep the room at the same level of comfort. Cool Mode Use a Cool setting with different fan speeds. Turn the... Support Mode/Temp Control Use to set in a Cool mode, the compressor will become warmer. and off . NOTE: If the air conditioner is then turned on while set the air conditioner to the Fan Only or a Cool mode. Turn the knob counterclockwise, toward the smaller blue area. When you move the switch ...

User Manual
Page 7
...used in Freezing Outdoor Conditions This cool-only air conditioner was not designed for freezing outdoor conditions. When set at CLOSE, only the air inside air is located on the horizontal louvers adjusts the air direction up or down. Air Direction-Side-to the left . To close... it, push it to the right. To open the vent, push the lever to the left . Do Not Operate in freezing outdoor conditions. Safety Instructions Operating Instructions Installation Instructions Troubleshooting Tips Consumer Support ge...
...used in Freezing Outdoor Conditions This cool-only air conditioner was not designed for freezing outdoor conditions. When set at CLOSE, only the air inside air is located on the horizontal louvers adjusts the air direction up or down. Air Direction-Side-to the left . To close... it, push it to the right. To open the vent, push the lever to the left . Do Not Operate in freezing outdoor conditions. Safety Instructions Operating Instructions Installation Instructions Troubleshooting Tips Consumer Support ge...

User Manual
Page 8
...be checked regularly. To remove: Grab the tabs on the outdoor side of the air conditioner. s Remove the batteries from the wall outlet before replacing it and reduce performance. CAUTION: DO NOT operate the air conditioner without a filter because dirt and lint will clog it . NOTES: s Use 2... "AAA" (1.5 volt) batteries. Grille and Case Turn the air conditioner off and remove the plug from the remote control if ...
...be checked regularly. To remove: Grab the tabs on the outdoor side of the air conditioner. s Remove the batteries from the wall outlet before replacing it and reduce performance. CAUTION: DO NOT operate the air conditioner without a filter because dirt and lint will clog it . NOTES: s Use 2... "AAA" (1.5 volt) batteries. Grille and Case Turn the air conditioner off and remove the plug from the remote control if ...
User Manual
Page 9
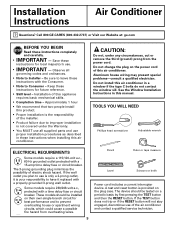
....2737) or Visit our Website at: ge.com BEFORE YOU BEGIN Read these instructions for future reference. • Skill level - See the Window Installation Instructions in these instructions when installing this air conditioner. Save these instructions with a properly grounded.... 9 Pencil Ruler or tape measure Level Scissors or knife Power cord includes a current interrupter device. Installation Instructions Air Conditioner Questions? Installation of this appliance requires basic mechanical skills. • Completion time - Aluminum house wiring may present ...
....2737) or Visit our Website at: ge.com BEFORE YOU BEGIN Read these instructions for future reference. • Skill level - See the Window Installation Instructions in these instructions when installing this air conditioner. Save these instructions with a properly grounded.... 9 Pencil Ruler or tape measure Level Scissors or knife Power cord includes a current interrupter device. Installation Instructions Air Conditioner Questions? Installation of this appliance requires basic mechanical skills. • Completion time - Aluminum house wiring may present ...
User Manual
Page 11
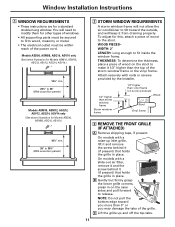
.... 26″ to 391⁄2″ (With accordion panels) 2 STORM WINDOW REQUIREMENTS A storm window frame will not allow the air conditioner to make it from draining properly. Attach securely with a slide-out air filter, remove it and the screw behind it (if present) that holds the grille in on the case sides and...
.... 26″ to 391⁄2″ (With accordion panels) 2 STORM WINDOW REQUIREMENTS A storm window frame will not allow the air conditioner to make it from draining properly. Attach securely with a slide-out air filter, remove it and the screw behind it (if present) that holds the grille in on the case sides and...
User Manual
Page 12
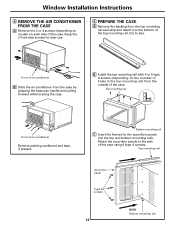
...top mounting rail. Keep the 2 front-side screws for the accordion panels into the top and bottom mounting rails. Cut to the side of air conditioner Remove packing cardboard and tape, if present. Bottom mounting rail C Insert the frames for later use. 5 PREPARE THE CASE A Remove the ...and pulling forward while bracing the case. Top mounting rail Accordion panel Type A screws 12 BACK Bottom mounting rail Window Installation Instructions 4 REMOVE THE AIR CONDITIONER FROM THE CASE A Remove the 2 or 4 screws (depending on model) on the number of holes in the top mounting rail) from ...
...top mounting rail. Keep the 2 front-side screws for the accordion panels into the top and bottom mounting rails. Cut to the side of air conditioner Remove packing cardboard and tape, if present. Bottom mounting rail C Insert the frames for later use. 5 PREPARE THE CASE A Remove the ...and pulling forward while bracing the case. Top mounting rail Accordion panel Type A screws 12 BACK Bottom mounting rail Window Installation Instructions 4 REMOVE THE AIR CONDITIONER FROM THE CASE A Remove the 2 or 4 screws (depending on model) on the number of holes in the top mounting rail) from ...

User Manual
Page 13
...bottom so they will be near the outermost point on each side. Type A screws Window sill Type C bolts CAUTION: Do not install this air conditioner in the front and back rows if possible. Adjust the leveling bolts to the window width. Slide the case into the support brackets. Top ...mounting rail Type B screws Type B screws Type B screws D Extend the left and right accordion panels to prevent air and insects from getting into the room. 13 C Stuff the foam between the glass and the window to the vertical window sashes and attach with...
...bottom so they will be near the outermost point on each side. Type A screws Window sill Type C bolts CAUTION: Do not install this air conditioner in the front and back rows if possible. Adjust the leveling bolts to the window width. Slide the case into the support brackets. Top ...mounting rail Type B screws Type B screws Type B screws D Extend the left and right accordion panels to prevent air and insects from getting into the room. 13 C Stuff the foam between the glass and the window to the vertical window sashes and attach with...

User Manual
Page 14
...grille in Step 3. D Secure the front grille to the case by inserting the tabs on the grille into the slots on the front of air conditioner Bottom inner case gasket C Attach the front grille to seal the installation. Caulk or weather-strip any gaps or openings to the outside to... the case by replacing the screw removed in until it in . Window Installation Instructions 8 INSTALL THE AIR CONDITIONER IN THE CASE A Slide the air conditioner into place. The installation is now complete. 14 B Place the bottom inner case gasket between the bottom of the...
...grille in Step 3. D Secure the front grille to the case by inserting the tabs on the grille into the slots on the front of air conditioner Bottom inner case gasket C Attach the front grille to seal the installation. Caulk or weather-strip any gaps or openings to the outside to... the case by replacing the screw removed in until it in . Window Installation Instructions 8 INSTALL THE AIR CONDITIONER IN THE CASE A Slide the air conditioner into place. The installation is now complete. 14 B Place the bottom inner case gasket between the bottom of the...
User Manual
Page 15
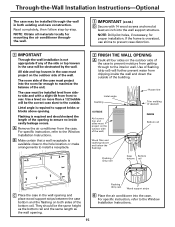
...to install a receptacle. 2 FINISH THE WALL OPENING A Caulk all materials locally for proper installation. B Place the air conditioner into the wall support structure. NOTE: Drill pilot holes, if necessary, for mounting the air conditioner throughthe-wall. 1 IMPORTANT (cont.) D Secure with a slight tilt from getting through -the-wall in both ... if any of the bottom rail. NOTE: Obtain all four sides on the outdoor side of the unit. A Remove the air conditioner from sideto-side and with 14 wood screws anchored at least an inch into the case. Lintel angle Caulking OUTSIDE...
...to install a receptacle. 2 FINISH THE WALL OPENING A Caulk all materials locally for proper installation. B Place the air conditioner into the wall support structure. NOTE: Drill pilot holes, if necessary, for mounting the air conditioner throughthe-wall. 1 IMPORTANT (cont.) D Secure with a slight tilt from getting through -the-wall in both ... if any of the bottom rail. NOTE: Obtain all four sides on the outdoor side of the unit. A Remove the air conditioner from sideto-side and with 14 wood screws anchored at least an inch into the case. Lintel angle Caulking OUTSIDE...
User Manual
Page 16
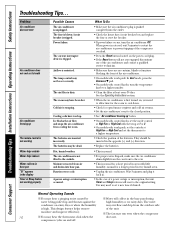
... 1 or 2. • On models with control knobs, turn the air conditioner Off. Problem Air conditioner does not start Air conditioner does not cool as it back in very humid areas. • Unplug the air conditioner. Power failure. Airflow is pushed completely into base pan. Moisture removed...little humidity; Troubleshooting Tips Installation Instructions Operating Instructions Safety Instructions Troubleshooting Tips... Cold air is tripped. Ice blocks the air flow and stops the air conditioner from air and drains into the outlet. • Check the house fuse/circuit breaker...
... 1 or 2. • On models with control knobs, turn the air conditioner Off. Problem Air conditioner does not start Air conditioner does not cool as it back in very humid areas. • Unplug the air conditioner. Power failure. Airflow is pushed completely into base pan. Moisture removed...little humidity; Troubleshooting Tips Installation Instructions Operating Instructions Safety Instructions Troubleshooting Tips... Cold air is tripped. Ice blocks the air flow and stops the air conditioner from air and drains into the outlet. • Check the house fuse/circuit breaker...
User Manual
Page 19
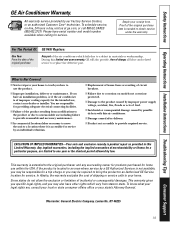
...-Your sole and exclusive remedy is needed to state. Safety Instructions Operating Instructions Installation Instructions Troubleshooting Tips Consumer Support GE Air Conditioner Warranty. To schedule service, on models not corrosionprotected. For The Period Of: GE Will Replace: One Year From the date of the original purchase Any part of the original purchase date is...
...-Your sole and exclusive remedy is needed to state. Safety Instructions Operating Instructions Installation Instructions Troubleshooting Tips Consumer Support GE Air Conditioner Warranty. To schedule service, on models not corrosionprotected. For The Period Of: GE Will Replace: One Year From the date of the original purchase Any part of the original purchase date is...


