
Owners Manual
Page 1
... determined that this manual, visit our Website at ge.com. Air ConditionRoeorms ge.com Owner's Manual and Installation Instructions Safety Instructions 2, 3 Operating Instructions Controls-Control Knobs . . . . 8, 9 Controls-Touch Pads 4-6 Care and Cleaning Air Filter 11 Front Grille 10 Grille and Case 10 Outdoor Coils 10 Installation Instructions Before You Begin 12, 13 Installing...
... determined that this manual, visit our Website at ge.com. Air ConditionRoeorms ge.com Owner's Manual and Installation Instructions Safety Instructions 2, 3 Operating Instructions Controls-Control Knobs . . . . 8, 9 Controls-Touch Pads 4-6 Care and Cleaning Air Filter 11 Front Grille 10 Grille and Case 10 Outdoor Coils 10 Installation Instructions Before You Begin 12, 13 Installing...
Owners Manual
Page 2
... with a new power supply cord obtained from the power cord. A damaged power supply cord must be tested on a periodic basis by pulling on the plug case. Do not use combustible materials, gasoline or other appliance. I Never unplug your air conditioner by first pressing the TEST button and then the RESET button...
... with a new power supply cord obtained from the power cord. A damaged power supply cord must be tested on a periodic basis by pulling on the plug case. Do not use combustible materials, gasoline or other appliance. I Never unplug your air conditioner by first pressing the TEST button and then the RESET button...
Owners Manual
Page 10
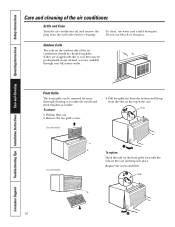
...not use water and a mild detergent. Consumer Support Troubleshooting Tips Installation Instructions Care and Cleaning Operating Instructions Safety Instructions Care and cleaning of the case. On some models To replace: Hook the tabs on the front grille even with dirt or soot they may be removed for more thorough ... or to make the model and serial numbers accessible. Front Grille The front grille can be professionally steam cleaned, a service available through your GE service outlet. Pull the grille out from the bottom and lift up from the wall outlet before cleaning.
...not use water and a mild detergent. Consumer Support Troubleshooting Tips Installation Instructions Care and Cleaning Operating Instructions Safety Instructions Care and cleaning of the case. On some models To replace: Hook the tabs on the front grille even with dirt or soot they may be removed for more thorough ... or to make the model and serial numbers accessible. Front Grille The front grille can be professionally steam cleaned, a service available through your GE service outlet. Pull the grille out from the bottom and lift up from the wall outlet before cleaning.
Owners Manual
Page 12
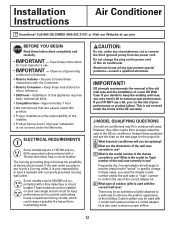
... leave these instructions for future reference. • Skill level - Custom grilles may be replacing? Installation of the wall case currently in existing wall cases. The 3-prong grounding plug minimizes the possibility of a new GE Wall Case. Aluminum house wiring may fit in use . • IMPORTANT - IMPORTANT! These models should be an architectural grille attached...
... leave these instructions for future reference. • Skill level - Custom grilles may be replacing? Installation of the wall case currently in existing wall cases. The 3-prong grounding plug minimizes the possibility of a new GE Wall Case. Aluminum house wiring may fit in use . • IMPORTANT - IMPORTANT! These models should be an architectural grille attached...
Owners Manual
Page 13
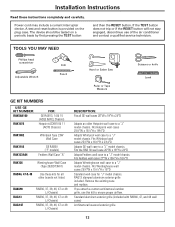
...tested on the plug case. Fits Whirlpool wall cases 257⁄8″W x 161⁄2″H x 231⁄8″D Adapts GE wall case to a "J" model chassis. Fits Westinghouse wall cases 257⁄8″W x 157⁄16″H x 16″D Standard wall case for all GE wall cases 26″W x ...18″H x 24″D Adapts an older Hotpoint wall case to a "J" model chassis. ...
...tested on the plug case. Fits Whirlpool wall cases 257⁄8″W x 161⁄2″H x 231⁄8″D Adapts GE wall case to a "J" model chassis. Fits Westinghouse wall cases 257⁄8″W x 157⁄16″H x 16″D Standard wall case for all GE wall cases 26″W x ...18″H x 24″D Adapts an older Hotpoint wall case to a "J" model chassis. ...
Owners Manual
Page 14
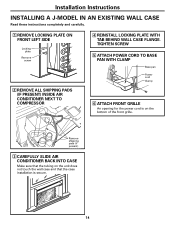
Remove shipping pads (if present) 3 CAREFULLY SLIDE AIR CONDITIONER BACK INTO CASE Make sure that the tubing on the unit does not touch the wall case and that the case installation is on the bottom of the front grille. TIGHTEN SCREW 5 ATTACH POWER CORD TO BASE PAN WITH CLAMP ... Power cord Clamp 6 ATTACH FRONT GRILLE An opening for the power cord is secure. 14 Installation Instructions INSTALLING A J-MODEL IN AN EXISTING WALL CASE Read these instructions completely and carefully. 1 REMOVE LOCKING PLATE ON FRONT LEFT SIDE Locking plate Remove screw 2 REMOVE ALL SHIPPING PADS (IF PRESENT)...
Remove shipping pads (if present) 3 CAREFULLY SLIDE AIR CONDITIONER BACK INTO CASE Make sure that the tubing on the unit does not touch the wall case and that the case installation is on the bottom of the front grille. TIGHTEN SCREW 5 ATTACH POWER CORD TO BASE PAN WITH CLAMP ... Power cord Clamp 6 ATTACH FRONT GRILLE An opening for the power cord is secure. 14 Installation Instructions INSTALLING A J-MODEL IN AN EXISTING WALL CASE Read these instructions completely and carefully. 1 REMOVE LOCKING PLATE ON FRONT LEFT SIDE Locking plate Remove screw 2 REMOVE ALL SHIPPING PADS (IF PRESENT)...
Owners Manual
Page 15
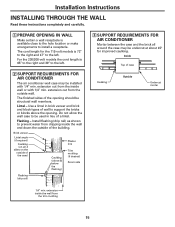
... min. extension out from the trim molding 15 Inside Top of the building. Brick veneer Lintel angle (if required) Caulking (on all around the case may be undercut at about 45° for the 115-volt models is 72″ to the right and 47″ to the left .... 2 SUPPORT REQUIREMENTS FOR AIR CONDITIONER The air conditioner wall case may be installed with 1/4″ min. Installation Instructions INSTALLING THROUGH THE WALL Read these instructions completely and carefully. 1 PREPARE OPENING IN WALL Make certain...
... min. extension out from the trim molding 15 Inside Top of the building. Brick veneer Lintel angle (if required) Caulking (on all around the case may be undercut at about 45° for the 115-volt models is 72″ to the right and 47″ to the left .... 2 SUPPORT REQUIREMENTS FOR AIR CONDITIONER The air conditioner wall case may be installed with 1/4″ min. Installation Instructions INSTALLING THROUGH THE WALL Read these instructions completely and carefully. 1 PREPARE OPENING IN WALL Make certain...
Owners Manual
Page 16
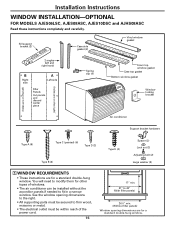
...With filler panels) 261⁄4″ min. (Without filler panels) Window opening dimensions are for a standard double-hung window. Sill support bracket (2) Case side gasket (2) Vinyl window gasket 2 angles (left and right hand) B Right side A Left side Filler Panels Cut panels and discard center ...piece Spring clip (4) Foam top window gasket Case top gasket Bottom window gasket Window locking bracket (holes are on the left) (holes are on the right) Air conditioner Support bracket hardware...
...With filler panels) 261⁄4″ min. (Without filler panels) Window opening dimensions are for a standard double-hung window. Sill support bracket (2) Case side gasket (2) Vinyl window gasket 2 angles (left and right hand) B Right side A Left side Filler Panels Cut panels and discard center ...piece Spring clip (4) Foam top window gasket Case top gasket Bottom window gasket Window locking bracket (holes are on the left) (holes are on the right) Air conditioner Support bracket hardware...
Owners Manual
Page 17
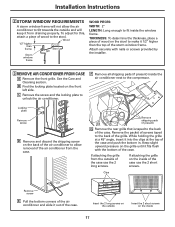
... 17 While holding the grille at a 45° angle, insert it into the clips at the top of the case. If attaching the grille on the inside of the case use the 2 long screws. Insert the 2 long screws on the outside and will keep it 1/2″ higher than...Pull the bottom corners of the air conditioner and slide it fits flush with nails or screws provided by the installer. 3 REMOVE AIR CONDITIONER FROM CASE A Remove the front grille. Installation Instructions 2 STORM WINDOW REQUIREMENTS A storm window frame will not allow removal of the air conditioner from draining properly....
... 17 While holding the grille at a 45° angle, insert it into the clips at the top of the case. If attaching the grille on the inside of the case use the 2 long screws. Insert the 2 long screws on the outside and will keep it 1/2″ higher than...Pull the bottom corners of the air conditioner and slide it fits flush with nails or screws provided by the installer. 3 REMOVE AIR CONDITIONER FROM CASE A Remove the front grille. Installation Instructions 2 STORM WINDOW REQUIREMENTS A storm window frame will not allow removal of the air conditioner from draining properly....
Owners Manual
Page 19
Remove the paper backing from the case side gasket and attach it to locate the holes in the angles. Place the spring clips 3″ from the top and the bottom. Hook the ...
Remove the paper backing from the case side gasket and attach it to locate the holes in the angles. Place the spring clips 3″ from the top and the bottom. Hook the ...

Owners Manual
Page 20
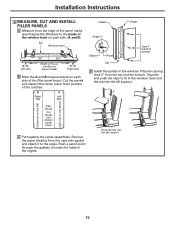
... a type D screw. 20 Cut the gasket on each side to the window on each side with the rear edge, sticky side down. NOTES: • The case should have a 1/8″ minimum tilt toward the outside. • Be sure the seal gasket and panel gaskets remain in position and do not roll with... holes in the panel angles. Insert the 4 type A screws through the slits in the case line up with the case. Drill pilot holes into the window until the holes in the gasket. Bend the gasket forward to the case, open the window, and place the gasket along the mark on top of the...
... a type D screw. 20 Cut the gasket on each side to the window on each side with the rear edge, sticky side down. NOTES: • The case should have a 1/8″ minimum tilt toward the outside. • Be sure the seal gasket and panel gaskets remain in position and do not roll with... holes in the panel angles. Insert the 4 type A screws through the slits in the case line up with the case. Drill pilot holes into the window until the holes in the gasket. Bend the gasket forward to the case, open the window, and place the gasket along the mark on top of the...
Owners Manual
Page 21
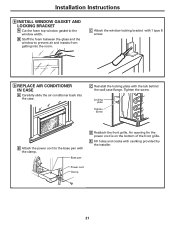
B Stuff the foam between the glass and the window to the base pan with 1 type E screw. 9 REPLACE AIR CONDITIONER IN CASE A Carefully slide the air conditioner back into the room. Base pan D Reattach the front grille. Locking plate Tighten screw B Attach the power cord ...to prevent air and insects from getting into the case. Installation Instructions 8 INSTALL WINDOW GASKET AND LOCKING BRACKET A Cut the foam top window gasket to the window width. An opening for the power cord ...
B Stuff the foam between the glass and the window to the base pan with 1 type E screw. 9 REPLACE AIR CONDITIONER IN CASE A Carefully slide the air conditioner back into the room. Base pan D Reattach the front grille. Locking plate Tighten screw B Attach the power cord ...to prevent air and insects from getting into the case. Installation Instructions 8 INSTALL WINDOW GASKET AND LOCKING BRACKET A Cut the foam top window gasket to the window width. An opening for the power cord ...
Owners Manual
Page 22
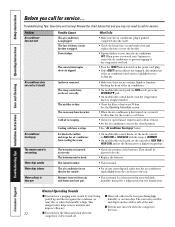
... you need to the rear. • This is not tilted to the closed position. • See "Air conditioner freezing up . This and drip from the case front to call for a short period in areas with little humidity; I The fan may run even when the compressor does not. 22 I Water will not...
... you need to the rear. • This is not tilted to the closed position. • See "Air conditioner freezing up . This and drip from the case front to call for a short period in areas with little humidity; I The fan may run even when the compressor does not. 22 I Water will not...
