
Owners Manual
Page 1
... and Cleaning Air Filter 11 Front Grille 10 Grille and Case 10 Outdoor Coils 10 Installation Instructions Before You Begin 12, 13 Installing a J-Model in an Existing Wall Case 14 Through-the-Wall Installation-Optional 15 Window Installation- Write the model and serial numbers here: Model Serial Find these numbers on a label on models so equipped 16-21 Troubleshooting Tips 22 Normal Operating Sounds . . . . 22 Consumer Support Consumer Support . . . Optional on the front of this product meets the ENERGY STAR...
... and Cleaning Air Filter 11 Front Grille 10 Grille and Case 10 Outdoor Coils 10 Installation Instructions Before You Begin 12, 13 Installing a J-Model in an Existing Wall Case 14 Through-the-Wall Installation-Optional 15 Window Installation- Write the model and serial numbers here: Model Serial Find these numbers on a label on models so equipped 16-21 Troubleshooting Tips 22 Normal Operating Sounds . . . . 22 Consumer Support Consumer Support . . . Optional on the front of this product meets the ENERGY STAR...
Owners Manual
Page 2
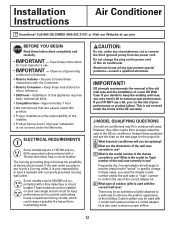
... not repaired. I For your air conditioner before it replaced with the company handling disposal about what to product disposal. A test and reset button is properly grounded. READ ALL INSTRUCTIONS BEFORE USING. Have the wall outlet and circuit checked by first pressing the TEST button and then the RESET button. Consumer Support Troubleshooting Tips Installation Instructions Care and Cleaning Operating Instructions Safety Instructions IMPORTANT SAFETY INFORMATION. Power cord may include a current interrupter device. Always grip plug...
... not repaired. I For your air conditioner before it replaced with the company handling disposal about what to product disposal. A test and reset button is properly grounded. READ ALL INSTRUCTIONS BEFORE USING. Have the wall outlet and circuit checked by first pressing the TEST button and then the RESET button. Consumer Support Troubleshooting Tips Installation Instructions Care and Cleaning Operating Instructions Safety Instructions IMPORTANT SAFETY INFORMATION. Power cord may include a current interrupter device. Always grip plug...
Owners Manual
Page 3
... local codes permit, a temporary connection may be a UL-listed, 14 gauge, 3-wire grounding type appliance extension cord having a grounding type plug and outlet and that the electrical rating of an adapter plug. READ AND FOLLOW THIS SAFETY INFORMATION CAREFULLY. SAVE THESE INSTRUCTIONS 3 CAUTION: DO NOT use of the power cord. Safety Instructions Operating Instructions Care and Cleaning Installation Instructions Troubleshooting Tips Consumer Support ge.com WARNING! If the adapter ground terminal breaks, DO NOT USE the air conditioner...
... local codes permit, a temporary connection may be a UL-listed, 14 gauge, 3-wire grounding type appliance extension cord having a grounding type plug and outlet and that the electrical rating of an adapter plug. READ AND FOLLOW THIS SAFETY INFORMATION CAREFULLY. SAVE THESE INSTRUCTIONS 3 CAUTION: DO NOT use of the power cord. Safety Instructions Operating Instructions Care and Cleaning Installation Instructions Troubleshooting Tips Consumer Support ge.com WARNING! If the adapter ground terminal breaks, DO NOT USE the air conditioner...
Owners Manual
Page 4
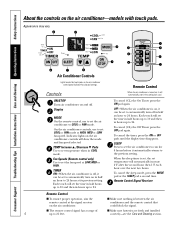
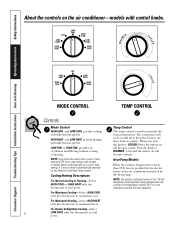
... Support Troubleshooting Tips Installation Instructions Care and Cleaning Operating Instructions Safety Instructions About the controls on and off. OFF-When the air conditioner is off, it can be set the air conditioner to 24 hours at HIGH, MED or LOW fan speed. I The remote control signal has a range of I Make sure nothing is set, the set the time in half hours up to automatically turn off in COOL mode. Display MODE On the remote control, use to set...
... Support Troubleshooting Tips Installation Instructions Care and Cleaning Operating Instructions Safety Instructions About the controls on and off. OFF-When the air conditioner is off, it can be set the air conditioner to 24 hours at HIGH, MED or LOW fan speed. I The remote control signal has a range of I Make sure nothing is set, the set the time in half hours up to automatically turn off in COOL mode. Display MODE On the remote control, use to set...

Owners Manual
Page 5
... a COOL setting to OFF or to a fan setting, wait at OPEN, some inside the room will take approximately 3 minutes for the desired fan speed. Safety Instructions Operating Instructions Care and Cleaning Installation Instructions Troubleshooting Tips Consumer Support ge.com COOL MODE Remote Control 1. When set the desired temperature 60°F to begin. A thermostat is exhausted outside. When set temperature. FAN MODE Use the FAN mode to direct the air left or right. 5 To open or close the vent: 1. Remove the front grille. 2. Locating hole Locating hole Screw hole...
... a COOL setting to OFF or to a fan setting, wait at OPEN, some inside the room will take approximately 3 minutes for the desired fan speed. Safety Instructions Operating Instructions Care and Cleaning Installation Instructions Troubleshooting Tips Consumer Support ge.com COOL MODE Remote Control 1. When set the desired temperature 60°F to begin. A thermostat is exhausted outside. When set temperature. FAN MODE Use the FAN mode to direct the air left or right. 5 To open or close the vent: 1. Remove the front grille. 2. Locating hole Locating hole Screw hole...
Owners Manual
Page 6
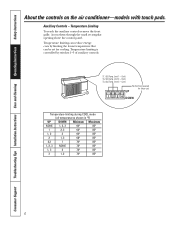
... 85° 6 Temperature limiting is controlled by limiting the lowest temperature that can reduce energy costs by switches 1-3 of auxiliary controls. Cool) TL2 (C) (Temp. Limit 2 - TL1 (C) (Temp. Limit 1 - Auxiliary Controls - Limit 3 - Cool) No function (reserved for cooling. Consumer Support Troubleshooting Tips Installation Instructions Care and Cleaning Operating Instructions Safety Instructions About the controls on the air conditioner-models with touch pads. Cool) TL3 (C) (Temp. Temperature Limiting To reach the auxiliary controls remove the front grille.
... 85° 6 Temperature limiting is controlled by limiting the lowest temperature that can reduce energy costs by switches 1-3 of auxiliary controls. Cool) TL2 (C) (Temp. Limit 2 - TL1 (C) (Temp. Limit 1 - Auxiliary Controls - Limit 3 - Cool) No function (reserved for cooling. Consumer Support Troubleshooting Tips Installation Instructions Care and Cleaning Operating Instructions Safety Instructions About the controls on the air conditioner-models with touch pads. Cool) TL3 (C) (Temp. Temperature Limiting To reach the auxiliary controls remove the front grille.
Owners Manual
Page 8
... control knobs. When you move the switch from a cool or heat setting to OFF or to a fan setting, wait at the same level of by the electric heater in the 115-volt heat pump model operates during defrost when the outdoor coil temperature is automatically provided on and off to maintain the room temperature. Turn the knob to COOLER (blue) the indoor air will become cooler. NOTE: The electric resistance heater in the air conditioner...
... control knobs. When you move the switch from a cool or heat setting to OFF or to a fan setting, wait at the same level of by the electric heater in the 115-volt heat pump model operates during defrost when the outdoor coil temperature is automatically provided on and off to maintain the room temperature. Turn the knob to COOLER (blue) the indoor air will become cooler. NOTE: The electric resistance heater in the air conditioner...
Owners Manual
Page 9
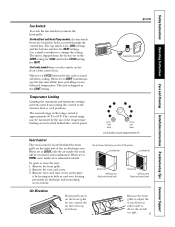
... cool temp Each position equals approximately 3°F. The normal range of the temperature limiting screws located behind the front grille on and off when cooling. When set at CLOSE, only the air inside air is shipped in holes accessed through the control box. When set at CYCLE (down . Remove the front grille. 2. Safety Instructions Operating Instructions Care and Cleaning Installation Instructions Troubleshooting Tips Consumer Support Fan Switch To reach the fan switch(es) remove the front grille. On Heat/Cool and Heat Pump models...
... cool temp Each position equals approximately 3°F. The normal range of the temperature limiting screws located behind the front grille on and off when cooling. When set at CLOSE, only the air inside air is shipped in holes accessed through the control box. When set at CYCLE (down . Remove the front grille. 2. Safety Instructions Operating Instructions Care and Cleaning Installation Instructions Troubleshooting Tips Consumer Support Fan Switch To reach the fan switch(es) remove the front grille. On Heat/Cool and Heat Pump models...
Owners Manual
Page 10
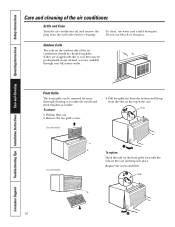
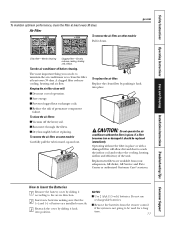
... up from the wall outlet before cleaning. Grille and Case Turn the air conditioner off and remove the plug from the tabs on the top of the air conditioner. Replace the screws and filter. Do not use water and a mild detergent. Consumer Support Troubleshooting Tips Installation Instructions Care and Cleaning Operating Instructions Safety Instructions Care and cleaning of the case. If they may be removed for more thorough cleaning or to make the model and serial numbers accessible.
... up from the wall outlet before cleaning. Grille and Case Turn the air conditioner off and remove the plug from the tabs on the top of the air conditioner. Replace the screws and filter. Do not use water and a mild detergent. Consumer Support Troubleshooting Tips Installation Instructions Care and Cleaning Operating Instructions Safety Instructions Care and cleaning of the case. If they may be removed for more thorough cleaning or to make the model and serial numbers accessible.
Owners Manual
Page 11
... NOTES: I Dry thoroughly before cleaning. ge.com Dirty filter-Needs cleaning Clogged filter-Greatly reduces cooling, heating and airflow. Turn the air conditioner off the heavy soil. Keeping the air filter clean will allow dirt and dust to reach the indoor coil and reduce the cooling, heating, airflow and efficiency of operation. I Decrease cost of the unit. Do not use rechargeable batteries. A clogged filter reduces cooling, heating and air flow. I Save energy. To remove the air filter, on other models: FRONT FRONT...
... NOTES: I Dry thoroughly before cleaning. ge.com Dirty filter-Needs cleaning Clogged filter-Greatly reduces cooling, heating and airflow. Turn the air conditioner off the heavy soil. Keeping the air filter clean will allow dirt and dust to reach the indoor coil and reduce the cooling, heating, airflow and efficiency of operation. I Decrease cost of the unit. Do not use rechargeable batteries. A clogged filter reduces cooling, heating and air flow. I Save energy. To remove the air filter, on other models: FRONT FRONT...
Owners Manual
Page 12
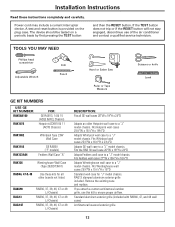
...; Proper installation is also used with the Consumer. • Note to Installer - Installation Instructions Air Conditioner Questions? Call 800.GE.CARES (800.432.2737) or Visit our Website at: ge.com BEFORE YOU BEGIN Read these cases, you need a kit to properly adapt the case to another brand model "series" or specific vintage. Save these instructions with the current wall case? Installation of outdoor grille is not covered under the Warranty...
...; Proper installation is also used with the Consumer. • Note to Installer - Installation Instructions Air Conditioner Questions? Call 800.GE.CARES (800.432.2737) or Visit our Website at: ge.com BEFORE YOU BEGIN Read these cases, you need a kit to properly adapt the case to another brand model "series" or specific vintage. Save these instructions with the current wall case? Installation of outdoor grille is not covered under the Warranty...
Owners Manual
Page 13
... other brands not listed. Remove the existing case and replace. If the TEST button does not trip or if the RESET button will not stay engaged, discontinue use this kit to a "J" model chassis. Fits the RAB 30 wall case 26″W x 18″H x 24″D Adapts Fedders wall case to a "J" model chassis. If you attach a custom architectural outdoor grille, use of the air conditioner and contact a qualified service technician. Standard...
... other brands not listed. Remove the existing case and replace. If the TEST button does not trip or if the RESET button will not stay engaged, discontinue use this kit to a "J" model chassis. Fits the RAB 30 wall case 26″W x 18″H x 24″D Adapts Fedders wall case to a "J" model chassis. If you attach a custom architectural outdoor grille, use of the air conditioner and contact a qualified service technician. Standard...
Owners Manual
Page 14
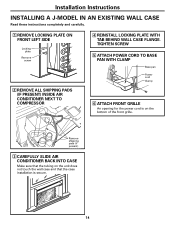
...) INSIDE AIR CONDITIONER NEXT TO COMPRESSOR 4 REINSTALL LOCKING PLATE WITH TAB BEHIND WALL CASE FLANGE. Remove shipping pads (if present) 3 CAREFULLY SLIDE AIR CONDITIONER BACK INTO CASE Make sure that the tubing on the bottom of the front grille. TIGHTEN SCREW 5 ATTACH POWER CORD TO BASE PAN WITH CLAMP Base pan Power cord Clamp 6 ATTACH FRONT GRILLE An opening for the power cord is on the unit does...
...) INSIDE AIR CONDITIONER NEXT TO COMPRESSOR 4 REINSTALL LOCKING PLATE WITH TAB BEHIND WALL CASE FLANGE. Remove shipping pads (if present) 3 CAREFULLY SLIDE AIR CONDITIONER BACK INTO CASE Make sure that the tubing on the bottom of the front grille. TIGHTEN SCREW 5 ATTACH POWER CORD TO BASE PAN WITH CLAMP Base pan Power cord Clamp 6 ATTACH FRONT GRILLE An opening for the power cord is on the unit does...
Owners Manual
Page 15
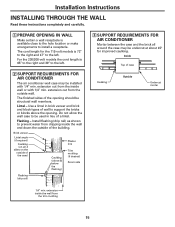
... the inside wall or with 1/4″ min. Install flashing (drip rail) as shown to prevent water from dripping inside the wall from the trim molding 15 Installation Instructions INSTALLING THROUGH THE WALL Read these instructions completely and carefully. 1 PREPARE OPENING IN WALL Make certain a wall receptacle is 72″ to the right and 47″ to the left . 2 SUPPORT REQUIREMENTS FOR AIR CONDITIONER The air conditioner wall case may be used in...
... the inside wall or with 1/4″ min. Install flashing (drip rail) as shown to prevent water from dripping inside the wall from the trim molding 15 Installation Instructions INSTALLING THROUGH THE WALL Read these instructions completely and carefully. 1 PREPARE OPENING IN WALL Make certain a wall receptacle is 72″ to the right and 47″ to the left . 2 SUPPORT REQUIREMENTS FOR AIR CONDITIONER The air conditioner wall case may be used in...
Owners Manual
Page 16
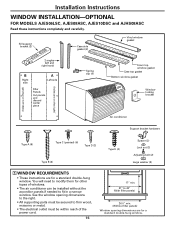
... • These instructions are for other types of windows. • The air conditioner can be installed without the accordion panels if needed to 43″ (With filler panels) 261⁄4″ min. (Without filler panels) Window opening dimensions to the right. • All supporting parts must be secured to firm wood, masonry or metal. • The electrical outlet must be within reach of the power cord. 16 17...
... • These instructions are for other types of windows. • The air conditioner can be installed without the accordion panels if needed to 43″ (With filler panels) 261⁄4″ min. (Without filler panels) Window opening dimensions to the right. • All supporting parts must be secured to firm wood, masonry or metal. • The electrical outlet must be within reach of the power cord. 16 17...
Owners Manual
Page 17
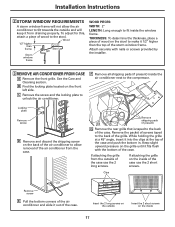
... screws on the inside of the air conditioner from the outside of the case. C Remove the screw and the locking plate to the compressor. Clips Remove screw E Pull the bottom corners of the air conditioner and slide it fits flush with nails or screws provided by the installer. 3 REMOVE AIR CONDITIONER FROM CASE A Remove the front grille. If attaching the grille on the inside 17 Wood...
... screws on the inside of the air conditioner from the outside of the case. C Remove the screw and the locking plate to the compressor. Clips Remove screw E Pull the bottom corners of the air conditioner and slide it fits flush with nails or screws provided by the installer. 3 REMOVE AIR CONDITIONER FROM CASE A Remove the front grille. If attaching the grille on the inside 17 Wood...
Owners Manual
Page 19
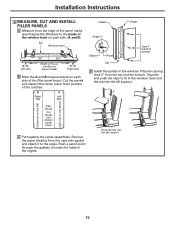
.... Push a pencil point through the gaskets to locate the holes in the window. Installation Instructions 6 MEASURE, CUT AND INSTALL FILLER PANELS A Measure from the edge of the panel marks (see Prepare the Window) to the inside of the window track on each side of the filler panel board. B A Right Left side side Gasket Angle Angle Gasket Panel Tab Type C (painted screws) D Install the panels in the angles.
.... Push a pencil point through the gaskets to locate the holes in the window. Installation Instructions 6 MEASURE, CUT AND INSTALL FILLER PANELS A Measure from the edge of the panel marks (see Prepare the Window) to the inside of the window track on each side of the filler panel board. B A Right Left side side Gasket Angle Angle Gasket Panel Tab Type C (painted screws) D Install the panels in the angles.
Owners Manual
Page 21
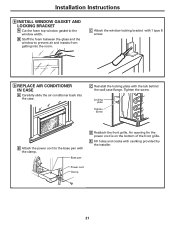
... holes and cracks with the clamp. Power cord Clamp 21 Locking plate Tighten screw B Attach the power cord to the base pan with caulking provided by the installer. An opening for the power cord is on the bottom of the front grille. C Reinstall the locking plate with 1 type E screw. 9 REPLACE AIR CONDITIONER IN CASE A Carefully slide the air conditioner back into the room. Installation Instructions 8 INSTALL WINDOW GASKET AND LOCKING BRACKET A Cut...
... holes and cracks with the clamp. Power cord Clamp 21 Locking plate Tighten screw B Attach the power cord to the base pan with caulking provided by the installer. An opening for the power cord is on the bottom of the front grille. C Reinstall the locking plate with 1 type E screw. 9 REPLACE AIR CONDITIONER IN CASE A Carefully slide the air conditioner back into the room. Installation Instructions 8 INSTALL WINDOW GASKET AND LOCKING BRACKET A Cut...
Owners Manual
Page 22
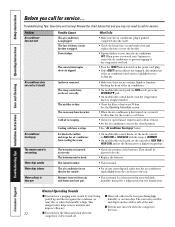
... filter at least every 30 days. Power failure. Cooling coils have been hot. The batteries may not be set the thermostat to a higher temperature. • Check the position of the compressor overload. • Press the RESET button located on , you need to the closed position. • See "Air conditioner freezing up The remote control is not working Water drips outside . normal for open furnace registers and cold air returns. • Set the air conditioner's vent...
... filter at least every 30 days. Power failure. Cooling coils have been hot. The batteries may not be set the thermostat to a higher temperature. • Check the position of the compressor overload. • Press the RESET button located on , you need to the closed position. • See "Air conditioner freezing up The remote control is not working Water drips outside . normal for open furnace registers and cold air returns. • Set the air conditioner's vent...
Owners Manual
Page 23
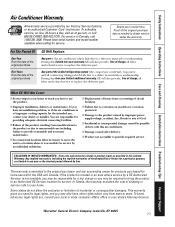
... one year or the shortest period allowed by improper power supply voltage, accident, fire, floods or acts of the product resulting from state to an Authorized GE Service location for a particular purpose, are responsible for service. Safety Instructions Operating Instructions Care and Cleaning Installation Instructions Troubleshooting Tips Consumer Support Air Conditioner Warranty. During this Limited Warranty. If you may be required to bring the product to state. I Replacement of house fuses or resetting...
... one year or the shortest period allowed by improper power supply voltage, accident, fire, floods or acts of the product resulting from state to an Authorized GE Service location for a particular purpose, are responsible for service. Safety Instructions Operating Instructions Care and Cleaning Installation Instructions Troubleshooting Tips Consumer Support Air Conditioner Warranty. During this Limited Warranty. If you may be required to bring the product to state. I Replacement of house fuses or resetting...

