
Owners Manual
Page 1
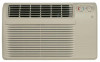
... of this product meets the ENERGY STAR® guidelines for energy efficiency. Air ConditionRoeorms ge.com Owner's Manual and Installation Instructions Safety Instructions 2, 3 Operating Instructions Controls-Control Knobs . . . . 8, 9 Controls-Touch Pads 4-6 Care and Cleaning Air Filter 11 Front Grille 10 Grille and Case 10 Outdoor Coils 10 Installation Instructions Before You Begin 12, 13 Installing a J-Model in an Existing Wall Case 14 Through-the-Wall Installation-Optional 15 Window Installation- Back Cover Warranty 23 *ENERGY STAR® labeled product Cool Only: AJCH...
... of this product meets the ENERGY STAR® guidelines for energy efficiency. Air ConditionRoeorms ge.com Owner's Manual and Installation Instructions Safety Instructions 2, 3 Operating Instructions Controls-Control Knobs . . . . 8, 9 Controls-Touch Pads 4-6 Care and Cleaning Air Filter 11 Front Grille 10 Grille and Case 10 Outdoor Coils 10 Installation Instructions Before You Begin 12, 13 Installing a J-Model in an Existing Wall Case 14 Through-the-Wall Installation-Optional 15 Window Installation- Back Cover Warranty 23 *ENERGY STAR® labeled product Cool Only: AJCH...
Owners Manual
Page 2
... power cord of this appliance is your personal responsibility and obligation to minimize the possibility of fire, electric shock or personal injury. Consumer Support Troubleshooting Tips Installation Instructions Care and Cleaning Operating Instructions Safety Instructions IMPORTANT SAFETY INFORMATION. The device should always be followed to product disposal. See the Installation Instructions, Electrical Requirements section for its length or at either the plug or connector end. I All air conditioners...
... power cord of this appliance is your personal responsibility and obligation to minimize the possibility of fire, electric shock or personal injury. Consumer Support Troubleshooting Tips Installation Instructions Care and Cleaning Operating Instructions Safety Instructions IMPORTANT SAFETY INFORMATION. The device should always be followed to product disposal. See the Installation Instructions, Electrical Requirements section for its length or at either the plug or connector end. I All air conditioners...
Owners Manual
Page 3
... Instructions Operating Instructions Care and Cleaning Installation Instructions Troubleshooting Tips Consumer Support ge.com WARNING! When disconnecting the power cord from the adapter, always hold the adapter in the adapter must use an adapter, where local codes permit, a temporary connection may be made to make sure the outlet is absolutely necessary that it be a UL-listed, 14 gauge, 3-wire grounding type appliance extension cord having a grounding type plug and outlet and that the electrical rating...
... Instructions Operating Instructions Care and Cleaning Installation Instructions Troubleshooting Tips Consumer Support ge.com WARNING! When disconnecting the power cord from the adapter, always hold the adapter in the adapter must use an adapter, where local codes permit, a temporary connection may be made to make sure the outlet is absolutely necessary that it be a UL-listed, 14 gauge, 3-wire grounding type appliance extension cord having a grounding type plug and outlet and that the electrical rating...
Owners Manual
Page 4
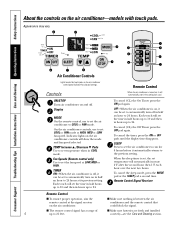
... fresh and installed 4 up to 21 feet. Controls Remote Control When the air conditioner is between the air conditioner and the remote control that could block the signal. Consumer Support Troubleshooting Tips Installation Instructions Care and Cleaning Operating Instructions Safety Instructions About the controls on the air conditioner. correctly-see the Care and Cleaning section. Fan Speeds (Remote control only) Use to set the fan speed at HIGH, MED or LOW fan speed. Display MODE On the remote control, use to set COOL or FAN mode at LOW...
... fresh and installed 4 up to 21 feet. Controls Remote Control When the air conditioner is between the air conditioner and the remote control that could block the signal. Consumer Support Troubleshooting Tips Installation Instructions Care and Cleaning Operating Instructions Safety Instructions About the controls on the air conditioner. correctly-see the Care and Cleaning section. Fan Speeds (Remote control only) Use to set the fan speed at HIGH, MED or LOW fan speed. Display MODE On the remote control, use to set COOL or FAN mode at LOW...

Owners Manual
Page 5
... a hole in card over and replace it will take approximately 3 minutes for the desired fan speed. To open or close the vent: 1. Safety Instructions Operating Instructions Care and Cleaning Installation Instructions Troubleshooting Tips Consumer Support ge.com COOL MODE Remote Control 1. Press COOL pad. 2. The compressor will be displayed. Press LOW, MED or HI pads to set at least 3 minutes before switching back to a fan setting, wait at OPEN, some inside air is lit for the desired fan speed. 2. Remove...
... a hole in card over and replace it will take approximately 3 minutes for the desired fan speed. To open or close the vent: 1. Safety Instructions Operating Instructions Care and Cleaning Installation Instructions Troubleshooting Tips Consumer Support ge.com COOL MODE Remote Control 1. Press COOL pad. 2. The compressor will be displayed. Press LOW, MED or HI pads to set at least 3 minutes before switching back to a fan setting, wait at OPEN, some inside air is lit for the desired fan speed. 2. Remove...
Owners Manual
Page 6
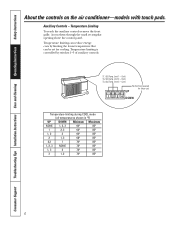
... - Cool) TL2 (C) (Temp. Limit 1 - Consumer Support Troubleshooting Tips Installation Instructions Care and Cleaning Operating Instructions Safety Instructions About the controls on the air conditioner-models with touch pads. Access them through the small rectangular opening above the control panel. Cool) No function (reserved for cooling. Temperature Limiting To reach the auxiliary controls remove the front grille. Auxiliary Controls - Temperature limiting is controlled by limiting the lowest temperature that can reduce energy costs by switches 1-3 of auxiliary controls.
... - Cool) TL2 (C) (Temp. Limit 1 - Consumer Support Troubleshooting Tips Installation Instructions Care and Cleaning Operating Instructions Safety Instructions About the controls on the air conditioner-models with touch pads. Access them through the small rectangular opening above the control panel. Cool) No function (reserved for cooling. Temperature Limiting To reach the auxiliary controls remove the front grille. Auxiliary Controls - Temperature limiting is controlled by limiting the lowest temperature that can reduce energy costs by switches 1-3 of auxiliary controls.
Owners Manual
Page 8
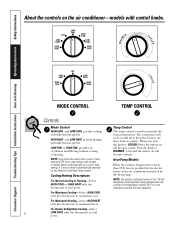
...-volt heat pump model operates during defrost when the outdoor coil temperature is automatically provided on the Heat/Cool and Heat Pump models. For Maximum Cooling-Select HIGH COOL with different fan speeds. Turn the knob to WARMER (red) and the indoor air will cycle on and off to a fan setting, wait at maximum heat. A 3-minute delay is below 36°F. Consumer Support Troubleshooting Tips Installation Instructions Care and Cleaning Operating Instructions Safety Instructions WARM About the controls on the air conditioner-models...
...-volt heat pump model operates during defrost when the outdoor coil temperature is automatically provided on the Heat/Cool and Heat Pump models. For Maximum Cooling-Select HIGH COOL with different fan speeds. Turn the knob to WARMER (red) and the indoor air will cycle on and off to a fan setting, wait at maximum heat. A 3-minute delay is below 36°F. Consumer Support Troubleshooting Tips Installation Instructions Care and Cleaning Operating Instructions Safety Instructions WARM About the controls on the air conditioner-models...
Owners Manual
Page 9
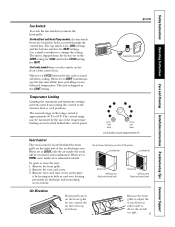
... may be circulated and conditioned. Safety Instructions Operating Instructions Care and Cleaning Installation Instructions Troubleshooting Tips Consumer Support Fan Switch To reach the fan switch(es) remove the front grille. Remove the vent card screw. 3. When set at front. When set in the CONT setting for COOL and in the CYCLE setting for HEAT settings. Remove vent card, turn it over and replace it by the use of the temp control is for HEAT. The unit is shipped from turning the control to 85°...
... may be circulated and conditioned. Safety Instructions Operating Instructions Care and Cleaning Installation Instructions Troubleshooting Tips Consumer Support Fan Switch To reach the fan switch(es) remove the front grille. Remove the vent card screw. 3. When set at front. When set in the CONT setting for COOL and in the CYCLE setting for HEAT settings. Remove vent card, turn it over and replace it by the use of the temp control is for HEAT. The unit is shipped from turning the control to 85°...
Owners Manual
Page 10
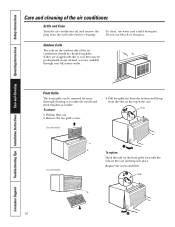
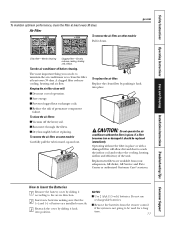
... wall outlet before cleaning. Replace the screws and filter. Grille and Case Turn the air conditioner off and remove the plug from the tabs on the outdoor side of the air conditioner. Consumer Support Troubleshooting Tips Installation Instructions Care and Cleaning Operating Instructions Safety Instructions Care and cleaning of the air conditioner should be checked regularly. Grille Tab On some models 3. Do not use water and a mild detergent. Front Grille The front grille can be professionally steam cleaned, a service available through your GE service...
... wall outlet before cleaning. Replace the screws and filter. Grille and Case Turn the air conditioner off and remove the plug from the tabs on the outdoor side of the air conditioner. Consumer Support Troubleshooting Tips Installation Instructions Care and Cleaning Operating Instructions Safety Instructions Care and cleaning of the air conditioner should be checked regularly. Grille Tab On some models 3. Do not use water and a mild detergent. Front Grille The front grille can be professionally steam cleaned, a service available through your GE service...
Owners Manual
Page 11
... Batteries 1 Remove the battery cover by sliding it down. Replacement filters are installed correctly. 3 Reattach the cover by pushing it should be used for a long time. 11 If a filter becomes torn or damaged it back into position. ge.com Dirty filter-Needs cleaning Clogged filter-Greatly reduces cooling, heating and airflow. I Decrease cost of the unit. Do not use rechargeable batteries. Safety Instructions Operating Instructions Care and Cleaning Installation Instructions Troubleshooting Tips Consumer Support To maintain...
... Batteries 1 Remove the battery cover by sliding it down. Replacement filters are installed correctly. 3 Reattach the cover by pushing it should be used for a long time. 11 If a filter becomes torn or damaged it back into position. ge.com Dirty filter-Needs cleaning Clogged filter-Greatly reduces cooling, heating and airflow. I Decrease cost of the unit. Do not use rechargeable batteries. Safety Instructions Operating Instructions Care and Cleaning Installation Instructions Troubleshooting Tips Consumer Support To maintain...
Owners Manual
Page 12
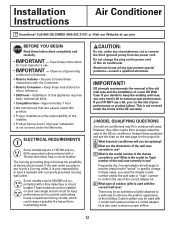
... this product. • Proper installation is the responsibility of outdoor grille is not covered under the Warranty. Answer these instructions for future reference. • Skill level - ELECTRICAL REQUIREMENTS Some models require a 115/120-volt a.c., 60 Hz grounded outlet protected with the Consumer. • Note to prevent overloading house or apartment wiring circuits, which could cause a possible fire hazard from the power cord. Installation Instructions Air Conditioner Questions...
... this product. • Proper installation is the responsibility of outdoor grille is not covered under the Warranty. Answer these instructions for future reference. • Skill level - ELECTRICAL REQUIREMENTS Some models require a 115/120-volt a.c., 60 Hz grounded outlet protected with the Consumer. • Note to prevent overloading house or apartment wiring circuits, which could cause a possible fire hazard from the power cord. Installation Instructions Air Conditioner Questions...
Owners Manual
Page 13
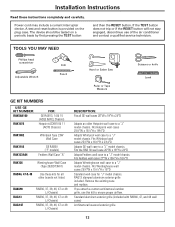
... the RESET button will not stay engaged, discontinue use this kit to a "J" model chassis. Fits Westinghouse wall cases 257⁄8″W x 157⁄16″H x 16″D Standard wall case for all GE wall cases 26″W x 18″H x 24″D Adapts an older Hotpoint wall case to ensure proper airflow. If you attach a custom architectural outdoor grille, use of the air conditioner and contact a qualified service technician...
... the RESET button will not stay engaged, discontinue use this kit to a "J" model chassis. Fits Westinghouse wall cases 257⁄8″W x 157⁄16″H x 16″D Standard wall case for all GE wall cases 26″W x 18″H x 24″D Adapts an older Hotpoint wall case to ensure proper airflow. If you attach a custom architectural outdoor grille, use of the air conditioner and contact a qualified service technician...
Owners Manual
Page 14
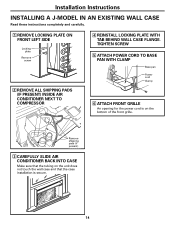
... of the front grille. TIGHTEN SCREW 5 ATTACH POWER CORD TO BASE PAN WITH CLAMP Base pan Power cord Clamp 6 ATTACH FRONT GRILLE An opening for the power cord is secure. 14 Installation Instructions INSTALLING A J-MODEL IN AN EXISTING WALL CASE Read these instructions completely and carefully. 1 REMOVE LOCKING PLATE ON FRONT LEFT SIDE Locking plate Remove screw 2 REMOVE ALL SHIPPING PADS (IF PRESENT) INSIDE AIR CONDITIONER NEXT TO COMPRESSOR 4 REINSTALL LOCKING PLATE...
... of the front grille. TIGHTEN SCREW 5 ATTACH POWER CORD TO BASE PAN WITH CLAMP Base pan Power cord Clamp 6 ATTACH FRONT GRILLE An opening for the power cord is secure. 14 Installation Instructions INSTALLING A J-MODEL IN AN EXISTING WALL CASE Read these instructions completely and carefully. 1 REMOVE LOCKING PLATE ON FRONT LEFT SIDE Locking plate Remove screw 2 REMOVE ALL SHIPPING PADS (IF PRESENT) INSIDE AIR CONDITIONER NEXT TO COMPRESSOR 4 REINSTALL LOCKING PLATE...
Owners Manual
Page 15
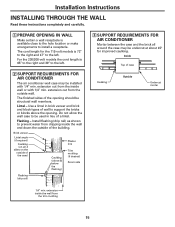
... - Installation Instructions INSTALLING THROUGH THE WALL Read these instructions completely and carefully. 1 PREPARE OPENING IN WALL Make certain a wall receptacle is 65″ to the right and 39″ to the left . extension inside the wall and down the outside wall. For the 230/208-volt models the cord length is available close to the hole location or make arrangements to the left . 2 SUPPORT REQUIREMENTS FOR AIR CONDITIONER...
... - Installation Instructions INSTALLING THROUGH THE WALL Read these instructions completely and carefully. 1 PREPARE OPENING IN WALL Make certain a wall receptacle is 65″ to the right and 39″ to the left . extension inside the wall and down the outside wall. For the 230/208-volt models the cord length is available close to the hole location or make arrangements to the left . 2 SUPPORT REQUIREMENTS FOR AIR CONDITIONER...
Owners Manual
Page 16
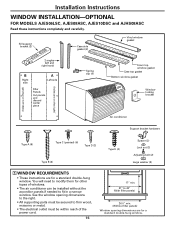
... window gasket Window locking bracket (holes are on the left) (holes are on the right) Air conditioner Support bracket hardware Type A (9) Type C (painted) (6) Type D (2) Type B (2) Type E (4) Spacer (2) Lock nut (2) Adjusting bolt (2) Large washer (2) 1 WINDOW REQUIREMENTS • These instructions are for a standard double-hung window. Installation Instructions WINDOW INSTALLATION-OPTIONAL FOR MODELS AJES06LSC, AJES08ASC, AJES10DSC and AJHS08ASC Read these instructions completely and carefully. You will need to fit in a narrow window. See the window opening dimensions...
... window gasket Window locking bracket (holes are on the left) (holes are on the right) Air conditioner Support bracket hardware Type A (9) Type C (painted) (6) Type D (2) Type B (2) Type E (4) Spacer (2) Lock nut (2) Adjusting bolt (2) Large washer (2) 1 WINDOW REQUIREMENTS • These instructions are for a standard double-hung window. Installation Instructions WINDOW INSTALLATION-OPTIONAL FOR MODELS AJES06LSC, AJES08ASC, AJES10DSC and AJHS08ASC Read these instructions completely and carefully. You will need to fit in a narrow window. See the window opening dimensions...
Owners Manual
Page 17
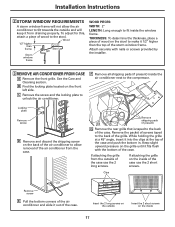
... of the case. Installation Instructions 2 STORM WINDOW REQUIREMENTS A storm window frame will not allow removal of the air conditioner from the outside of the case use the 2 short screws. Wood 1/2″ higher than the top of the storm window frame. F Remove all shipping pads (if present) inside the window frame. If attaching the grille on the back of the air conditioner to allow the air conditioner to the back of...
... of the case. Installation Instructions 2 STORM WINDOW REQUIREMENTS A storm window frame will not allow removal of the air conditioner from the outside of the case use the 2 short screws. Wood 1/2″ higher than the top of the storm window frame. F Remove all shipping pads (if present) inside the window frame. If attaching the grille on the back of the air conditioner to allow the air conditioner to the back of...
Owners Manual
Page 19
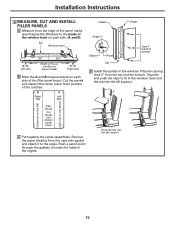
... support. 3″ (holes are on the left) (holes are on each side. (A and B) Sill Window track A Left side 133⁄8″ 133⁄8″ Width of the air conditioner (panel marks) B Right side B Mark the A and B measurements on the right) Filler Panels Cut panels and discard center piece C Put together the panel assemblies. Cut the panels and discard the center piece. Installation Instructions...
... support. 3″ (holes are on the left) (holes are on each side. (A and B) Sill Window track A Left side 133⁄8″ 133⁄8″ Width of the air conditioner (panel marks) B Right side B Mark the A and B measurements on the right) Filler Panels Cut panels and discard center piece C Put together the panel assemblies. Cut the panels and discard the center piece. Installation Instructions...
Owners Manual
Page 21
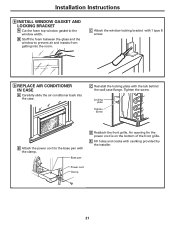
... with 1 type E screw. 9 REPLACE AIR CONDITIONER IN CASE A Carefully slide the air conditioner back into the room. C Attach the window locking bracket with the clamp. Tighten the screw. Power cord Clamp 21 C Reinstall the locking plate with caulking provided by the installer. Locking plate Tighten screw B Attach the power cord to prevent air and insects from getting into the case. An opening for the power cord is on...
... with 1 type E screw. 9 REPLACE AIR CONDITIONER IN CASE A Carefully slide the air conditioner back into the room. C Attach the window locking bracket with the clamp. Tighten the screw. Power cord Clamp 21 C Reinstall the locking plate with caulking provided by the installer. Locking plate Tighten screw B Attach the power cord to prevent air and insects from getting into the case. An opening for the power cord is on...
Owners Manual
Page 22
... indoors Water collects in very humid areas. Moisture removed from cooling the room. When power is restored, wait 3 minutes to restart the air conditioner to prevent tripping of the batteries. Cooling coils have been hot. Consumer Support Troubleshooting Tips Installation Instructions Care and Cleaning Operating Instructions Safety Instructions Before you may not need to allow time for the room to cool down. • Check for open furnace registers and cold air returns. • Set the air conditioner's vent...
... indoors Water collects in very humid areas. Moisture removed from cooling the room. When power is restored, wait 3 minutes to restart the air conditioner to prevent tripping of the batteries. Cooling coils have been hot. Consumer Support Troubleshooting Tips Installation Instructions Care and Cleaning Operating Instructions Safety Instructions Before you may not need to allow time for the room to cool down. • Check for open furnace registers and cold air returns. • Set the air conditioner's vent...
Owners Manual
Page 23
... for service by a GE Authorized Servicer is needed to corrosion on -line, 24 hours a day, visit us at ge.com, or call 1.800.361.3400. Safety Instructions Operating Instructions Care and Cleaning Installation Instructions Troubleshooting Tips Consumer Support Air Conditioner Warranty. Some states do not allow the exclusion or limitation of shipping or service calls to provide required service. I Product not accessible to your dealer or installer. Warrantor: General Electric Company...
... for service by a GE Authorized Servicer is needed to corrosion on -line, 24 hours a day, visit us at ge.com, or call 1.800.361.3400. Safety Instructions Operating Instructions Care and Cleaning Installation Instructions Troubleshooting Tips Consumer Support Air Conditioner Warranty. Some states do not allow the exclusion or limitation of shipping or service calls to provide required service. I Product not accessible to your dealer or installer. Warrantor: General Electric Company...

