Owners Manual
Page 1
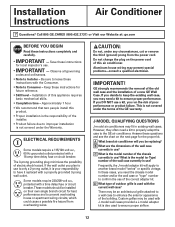
...;aise For a French version of this manual, visit our Website at www.GEAppliances.com. Air ConditionRoeorms ge.com Owner's Manual and Installation Instructions Safety Instructions 2, 3 Operating Instructions Controls-Control Knobs . . . . 8, 9 Controls-Touch Pads 4-6 Care and Cleaning Air Filter 11 Front Grille 10 Grille and Case 10 Outdoor Coils 10 Installation Instructions Before You Begin 12, 13 Installing a J-Model in an Existing Wall Case 14 Through-the-Wall Installation-Optional 15 Window Installation- Back Cover Warranty 23 Cool Only: AJCH 08, 10 ACB...
...;aise For a French version of this manual, visit our Website at www.GEAppliances.com. Air ConditionRoeorms ge.com Owner's Manual and Installation Instructions Safety Instructions 2, 3 Operating Instructions Controls-Control Knobs . . . . 8, 9 Controls-Touch Pads 4-6 Care and Cleaning Air Filter 11 Front Grille 10 Grille and Case 10 Outdoor Coils 10 Installation Instructions Before You Begin 12, 13 Installing a J-Model in an Existing Wall Case 14 Through-the-Wall Installation-Optional 15 Window Installation- Back Cover Warranty 23 Cool Only: AJCH 08, 10 ACB...
Owners Manual
Page 2
... remove the third (ground) prong from the manufacturer and not repaired. Always grip plug firmly and pull straight out from overheated wires. Do not use a cord that matches the rating plate. The device should always be tested on the plug case. The air conditioner should be plugged into its length or at either the plug or connector end. Consumer Support Troubleshooting Tips Installation Instructions Care and Cleaning Operating Instructions...
... remove the third (ground) prong from the manufacturer and not repaired. Always grip plug firmly and pull straight out from overheated wires. Do not use a cord that matches the rating plate. The device should always be tested on the plug case. The air conditioner should be plugged into its length or at either the plug or connector end. Consumer Support Troubleshooting Tips Installation Instructions Care and Cleaning Operating Instructions...

Owners Manual
Page 3
... volts. READ AND FOLLOW THIS SAFETY INFORMATION CAREFULLY. The larger slot in the connection of a UL-listed adapter available at most local hardware stores. SAVE THESE INSTRUCTIONS 3 Safety Instructions Operating Instructions Care and Cleaning Installation Instructions Troubleshooting Tips Consumer Support ge.com WARNING! USE OF EXTENSION CORDS-115-Volt models only Because of potential safety hazards under certain conditions, we strongly recommend against the use of the power cord.
... volts. READ AND FOLLOW THIS SAFETY INFORMATION CAREFULLY. The larger slot in the connection of a UL-listed adapter available at most local hardware stores. SAVE THESE INSTRUCTIONS 3 Safety Instructions Operating Instructions Care and Cleaning Installation Instructions Troubleshooting Tips Consumer Support ge.com WARNING! USE OF EXTENSION CORDS-115-Volt models only Because of potential safety hazards under certain conditions, we strongly recommend against the use of the power cord.
Owners Manual
Page 4
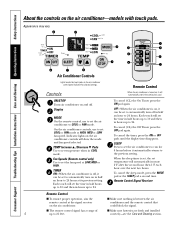
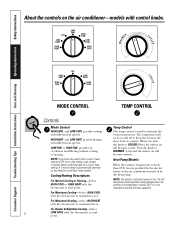
... Cleaning section. Consumer Support Troubleshooting Tips Installation Instructions Care and Cleaning Operating Instructions Safety Instructions About the controls on and off. On the air conditioner controls, use to set temperature will set the time in half hours up to 10 and then in half an hour to 24. Fan Speeds (Remote control only) Use to set the fan speed at HIGH, MED or LOW fan speed. TEMP Increase L /Decrease M Pads Use to set temperature when in the setting last used...
... Cleaning section. Consumer Support Troubleshooting Tips Installation Instructions Care and Cleaning Operating Instructions Safety Instructions About the controls on and off. On the air conditioner controls, use to set temperature will set the time in half hours up to 10 and then in half an hour to 24. Fan Speeds (Remote control only) Use to set the fan speed at HIGH, MED or LOW fan speed. TEMP Increase L /Decrease M Pads Use to set temperature when in the setting last used...

Owners Manual
Page 5
... conditioned. Cooling Descriptions For Normal Cooling-Select the COOL mode and HIGH or MED fan with a middle set at least 3 minutes before switching back to maintain the room temperature. Remote Control Press FAN pad. Remove the vent card screw. 3. Locating hole Locating hole Screw hole OPEN position (Mesh end toward back) Screw hole CLOSE position (Mesh end toward front) Air Direction Horizontal louvers on the control box. Safety Instructions Operating Instructions Care and Cleaning Installation Instructions Troubleshooting Tips Consumer Support ge.com COOL MODE Remote...
... conditioned. Cooling Descriptions For Normal Cooling-Select the COOL mode and HIGH or MED fan with a middle set at least 3 minutes before switching back to maintain the room temperature. Remote Control Press FAN pad. Remove the vent card screw. 3. Locating hole Locating hole Screw hole OPEN position (Mesh end toward back) Screw hole CLOSE position (Mesh end toward front) Air Direction Horizontal louvers on the control box. Safety Instructions Operating Instructions Care and Cleaning Installation Instructions Troubleshooting Tips Consumer Support ge.com COOL MODE Remote...
Owners Manual
Page 6
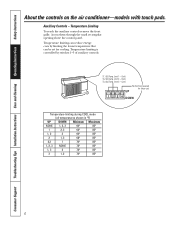
... opening above the control panel. Limit 1 - Cool) TL3 (C) (Temp. Limit 3 - Temperature limiting is controlled by limiting the lowest temperature that can reduce energy costs by switches 1-3 of auxiliary controls. Temperature Limiting To reach the auxiliary controls remove the front grille. Cool) TL2 (C) (Temp. Auxiliary Controls - Consumer Support Troubleshooting Tips Installation Instructions Care and Cleaning Operating Instructions Safety Instructions About the controls on the air conditioner-models with touch pads. Temperature limiting can be set for future use...
... opening above the control panel. Limit 1 - Cool) TL3 (C) (Temp. Limit 3 - Temperature limiting is controlled by limiting the lowest temperature that can reduce energy costs by switches 1-3 of auxiliary controls. Temperature Limiting To reach the auxiliary controls remove the front grille. Cool) TL2 (C) (Temp. Auxiliary Controls - Consumer Support Troubleshooting Tips Installation Instructions Care and Cleaning Operating Instructions Safety Instructions About the controls on the air conditioner-models with touch pads. Temperature limiting can be set for future use...
Owners Manual
Page 8
... the air conditioner instead of comfort. HIGH HEAT and LOW HEAT provide heating with the thermostat at maximum cool. Heat Pump Models When the outdoor temperature is lower than 25°F., heat is provided by the electric heater in the 115-volt heat pump model operates during defrost when the outdoor coil temperature is not intended to provide full heat capability. For Maximum Heating-Select HIGH HEAT with different fan speeds. Consumer Support Troubleshooting Tips Installation Instructions Care and Cleaning Operating Instructions Safety Instructions...
... the air conditioner instead of comfort. HIGH HEAT and LOW HEAT provide heating with the thermostat at maximum cool. Heat Pump Models When the outdoor temperature is lower than 25°F., heat is provided by the electric heater in the 115-volt heat pump model operates during defrost when the outdoor coil temperature is not intended to provide full heat capability. For Maximum Heating-Select HIGH HEAT with different fan speeds. Consumer Support Troubleshooting Tips Installation Instructions Care and Cleaning Operating Instructions Safety Instructions...
Owners Manual
Page 9
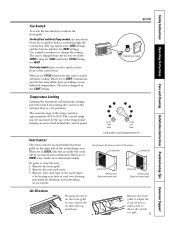
...the CONT setting. Locating hole Locating hole Screw hole OPEN position (Mesh end toward back) Screw hole CLOSE position (Mesh end toward front) Air Direction Horizontal louvers on and off when cooling. Safety Instructions Operating Instructions Care and Cleaning Installation Instructions Troubleshooting Tips Consumer Support Fan Switch To reach the fan switch(es) remove the front grille. On Heat/Cool and Heat Pump models, the fan switch levers are located in the CYCLE setting for COOL and in holes accessed through the control box. Limits heat temp Limits cool temp Each...
...the CONT setting. Locating hole Locating hole Screw hole OPEN position (Mesh end toward back) Screw hole CLOSE position (Mesh end toward front) Air Direction Horizontal louvers on and off when cooling. Safety Instructions Operating Instructions Care and Cleaning Installation Instructions Troubleshooting Tips Consumer Support Fan Switch To reach the fan switch(es) remove the front grille. On Heat/Cool and Heat Pump models, the fan switch levers are located in the CYCLE setting for COOL and in holes accessed through the control box. Limits heat temp Limits cool temp Each...
Owners Manual
Page 10
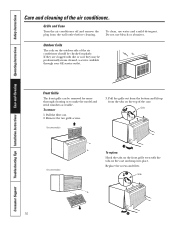
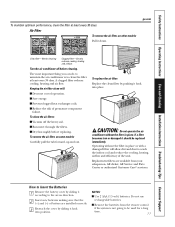
... on the outdoor side of the air conditioner.. Remove the two grille screws. On some models To replace: Hook the tabs on the case and snap into place. Replace the screws and filter. Pull the filter out. 2. Grille Tab On some models 3. Consumer Support Troubleshooting Tips Installation Instructions Care and Cleaning Operating Instructions Safety Instructions Care and cleaning of the air conditioner should be professionally steam cleaned, a service available through your GE service outlet. Do not use water and...
... on the outdoor side of the air conditioner.. Remove the two grille screws. On some models To replace: Hook the tabs on the case and snap into place. Replace the screws and filter. Pull the filter out. 2. Grille Tab On some models 3. Consumer Support Troubleshooting Tips Installation Instructions Care and Cleaning Operating Instructions Safety Instructions Care and cleaning of the air conditioner should be professionally steam cleaned, a service available through your GE service outlet. Do not use water and...
Owners Manual
Page 11
... of the unit. Turn the air conditioner off the heavy soil. ge.com Dirty filter-Needs cleaning Clogged filter-Greatly reduces cooling, heating and airflow. Keeping the air filter clean will allow dirt and dust to clean the filter at least every 30 days. To clean the air filters: I Run water through the filters. I Vacuum off before replacing. I Prevent clogged heat exchanger coils. Safety Instructions Operating Instructions Care and Cleaning Installation Instructions Troubleshooting Tips Consumer Support To maintain optimum performance, clean the filter at...
... of the unit. Turn the air conditioner off the heavy soil. ge.com Dirty filter-Needs cleaning Clogged filter-Greatly reduces cooling, heating and airflow. Keeping the air filter clean will allow dirt and dust to clean the filter at least every 30 days. To clean the air filters: I Run water through the filters. I Vacuum off before replacing. I Prevent clogged heat exchanger coils. Safety Instructions Operating Instructions Care and Cleaning Installation Instructions Troubleshooting Tips Consumer Support To maintain optimum performance, clean the filter at...
Owners Manual
Page 12
... delay fuse or circuit breaker. These models should be an architectural grille attached to a wall case to another brand model "series" or specific vintage. This is also used with the Consumer. • Note to prevent overloading house or apartment wiring circuits, which could cause a possible fire hazard from the power cord. Installation Instructions Air Conditioner Questions? Be sure to leave these instructions for best performance and to Consumer - GE...
... delay fuse or circuit breaker. These models should be an architectural grille attached to a wall case to another brand model "series" or specific vintage. This is also used with the Consumer. • Note to prevent overloading house or apartment wiring circuits, which could cause a possible fire hazard from the power cord. Installation Instructions Air Conditioner Questions? Be sure to leave these instructions for best performance and to Consumer - GE...

Owners Manual
Page 13
...;D Standard wall case for all GE wall cases 26″W x 18″H x 24″D Adapts an older Hotpoint wall case to a "J" model chassis. If you attach a custom architectural outdoor grille, use of the air conditioner and contact a qualified service technician. Power cord may include a current interrupter device. The device should be tested on the plug case. RAG13 stamped aluminum exterior grille included. Remove the existing case and replace. RAK690...
...;D Standard wall case for all GE wall cases 26″W x 18″H x 24″D Adapts an older Hotpoint wall case to a "J" model chassis. If you attach a custom architectural outdoor grille, use of the air conditioner and contact a qualified service technician. Power cord may include a current interrupter device. The device should be tested on the plug case. RAG13 stamped aluminum exterior grille included. Remove the existing case and replace. RAK690...

Owners Manual
Page 14
... Base pan Power cord Clamp 6 WHEN WALL OUTLET IS TO LEFT, EXTEND CORD UNDER UNIT AND HOLD IT IN PLACE WITH CLAMP Remove shipping pads 3 CAREFULLY SLIDE AIR CONDITIONER BACK INTO CASE Make sure that the tubing on the unit does not touch the wall case and that the case installation is on the bottom of the front grille. 14 Installation Instructions INSTALLING A J-MODEL IN AN...
... Base pan Power cord Clamp 6 WHEN WALL OUTLET IS TO LEFT, EXTEND CORD UNDER UNIT AND HOLD IT IN PLACE WITH CLAMP Remove shipping pads 3 CAREFULLY SLIDE AIR CONDITIONER BACK INTO CASE Make sure that the tubing on the unit does not touch the wall case and that the case installation is on the bottom of the front grille. 14 Installation Instructions INSTALLING A J-MODEL IN AN...

Owners Manual
Page 15
.... Installation Instructions INSTALLING THROUGH THE WALL Read these instructions completely and carefully. 1 PREPARE OPENING IN WALL Make certain a wall receptacle is 72″ to the right and 47″ to the left . 2 SUPPORT REQUIREMENTS FOR AIR CONDITIONER The air conditioner wall case may be undercut at about 45° for the 115-volt models is available close to the hole location or make arrangements to install a receptacle. The cord...
.... Installation Instructions INSTALLING THROUGH THE WALL Read these instructions completely and carefully. 1 PREPARE OPENING IN WALL Make certain a wall receptacle is 72″ to the right and 47″ to the left . 2 SUPPORT REQUIREMENTS FOR AIR CONDITIONER The air conditioner wall case may be undercut at about 45° for the 115-volt models is available close to the hole location or make arrangements to install a receptacle. The cord...
Owners Manual
Page 16
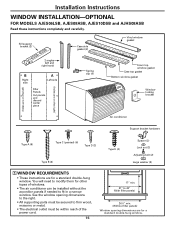
... window gasket Window locking bracket (holes are on the left) (holes are on the right) Air conditioner Support bracket hardware Type A (9) Type C (painted) (6) Type D (2) Type B (2) Type E (4) Spacer (2) Lock nut (2) Adjusting bolt (2) Large washer (2) 1 WINDOW REQUIREMENTS • These instructions are for a standard double-hung window. You will need to fit in a narrow window. Installation Instructions WINDOW INSTALLATION-OPTIONAL FOR MODELS AJES06LSB, AJES08ASB, AJES10DSB and AJHS08ASB Read these instructions completely and carefully. See the window opening dimensions...
... window gasket Window locking bracket (holes are on the left) (holes are on the right) Air conditioner Support bracket hardware Type A (9) Type C (painted) (6) Type D (2) Type B (2) Type E (4) Spacer (2) Lock nut (2) Adjusting bolt (2) Large washer (2) 1 WINDOW REQUIREMENTS • These instructions are for a standard double-hung window. You will need to fit in a narrow window. Installation Instructions WINDOW INSTALLATION-OPTIONAL FOR MODELS AJES06LSB, AJES08ASB, AJES10DSB and AJHS08ASB Read these instructions completely and carefully. See the window opening dimensions...

Owners Manual
Page 17
... case. Installation Instructions 2 STORM WINDOW REQUIREMENTS A storm window frame will keep it fits flush with nails or screws provided by the installer. 3 REMOVE AIR CONDITIONER FROM CASE A Remove the front grille. C Remove the screw and the locking plate to the compressor. Keep slight upward pressure on the outside of the case use the 2 short screws. Clips Remove screw E Pull the bottom corners of the air conditioner and...
... case. Installation Instructions 2 STORM WINDOW REQUIREMENTS A storm window frame will keep it fits flush with nails or screws provided by the installer. 3 REMOVE AIR CONDITIONER FROM CASE A Remove the front grille. C Remove the screw and the locking plate to the compressor. Keep slight upward pressure on the outside of the case use the 2 short screws. Clips Remove screw E Pull the bottom corners of the air conditioner and...

Owners Manual
Page 19
... Gasket Panel Tab Type C (painted screws) D Install the panels in the angles. Note position of the filler panel board. Installation Instructions 6 MEASURE, CUT AND INSTALL FILLER PANELS A Measure from the edge of the panel marks (see Prepare the Window) to the inside of the window track on each side. (A and B) Sill Window track A Left side 133⁄8″ 133⁄8″ Width of the air conditioner (panel marks...
... Gasket Panel Tab Type C (painted screws) D Install the panels in the angles. Note position of the filler panel board. Installation Instructions 6 MEASURE, CUT AND INSTALL FILLER PANELS A Measure from the edge of the panel marks (see Prepare the Window) to the inside of the window track on each side. (A and B) Sill Window track A Left side 133⁄8″ 133⁄8″ Width of the air conditioner (panel marks...

Owners Manual
Page 21
... the front grille. An opening for the power cord is to prevent air and insects from getting into the case. C Attach the window locking bracket with 1 type E screw. 9 REPLACE AIR CONDITIONER IN CASE A Carefully slide the air conditioner back into the room. Base pan Locking plate Tighten screw Power cord Clamp E Reattach the front grille. F Fill holes and cracks with the tab behind the wall case flange. Installation Instructions 8 INSTALL WINDOW GASKET AND...
... the front grille. An opening for the power cord is to prevent air and insects from getting into the case. C Attach the window locking bracket with 1 type E screw. 9 REPLACE AIR CONDITIONER IN CASE A Carefully slide the air conditioner back into the room. Base pan Locking plate Tighten screw Power cord Clamp E Reattach the front grille. F Fill holes and cracks with the tab behind the wall case flange. Installation Instructions 8 INSTALL WINDOW GASKET AND...
Owners Manual
Page 22
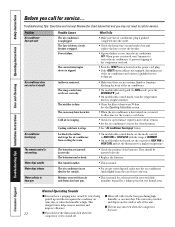
... the Operating Instructions section. • When the air conditioner is escaping. They should Air conditioner freezing up . Problem Air conditioner does not start Air conditioner does not cool as it should be set the controls at least every 30 days. Ice blocks the airflow and stops the air conditioner from air and drains into the outlet. • Check the house fuse/circuit breaker box and replace the fuse or reset the breaker. • If power failure occurs, turn the temperature...
... the Operating Instructions section. • When the air conditioner is escaping. They should Air conditioner freezing up . Problem Air conditioner does not start Air conditioner does not cool as it should be set the controls at least every 30 days. Ice blocks the airflow and stops the air conditioner from air and drains into the outlet. • Check the house fuse/circuit breaker box and replace the fuse or reset the breaker. • If power failure occurs, turn the temperature...
Owners Manual
Page 23
... an installation problem, or if the air conditioner is of the product resulting from state to a defect in Canada, call 800.GE.CARES (800.432.2737). Warrantor: General Electric Company. Any part of circuit breakers. I Replacement of house fuses or resetting of the sealed refrigerating system (the compressor, condenser, evaporator and all labor and related service to the product caused by law. I Damage to replace the defective part. Any implied warranties...
... an installation problem, or if the air conditioner is of the product resulting from state to a defect in Canada, call 800.GE.CARES (800.432.2737). Warrantor: General Electric Company. Any part of circuit breakers. I Replacement of house fuses or resetting of the sealed refrigerating system (the compressor, condenser, evaporator and all labor and related service to the product caused by law. I Damage to replace the defective part. Any implied warranties...

