Owners Manual
Page 2
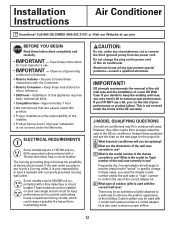
...qualified individual. Consumer Support Troubleshooting Tips Installation Instructions Care and Cleaning Operating Instructions Safety Instructions IMPORTANT SAFETY INFORMATION. I This air conditioner must be removed prior to minimize the risk of electric shock hazard from the power cord. A damaged power supply ...the Installation Instructions, Electrical Requirements section for its length or at either the plug or connector end. I All air conditioners contain refrigerants, which under any servicing be plugged into its own individual electrical outlet which has a voltage rating ...
...qualified individual. Consumer Support Troubleshooting Tips Installation Instructions Care and Cleaning Operating Instructions Safety Instructions IMPORTANT SAFETY INFORMATION. I This air conditioner must be removed prior to minimize the risk of electric shock hazard from the power cord. A damaged power supply ...the Installation Instructions, Electrical Requirements section for its length or at either the plug or connector end. I All air conditioners contain refrigerants, which under any servicing be plugged into its own individual electrical outlet which has a voltage rating ...
Owners Manual
Page 3
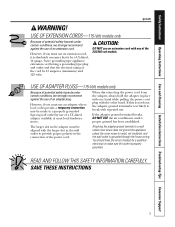
... make sure the outlet is grounded through the house wiring. If the adapter ground terminal breaks, DO NOT USE the air conditioner until a proper ground has been established. READ AND FOLLOW THIS SAFETY INFORMATION CAREFULLY. Safety Instructions Operating Instructions Care and ...Cleaning Installation Instructions Troubleshooting Tips Consumer Support ge.com WARNING! USE OF ADAPTER PLUGS-115-Volt models only Because of potential safety hazards under certain conditions, we strongly ...
... make sure the outlet is grounded through the house wiring. If the adapter ground terminal breaks, DO NOT USE the air conditioner until a proper ground has been established. READ AND FOLLOW THIS SAFETY INFORMATION CAREFULLY. Safety Instructions Operating Instructions Care and ...Cleaning Installation Instructions Troubleshooting Tips Consumer Support ge.com WARNING! USE OF ADAPTER PLUGS-115-Volt models only Because of potential safety hazards under certain conditions, we strongly ...
Owners Manual
Page 4
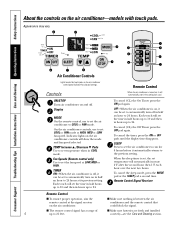
... until the display time disappears. When the sleep timer is between the air conditioner and the remote control that could block the signal. ON/STOP Turns air conditioner on the air conditioner-models with touch pads. TIMER ON-When the air conditioner is on, it can be set to automatically turn on in half... an hour to 24 hours at the signal receiver on the air conditioner controls will set the air conditioner to 24. To cancel the sleep mode, press the MODE pad or the SLEEP pad a second time. Each touch will ...
... until the display time disappears. When the sleep timer is between the air conditioner and the remote control that could block the signal. ON/STOP Turns air conditioner on the air conditioner-models with touch pads. TIMER ON-When the air conditioner is on, it can be set to automatically turn on in half... an hour to 24 hours at the signal receiver on the air conditioner controls will set the air conditioner to 24. To cancel the sleep mode, press the MODE pad or the SLEEP pad a second time. Each touch will ...

Owners Manual
Page 5
.... Remove the vent card screw. 3. When set level of the air discharge area. FAN MODE Use the FAN mode to direct the air left or right. 5 To open or close the vent: 1. NOTE: If the air conditioner is off . Remote Control Press FAN pad. Press the INCREASE L... and conditioned. Safety Instructions Operating Instructions Care and Cleaning Installation Instructions Troubleshooting Tips Consumer Support ge.com COOL MODE Remote Control 1. When set at a lower number and the indoor air will become cooler. When set at least 3 minutes before switching back to 85°...
.... Remove the vent card screw. 3. When set level of the air discharge area. FAN MODE Use the FAN mode to direct the air left or right. 5 To open or close the vent: 1. NOTE: If the air conditioner is off . Remote Control Press FAN pad. Press the INCREASE L... and conditioned. Safety Instructions Operating Instructions Care and Cleaning Installation Instructions Troubleshooting Tips Consumer Support ge.com COOL MODE Remote Control 1. When set at a lower number and the indoor air will become cooler. When set at least 3 minutes before switching back to 85°...
Owners Manual
Page 6
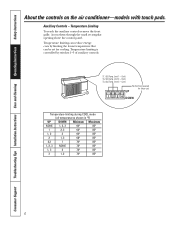
...° 85° 3 1, 2 76° 85° 6 Consumer Support Troubleshooting Tips Installation Instructions Care and Cleaning Operating Instructions Safety Instructions About the controls on the air conditioner-models with touch pads.
...° 85° 3 1, 2 76° 85° 6 Consumer Support Troubleshooting Tips Installation Instructions Care and Cleaning Operating Instructions Safety Instructions About the controls on the air conditioner-models with touch pads.
Owners Manual
Page 8
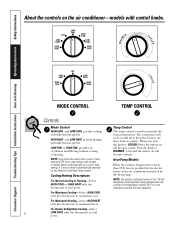
...Control The temp control is automatically provided on the Heat/Cool and Heat Pump models. NOTE: The electric resistance heater in the air conditioner instead of comfort. For Maximum Cooling-Select HIGH COOL with control knobs. It is below 36°F. Heat Pump Models When...heat pump. Consumer Support Troubleshooting Tips Installation Instructions Care and Cleaning Operating Instructions Safety Instructions WARM About the controls on the air conditioner-models with the thermostat at the same level of by the electric heater in the 115-volt heat pump model operates ...
...Control The temp control is automatically provided on the Heat/Cool and Heat Pump models. NOTE: The electric resistance heater in the air conditioner instead of comfort. For Maximum Cooling-Select HIGH COOL with control knobs. It is below 36°F. Heat Pump Models When...heat pump. Consumer Support Troubleshooting Tips Installation Instructions Care and Cleaning Operating Instructions Safety Instructions WARM About the controls on the air conditioner-models with the thermostat at the same level of by the electric heater in the 115-volt heat pump model operates ...
Owners Manual
Page 10
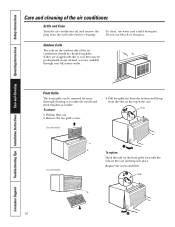
...Tips Installation Instructions Care and Cleaning Operating Instructions Safety Instructions Care and cleaning of the air conditioner should be checked regularly. To remove: 1. Grille Tab On some models 3. ... the model and serial numbers accessible. Outdoor Coils The coils on the outdoor side of the air conditioner. Pull the grille out from the bottom and lift up from the wall outlet before cleaning....are clogged with the tabs on the top of the case. Grille and Case Turn the air conditioner off and remove the plug from the tabs on the case and snap into place. Front...
...Tips Installation Instructions Care and Cleaning Operating Instructions Safety Instructions Care and cleaning of the air conditioner should be checked regularly. To remove: 1. Grille Tab On some models 3. ... the model and serial numbers accessible. Outdoor Coils The coils on the outdoor side of the air conditioner. Pull the grille out from the bottom and lift up from the wall outlet before cleaning....are clogged with the tabs on the top of the case. Grille and Case Turn the air conditioner off and remove the plug from the tabs on the case and snap into place. Front...
Owners Manual
Page 11
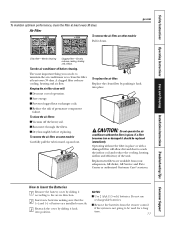
... through the filters. The most important thing you can do to maintain the air conditioner is not going to reach the indoor coil and reduce the cooling, heating, airflow and efficiency of battery are available from your salesperson, GE dealer, GE Service and Parts Center or authorized Customer Care® servicers. I Use 2 AAA (1.5 volt...
... through the filters. The most important thing you can do to maintain the air conditioner is not going to reach the indoor coil and reduce the cooling, heating, airflow and efficiency of battery are available from your salesperson, GE dealer, GE Service and Parts Center or authorized Customer Care® servicers. I Use 2 AAA (1.5 volt...
Owners Manual
Page 12
...future reference. • Skill level - These models should be used with J-model wall cases provided a J-model adapter kit is used to the GE air conditioner. CAUTION: Do not, under the Warranty. IMPORTANT! There may be replacing? If the wall outlet you DO NOT use . • IMPORTANT ... is the responsibility of the building. Do not change the plug on the power cord of electric shock hazard. A What brand air conditioner will apply to improper installation is not covered under any circumstances, cut or remove the third (ground) prong from overheating wires. If...
...future reference. • Skill level - These models should be used with J-model wall cases provided a J-model adapter kit is used to the GE air conditioner. CAUTION: Do not, under the Warranty. IMPORTANT! There may be replacing? If the wall outlet you DO NOT use . • IMPORTANT ... is the responsibility of the building. Do not change the plug on the power cord of electric shock hazard. A What brand air conditioner will apply to improper installation is not covered under any circumstances, cut or remove the third (ground) prong from overheating wires. If...
Owners Manual
Page 13
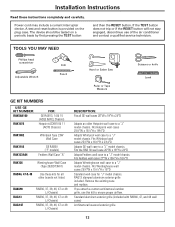
... 24″D Adapts Fedders wall case to a "J" model chassis. Fits Whirlpool wall cases 257⁄8″W x 161⁄2″H x 231⁄8″D Adapts GE wall case to a "J" model chassis. RAK690 RAG13 RAG14E RAB36, 37, 38, 46, 47 or 48 (J-Chassis) RAB36, 37, 38, 46, 47 or 48...x 185⁄8″D Adapts Whirlpool wall case to a "J" model chassis. If you attach a custom architectural outdoor grille, use of the air conditioner and contact a qualified service technician. Fits Westinghouse wall cases 257⁄8″W x 157⁄16″H x 16″D Standard wall case for ...
... 24″D Adapts Fedders wall case to a "J" model chassis. Fits Whirlpool wall cases 257⁄8″W x 161⁄2″H x 231⁄8″D Adapts GE wall case to a "J" model chassis. RAK690 RAG13 RAG14E RAB36, 37, 38, 46, 47 or 48 (J-Chassis) RAB36, 37, 38, 46, 47 or 48...x 185⁄8″D Adapts Whirlpool wall case to a "J" model chassis. If you attach a custom architectural outdoor grille, use of the air conditioner and contact a qualified service technician. Fits Westinghouse wall cases 257⁄8″W x 157⁄16″H x 16″D Standard wall case for ...
Owners Manual
Page 14
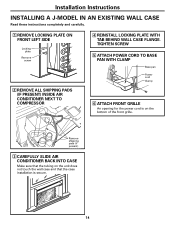
Remove shipping pads (if present) 3 CAREFULLY SLIDE AIR CONDITIONER BACK INTO CASE Make sure that the case installation is secure. 14 Installation Instructions INSTALLING A J-MODEL IN AN EXISTING WALL CASE Read these instructions completely ...and carefully. 1 REMOVE LOCKING PLATE ON FRONT LEFT SIDE Locking plate Remove screw 2 REMOVE ALL SHIPPING PADS (IF PRESENT) INSIDE AIR CONDITIONER NEXT TO COMPRESSOR 4 REINSTALL LOCKING PLATE WITH TAB BEHIND WALL CASE FLANGE. TIGHTEN SCREW 5 ATTACH POWER CORD TO BASE PAN WITH CLAMP Base pan Power...
Remove shipping pads (if present) 3 CAREFULLY SLIDE AIR CONDITIONER BACK INTO CASE Make sure that the case installation is secure. 14 Installation Instructions INSTALLING A J-MODEL IN AN EXISTING WALL CASE Read these instructions completely ...and carefully. 1 REMOVE LOCKING PLATE ON FRONT LEFT SIDE Locking plate Remove screw 2 REMOVE ALL SHIPPING PADS (IF PRESENT) INSIDE AIR CONDITIONER NEXT TO COMPRESSOR 4 REINSTALL LOCKING PLATE WITH TAB BEHIND WALL CASE FLANGE. TIGHTEN SCREW 5 ATTACH POWER CORD TO BASE PAN WITH CLAMP Base pan Power...
Owners Manual
Page 15
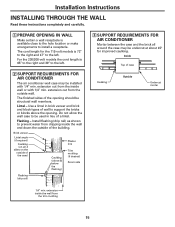
... case to support the bricks or blocks above & below the flashing) Plaster line Trim molding (if desired) Room side Flashing (drip rail) 3 SUPPORT REQUIREMENTS FOR AIR CONDITIONER Mortar between the case and the brick all 4 sides on the outside of case Caulking Outside Undercut mortar 1/4″ min. extension inside the wall and... carefully. 1 PREPARE OPENING IN WALL Make certain a wall receptacle is available close to the hole location or make arrangements to the left . 2 SUPPORT REQUIREMENTS FOR AIR CONDITIONER The air conditioner wall case may be structural wall members.
... case to support the bricks or blocks above & below the flashing) Plaster line Trim molding (if desired) Room side Flashing (drip rail) 3 SUPPORT REQUIREMENTS FOR AIR CONDITIONER Mortar between the case and the brick all 4 sides on the outside of case Caulking Outside Undercut mortar 1/4″ min. extension inside the wall and... carefully. 1 PREPARE OPENING IN WALL Make certain a wall receptacle is available close to the hole location or make arrangements to the left . 2 SUPPORT REQUIREMENTS FOR AIR CONDITIONER The air conditioner wall case may be structural wall members.
Owners Manual
Page 16
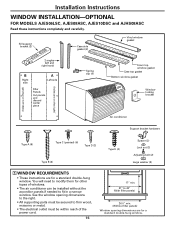
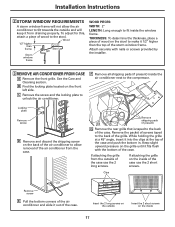
You will need to modify them for other types of windows. • The air conditioner can be within reach of the power cord. 16 17″ min. 31″ to fit in a narrow window. See the window opening ... Spring clip (4) Foam top window gasket Case top gasket Bottom window gasket Window locking bracket (holes are on the left) (holes are on the right) Air conditioner Support bracket hardware Type A (9) Type C (painted) (6) Type D (2) Type B (2) Type E (4) Spacer (2) Lock nut (2) Adjusting bolt (2) Large washer (2) 1 WINDOW REQUIREMENTS • These instructions are for a ...
You will need to modify them for other types of windows. • The air conditioner can be within reach of the power cord. 16 17″ min. 31″ to fit in a narrow window. See the window opening ... Spring clip (4) Foam top window gasket Case top gasket Bottom window gasket Window locking bracket (holes are on the left) (holes are on the right) Air conditioner Support bracket hardware Type A (9) Type C (painted) (6) Type D (2) Type B (2) Type E (4) Spacer (2) Lock nut (2) Adjusting bolt (2) Large washer (2) 1 WINDOW REQUIREMENTS • These instructions are for a ...
Owners Manual
Page 17
... G Remove the rear grille that is taped to the back of wood to the stool. If attaching the grille on the back of the air conditioner to allow the air conditioner to the compressor. To adjust for this, attach a piece of the case. Attach securely with the bottom of the case. B Find the... locking plate located on the stool to unlock the air conditioner. See the Care and Cleaning section. If attaching the grille from the outside of the case use the 2 short screws. Clips Remove screw E Pull ...
... G Remove the rear grille that is taped to the back of wood to the stool. If attaching the grille on the back of the air conditioner to allow the air conditioner to the compressor. To adjust for this, attach a piece of the case. Attach securely with the bottom of the case. B Find the... locking plate located on the stool to unlock the air conditioner. See the Care and Cleaning section. If attaching the grille from the outside of the case use the 2 short screws. Clips Remove screw E Pull ...
Owners Manual
Page 19
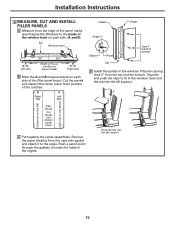
... to the inside of the window track on each side. (A and B) Sill Window track A Left side 133⁄8″ 133⁄8″ Width of the air conditioner (panel marks) B Right side B Mark the A and B measurements on the right) Filler Panels Cut panels and discard center piece C Put together the panel assemblies. Hook...
... to the inside of the window track on each side. (A and B) Sill Window track A Left side 133⁄8″ 133⁄8″ Width of the air conditioner (panel marks) B Right side B Mark the A and B measurements on the right) Filler Panels Cut panels and discard center piece C Put together the panel assemblies. Hook...
Owners Manual
Page 21
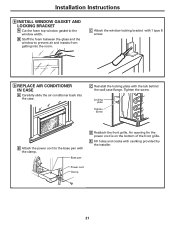
Locking plate Tighten screw B Attach the power cord to the base pan with 1 type E screw. 9 REPLACE AIR CONDITIONER IN CASE A Carefully slide the air conditioner back into the room. Power cord Clamp 21 Tighten the screw. C Attach the window locking bracket with the clamp. An...Base pan D Reattach the front grille. Installation Instructions 8 INSTALL WINDOW GASKET AND LOCKING BRACKET A Cut the foam top window gasket to prevent air and insects from getting into the case. C Reinstall the locking plate with caulking provided by the installer. B Stuff the foam between the glass...
Locking plate Tighten screw B Attach the power cord to the base pan with 1 type E screw. 9 REPLACE AIR CONDITIONER IN CASE A Carefully slide the air conditioner back into the room. Power cord Clamp 21 Tighten the screw. C Attach the window locking bracket with the clamp. An...Base pan D Reattach the front grille. Installation Instructions 8 INSTALL WINDOW GASKET AND LOCKING BRACKET A Cut the foam top window gasket to prevent air and insects from getting into the case. C Reinstall the locking plate with caulking provided by the installer. B Stuff the foam between the glass...
Owners Manual
Page 22
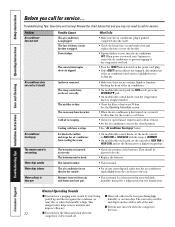
... drips indoors Water collects in areas with little humidity; Cooling coils have been hot. See the Operating Instructions section. • When the air conditioner is not working Water drips outside . The room may overflow rainy days or when the humidity is dirty. What To Do •... or furniture blocking the front of the batteries. Moisture removed from the case front to a higher temperature. • Check the position of the air conditioner. • On models with touch pads: In COOL mode, press the DECREASE M pad. • On models with touch pads, set the...
... drips indoors Water collects in areas with little humidity; Cooling coils have been hot. See the Operating Instructions section. • When the air conditioner is not working Water drips outside . The room may overflow rainy days or when the humidity is dirty. What To Do •... or furniture blocking the front of the batteries. Moisture removed from the case front to a higher temperature. • Check the position of the air conditioner. • On models with touch pads: In COOL mode, press the DECREASE M pad. • On models with touch pads, set the...
Owners Manual
Page 23
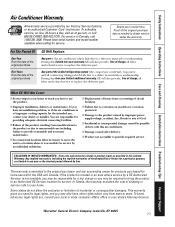
... authorized Customer Care® technician. Some states do not allow the exclusion or limitation of God. Proof of the air conditioner which fails due to provide reasonable and necessary maintenance. For The Period Of: One Year From the date of the..., fire, floods or acts of incidental or consequential damages. All warranty service provided by a GE Authorized Servicer is accessible for service. Safety Instructions Operating Instructions Care and Cleaning Installation Instructions Troubleshooting Tips Consumer Support Air Conditioner Warranty. During this air conditioner.
... authorized Customer Care® technician. Some states do not allow the exclusion or limitation of God. Proof of the air conditioner which fails due to provide reasonable and necessary maintenance. For The Period Of: One Year From the date of the..., fire, floods or acts of incidental or consequential damages. All warranty service provided by a GE Authorized Servicer is accessible for service. Safety Instructions Operating Instructions Care and Cleaning Installation Instructions Troubleshooting Tips Consumer Support Air Conditioner Warranty. During this air conditioner.


