
Owners Manual
Page 1
... this product meets the ENERGY STAR® guidelines for energy efficiency. Write the model and serial numbers here: Model Serial Find these numbers on a label on models so equipped 16-21 Troubleshooting Tips 22 Normal Operating Sounds . . . . 22 Consumer Support Consumer Support . . . Air ConditionRoeorms ge.com Owner's Manual and Installation Instructions Safety Instructions 2, 3 Operating Instructions Controls-Control Knobs . . . . 8, 9 Controls-Touch Pads 4-6 Care and Cleaning Air Filter 11 Front Grille 10 Grille and Case 10 Outdoor Coils 10 Installation Instructions...
... this product meets the ENERGY STAR® guidelines for energy efficiency. Write the model and serial numbers here: Model Serial Find these numbers on a label on models so equipped 16-21 Troubleshooting Tips 22 Normal Operating Sounds . . . . 22 Consumer Support Consumer Support . . . Air ConditionRoeorms ge.com Owner's Manual and Installation Instructions Safety Instructions 2, 3 Operating Instructions Controls-Control Knobs . . . . 8, 9 Controls-Touch Pads 4-6 Care and Cleaning Air Filter 11 Front Grille 10 Grille and Case 10 Outdoor Coils 10 Installation Instructions...
Owners Manual
Page 2
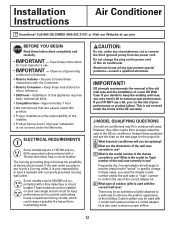
... TEST button and then the RESET button. READ ALL INSTRUCTIONS BEFORE USING. I For your air conditioner before it replaced with a new power supply cord obtained from overheated wires. This provides the best performance and also prevents overloading house wiring circuits which has a voltage rating that any other flammable vapors or liquids in this or any servicing be tested on the power cord. Consumer Support Troubleshooting Tips Installation Instructions Care and Cleaning Operating Instructions Safety Instructions IMPORTANT...
... TEST button and then the RESET button. READ ALL INSTRUCTIONS BEFORE USING. I For your air conditioner before it replaced with a new power supply cord obtained from overheated wires. This provides the best performance and also prevents overloading house wiring circuits which has a voltage rating that any other flammable vapors or liquids in this or any servicing be tested on the power cord. Consumer Support Troubleshooting Tips Installation Instructions Care and Cleaning Operating Instructions Safety Instructions IMPORTANT...
Owners Manual
Page 3
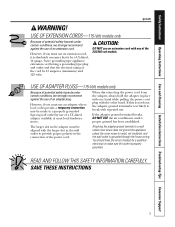
... the power cord from the adapter, always hold the adapter in the connection of an adapter plug. Safety Instructions Operating Instructions Care and Cleaning Installation Instructions Troubleshooting Tips Consumer Support ge.com WARNING! If the adapter ground terminal breaks, DO NOT USE the air conditioner until a proper ground has been established. However, if you must use of the 230/208 volt models. Attaching the adapter ground terminal to a properly grounded 2-prong wall outlet...
... the power cord from the adapter, always hold the adapter in the connection of an adapter plug. Safety Instructions Operating Instructions Care and Cleaning Installation Instructions Troubleshooting Tips Consumer Support ge.com WARNING! If the adapter ground terminal breaks, DO NOT USE the air conditioner until a proper ground has been established. However, if you must use of the 230/208 volt models. Attaching the adapter ground terminal to a properly grounded 2-prong wall outlet...
Owners Manual
Page 4
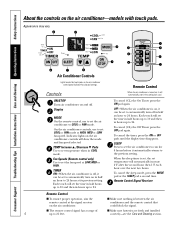
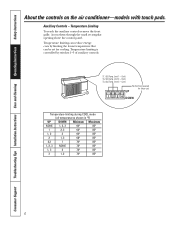
..., use to set to set temperature will show the mode and fan speed selected. On the air conditioner controls, use to automatically turn on , it can be set to 24. I The remote control signal has a range of I To ensure proper operation, aim the remote control at its previous setting. Consumer Support Troubleshooting Tips Installation Instructions Care and Cleaning Operating Instructions Safety Instructions About the controls on , it will automatically start in the setting last used. Controls Remote Control When the air conditioner is turned on the air conditioner-models...
..., use to set to set temperature will show the mode and fan speed selected. On the air conditioner controls, use to automatically turn on , it can be set to 24. I The remote control signal has a range of I To ensure proper operation, aim the remote control at its previous setting. Consumer Support Troubleshooting Tips Installation Instructions Care and Cleaning Operating Instructions Safety Instructions About the controls on , it will automatically start in the setting last used. Controls Remote Control When the air conditioner is turned on the air conditioner-models...

Owners Manual
Page 5
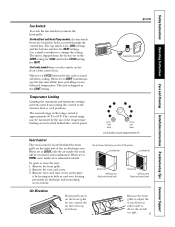
... the desired fan speed. 2. NOTE: If the air conditioner is off to set temperature. Fan Switch The fan switch is used to set desired fan speed. 3. When set at a lower number and the indoor air will not be circulated and conditioned. Remote Control Press FAN pad. For Quieter & Nighttime Cooling-Select the COOL mode and LOW fan with a middle set desired fan speed. Access through a hole in card over locating pin inside the room will become cooler. Remove vent card, turn it over...
... the desired fan speed. 2. NOTE: If the air conditioner is off to set temperature. Fan Switch The fan switch is used to set desired fan speed. 3. When set at a lower number and the indoor air will not be circulated and conditioned. Remote Control Press FAN pad. For Quieter & Nighttime Cooling-Select the COOL mode and LOW fan with a middle set desired fan speed. Access through a hole in card over locating pin inside the room will become cooler. Remove vent card, turn it over...
Owners Manual
Page 6
... small rectangular opening above the control panel. Cool) TL3 (C) (Temp. Consumer Support Troubleshooting Tips Installation Instructions Care and Cleaning Operating Instructions Safety Instructions About the controls on the air conditioner-models with touch pads. Temperature limiting is controlled by limiting the lowest temperature that can reduce energy costs by switches 1-3 of auxiliary controls. Limit 2 - Cool) No function (reserved for cooling. Temperature Limiting To reach the auxiliary controls remove the front grille. Temperature limiting can be set for future use) UP...
... small rectangular opening above the control panel. Cool) TL3 (C) (Temp. Consumer Support Troubleshooting Tips Installation Instructions Care and Cleaning Operating Instructions Safety Instructions About the controls on the air conditioner-models with touch pads. Temperature limiting is controlled by limiting the lowest temperature that can reduce energy costs by switches 1-3 of auxiliary controls. Limit 2 - Cool) No function (reserved for cooling. Temperature Limiting To reach the auxiliary controls remove the front grille. Temperature limiting can be set for future use) UP...
Owners Manual
Page 8
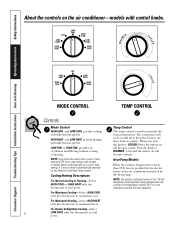
...FAN COOL HIGH FAN HIGH COOL MODE CONTROL TEMP CONTROL Controls Mode Control HIGH COOL and LOW COOL provide cooling with different fan speeds. For Maximum Cooling-Select HIGH COOL with control knobs. It is used to provide full heat capability. Temp Control The temp control is not intended to maintain the room temperature. Consumer Support Troubleshooting Tips Installation Instructions Care and Cleaning Operating Instructions Safety Instructions WARM About the controls on the air conditioner-models with the thermostat at maximum heat. Heat Pump Models When the outdoor...
...FAN COOL HIGH FAN HIGH COOL MODE CONTROL TEMP CONTROL Controls Mode Control HIGH COOL and LOW COOL provide cooling with different fan speeds. For Maximum Cooling-Select HIGH COOL with control knobs. It is used to provide full heat capability. Temp Control The temp control is not intended to maintain the room temperature. Consumer Support Troubleshooting Tips Installation Instructions Care and Cleaning Operating Instructions Safety Instructions WARM About the controls on the air conditioner-models with the thermostat at maximum heat. Heat Pump Models When the outdoor...
Owners Manual
Page 9
... grille. 2. On Heat/Cool and Heat Pump models, the fan switch levers are located in card over and replace it by the use of the temperature limiting screws located behind the front grille on the front grille let you control the air direction up ) the fan runs all the time, providing a more balanced temperature. Limits heat temp Limits cool temp Each position equals approximately 3°F. Safety Instructions Operating Instructions Care and Cleaning Installation Instructions Troubleshooting Tips Consumer Support Fan Switch To reach the fan switch(es) remove...
... grille. 2. On Heat/Cool and Heat Pump models, the fan switch levers are located in card over and replace it by the use of the temperature limiting screws located behind the front grille on the front grille let you control the air direction up ) the fan runs all the time, providing a more balanced temperature. Limits heat temp Limits cool temp Each position equals approximately 3°F. Safety Instructions Operating Instructions Care and Cleaning Installation Instructions Troubleshooting Tips Consumer Support Fan Switch To reach the fan switch(es) remove...
Owners Manual
Page 10
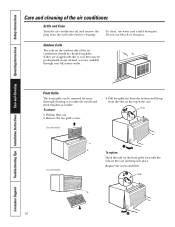
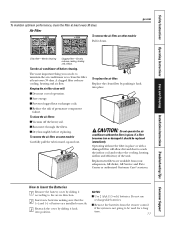
... Case Turn the air conditioner off and remove the plug from the tabs on the front grille even with dirt or soot they are clogged with the tabs on the outdoor side of the air conditioner. Grille Tab On some models 3. Consumer Support Troubleshooting Tips Installation Instructions Care and Cleaning Operating Instructions Safety Instructions Care and cleaning of the air conditioner should be removed for more thorough cleaning or to make the model and serial numbers accessible. Remove...
... Case Turn the air conditioner off and remove the plug from the tabs on the front grille even with dirt or soot they are clogged with the tabs on the outdoor side of the air conditioner. Grille Tab On some models 3. Consumer Support Troubleshooting Tips Installation Instructions Care and Cleaning Operating Instructions Safety Instructions Care and cleaning of the air conditioner should be removed for more thorough cleaning or to make the model and serial numbers accessible. Remove...
Owners Manual
Page 11
... operate the air conditioner without the filter in place. To replace the air filter: Replace the clean filter by sliding it according to reach the indoor coil and reduce the cooling, heating, airflow and efficiency of battery are available from the remote control if the system is to be replaced immediately. Replacement filters are installed correctly. 3 Reattach the cover by sliding it should be used for a long time. 11 Safety Instructions Operating Instructions Care and Cleaning Installation Instructions Troubleshooting...
... operate the air conditioner without the filter in place. To replace the air filter: Replace the clean filter by sliding it according to reach the indoor coil and reduce the cooling, heating, airflow and efficiency of battery are available from the remote control if the system is to be replaced immediately. Replacement filters are installed correctly. 3 Reattach the cover by sliding it should be used for a long time. 11 Safety Instructions Operating Instructions Care and Cleaning Installation Instructions Troubleshooting...
Owners Manual
Page 12
... kit. Observe all governing codes and ordinances. • Note to ensure proper airflow. 12 Installation of this appliance requires basic mechanical skills. • Completion time - Do not change the plug on the power cord of this air conditioner. Aluminum house wiring may fit in use ? C What is your responsibility to ensure proper performance. Custom grilles may be replacing? Save these cases, you need the chassis model number...
... kit. Observe all governing codes and ordinances. • Note to ensure proper airflow. 12 Installation of this appliance requires basic mechanical skills. • Completion time - Do not change the plug on the power cord of this air conditioner. Aluminum house wiring may fit in use ? C What is your responsibility to ensure proper performance. Custom grilles may be replacing? Save these cases, you need the chassis model number...
Owners Manual
Page 13
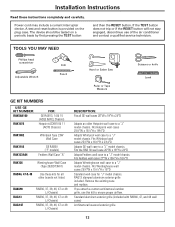
... Wall Case RAK1102 RAK123A64 GE RAB30 ("F" models) Fedders Wall Case "A" RAK126 Westinghouse Wall Case (Type 2626D73H01) RAB46, 47 & 48 Use these instructions completely and carefully. Remove the existing case and replace. Fits Hotpoint wall cases 253⁄4″W x 167⁄8″H x 185⁄8″D Adapts Whirlpool wall case to a "J" model chassis. Installation Instructions Read these kits for "J" model chassis. If you attach a custom architectural outdoor grille, use of the air conditioner and contact a qualified service...
... Wall Case RAK1102 RAK123A64 GE RAB30 ("F" models) Fedders Wall Case "A" RAK126 Westinghouse Wall Case (Type 2626D73H01) RAB46, 47 & 48 Use these instructions completely and carefully. Remove the existing case and replace. Fits Hotpoint wall cases 253⁄4″W x 167⁄8″H x 185⁄8″D Adapts Whirlpool wall case to a "J" model chassis. Installation Instructions Read these kits for "J" model chassis. If you attach a custom architectural outdoor grille, use of the air conditioner and contact a qualified service...
Owners Manual
Page 14
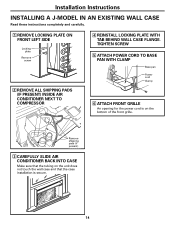
... Power cord Clamp 6 ATTACH FRONT GRILLE An opening for the power cord is secure. 14 Remove shipping pads (if present) 3 CAREFULLY SLIDE AIR CONDITIONER BACK INTO CASE Make sure that the tubing on the unit does not touch the wall case and that the case installation is on the bottom of the front grille. Installation Instructions INSTALLING A J-MODEL IN AN EXISTING WALL CASE Read these instructions completely and carefully. 1 REMOVE...
... Power cord Clamp 6 ATTACH FRONT GRILLE An opening for the power cord is secure. 14 Remove shipping pads (if present) 3 CAREFULLY SLIDE AIR CONDITIONER BACK INTO CASE Make sure that the tubing on the unit does not touch the wall case and that the case installation is on the bottom of the front grille. Installation Instructions INSTALLING A J-MODEL IN AN EXISTING WALL CASE Read these instructions completely and carefully. 1 REMOVE...
Owners Manual
Page 15
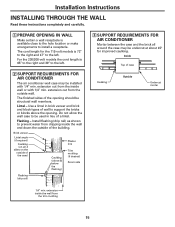
... to be installed with 1/4″ min. Flashing - Install flashing (drip rail) as shown to prevent water from the outside of the opening . The cord length for improved caulking. Installation Instructions INSTALLING THROUGH THE WALL Read these instructions completely and carefully. 1 PREPARE OPENING IN WALL Make certain a wall receptacle is 72″ to the right and 47″ to the left . 2 SUPPORT REQUIREMENTS FOR AIR CONDITIONER The air conditioner wall case may...
... to be installed with 1/4″ min. Flashing - Install flashing (drip rail) as shown to prevent water from the outside of the opening . The cord length for improved caulking. Installation Instructions INSTALLING THROUGH THE WALL Read these instructions completely and carefully. 1 PREPARE OPENING IN WALL Make certain a wall receptacle is 72″ to the right and 47″ to the left . 2 SUPPORT REQUIREMENTS FOR AIR CONDITIONER The air conditioner wall case may...
Owners Manual
Page 16
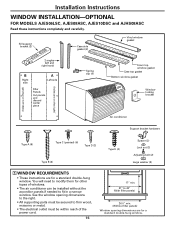
...) (holes are on the right) Air conditioner Support bracket hardware Type A (9) Type C (painted) (6) Type D (2) Type B (2) Type E (4) Spacer (2) Lock nut (2) Adjusting bolt (2) Large washer (2) 1 WINDOW REQUIREMENTS • These instructions are for a standard double-hung window. You will need to modify them for other types of windows. • The air conditioner can be within reach of the power cord. 16 17″ min. 31″ to fit in a narrow window. Installation Instructions WINDOW INSTALLATION-OPTIONAL FOR MODELS AJES06LSC...
...) (holes are on the right) Air conditioner Support bracket hardware Type A (9) Type C (painted) (6) Type D (2) Type B (2) Type E (4) Spacer (2) Lock nut (2) Adjusting bolt (2) Large washer (2) 1 WINDOW REQUIREMENTS • These instructions are for a standard double-hung window. You will need to modify them for other types of windows. • The air conditioner can be within reach of the power cord. 16 17″ min. 31″ to fit in a narrow window. Installation Instructions WINDOW INSTALLATION-OPTIONAL FOR MODELS AJES06LSC...
Owners Manual
Page 17
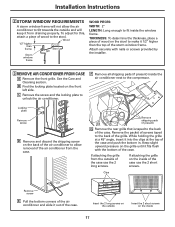
... and will not allow removal of the air conditioner from draining properly. Remove the packet of screws taped to make it out of the grille. C Remove the screw and the locking plate to the compressor. Installation Instructions 2 STORM WINDOW REQUIREMENTS A storm window frame will keep it into the clips at the top of wood to the back of the case use the 2 short screws...
... and will not allow removal of the air conditioner from draining properly. Remove the packet of screws taped to make it out of the grille. C Remove the screw and the locking plate to the compressor. Installation Instructions 2 STORM WINDOW REQUIREMENTS A storm window frame will keep it into the clips at the top of wood to the back of the case use the 2 short screws...
Owners Manual
Page 19
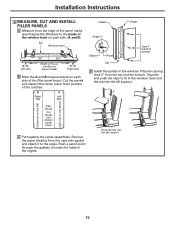
... the sill support. 3″ (holes are on the left) (holes are on each side. (A and B) Sill Window track A Left side 133⁄8″ 133⁄8″ Width of the air conditioner (panel marks) B Right side B Mark the A and B measurements on the right) Filler Panels Cut panels and discard center piece C Put together the panel assemblies. Installation Instructions 6 MEASURE, CUT AND INSTALL FILLER PANELS A Measure...
... the sill support. 3″ (holes are on the left) (holes are on each side. (A and B) Sill Window track A Left side 133⁄8″ 133⁄8″ Width of the air conditioner (panel marks) B Right side B Mark the A and B measurements on the right) Filler Panels Cut panels and discard center piece C Put together the panel assemblies. Installation Instructions 6 MEASURE, CUT AND INSTALL FILLER PANELS A Measure...
Owners Manual
Page 21
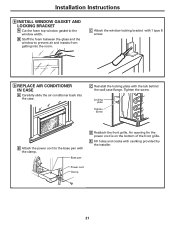
... clamp. Power cord Clamp 21 An opening for the power cord is on the bottom of the front grille. Installation Instructions 8 INSTALL WINDOW GASKET AND LOCKING BRACKET A Cut the foam top window gasket to prevent air and insects from getting into the case. Locking plate Tighten screw B Attach the power cord to the base pan with 1 type E screw. 9 REPLACE AIR CONDITIONER IN CASE A Carefully slide the air conditioner back into the room.
... clamp. Power cord Clamp 21 An opening for the power cord is on the bottom of the front grille. Installation Instructions 8 INSTALL WINDOW GASKET AND LOCKING BRACKET A Cut the foam top window gasket to prevent air and insects from getting into the case. Locking plate Tighten screw B Attach the power cord to the base pan with 1 type E screw. 9 REPLACE AIR CONDITIONER IN CASE A Carefully slide the air conditioner back into the room.
Owners Manual
Page 22
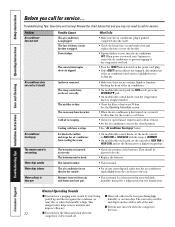
... air conditioner is first turned on and off. Review the chart below . • On models with control knobs, set the mode control at HIGH FAN or HIGH COOL with the temp at least every 30 days. The fuse is blown/circuit breaker is dirty. This and drip from cooling the room. They should Air conditioner freezing up . Cooling coils have been hot. Troubleshooting Tips: Save time and money! Airflow is not working Water drips...
... air conditioner is first turned on and off. Review the chart below . • On models with control knobs, set the mode control at HIGH FAN or HIGH COOL with the temp at least every 30 days. The fuse is blown/circuit breaker is dirty. This and drip from cooling the room. They should Air conditioner freezing up . Cooling coils have been hot. Troubleshooting Tips: Save time and money! Airflow is not working Water drips...
Owners Manual
Page 23
... air conditioner. If you may be required to bring the product to a location where it is of circuit breakers. I Service trips to replace the defective part. Louisville, KY 40225 23 Staple your home to teach you may be responsible for a trip charge or you have serial number and model number available when calling for home use the product. What GE Will Not Cover: I Product not accessible to the product...
... air conditioner. If you may be required to bring the product to a location where it is of circuit breakers. I Service trips to replace the defective part. Louisville, KY 40225 23 Staple your home to teach you may be responsible for a trip charge or you have serial number and model number available when calling for home use the product. What GE Will Not Cover: I Product not accessible to the product...

