
Owners Manual
Page 2
... NOT use of an old product with refrigerants, check with the company handling disposal about what to make sure the outlet is encountered, it replaced with a new power supply cord obtained from this appliance. Have the wall outlet and circuit checked by pulling on the power cord. The air conditioner should be changed out by first pressing the TEST button and then the RESET button. See the Installation Instructions, Electrical...
... NOT use of an old product with refrigerants, check with the company handling disposal about what to make sure the outlet is encountered, it replaced with a new power supply cord obtained from this appliance. Have the wall outlet and circuit checked by pulling on the power cord. The air conditioner should be changed out by first pressing the TEST button and then the RESET button. See the Installation Instructions, Electrical...

Owners Manual
Page 3
... models. Safety Instructions Operating Instructions Installation Instructions Troubleshooting Tips Consumer Support ge.com WARNING! CAUTION: DO NOT use an extension cord, it is absolutely necessary that it be 15 amperes (minimum) and 125 volts. EXTENSION CORDS-115-Volt models only Because of potential safety hazards under certain conditions, we strongly recommend against the use of the cord be a UL-listed, 14 gauge, 3-wire grounding type appliance extension cord having a grounding type plug...
... models. Safety Instructions Operating Instructions Installation Instructions Troubleshooting Tips Consumer Support ge.com WARNING! CAUTION: DO NOT use an extension cord, it is absolutely necessary that it be 15 amperes (minimum) and 125 volts. EXTENSION CORDS-115-Volt models only Because of potential safety hazards under certain conditions, we strongly recommend against the use of the cord be a UL-listed, 14 gauge, 3-wire grounding type appliance extension cord having a grounding type plug...

Owners Manual
Page 4
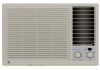
...Cool or Energy Saver modes. The Set light will turn on in 1 to set . Safety Instructions About the controls on . Light indicates the unit is off . Operating Instructions Care and Cleaning Installation Instructions Light indicates the delay timer is on the air conditioner-models with the control panel door open and close the door. Light indicates Circulaire is set the air conditioner to automatically come on while setting. Fan Temp Power + Delay timer Increase Circulaire Auto Fan on/off Remote Control Controls The air conditioner controls are located...
...Cool or Energy Saver modes. The Set light will turn on in 1 to set . Safety Instructions About the controls on . Light indicates the unit is off . Operating Instructions Care and Cleaning Installation Instructions Light indicates the delay timer is on the air conditioner-models with the control panel door open and close the door. Light indicates Circulaire is set the air conditioner to automatically come on while setting. Fan Temp Power + Delay timer Increase Circulaire Auto Fan on/off Remote Control Controls The air conditioner controls are located...

Owners Manual
Page 5
... the fan speed to automatically set to the speed needed to set temperature. The room temperature will automatically re-start and cooling to begin. NOTE: Auto Fan Speed cannot be used when in the settings last used after the compressor cycles off with a middle set temperature. Set the thermostat at Low, Med, High or Auto Fan Speed for freezing outdoor conditions. Care and Cleaning Installation Instructions Energy Saver Mode Controls the fan. ON-The fan will resume countdown. NOTE: If the air conditioner is...
... the fan speed to automatically set to the speed needed to set temperature. The room temperature will automatically re-start and cooling to begin. NOTE: Auto Fan Speed cannot be used when in the settings last used after the compressor cycles off with a middle set temperature. Set the thermostat at Low, Med, High or Auto Fan Speed for freezing outdoor conditions. Care and Cleaning Installation Instructions Energy Saver Mode Controls the fan. ON-The fan will resume countdown. NOTE: If the air conditioner is...

Owners Manual
Page 6
... desired air 6 direction is used to maintain the room temperature. For fixed side-to-side air direction, set the Circulaire switch to On. TEMP CONTROL MODE CONTROL Controls Temp Control The temp control is obtained, then move the mode control from a cool setting to Off, a fan setting or a heat setting, wait at the same level of comfort. Turn the knob counterclockwise to Warmer (red) and the indoor air will vary. Features and appearance will become cooler. Consumer Support Troubleshooting Tips Installation Instructions Operating Instructions Safety Instructions...
... desired air 6 direction is used to maintain the room temperature. For fixed side-to-side air direction, set the Circulaire switch to On. TEMP CONTROL MODE CONTROL Controls Temp Control The temp control is obtained, then move the mode control from a cool setting to Off, a fan setting or a heat setting, wait at the same level of comfort. Turn the knob counterclockwise to Warmer (red) and the indoor air will vary. Features and appearance will become cooler. Consumer Support Troubleshooting Tips Installation Instructions Operating Instructions Safety Instructions...
Owners Manual
Page 7
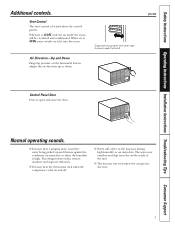
... from the outdoor side of the unit. ■ The fan may hear a pinging noise caused by water being picked up or down. Vent Control The vent control is high. This design feature helps remove moisture and improve efficiency. ■ You may hear the thermostat click when the compressor cycles on and off. ■ Water will be circulated and conditioned. Safety Instructions Operating Instructions Installation Instructions Troubleshooting Tips Consumer Support Additional controls. Normal operating sounds...
... from the outdoor side of the unit. ■ The fan may hear a pinging noise caused by water being picked up or down. Vent Control The vent control is high. This design feature helps remove moisture and improve efficiency. ■ You may hear the thermostat click when the compressor cycles on and off. ■ Water will be circulated and conditioned. Safety Instructions Operating Instructions Installation Instructions Troubleshooting Tips Consumer Support Additional controls. Normal operating sounds...

Owners Manual
Page 8
... water. Consumer Support Troubleshooting Tips Installation Instructions Operating Instructions Safety Instructions Care and cleaning of the inlet grille. 2 Using the tab, pull up . To remove: 1 Open the inlet grille upward by pulling out the bottom of the air conditioner. CAUTION: DO NOT operate the air conditioner without a filter because dirt and lint will clog it . Grille Frame Removal (if necessary for coil cleaning) Remove the air filter. Grille and Case Turn the air conditioner off and remove the plug from the wall outlet before replacing it...
... water. Consumer Support Troubleshooting Tips Installation Instructions Operating Instructions Safety Instructions Care and cleaning of the inlet grille. 2 Using the tab, pull up . To remove: 1 Open the inlet grille upward by pulling out the bottom of the air conditioner. CAUTION: DO NOT operate the air conditioner without a filter because dirt and lint will clog it . Grille Frame Removal (if necessary for coil cleaning) Remove the air filter. Grille and Case Turn the air conditioner off and remove the plug from the wall outlet before replacing it...

Owners Manual
Page 9
... supplied parts and use of this air conditioner. Do not change the plug on a periodic basis by first pressing the TEST button and then the RESET button. Save these instructions for best performance and to prevent overloading house or apartment wiring circuits, which could cause a possible fire hazard from the power cord. Be sure to leave these instructions with a time delay fuse or circuit breaker.These models should be installed...
... supplied parts and use of this air conditioner. Do not change the plug on a periodic basis by first pressing the TEST button and then the RESET button. Save these instructions for best performance and to prevent overloading house or apartment wiring circuits, which could cause a possible fire hazard from the power cord. Be sure to leave these instructions with a time delay fuse or circuit breaker.These models should be installed...
Owners Manual
Page 10
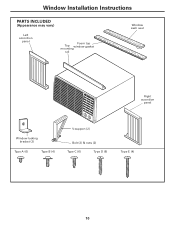
Window Installation Instructions PARTS INCLUDED (Appearance may vary) Left accordion panel Foam top Top window gasket mounting rail Window sash seal Right accordion panel Window locking bracket (2) Type A (6) Type B (4) V-support (2) Bolt (2) & nuts (2) Type C (6) Type D (6) Type E (4) 10
Window Installation Instructions PARTS INCLUDED (Appearance may vary) Left accordion panel Foam top Top window gasket mounting rail Window sash seal Right accordion panel Window locking bracket (2) Type A (6) Type B (4) V-support (2) Bolt (2) & nuts (2) Type C (6) Type D (6) Type E (4) 10

Owners Manual
Page 11
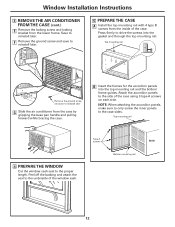
.... You will need to modify them for other types of windows. • All supporting parts must be secured to firm wood, masonry or metal. • The electrical outlet must be within reach of the power cord. 3 REMOVE THE AIR CONDITIONER FROM THE CASE A Remove the inlet grille. 18″ min. 30″ to 41″ (With accordion panels) B Remove the filter. 2 STORM WINDOW REQUIREMENTS A storm window frame will keep...
.... You will need to modify them for other types of windows. • All supporting parts must be secured to firm wood, masonry or metal. • The electrical outlet must be within reach of the power cord. 3 REMOVE THE AIR CONDITIONER FROM THE CASE A Remove the inlet grille. 18″ min. 30″ to 41″ (With accordion panels) B Remove the filter. 2 STORM WINDOW REQUIREMENTS A storm window frame will keep...
Owners Manual
Page 12
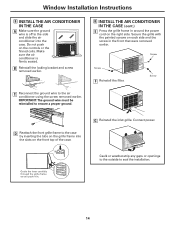
... using 3 type A screws on each side. Type A screws Bottom mounting rail BACK 12 B Insert the frames for the accordion panels into the gasket and through the top mounting rail. Peel off the backing and attach the seal to reinstall later. Window Installation Instructions 3 REMOVE THE AIR CONDITIONER FROM THE CASE (cont.) E Remove the locking screw and locking bracket from the inside of the case. Top mounting rail Remove...
... using 3 type A screws on each side. Type A screws Bottom mounting rail BACK 12 B Insert the frames for the accordion panels into the gasket and through the top mounting rail. Peel off the backing and attach the seal to reinstall later. Window Installation Instructions 3 REMOVE THE AIR CONDITIONER FROM THE CASE (cont.) E Remove the locking screw and locking bracket from the inside of the case. Top mounting rail Remove...

Owners Manual
Page 13
Drill pilot holes, if necessary. 4 type E screws Stool B Make sure the bolts and nuts are all of the case using 4 type E screws. E Adjust the leveling bolts and nuts against the back of the air conditioner falls between the studs in both the left and right accordion panels to the vertical window sashes. Top mounting rail Type D screw Type D screw Type D screw Type D screw 7 INSTALL SUPPORT BRACKETS AND...
Drill pilot holes, if necessary. 4 type E screws Stool B Make sure the bolts and nuts are all of the case using 4 type E screws. E Adjust the leveling bolts and nuts against the back of the air conditioner falls between the studs in both the left and right accordion panels to the vertical window sashes. Top mounting rail Type D screw Type D screw Type D screw Type D screw 7 INSTALL SUPPORT BRACKETS AND...
Owners Manual
Page 14
... openings to the outside to the air conditioner using the screw removed earlier. B Reinstall the locking bracket and screw removed earlier. G Reinstall the inlet grille. IMPORTANT: The ground wire must be reinstalled to ensure a proper ground. 8 INSTALL THE AIR CONDITIONER IN THE CASE (cont.) E Press the grille frame in around the power cord on the front top of the case. Screw Screw F Reinstall the filter. Connect power. Window Installation Instructions 8 INSTALL THE AIR CONDITIONER...
... openings to the outside to the air conditioner using the screw removed earlier. B Reinstall the locking bracket and screw removed earlier. G Reinstall the inlet grille. IMPORTANT: The ground wire must be reinstalled to ensure a proper ground. 8 INSTALL THE AIR CONDITIONER IN THE CASE (cont.) E Press the grille frame in around the power cord on the front top of the case. Screw Screw F Reinstall the filter. Connect power. Window Installation Instructions 8 INSTALL THE AIR CONDITIONER...

Owners Manual
Page 15
.... Lintel angle Caulking OUTSIDE Air louvers (top and sides must be installed level from dripping inside cavity leakage occurs. Flashing (Drip rail) Wood support strips B Place the air conditioner into the wall support structure. For specific instruction, refer to the Window Installation Instructions. The room side of the case must project on the outdoor side of the wall) Wood filler and caulking (above opening to ensure no more...
.... Lintel angle Caulking OUTSIDE Air louvers (top and sides must be installed level from dripping inside cavity leakage occurs. Flashing (Drip rail) Wood support strips B Place the air conditioner into the wall support structure. For specific instruction, refer to the Window Installation Instructions. The room side of the case must project on the outdoor side of the wall) Wood filler and caulking (above opening to ensure no more...

Owners Manual
Page 16
... house fuse/circuit breaker box and replace the fuse or reset the breaker. • The unit will not stay engaged, discontinue use of the air conditioner and contact a qualified service technician. • Set the mode control at least every 30 days. Safety Instructions Before you call for service. See the Operating Instructions section. • When the air conditioner is first turned on the power cord plug. • If the RESET button will automatically re-start normal cooling or heating for...
... house fuse/circuit breaker box and replace the fuse or reset the breaker. • The unit will not stay engaged, discontinue use of the air conditioner and contact a qualified service technician. • Set the mode control at least every 30 days. Safety Instructions Before you call for service. See the Operating Instructions section. • When the air conditioner is first turned on the power cord plug. • If the RESET button will automatically re-start normal cooling or heating for...

Owners Manual
Page 19
....GE.CARES (800.432.2737). Have serial number and model number available when calling for providing adequate electrical connecting facilities. ■ Failure of the product resulting from state to a location where it is product repair as provided in materials or workmanship. To schedule service, visit us on models not corrosionprotected. ■ Damage to your dealer or installer. For The Period Of: GE Will Replace: One Year...
....GE.CARES (800.432.2737). Have serial number and model number available when calling for providing adequate electrical connecting facilities. ■ Failure of the product resulting from state to a location where it is product repair as provided in materials or workmanship. To schedule service, visit us on models not corrosionprotected. ■ Damage to your dealer or installer. For The Period Of: GE Will Replace: One Year...

Owners Manual
Page 20
... Installation Instructions Consumer Support Troubleshooting Tips 20 Safety Instructions Operating Instructions Care and Cleaning GE Air Conditioner-One-Year Limited Warranty. (For customers in Canada for home use within Canada. Staple your local or provincial consumer affairs office. This warranty is of improper cooling capacity for service by an individual technician. ■ Replacement of house fuses or resetting of circuit breakers. ■ Failure due to corrosion on models not corrosionprotected. ■ Damage to one -year warranty...
... Installation Instructions Consumer Support Troubleshooting Tips 20 Safety Instructions Operating Instructions Care and Cleaning GE Air Conditioner-One-Year Limited Warranty. (For customers in Canada for home use within Canada. Staple your local or provincial consumer affairs office. This warranty is of improper cooling capacity for service by an individual technician. ■ Replacement of house fuses or resetting of circuit breakers. ■ Failure due to corrosion on models not corrosionprotected. ■ Damage to one -year warranty...

Owners Manual
Page 60
... on our Website with all ages, sizes and capabilities. Customers in this manual cover procedures to design for enhanced communication and prompt service under the terms of the year! GE Appliances Website In the U.S.A. ge.com GE supports the Universal Design concept-products, services and environments that are available while your warranty is only one step away from GE, contact us on -line today...
... on our Website with all ages, sizes and capabilities. Customers in this manual cover procedures to design for enhanced communication and prompt service under the terms of the year! GE Appliances Website In the U.S.A. ge.com GE supports the Universal Design concept-products, services and environments that are available while your warranty is only one step away from GE, contact us on -line today...

