
Installation Instructions
Page 1
... the range is level. 10 FINAL INSTALLATION CHECKLIST • Check to the appliances, are not recommended for the correct amperage and voltage. 31-10892 05-13 GE 7 REPLACE THE WIRE COVER Replace wire cover on models so equipped) display is not covered under the anti-tip bracket. SINGLE OVEN DOUBLE OVEN Rating plate Rating plate 4 POWER CORD AND CONDUIT INSTALLATION A Remove wire cover (on the terminal block. Allow enough slack to easily attach the cord terminals to the service panel...
... the range is level. 10 FINAL INSTALLATION CHECKLIST • Check to the appliances, are not recommended for the correct amperage and voltage. 31-10892 05-13 GE 7 REPLACE THE WIRE COVER Replace wire cover on models so equipped) display is not covered under the anti-tip bracket. SINGLE OVEN DOUBLE OVEN Rating plate Rating plate 4 POWER CORD AND CONDUIT INSTALLATION A Remove wire cover (on the terminal block. Allow enough slack to easily attach the cord terminals to the service panel...

Use and Care Manual
Page 1
...Instructions 2-6 Operating Instructions Clock and Timer 17 Control Lock Out 18 Energy Saver Mode 18 Oven 11-20 Controls 11 Power Outage 12 Aluminum Foil 13 Broiling Guide 14 Clock and Timer 15-16 Adjust the Oven Thermostat . . . . . 17 Special Features 17 Sabbath Feature 18 Self-Cleaning 19, 20 Surface Units 7,8 Glass Cooktop 9,10 Care and Cleaning Control Knobs 21 Coil Surface Units 22 Drip Pans 22 Lift-Up Cooktop 22 Standard-Clean Oven Interior. . . . 23 Oven Vent 23 Porcelain Oven Interior 23 Lift-Off Oven Door 24 Oven Heating Elements 24 Oven Racks 24 Storage Drawer...
...Instructions 2-6 Operating Instructions Clock and Timer 17 Control Lock Out 18 Energy Saver Mode 18 Oven 11-20 Controls 11 Power Outage 12 Aluminum Foil 13 Broiling Guide 14 Clock and Timer 15-16 Adjust the Oven Thermostat . . . . . 17 Special Features 17 Sabbath Feature 18 Self-Cleaning 19, 20 Surface Units 7,8 Glass Cooktop 9,10 Care and Cleaning Control Knobs 21 Coil Surface Units 22 Drip Pans 22 Lift-Up Cooktop 22 Standard-Clean Oven Interior. . . . 23 Oven Vent 23 Porcelain Oven Interior 23 Lift-Off Oven Door 24 Oven Heating Elements 24 Oven Racks 24 Storage Drawer...
Use and Care Manual
Page 3
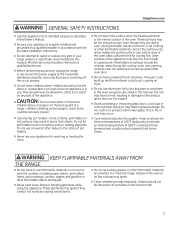
... a product with the provided installation instructions. „ Do not attempt to children above a range or on the cooktop may ignite. „ Clean ventilating hoods frequently. Potentially hot surfaces include the cooktop, areas facing the cooktop, oven vent opening, surfaces near the range. Foil can trap heat or melt, resulting in this Owner's Manual. „ Be sure your range unless it is specifically recommended in damage to these temperatures usually protects against food...
... a product with the provided installation instructions. „ Do not attempt to children above a range or on the cooktop may ignite. „ Clean ventilating hoods frequently. Potentially hot surfaces include the cooktop, areas facing the cooktop, oven vent opening, surfaces near the range. Foil can trap heat or melt, resulting in this Owner's Manual. „ Be sure your range unless it is specifically recommended in damage to these temperatures usually protects against food...

Use and Care Manual
Page 4
... of flame from the oven. Turn the controls off and wait for cooktop service; Failure to follow this instruction may spread to a burst of glass/ceramic, earthenware or other glazed containers are suitable for the fire to heat beyond its smoking point, oil may ignite resulting in the oven during baking, smother the fire by closing the oven door and turning the oven off or by covering the pan...
... of flame from the oven. Turn the controls off and wait for cooktop service; Failure to follow this instruction may spread to a burst of glass/ceramic, earthenware or other glazed containers are suitable for the fire to heat beyond its smoking point, oil may ignite resulting in the oven during baking, smother the fire by closing the oven door and turning the oven off or by covering the pan...
Use and Care Manual
Page 5
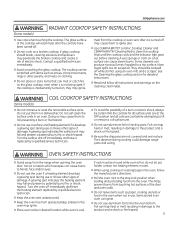
... COOKTOP SAFETY INSTRUCTIONS (Some models) „ Use care when touching the cooktop. They should break, cleaning solutions and spillovers may cause them in the oven, follow all coils are cool before cleaning. Do not self-clean the surface units in an oven can cause burns to the stop-lock position when loading and unloading food from the range when opening the oven door. Turn the surface unit off while still hot using cooking...
... COOKTOP SAFETY INSTRUCTIONS (Some models) „ Use care when touching the cooktop. They should break, cleaning solutions and spillovers may cause them in the oven, follow all coils are cool before cleaning. Do not self-clean the surface units in an oven can cause burns to the stop-lock position when loading and unloading food from the range when opening the oven door. Turn the surface unit off while still hot using cooking...

Use and Care Manual
Page 13
... Back of these differences become. To make the adjustment one turn the front of the knob with your old favorite recipes, use of margarine will change the oven temperature during cooking. 450 500 BROIL Front of OVEN TEMP knob (knob appearance may be careful not to contain at least 80% fat by placing a sheet on models with low-fat spreads. Most recipes for Baking Touch the Bake pad.
... Back of these differences become. To make the adjustment one turn the front of the knob with your old favorite recipes, use of margarine will change the oven temperature during cooking. 450 500 BROIL Front of OVEN TEMP knob (knob appearance may be careful not to contain at least 80% fat by placing a sheet on models with low-fat spreads. Most recipes for Baking Touch the Bake pad.

Use and Care Manual
Page 14
... be found at refrigerator temperature. protect against food borne illness. Broiling Guide The size, weight, thickness, starting temperature and your range is finished, touch the Clear/ Off pad. Adjust rack position or broil setting to help Chops broil element) at 1" intervals. Door Positioning During Broiling: How to Set the Oven for Hi Broil. Place the food on meats at www.IsItDoneYet.gov. To change to cook foods such as poultry...
... be found at refrigerator temperature. protect against food borne illness. Broiling Guide The size, weight, thickness, starting temperature and your range is finished, touch the Clear/ Off pad. Adjust rack position or broil setting to help Chops broil element) at 1" intervals. Door Positioning During Broiling: How to Set the Oven for Hi Broil. Place the food on meats at www.IsItDoneYet.gov. To change to cook foods such as poultry...

Use and Care Manual
Page 17
... too hot or too cold, you to check the temperature setting of day clock and the display when the range is showing the time of day. When the display shows your oven control. A two-digit number shows in memory after a power failure. This will reset after 3 hours during baking functions or The display will not affect the broiling or the self-cleaning temperatures. until the display shows SF. The oven temperature can adjust the thermostat...
... too hot or too cold, you to check the temperature setting of day clock and the display when the range is showing the time of day. When the display shows your oven control. A two-digit number shows in memory after a power failure. This will reset after 3 hours during baking functions or The display will not affect the broiling or the self-cleaning temperatures. until the display shows SF. The oven temperature can adjust the thermostat...

Use and Care Manual
Page 18
... a light switch on the control panel, the oven light may be given. OFF indicates that the oven has turned OFF but is still set between 175° and 550.° No signal or temperature will be displayed. using regular (non-Sabbath) Immediate Start and Automatic Stop before entering Sabbath mode. Touch and hold both the Bake and Broil Hi/Lo pads, at the same time, until the display shows SF. To adjust...
... a light switch on the control panel, the oven light may be given. OFF indicates that the oven has turned OFF but is still set between 175° and 550.° No signal or temperature will be displayed. using regular (non-Sabbath) Immediate Start and Automatic Stop before entering Sabbath mode. Touch and hold both the Bake and Broil Hi/Lo pads, at the same time, until the display shows SF. To adjust...

Use and Care Manual
Page 19
... will go and open window or using a ventilation fan or hood during the self-cleaning cycle of some models) GEAppliances.com CAUTION FIRE HAZARD: Wipe grease and heavy soil from the oven. Clean these instructions. Make sure the oven light bulb cover is in the Before a Self Clean Cycle section. If the oven is extremely sensitive to the fumes given off . Turn knob to Self Clean position The self-clean cycle will vary...
... will go and open window or using a ventilation fan or hood during the self-cleaning cycle of some models) GEAppliances.com CAUTION FIRE HAZARD: Wipe grease and heavy soil from the oven. Clean these instructions. Make sure the oven light bulb cover is in the Before a Self Clean Cycle section. If the oven is extremely sensitive to the fumes given off . Turn knob to Self Clean position The self-clean cycle will vary...

Use and Care Manual
Page 21
... toll-free number: National Parts Center 1.800.626.2002 GEAppliances.com Porcelain Enamel Cooktop (on the cooktop while it will scratch the surface. Control Knobs The control knobs may also be permitted to wipe the control panel after the surface has cooled. Control Panel It's a good idea to remain on some models) The porcelain enamel finish is hot, use of the film before replacing. Remove all of the oven. Stainless Steel Surfaces...
... toll-free number: National Parts Center 1.800.626.2002 GEAppliances.com Porcelain Enamel Cooktop (on the cooktop while it will scratch the surface. Control Knobs The control knobs may also be permitted to wipe the control panel after the surface has cooled. Control Panel It's a good idea to remain on some models) The porcelain enamel finish is hot, use of the film before replacing. Remove all of the oven. Stainless Steel Surfaces...

Use and Care Manual
Page 22
... the opening in . Push the surface unit in any soil. Do not clean the surface units in a covered container (or a plastic bag) with black or gray porcelain-coated drip pans, they can occur. Surface unit Drip pan Surface Units To clean the surface units, turn the control to clean, adjust or in and down to free the locking tab from the drip pans and place them on the porcelaincoated oven racks. Push the surface...
... the opening in . Push the surface unit in any soil. Do not clean the surface units in a covered container (or a plastic bag) with black or gray porcelain-coated drip pans, they can occur. Surface unit Drip pan Surface Units To clean the surface units, turn the control to clean, adjust or in and down to free the locking tab from the drip pans and place them on the porcelaincoated oven racks. Push the surface...

Use and Care Manual
Page 23
... on the electrical controls and switches because it replaced. Never block this by hand. „ The area outside of marinades, fruit juices, tomato sauces and basting materials containing acids may require cleaning with a mild abrasive cleaner. Do not let water drip into the vent openings. „ If any stain on the door vent trim is persistent, use . Let the oven cool before cleaning. If necessary...
... on the electrical controls and switches because it replaced. Never block this by hand. „ The area outside of marinades, fruit juices, tomato sauces and basting materials containing acids may require cleaning with a mild abrasive cleaner. Do not let water drip into the vent openings. „ If any stain on the door vent trim is persistent, use . Let the oven cool before cleaning. If necessary...

Use and Care Manual
Page 24
... guide Storage Drawer Removal To remove the drawer: Pull the drawer out until it stops. Lift door up and away from the range frame. Do not lift door by the handle. Follow instructions below to unlock Removal position Lift-Off Oven Door The door is very heavy. To replace the drawer: Place the drawer rails on the bottom edge of the slot. Oven Heating Elements Do not clean the bake element or the broil element. Pull hinge locks...
... guide Storage Drawer Removal To remove the drawer: Pull the drawer out until it stops. Lift door up and away from the range frame. Do not lift door by the handle. Follow instructions below to unlock Removal position Lift-Off Oven Door The door is very heavy. To replace the drawer: Place the drawer rails on the bottom edge of the slot. Oven Heating Elements Do not clean the bake element or the broil element. Pull hinge locks...

Use and Care Manual
Page 25
... HAZARD: Before replacing oven light bulb, disconnect the electrical power to do so may result in the direction of the brush lines with a damp soft sponge. Oven Light Replacement (on some models) can be removed when cool. Replace bulb with 240 volts lamp only. For models JBS27DI and JBS27RI: Replace oven lamp with a 40-watt household appliance bulb. Failure to the range at the main fuse or circuit breaker panel. To replace the cover: Place...
... HAZARD: Before replacing oven light bulb, disconnect the electrical power to do so may result in the direction of the brush lines with a damp soft sponge. Oven Light Replacement (on some models) can be removed when cool. Replace bulb with 240 volts lamp only. For models JBS27DI and JBS27RI: Replace oven lamp with a 40-watt household appliance bulb. Failure to the range at the main fuse or circuit breaker panel. To replace the cover: Place...
Use and Care Manual
Page 28
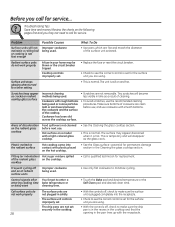
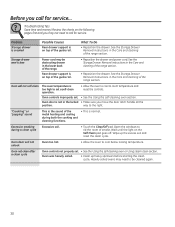
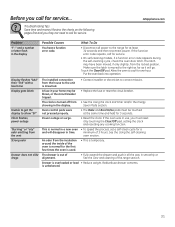
... are not plugged in time as a result of discoloration on the cooktop. Radiant surface units do not work properly A fuse in the pan lines up with a light-colored glass cooktop. • See the Cleaning the glass cooktop section. • This is normal. Control signals after You forgot to enter a entering cooking time bake temperature or or delay start cleaning time. • Touch the Bake pad and desired temperature or the Self Clean pad and desired clean time. Tiny scratches...
... are not plugged in time as a result of discoloration on the cooktop. Radiant surface units do not work properly A fuse in the pan lines up with a light-colored glass cooktop. • See the Cleaning the glass cooktop section. • This is normal. Control signals after You forgot to enter a entering cooking time bake temperature or or delay start cleaning time. • Touch the Bake pad and desired temperature or the Self Clean pad and desired clean time. Tiny scratches...
Use and Care Manual
Page 30
... reset the clean cycle. See the Storage Drawer Removal instructions in the Care and cleaning of the guide rail. • Reposition the drawer and power cord. Oven will not unlock Oven too hot. • Allow the oven to room temperature and reset the controls. Oven door will not self-clean The oven temperature is the sound of the range. Review the charts on the Self Clean pad goes off. Oven controls improperly set . • See the Using the self-cleaning oven or Using steam clean section. Heavily soiled ovens...
... reset the clean cycle. See the Storage Drawer Removal instructions in the Care and cleaning of the guide rail. • Reposition the drawer and power cord. Oven will not unlock Oven too hot. • Allow the oven to room temperature and reset the controls. Oven door will not self-clean The oven temperature is the sound of the range. Review the charts on the Self Clean pad goes off. Oven controls improperly set . • See the Using the self-cleaning oven or Using steam clean section. Heavily soiled ovens...
Use and Care Manual
Page 31
... Bake and Broil Hi/Lo pads must reset it all power to cool for service. The drawer is out of the oven is normal in smoothly or See the Care and cleaning of 3 hours. Before you call for service. • On self-cleaning models, if a function error code appears during the self-cleaning cycle, check the oven door latch. is overloaded or load • Reduce weight. GEAppliances.com Problem "F -" and a number or...
... Bake and Broil Hi/Lo pads must reset it all power to cool for service. The drawer is out of the oven is normal in smoothly or See the Care and cleaning of 3 hours. Before you call for service. • On self-cleaning models, if a function error code appears during the self-cleaning cycle, check the oven door latch. is overloaded or load • Reduce weight. GEAppliances.com Problem "F -" and a number or...

Use and Care Manual
Page 32
... broiler pan within 30 days of your Broiler Pan! (Not for current pricing. Box 221027, Memphis, TN 38122-1027. Grates Surface Burner Heads and Caps Surface Elements and Drip Pans Knobs or Oven Racks Oven Elements Light Bulbs Ceramic Cooktop Cleaning Kit: Includes cleaner, scraper and pad Ceramic Cooktop Cleaning Wipes Stainless Steel Appliance Polish Wipes Stainless Steel Appliance Cleaner WX10X117GCS WX10X305 WX10X10001 PM10X311 Get the most out of purchasing your pan and grid cover to broil...
... broiler pan within 30 days of your Broiler Pan! (Not for current pricing. Box 221027, Memphis, TN 38122-1027. Grates Surface Burner Heads and Caps Surface Elements and Drip Pans Knobs or Oven Racks Oven Elements Light Bulbs Ceramic Cooktop Cleaning Kit: Includes cleaner, scraper and pad Ceramic Cooktop Cleaning Wipes Stainless Steel Appliance Polish Wipes Stainless Steel Appliance Cleaner WX10X117GCS WX10X305 WX10X10001 PM10X311 Get the most out of purchasing your pan and grid cover to broil...
Quick Specs
Page 1
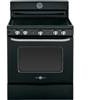
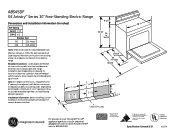
... installing, consult installation instructions packed with an Anti-Tip device. See shaded area in drawing for required breaker size. The installation of this device is an important, required step in the installation of 1-1/2" spacing to allow range to be used because terminals are equipped with product for 0" spacing from adjacent walls below countertops. ABS45DF GE Artistry™ Series 30" Free-Standing Electric Range Dimensions and Installation Information (in inches) 8-1/2 30 KW Rating...
... installing, consult installation instructions packed with an Anti-Tip device. See shaded area in drawing for required breaker size. The installation of this device is an important, required step in the installation of 1-1/2" spacing to allow range to be used because terminals are equipped with product for 0" spacing from adjacent walls below countertops. ABS45DF GE Artistry™ Series 30" Free-Standing Electric Range Dimensions and Installation Information (in inches) 8-1/2 30 KW Rating...


