
User Guide
Page 2
... devices ring when your telephone number is called. See installation instructions for Telephone Terminal Equipment published by ACTA. 1 Notification to the Local Telephone Company On the bottom of this information to your own telephone equipment if you are on coin service provided by the ACTA. Check with your local telephone company. • Notice must be certain of the number of devices you may connect...
... devices ring when your telephone number is called. See installation instructions for Telephone Terminal Equipment published by ACTA. 1 Notification to the Local Telephone Company On the bottom of this information to your own telephone equipment if you are on coin service provided by the ACTA. Check with your local telephone company. • Notice must be certain of the number of devices you may connect...
User Guide
Page 3
... the operation of its business and not inconsistent with the instructions, may make changes in its communications facilities, equipment, operations or procedures where such action is , the antenna for a Class B digital device, pursuant to Part 15 of the FCC Rules. However, there is no guarantee that may temporarily discontinue service immediately. Privacy of Communications may harm the telephone network, the telephone company...
... the operation of its business and not inconsistent with the instructions, may make changes in its communications facilities, equipment, operations or procedures where such action is , the antenna for a Class B digital device, pursuant to Part 15 of the FCC Rules. However, there is no guarantee that may temporarily discontinue service immediately. Privacy of Communications may harm the telephone network, the telephone company...
User Guide
Page 5
... Date and Time 16 Area Code 17 Tone/Pulse 17 Language 17 Auto Talk 18 Registration 18 De-Registration 19 Global De-registration.......... 20 Sound Setup 20 Ringer Tone 20 Ringer Volume 21 Key Tone 21 Reset Setting 21 Voicemail 22 All Settings 22 Telephone Operation 22 Visual Indicators 22 Base 22 Handset 23 VMWI / Visual Ringer Indicator on Handset 23 Speakerphone Operation........ 23 Making a Call 23 Answering Calls 24 Call Timer 24 Auto Standby 24 Ringer Volume 24 Flash/Call Waiting 25 Last Number Redial 25 Exit 25 Page 26 Paging from the Base/Group Page26 Mute...
... Date and Time 16 Area Code 17 Tone/Pulse 17 Language 17 Auto Talk 18 Registration 18 De-Registration 19 Global De-registration.......... 20 Sound Setup 20 Ringer Tone 20 Ringer Volume 21 Key Tone 21 Reset Setting 21 Voicemail 22 All Settings 22 Telephone Operation 22 Visual Indicators 22 Base 22 Handset 23 VMWI / Visual Ringer Indicator on Handset 23 Speakerphone Operation........ 23 Making a Call 23 Answering Calls 24 Call Timer 24 Auto Standby 24 Ringer Volume 24 Flash/Call Waiting 25 Last Number Redial 25 Exit 25 Page 26 Paging from the Base/Group Page26 Mute...
User Guide
Page 6
... Three-Way Calling 28 Transferring External Calls to Other Handsets 29 Caller ID (CID 30 Call Waiting Caller ID 30 Receiving CID Records 30 Storing CID Records 31 Reviewing CID Records 31 Dialing a CID Number 31 Storing CID Records in Internal Memory 32 Deleting All CID Records 32 Phonebook 33 Review Records 33 Add Records 33 Inserting a Pause in the Dialing Sequence 34 Edit Records 34 Delete Records 34 Dialing a Number from Internal Memory 35 Changing the Battery 36 Battery Safety Precautions 36 Display Messages 37 Troubleshooting Guide...
... Three-Way Calling 28 Transferring External Calls to Other Handsets 29 Caller ID (CID 30 Call Waiting Caller ID 30 Receiving CID Records 30 Storing CID Records 31 Reviewing CID Records 31 Dialing a CID Number 31 Storing CID Records in Internal Memory 32 Deleting All CID Records 32 Phonebook 33 Review Records 33 Add Records 33 Inserting a Pause in the Dialing Sequence 34 Edit Records 34 Delete Records 34 Dialing a Number from Internal Memory 35 Changing the Battery 36 Battery Safety Precautions 36 Display Messages 37 Troubleshooting Guide...
User Guide
Page 14
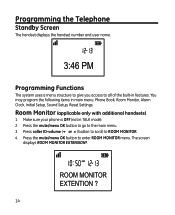
... MONITOR. 4. Make sure your phone is OFF (not in features. Press the mute/menu OK button to go to enter ROOM MONITOR menu. The screen displays ROOM MONITOR EXTENSION?. 14 You may program the following items in main menu: Phone Book, Room Monitor, Alarm Clock, Initial Setup, Sound Setup, Reset Settings. Press caller ID-volume (6 or 5) button to scroll to all of the built-in TALK mode). 2. Programming the Telephone Standby Screen The handset displays the handset number and user name.
... MONITOR. 4. Make sure your phone is OFF (not in features. Press the mute/menu OK button to go to enter ROOM MONITOR menu. The screen displays ROOM MONITOR EXTENSION?. 14 You may program the following items in main menu: Phone Book, Room Monitor, Alarm Clock, Initial Setup, Sound Setup, Reset Settings. Press caller ID-volume (6 or 5) button to scroll to all of the built-in TALK mode). 2. Programming the Telephone Standby Screen The handset displays the handset number and user name.

User Guide
Page 15
Make sure your phone is selected, then the screen displays SET ALARM TIME. The screen displays ON > OFF. 5. If ON is OFF (not in 0210. Press the mute/menu ok button to enter the alarm time (for example, 02:10PM) key in TALK mode) 2. The receiving handset will turn on the handset to exit room monitor mode. 5. NOTE: For room monitoring mode to 6 handsets by purchase of optional Model 28203 handset with recharge cradle...
Make sure your phone is selected, then the screen displays SET ALARM TIME. The screen displays ON > OFF. 5. If ON is OFF (not in 0210. Press the mute/menu ok button to enter the alarm time (for example, 02:10PM) key in TALK mode) 2. The receiving handset will turn on the handset to exit room monitor mode. 5. NOTE: For room monitoring mode to 6 handsets by purchase of optional Model 28203 handset with recharge cradle...

User Guide
Page 16
... program the following items: Handset Name, Date and Time, Area Code, Tone/Pulse, Language, Auto Talk, Registration, Deregistration. For example, to save your selection and advance SET TIME sub-menu. 16 Make sure your phone is stored in TALK mode). 2. Press the mute/menu OK button to the HANDSET NAME sub-menu. 2. Press mute/menu OK button to enter the menu. Press mute/menu OK button to enter the menu. Initial Setup 1. NOTE: During programming, you may press the END button at a time. 4. The screen displays HANDSET...
... program the following items: Handset Name, Date and Time, Area Code, Tone/Pulse, Language, Auto Talk, Registration, Deregistration. For example, to save your selection and advance SET TIME sub-menu. 16 Make sure your phone is stored in TALK mode). 2. Press the mute/menu OK button to the HANDSET NAME sub-menu. 2. Press mute/menu OK button to enter the menu. Press mute/menu OK button to enter the menu. Initial Setup 1. NOTE: During programming, you may press the END button at a time. 4. The screen displays HANDSET...

User Guide
Page 18
... directly. Press the handset mute/menu OK button. The handset screen displays REGISTERED. It is not recommended that a handset be held near the base during an external call, you may now rename your handset. (Refer to answer a call immediately without pressing any buttons. From the Initial Setup Menu: 1. Press the caller ID-volume (5 or 6) button to scroll to enter the menu. Press mute/menu OK button to the AUTO TALK sub-menu. 2. Use the caller ID-volume (5 or 6) button to scroll to use indicator flashes. The screen displays REGISTERING. Registration...
... directly. Press the handset mute/menu OK button. The handset screen displays REGISTERED. It is not recommended that a handset be held near the base during an external call, you may now rename your handset. (Refer to answer a call immediately without pressing any buttons. From the Initial Setup Menu: 1. Press the caller ID-volume (5 or 6) button to scroll to enter the menu. Press mute/menu OK button to the AUTO TALK sub-menu. 2. Use the caller ID-volume (5 or 6) button to scroll to use indicator flashes. The screen displays REGISTERING. Registration...
User Guide
Page 20
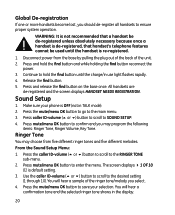
...-registered and the screen displays HANDSET NEEDS REGISTRATION. The screen displays 4 1 OF 10. 01 is OFF (not in use light flashes rapidly. 4. Use the caller ID-volume (5 or 6) button to scroll to SOUND SETUP. 4. Press the mute/menu OK button to go to save your phone is default setting. 3. Sound Setup 1. Press the mute/menu OK button to the main menu. 3. Press mute/menu OK button to the RINGER TONE sub-menu. 2. Press the caller ID-volume (5 or 6) button to scroll to enter the menu. Disconnect power...
...-registered and the screen displays HANDSET NEEDS REGISTRATION. The screen displays 4 1 OF 10. 01 is OFF (not in use light flashes rapidly. 4. Use the caller ID-volume (5 or 6) button to scroll to SOUND SETUP. 4. Press the mute/menu OK button to go to save your phone is default setting. 3. Sound Setup 1. Press the mute/menu OK button to the main menu. 3. Press mute/menu OK button to the RINGER TONE sub-menu. 2. Press the caller ID-volume (5 or 6) button to scroll to enter the menu. Disconnect power...
User Guide
Page 21
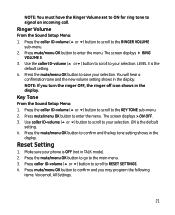
... in TALK mode). 2. The screen displays 4 RING VOLUME 5. 3. ON is the default setting. 4. LEVEL 5 is the default setting. 4. You will hear a confirmation tone and the new volume setting shows in the display. Press mute/menu OK button to RESET SETTINGS. 4. Press caller ID-volume (5 or 6) button to scroll to enter the menu. NOTE: You must have the Ringer Volume set to ON for ring tone to the KEY TONE sub-menu. 2. Press the caller ID-volume (5 or 6) button to scroll to signal an incoming call. Press the mute/menu OK button...
... in TALK mode). 2. The screen displays 4 RING VOLUME 5. 3. ON is the default setting. 4. LEVEL 5 is the default setting. 4. You will hear a confirmation tone and the new volume setting shows in the display. Press mute/menu OK button to RESET SETTINGS. 4. Press caller ID-volume (5 or 6) button to scroll to enter the menu. NOTE: You must have the Ringer Volume set to ON for ring tone to the KEY TONE sub-menu. 2. Press the caller ID-volume (5 or 6) button to scroll to signal an incoming call. Press the mute/menu OK button...

User Guide
Page 22
... VOICEMAIL sub-menu. 2. Press the mute/menu OK button to the factory default settings. Telephone Operation Visual Indicators Base The charge/in use . 22 Follow the steps below to return to save your selection. Use the caller ID-volume (5 or 6) button to move the cursor to factory default setting. 4. The screen displays 4YES NO. The default setting is NO. 3. NOTE: If you choose YES all the settings in use LED on the base). 4. You will hear a confirmation tone. All Settings...
... VOICEMAIL sub-menu. 2. Press the mute/menu OK button to the factory default settings. Telephone Operation Visual Indicators Base The charge/in use . 22 Follow the steps below to return to save your selection. Use the caller ID-volume (5 or 6) button to move the cursor to factory default setting. 4. The screen displays 4YES NO. The default setting is NO. 3. NOTE: If you choose YES all the settings in use LED on the base). 4. You will hear a confirmation tone. All Settings...
User Guide
Page 23
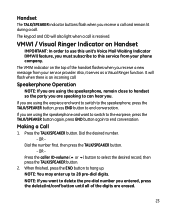
... a new message from your service provider. Making a Call 1. Press the caller ID-volume (5 or 6) button to select the desired record, then press the TALK/SPEAKER button. 2. Press the TALK/SPEAKER button. It will also light when a call is an incoming call . Handset The TALK/SPEAKER indicator buttons flash when you want to switch to the earpiece, press the TALK/SPEAKER button again, press END button again to end conversation. NOTE: If you receive a call and remain lit during a call . Dial the number first...
... a new message from your service provider. Making a Call 1. Press the caller ID-volume (5 or 6) button to select the desired record, then press the TALK/SPEAKER button. 2. Press the TALK/SPEAKER button. It will also light when a call is an incoming call . Handset The TALK/SPEAKER indicator buttons flash when you want to switch to the earpiece, press the TALK/SPEAKER button again, press END button again to end conversation. NOTE: If you receive a call and remain lit during a call . Dial the number first...
User Guide
Page 24
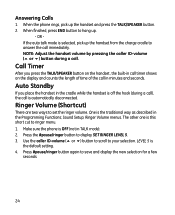
.... Use the caller ID-volume (5 or 6) button to scroll to display SET RINGER LEVEL 5. 3. Press #pause/ringer button again to set the ringer volume. OR - Make sure the phone is this short cut to hang up the handset and press the TALK/SPEAKER button. 2. If the auto talk mode is automatically disconnected. Ringer Volume (Shortcut) There are two ways to save and display the new selection for a few seconds. 24 When finished, press END button to ringer menu. 1. Sound Setup; Auto...
.... Use the caller ID-volume (5 or 6) button to scroll to display SET RINGER LEVEL 5. 3. Press #pause/ringer button again to set the ringer volume. OR - Make sure the phone is this short cut to hang up the handset and press the TALK/SPEAKER button. 2. If the auto talk mode is automatically disconnected. Ringer Volume (Shortcut) There are two ways to save and display the new selection for a few seconds. 24 When finished, press END button to ringer menu. 1. Sound Setup; Auto...
User Guide
Page 26
... incoming call ringing in, or during call screening after the call is taken by pressing the caller ID-volume (5 or 6) button. Paging from . Press the mute/menu OK button. The DND indicator will light and shows in each handset screen displays FIND HANDSET. 2. If your phone conversation. Receiver Volume Control When the handset is maximum. Press the mute/menu OK button to cancel and return to choose from the Base/Group Page Use the base-only to turn off -line conversation, use the MUTE feature...
... incoming call ringing in, or during call screening after the call is taken by pressing the caller ID-volume (5 or 6) button. Paging from . Press the mute/menu OK button. The DND indicator will light and shows in each handset screen displays FIND HANDSET. 2. If your phone conversation. Receiver Volume Control When the handset is maximum. Press the mute/menu OK button to cancel and return to choose from the Base/Group Page Use the base-only to turn off -line conversation, use the MUTE feature...

User Guide
Page 27
... handset shall display a paged handset number list (i.e. Intercom Operation (applicable only with additional handsets) The intercom feature allows you to have a conversation with another registered handset without tying up to still receive incoming calls. Press the delete/int/conf button on either handset to page. Handset 2, Handset 3, Handset 4, Handset 5 and Handset 6) if Handset 1 is OFF (not in TALK mode). 2. When 4 handsets are immediately connected. Making an Auto Intercom Call 1. c) If the user has selected a paged handset number that the user of optional Model 28203...
... handset shall display a paged handset number list (i.e. Intercom Operation (applicable only with additional handsets) The intercom feature allows you to have a conversation with another registered handset without tying up to still receive incoming calls. Press the delete/int/conf button on either handset to page. Handset 2, Handset 3, Handset 4, Handset 5 and Handset 6) if Handset 1 is OFF (not in TALK mode). 2. When 4 handsets are immediately connected. Making an Auto Intercom Call 1. c) If the user has selected a paged handset number that the user of optional Model 28203...

User Guide
Page 30
... to use this unit's Caller ID features, you must subscribe to answer the call. 30 This information can include the phone number, date, and time; or the name, phone number, date, and time. The Caller ID information appears on the phone, you hear the call waiting beep in the history of a Call Waiting call on hold and answer the incoming call on the line. To know who is transmitted between the first and second ring. Press the flash button to...
... to use this unit's Caller ID features, you must subscribe to answer the call. 30 This information can include the phone number, date, and time; or the name, phone number, date, and time. The Caller ID information appears on the phone, you hear the call waiting beep in the history of a Call Waiting call on hold and answer the incoming call on the line. To know who is transmitted between the first and second ring. Press the flash button to...
User Guide
Page 31
... previously pre-programmed your local area code into the set up menu, you were unavailable. Dialing a CID Number 1. Calls received since your telephone's Caller ID memory stores the data for the 40 most recent calls you received so you can see who called while you may review the stored information at home or cannot answer, your last review show as in the display. Press the TALK/SPEAKER button. Seven digits 7-digit telephone number. 888-8888...
... previously pre-programmed your local area code into the set up menu, you were unavailable. Dialing a CID Number 1. Calls received since your telephone's Caller ID memory stores the data for the 40 most recent calls you received so you can see who called while you may review the stored information at home or cannot answer, your last review show as in the display. Press the TALK/SPEAKER button. Seven digits 7-digit telephone number. 888-8888...
User Guide
Page 37
... registered handset. Indicates no additional information in the phone's memory. Prompt asking if you want to erase the CID record showing on handset while the line is blocked from a long distance call . Prompt asking if you want to erase one of the 50 memory locations. HANDSET NEEDS REGISTRATION Indicates you to enter the user name for a period of time before answering the call . 37 Prompt asking if you set up and use the handset...
... registered handset. Indicates no additional information in the phone's memory. Prompt asking if you want to erase the CID record showing on handset while the line is blocked from a long distance call . Prompt asking if you want to erase one of the 50 memory locations. HANDSET NEEDS REGISTRATION Indicates you to enter the user name for a period of time before answering the call . 37 Prompt asking if you set up and use the handset...
User Guide
Page 38
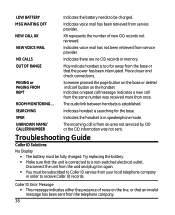
... sent from the telephone company. 38 Troubleshooting Guide Caller ID Solutions No Display • The battery must be fully charged. Move closer and check connections. Indicates a new call from your local telephone company in speakerphone mode. Disconnect the unit from the wall and plug it in memory. NEW VOICE MAIL Indicates voice mail has not been retrieved from an area not serviced by CID or the CID information was received more than once. UNKNOWN NAME/ CALLER/NUMBER The incoming call message.
... sent from the telephone company. 38 Troubleshooting Guide Caller ID Solutions No Display • The battery must be fully charged. Move closer and check connections. Indicates a new call from your local telephone company in speakerphone mode. Disconnect the unit from the wall and plug it in memory. NEW VOICE MAIL Indicates voice mail has not been retrieved from an area not serviced by CID or the CID information was received more than once. UNKNOWN NAME/ CALLER/NUMBER The incoming call message.
User Guide
Page 46
... Add Records 33 Advanced Intercom Features 28 Alarm Clock 15 All Settings 22 Answering Calls 24 Area Code 17 Auto Standby 24 Auto Talk 18 B Base 22 Base Layout 10 Base Station 13 Battery Safety Precautions 36 Before You Begin 7 C Call Timer 24 Call Waiting Caller ID 30 Caller ID (CID) 30 Causes of Poor Reception 40 Changing the Battery 36 D Date and Time 16 Delete Records 34 Deleting All CID Records 32 De-Registration 19 Dialing a CID Number 31 Dialing a Number from Internal Memory...
... Add Records 33 Advanced Intercom Features 28 Alarm Clock 15 All Settings 22 Answering Calls 24 Area Code 17 Auto Standby 24 Auto Talk 18 B Base 22 Base Layout 10 Base Station 13 Battery Safety Precautions 36 Before You Begin 7 C Call Timer 24 Call Waiting Caller ID 30 Caller ID (CID) 30 Causes of Poor Reception 40 Changing the Battery 36 D Date and Time 16 Delete Records 34 Deleting All CID Records 32 De-Registration 19 Dialing a CID Number 31 Dialing a Number from Internal Memory...


