
User Guide
Page 2
... is available from that is connected. See installation instructions for a Class B digital device, pursuant to correct the situation; Interference Information This device complies with the limits for details. This equipment has been tested and found to comply with Part 15 of these devices ring when your telephone number is useful in compliance with the instructions, may cause harmful interference to...
... is available from that is connected. See installation instructions for a Class B digital device, pursuant to correct the situation; Interference Information This device complies with the limits for details. This equipment has been tested and found to comply with Part 15 of these devices ring when your telephone number is useful in compliance with the instructions, may cause harmful interference to...

User Guide
Page 3
... SETUP 6 BASE LAYOUT 6 PARTS CHECKLIST 7 TELEPHONE JACK REQUIREMENTS 7 INSTALLATION 7 IMPORTANT INSTALLATION INFORMATION 7 INSTALLING THE PHONE 8 DATA PORT 10 PROGRAMMING THE TELEPHONE 11 DISPLAY LANGUAGE 11 MANUALLY SETTING THE DATE AND TIME 11 FLASH TIME 12 HOUR FORMAT 12 CALL ALERT TONE 13 LOCAL AREA CODE 13 REGIONAL AREA CODES 14 DISPLAY CONTRAST 14 VOICE MAIL ACCESS CODES 15 RESTORING THE DEFAULTS 15 TELEPHONE OPERATION 16 TELEPHONE OPERATION 16 MAKING CALLS WITH THE HANDSET 16 MAKING CALLS WITH THE SPEAKERPHONE .......... 16 MAKING CALLS WITH THE OPTIONAL HEADSET...
... SETUP 6 BASE LAYOUT 6 PARTS CHECKLIST 7 TELEPHONE JACK REQUIREMENTS 7 INSTALLATION 7 IMPORTANT INSTALLATION INFORMATION 7 INSTALLING THE PHONE 8 DATA PORT 10 PROGRAMMING THE TELEPHONE 11 DISPLAY LANGUAGE 11 MANUALLY SETTING THE DATE AND TIME 11 FLASH TIME 12 HOUR FORMAT 12 CALL ALERT TONE 13 LOCAL AREA CODE 13 REGIONAL AREA CODES 14 DISPLAY CONTRAST 14 VOICE MAIL ACCESS CODES 15 RESTORING THE DEFAULTS 15 TELEPHONE OPERATION 16 TELEPHONE OPERATION 16 MAKING CALLS WITH THE HANDSET 16 MAKING CALLS WITH THE SPEAKERPHONE .......... 16 MAKING CALLS WITH THE OPTIONAL HEADSET...

User Guide
Page 4
... AREA CODE IN THE SETUP MENU 23 IF YOU DID NOT PROGRAM YOUR LOCAL AREA CODE IN THE SETUP MENU 24 CALL WAITING CALLER ID 24 MEMORY 25 DIRECT ACCESS MEMORY & DIRECTORY MEMORY 25 STORING A NAME AND NUMBER IN MEMORY ... 25 REVIEWING STORED NAMES & NUMBERS ......... 25 CHANGING A STORED NAME OR NUMBER ......... 26 STORING THE LAST NUMBER DIALED 26 STORING A PAUSE 26 DIALING A STORED NUMBER 27 CHAIN DIALING 27 DELETING ALL DIRECTORY MEMORY 28 OTHER INFORMATION 29 DISPLAY MESSAGES 29 TROUBLESHOOTING GUIDE 29 GENERAL PRODUCT CARE 31 SERVICE...
... AREA CODE IN THE SETUP MENU 23 IF YOU DID NOT PROGRAM YOUR LOCAL AREA CODE IN THE SETUP MENU 24 CALL WAITING CALLER ID 24 MEMORY 25 DIRECT ACCESS MEMORY & DIRECTORY MEMORY 25 STORING A NAME AND NUMBER IN MEMORY ... 25 REVIEWING STORED NAMES & NUMBERS ......... 25 CHANGING A STORED NAME OR NUMBER ......... 26 STORING THE LAST NUMBER DIALED 26 STORING A PAUSE 26 DIALING A STORED NUMBER 27 CHAIN DIALING 27 DELETING ALL DIRECTORY MEMORY 28 OTHER INFORMATION 29 DISPLAY MESSAGES 29 TROUBLESHOOTING GUIDE 29 GENERAL PRODUCT CARE 31 SERVICE...

User Guide
Page 5
... this user's guide. Your Caller ID phone enables you to: • Identify callers before you answer the phone. • View the time and date of Caller ID or similar caller identification services. Introduction CAUTION: When using telephone equipment, there are on the phone, you must subscribe to Caller ID with Call Waiting Service. To get the most from your local telephone company, to subscribers of each incoming call. • Record up to 99 Caller ID messages...
... this user's guide. Your Caller ID phone enables you to: • Identify callers before you answer the phone. • View the time and date of Caller ID or similar caller identification services. Introduction CAUTION: When using telephone equipment, there are on the phone, you must subscribe to Caller ID with Call Waiting Service. To get the most from your local telephone company, to subscribers of each incoming call. • Record up to 99 Caller ID messages...

User Guide
Page 6
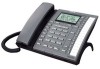
... MEM. INT. INT. DIRECTORY button MENU button STORE button DIAL button CONFERENCE button LINE 2 button VOLUME button LINE 1 button FLASH button HEADSET button HOLD button MUTE button SPEAKER button 6 INT. MEM. INT. MEM. INT. MEM. MEM. INT. MEM. MEM. Connections and Setup Base Layout NEW CALL indicator REVIEW button EXIT button DELETE button SELECT/SAVE button MEMORY buttons VOICE MAIL 1 button VOICE MAIL 2 button DND button PAUSE/REDIAL button DELETE VOICE MAIL 1 VOICE MAIL 2 DND PAUSE REDIAL EXIT 1 NEW CALL SELECT/SAVE REVIEW 2 ABC 3 DEF 4 GHI...
... MEM. INT. INT. DIRECTORY button MENU button STORE button DIAL button CONFERENCE button LINE 2 button VOLUME button LINE 1 button FLASH button HEADSET button HOLD button MUTE button SPEAKER button 6 INT. MEM. INT. MEM. INT. MEM. MEM. INT. MEM. MEM. Connections and Setup Base Layout NEW CALL indicator REVIEW button EXIT button DELETE button SELECT/SAVE button MEMORY buttons VOICE MAIL 1 button VOICE MAIL 2 button DND button PAUSE/REDIAL button DELETE VOICE MAIL 1 VOICE MAIL 2 DND PAUSE REDIAL EXIT 1 NEW CALL SELECT/SAVE REVIEW 2 ABC 3 DEF 4 GHI...

User Guide
Page 7
... the telephone line has been disconnected at the network interface. • Use caution when installing or modifying telephone lines. • Never install telephone jacks in your package includes the following items: Connections and Setup DELETE VOICE MAIL 1 VOICE MAIL 2 DND PAUSE REDIAL EXIT 1 NEW CALL SELECT/SAVE REVIEW 2 ABC 3 DEF 4 GHI 5 JKL 6 MNO 7 PQRS 8 TUV 9 WXYZ VOLUME FLASH * TONE 0 OPER HANDSET SPEAKER # MUTE DIRECTORY 1 2 MENU 3 STORE 4 5 DIAL 6 7 8 CONFER 9 10 11 LINE 2 12 13 LINE 1 14 15 HOLD 16 INTERCOM/MEMORY LOG INT. Parts Checklist Make sure...
... the telephone line has been disconnected at the network interface. • Use caution when installing or modifying telephone lines. • Never install telephone jacks in your package includes the following items: Connections and Setup DELETE VOICE MAIL 1 VOICE MAIL 2 DND PAUSE REDIAL EXIT 1 NEW CALL SELECT/SAVE REVIEW 2 ABC 3 DEF 4 GHI 5 JKL 6 MNO 7 PQRS 8 TUV 9 WXYZ VOLUME FLASH * TONE 0 OPER HANDSET SPEAKER # MUTE DIRECTORY 1 2 MENU 3 STORE 4 5 DIAL 6 7 8 CONFER 9 10 11 LINE 2 12 13 LINE 1 14 15 HOLD 16 INTERCOM/MEMORY LOG INT. Parts Checklist Make sure...

User Guide
Page 9
... use two line, you hear a dial tone, the phone is properly installed. 9 Connect the handset cord: Plug one end of the coiled handset cord into the side of the base and the other end of each line cord into separate wall jacks. If you must have two telephone lines with unique telephone numbers. Connections and Setup 4 6 3 5 If you have two separate telephone line jacks, plug one telephone line cord into the jack marked LINE...
... use two line, you hear a dial tone, the phone is properly installed. 9 Connect the handset cord: Plug one end of the coiled handset cord into the side of the base and the other end of each line cord into separate wall jacks. If you must have two telephone lines with unique telephone numbers. Connections and Setup 4 6 3 5 If you have two separate telephone line jacks, plug one telephone line cord into the jack marked LINE...

User Guide
Page 10
... the phone number for line 2. Use the DATA PORT jack to hook up your fax machine if they dial the normal fax line. 10 Your fax machine can now receive calls on line 2 and want them to fax something to someone on line 1. IMPORTANT: Be sure to switch the fax machine back to the normal line when you are done because outside callers who do not know that you are talking to...
... the phone number for line 2. Use the DATA PORT jack to hook up your fax machine if they dial the normal fax line. 10 Your fax machine can now receive calls on line 2 and want them to fax something to someone on line 1. IMPORTANT: Be sure to switch the fax machine back to the normal line when you are done because outside callers who do not know that you are talking to...

User Guide
Page 15
... RESTORE SET menu. 15 Restoring the Defaults This feature allows you to reset all the menu settings to VM CODE. 3. Use the REVIEW or to scroll to YES. 5. Use the REVIEW or to scroll to RESTORE SET. 3. Use the touch-tone pad to enter your voice mail. 1. Connections and Setup Voice Mail Access Codes You can program a voice mail access code for each telephone line for quick access to your voice mail access phone number. • Use the REVIEW or button to move the cursor in the display. • Use the DELETE button to erase...
... RESTORE SET menu. 15 Restoring the Defaults This feature allows you to reset all the menu settings to VM CODE. 3. Use the REVIEW or to scroll to YES. 5. Use the REVIEW or to scroll to RESTORE SET. 3. Use the touch-tone pad to enter your voice mail. 1. Connections and Setup Voice Mail Access Codes You can program a voice mail access code for each telephone line for quick access to your voice mail access phone number. • Use the REVIEW or button to move the cursor in the display. • Use the DELETE button to erase...

User Guide
Page 16
... your ear. 3. Press HEADSET when finished. NOTE: To converse using the headset, the handset must be placed in the cradle. 16 Wait for a dial tone. 3. Making Calls with the Optional Headset 1. Wait for a dial tone. 3. Wait for a dial tone. 6. Dial a phone number. 7. Press the SPEAKER button and the phone automatically selects an open line. 5. Dial a phone number. 4. Adjust the headset to the HEADSET jack on top of the base. 2. Press the HEADSET button, and the phone automatically selects an open line. 2. Dial a phone number. 4. Connect a headset to rest comfortably...
... your ear. 3. Press HEADSET when finished. NOTE: To converse using the headset, the handset must be placed in the cradle. 16 Wait for a dial tone. 3. Making Calls with the Optional Headset 1. Wait for a dial tone. 3. Wait for a dial tone. 6. Dial a phone number. 7. Press the SPEAKER button and the phone automatically selects an open line. 5. Dial a phone number. 4. Adjust the headset to the HEADSET jack on top of the base. 2. Press the HEADSET button, and the phone automatically selects an open line. 2. Dial a phone number. 4. Connect a headset to rest comfortably...

User Guide
Page 17
... HEADSET. The speakerphone turns on . Press the HEADSET button, and the phone automatically selects the line using the headset, the handset must be placed in the cradle. 17 Receiving Calls with the Optional Headset When the phone rings, the corresponding line's indicator flashes rapidly. 1. When you are making or receiving a call on . NOTE: Whether you press another line without putting the call , the caller is disconnected if you are finished, press SPEAKER. The headset indicator turns...
... HEADSET. The speakerphone turns on . Press the HEADSET button, and the phone automatically selects the line using the headset, the handset must be placed in the cradle. 17 Receiving Calls with the Optional Headset When the phone rings, the corresponding line's indicator flashes rapidly. 1. When you are making or receiving a call on . NOTE: Whether you press another line without putting the call , the caller is disconnected if you are finished, press SPEAKER. The headset indicator turns...

User Guide
Page 18
... the phone book memory. • Press the REVIEW or buttons to scroll the CID memory, or • Press the REDIAL button. Press the DIAL button. The mute indicator turns on the speakerphone. 2. There are several ways to pre-dial a telephone number: • Manually enter the telephone number, or • Press one of the call is timed even while it is finished, total time shows in call is on the telephone line cannot hear you to handset or headset cancels mute...
... the phone book memory. • Press the REVIEW or buttons to scroll the CID memory, or • Press the REDIAL button. Press the DIAL button. The mute indicator turns on the speakerphone. 2. There are several ways to pre-dial a telephone number: • Manually enter the telephone number, or • Press one of the call is timed even while it is finished, total time shows in call is on the telephone line cannot hear you to handset or headset cancels mute...

User Guide
Page 19
... hold flashes green. 2. Wait for the line on hold . To return to activate custom calling services such as Call Waiting, which is available through your local telephone company. Press HOLD. Hang up the handset, or press SPEAKER or HEADSET. 2. Flash Use the FLASH button to the default settings, press both the VOLUME or buttons simultaneously. 19 Your telephone is selected automatically. 3. The phone automatically goes into speakerphone mode. Redial To quickly redial the last number you want to change modes...
... hold flashes green. 2. Wait for the line on hold . To return to activate custom calling services such as Call Waiting, which is available through your local telephone company. Press HOLD. Hang up the handset, or press SPEAKER or HEADSET. 2. Flash Use the FLASH button to the default settings, press both the VOLUME or buttons simultaneously. 19 Your telephone is selected automatically. 3. The phone automatically goes into speakerphone mode. Redial To quickly redial the last number you want to change modes...

User Guide
Page 20
... DND button. The phone generates a sample ring at the selected setting. Speakerphone, Handset, and Headset Volume While using the speakerphone or press HEADSET if you connect two calls to continue talking with two calls: 1. To connect with and the other line remains on hold . 3. If you release the button. To talk with both lines on hold . 2. To resume the conference call ring, within the time duration you want to make a second call connects, press CONFER. Do Not Disturb This feature disables an incoming call with...
... DND button. The phone generates a sample ring at the selected setting. Speakerphone, Handset, and Headset Volume While using the speakerphone or press HEADSET if you connect two calls to continue talking with two calls: 1. To connect with and the other line remains on hold . 3. If you release the button. To talk with both lines on hold . 2. To resume the conference call ring, within the time duration you want to make a second call connects, press CONFER. Do Not Disturb This feature disables an incoming call with...

User Guide
Page 21
Voice Messaging Provided your selection. 4. See "Voice Mail Access Codes." 1. The unit auto dials the pre-programmed voice mail access number/code so you will still receive a ringing line indication, CID information, and New Call indicators. Use the REVIEW or button to indicate a message is On, you can also review the access number first before dialing. 1. NOTE: When Do Not Disturb is waiting. IMPORTANT: You must have the voice mail access code programmed for this feature to 24 hours. 3. Pick up the handset, or press HEADSET or SPEAKER. 2. You may choose from...
Voice Messaging Provided your selection. 4. See "Voice Mail Access Codes." 1. The unit auto dials the pre-programmed voice mail access number/code so you will still receive a ringing line indication, CID information, and New Call indicators. Use the REVIEW or button to indicate a message is On, you can also review the access number first before dialing. 1. NOTE: When Do Not Disturb is waiting. IMPORTANT: You must have the voice mail access code programmed for this feature to 24 hours. 3. Pick up the handset, or press HEADSET or SPEAKER. 2. You may choose from...

User Guide
Page 24
... adjust the phone number format, use this unit, you hear the tone. If You Did Not Program Your Local Area Code in the display. You may adjust the number format if in the Setup Menu 1. Press the REVIEW or button to display the number you must subscribe to Caller ID with Call Waiting Service. The caller identification information appears in the receiver. To dial the displayed number, pick up the handset or press DIAL again. TO ADJUST shows Call Waiting Caller ID This feature...
... adjust the phone number format, use this unit, you hear the tone. If You Did Not Program Your Local Area Code in the display. You may adjust the number format if in the Setup Menu 1. Press the REVIEW or button to display the number you must subscribe to Caller ID with Call Waiting Service. The caller identification information appears in the receiver. To dial the displayed number, pick up the handset or press DIAL again. TO ADJUST shows Call Waiting Caller ID This feature...

User Guide
Page 25
... the record in each of the number keys. For example, to 32 digits). press the 6 key once for the letter B. NOTE: If you make a mistake, press DELETE to 21 characters). shows in the display. 2. Enter the memory location : • Press the DIRECTORY button to save the record in Directory Memory OR • Press a MEMORY button to review the records stored in Memory 1. Memory Direct Access Memory & Directory Memory Storing a Name and Number in Directory Memory. Use the touch-tone pad...
... the record in each of the number keys. For example, to 32 digits). press the 6 key once for the letter B. NOTE: If you make a mistake, press DELETE to 21 characters). shows in the display. 2. Enter the memory location : • Press the DIRECTORY button to save the record in Directory Memory OR • Press a MEMORY button to review the records stored in Memory 1. Memory Direct Access Memory & Directory Memory Storing a Name and Number in Directory Memory. Use the touch-tone pad...

User Guide
Page 29
Other Information Display Messages The following special messages indicate the status of the CID memory log. Troubleshooting Guide No dial tone • Check or repeat installation steps: Make sure the telephone line cords are connected to the same jack. If there is lifted . • Check the SPEAKER button. START/END You are not damaged . • Make sure the hook switch pops up when the handset is no dial tone in the second phone, the problem might be your...
Other Information Display Messages The following special messages indicate the status of the CID memory log. Troubleshooting Guide No dial tone • Check or repeat installation steps: Make sure the telephone line cords are connected to the same jack. If there is lifted . • Check the SPEAKER button. START/END You are not damaged . • Make sure the hook switch pops up when the handset is no dial tone in the second phone, the problem might be your...

User Guide
Page 30
... many extension phones on . Memory dialing doesn't work • Make sure you program the memory location keys correctly . • Make sure you follow proper dialing sequence . Incoming voice too low or none at all. • Check and adjust volume control setting. Battery LOW indicator blinks or is not turned on. Other Information You cannot be heard by the other party. • Make sure the handset or headset cord is connected properly and securely. • Make sure MUTE...
... many extension phones on . Memory dialing doesn't work • Make sure you program the memory location keys correctly . • Make sure you follow proper dialing sequence . Incoming voice too low or none at all. • Check and adjust volume control setting. Battery LOW indicator blinks or is not turned on. Other Information You cannot be heard by the other party. • Make sure the handset or headset cord is connected properly and securely. • Make sure MUTE...

User Guide
Page 35
... Call Waiting Caller ID 24 Caller ID (CID) 22 Chain Dialing 27 Changing a Stored Name or Number 26 Conference 20 Connections and Setup 6 D Data Port 10 Deleting a CID Record 23 Deleting All CID Records 23 Deleting All Directory Memory 28 Dialing a Stored Number 27 Dialing Back 23 Direct Access Memory & Directory Memory 25 Display Contrast 14 Display Language 11 Display Messages 29 Do Not Disturb 20 E Equipment Approval Information 2 F Flash 19 Flash Time 12 H Hold 19 Hour Format 12 I If You Did Not Program Your Local Area Code...
... Call Waiting Caller ID 24 Caller ID (CID) 22 Chain Dialing 27 Changing a Stored Name or Number 26 Conference 20 Connections and Setup 6 D Data Port 10 Deleting a CID Record 23 Deleting All CID Records 23 Deleting All Directory Memory 28 Dialing a Stored Number 27 Dialing Back 23 Direct Access Memory & Directory Memory 25 Display Contrast 14 Display Language 11 Display Messages 29 Do Not Disturb 20 E Equipment Approval Information 2 F Flash 19 Flash Time 12 H Hold 19 Hour Format 12 I If You Did Not Program Your Local Area Code...


