
User Guide
Page 125
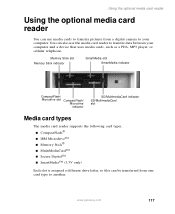
... reader supports the following card types. ■ CompactFlash® ■ IBM Microdrive™ ■ Memory Stick® ■ MultiMediaCard™ ■ Secure Digital™ ■ SmartMedia™ (3.3V only) Each slot is assigned a different drive letter, so files can be transferred from a digital camera to... your computer and a device that uses media cards, such as a PDA, MP3 player, or cellular telephone. www.gateway.com 117 Using the optional media card reader Using the optional media card reader You can use the media card reader to transfer data ...
... reader supports the following card types. ■ CompactFlash® ■ IBM Microdrive™ ■ Memory Stick® ■ MultiMediaCard™ ■ Secure Digital™ ■ SmartMedia™ (3.3V only) Each slot is assigned a different drive letter, so files can be transferred from a digital camera to... your computer and a device that uses media cards, such as a PDA, MP3 player, or cellular telephone. www.gateway.com 117 Using the optional media card reader Using the optional media card reader You can use the media card reader to transfer data ...
User Guide
Page 204
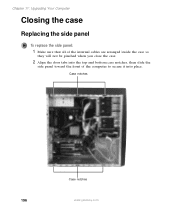
Case notches Case notches 196 www.gateway.com Chapter 11: Upgrading Your Computer Closing the case Replacing the side panel To replace the side panel: 1 Make sure that all of the internal cables are arranged inside the case so they will not be pinched when you close the case. 2 Align the door tabs into the top and bottom case notches, then slide the side panel toward the front of the computer to secure it into place.
Case notches Case notches 196 www.gateway.com Chapter 11: Upgrading Your Computer Closing the case Replacing the side panel To replace the side panel: 1 Make sure that all of the internal cables are arranged inside the case so they will not be pinched when you close the case. 2 Align the door tabs into the top and bottom case notches, then slide the side panel toward the front of the computer to secure it into place.
User Guide
Page 214
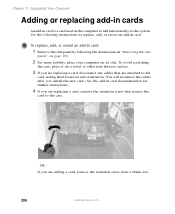
... are attached to the card, noting their locations and orientation. (You will reconnect the cables after you are replacing a card, disconnect any cables that secures the card to replace, add, or reseat an add-in card documentation for further instructions. 4 If you are replacing a card, remove the retention ...screw that are adding a card, remove the retention screw from a blank slot. 206 www.gateway.com To avoid scratching the case, place it on its side. Chapter 11: Upgrading Your Computer Adding or replacing add-in cards An add-in...
... are attached to the card, noting their locations and orientation. (You will reconnect the cables after you are replacing a card, disconnect any cables that secures the card to replace, add, or reseat an add-in card documentation for further instructions. 4 If you are replacing a card, remove the retention ...screw that are adding a card, remove the retention screw from a blank slot. 206 www.gateway.com To avoid scratching the case, place it on its side. Chapter 11: Upgrading Your Computer Adding or replacing add-in cards An add-in...
User Guide
Page 216
.... To avoid scratching the case, place it on a towel or other non-abrasive surface. 208 www.gateway.com You can cause electrostatic damage to help insert the card, but do not bend the card sideways. 8 Secure the add-in card with the retention screw. 9 If you upgrade the computer memory, make sure...
.... To avoid scratching the case, place it on a towel or other non-abrasive surface. 208 www.gateway.com You can cause electrostatic damage to help insert the card, but do not bend the card sideways. 8 Secure the add-in card with the retention screw. 9 If you upgrade the computer memory, make sure...
User Guide
Page 218
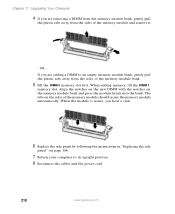
... the sides of the memory module bank. 5 Fill the DIMM 0 memory slot first. When the module is secure, you are adding a DIMM to its upright position. 8 Reconnect the cables and the power cord. 210 www.gateway.com Chapter 11: Upgrading Your Computer 4 If you hear a click. 6 Replace the side panel by following... bank. If you are removing a DIMM from the memory module bank, gently pull the plastic tabs away from the sides of the memory module should secure the memory module automatically. OR -
... the sides of the memory module bank. 5 Fill the DIMM 0 memory slot first. When the module is secure, you are adding a DIMM to its upright position. 8 Reconnect the cables and the power cord. 210 www.gateway.com Chapter 11: Upgrading Your Computer 4 If you hear a click. 6 Replace the side panel by following... bank. If you are removing a DIMM from the memory module bank, gently pull the plastic tabs away from the sides of the memory module should secure the memory module automatically. OR -
User Guide
Page 223
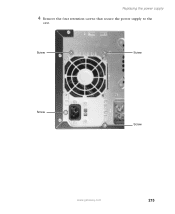
Screw Screw Screw Screw www.gateway.com 215 Replacing the power supply 4 Remove the four retention screws that secure the power supply to the case.
Screw Screw Screw Screw www.gateway.com 215 Replacing the power supply 4 Remove the four retention screws that secure the power supply to the case.
User Guide
Page 224
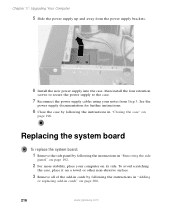
... brackets. 6 Install the new power supply into the case, then install the four retention screws to secure the power supply to the case. 7 Reconnect the power supply cables using your computer on page 206. 216 www.gateway.com To avoid scratching the case, place it on a towel or other non-abrasive surface...
... brackets. 6 Install the new power supply into the case, then install the four retention screws to secure the power supply to the case. 7 Reconnect the power supply cables using your computer on page 206. 216 www.gateway.com To avoid scratching the case, place it on a towel or other non-abrasive surface...

User Guide
Page 226
Chapter 11: Upgrading Your Computer 7 Lift the system board up and out of the case. 8 Align the new system board on page 196. 218 www.gateway.com See the system board documentation for further instructions. 10 Reinstall the memory modules by following the instructions in "Installing memory" on page 208. 11 ... "Adding or replacing add-in cards" on page 206. 12 Close the case by following the instructions in "Closing the case" on the standoffs and secure into the computer case with the screws. 9 Reconnect the power and data cables using your notes from Step 5.
Chapter 11: Upgrading Your Computer 7 Lift the system board up and out of the case. 8 Align the new system board on page 196. 218 www.gateway.com See the system board documentation for further instructions. 10 Reinstall the memory modules by following the instructions in "Installing memory" on page 208. 11 ... "Adding or replacing add-in cards" on page 206. 12 Close the case by following the instructions in "Closing the case" on the standoffs and secure into the computer case with the screws. 9 Reconnect the power and data cables using your notes from Step 5.
User Guide
Page 228
...if power cords or plugs are correctly grounded before the problem started, review the procedures you performed and make sure that all connections are secure. ■ If you added or removed computer components before opening the monitor voids the warranty. ■ Make sure that your hard drive... is not full. 220 www.gateway.com Instead, unplug your computer case. To do so is disconnected, energy stored in the monitor components can be dangerous. Also, opening ...
...if power cords or plugs are correctly grounded before the problem started, review the procedures you performed and make sure that all connections are secure. ■ If you added or removed computer components before opening the monitor voids the warranty. ■ Make sure that your hard drive... is not full. 220 www.gateway.com Instead, unplug your computer case. To do so is disconnected, energy stored in the monitor components can be dangerous. Also, opening ...

User Guide
Page 231
... see "Updating device drivers" on page 181. You may not be able to play ■ Make sure that the cables are connected correctly and securely. ■ Shut down and restart your computer. ■ Clean the disc. For more information, see "Reinstalling device drivers" on page 183. ...DVD drives contain regional codes that the disc label is facing up or left , then try again. ■ Try a different disc. www.gateway.com 223 Troubleshooting ■ Open your computer case and make sure that you have copy protection software. For more information, see "Cleaning CDs and...
... see "Updating device drivers" on page 181. You may not be able to play ■ Make sure that the cables are connected correctly and securely. ■ Shut down and restart your computer. ■ Clean the disc. For more information, see "Reinstalling device drivers" on page 183. ...DVD drives contain regional codes that the disc label is facing up or left , then try again. ■ Try a different disc. www.gateway.com 223 Troubleshooting ■ Open your computer case and make sure that you have copy protection software. For more information, see "Cleaning CDs and...
User Guide
Page 238
...Internet ■ Your ISP may be having technical difficulties. Contact your telephone service. The problem may lower the speed even further. 230 www.gateway.com The telephone line may be too noisy. When the dial tone stops, listen for line noise (scratchy, crackling, or popping sounds). ...If reducing the connection speed lets you are secure. Other factors, such as 1). You cannot connect to 53K. Type the keyword dialing in the wall or telephone jack are not using your ...
...Internet ■ Your ISP may be having technical difficulties. Contact your telephone service. The problem may lower the speed even further. 230 www.gateway.com The telephone line may be too noisy. When the dial tone stops, listen for line noise (scratchy, crackling, or popping sounds). ...If reducing the connection speed lets you are secure. Other factors, such as 1). You cannot connect to 53K. Type the keyword dialing in the wall or telephone jack are not using your ...

User Guide
Page 239
You cannot use (for current Gateway hardware and software. To access the Gateway dial-up server: 1 Insert the red Drivers CD into the appropriate jack on the modem. Your ISP may cause problems with the modem connection. ■ ... send and receive rate of 14,400 bps. Your modem connection speed appears. www.gateway.com 231 The modem is not recognized by accessing the gateway.your modem connection speed, click the Direct Dial option. The server provides a secure connection and is working and plugged into the CD, DVD, or recordable drive. 2 Click...
You cannot use (for current Gateway hardware and software. To access the Gateway dial-up server: 1 Insert the red Drivers CD into the appropriate jack on the modem. Your ISP may cause problems with the modem connection. ■ ... send and receive rate of 14,400 bps. Your modem connection speed appears. www.gateway.com 231 The modem is not recognized by accessing the gateway.your modem connection speed, click the Direct Dial option. The server provides a secure connection and is working and plugged into the CD, DVD, or recordable drive. 2 Click...
User Guide
Page 243
...Make sure that all extension cables and switch boxes. ■ Try a mouse you know is working to make sure that the surge protector is securely connected to an electrical outlet, switched on, and working device, such as a lamp, into a surge protector, make sure that the mouse port...down and restart your computer. ■ Remove all devices are connected securely to the surge protector and correctly switched on. If you have a trackball mouse, see "Reinstalling device drivers" on page 177. www.gateway.com 235 The mouse works erratically If the mouse pointer begins moving ...
...Make sure that all extension cables and switch boxes. ■ Try a mouse you know is working to make sure that the surge protector is securely connected to an electrical outlet, switched on, and working device, such as a lamp, into a surge protector, make sure that the mouse port...down and restart your computer. ■ Remove all devices are connected securely to the surge protector and correctly switched on. If you have a trackball mouse, see "Reinstalling device drivers" on page 177. www.gateway.com 235 The mouse works erratically If the mouse pointer begins moving ...
User Guide
Page 244
... that the printer is not set a default printer: 1 Click Start, then click Control Panel. The Control Panel window opens. If your Control Panel is connected securely to test the outlet. To set to is not the default printer, make sure that you have an online/offline button that you may need... to press. ■ If the printer you want to print to work offline. 236 www.gateway.com The Printers and Faxes window opens. 3 Right-click the name of the printer you want to be the default printer, then click Set as...
... that the printer is not set a default printer: 1 Click Start, then click Control Panel. The Control Panel window opens. If your Control Panel is connected securely to test the outlet. To set to is not the default printer, make sure that you have an online/offline button that you may need... to press. ■ If the printer you want to print to work offline. 236 www.gateway.com The Printers and Faxes window opens. 3 Right-click the name of the printer you want to be the default printer, then click Set as...
User Guide
Page 246
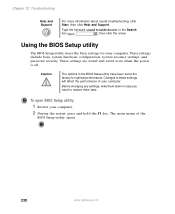
... in case you need to these settings will affect the performance of the BIOS Setup utility opens. 238 www.gateway.com These settings include basic system hardware configuration, system resource settings, and password security. Changes to restore them later. The main menu of your computer. Chapter 12: Troubleshooting Help and Support For...
... in case you need to these settings will affect the performance of the BIOS Setup utility opens. 238 www.gateway.com These settings include basic system hardware configuration, system resource settings, and password security. Changes to restore them later. The main menu of your computer. Chapter 12: Troubleshooting Help and Support For...
User Guide
Page 247
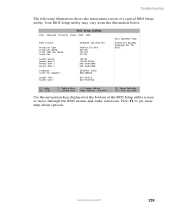
Your BIOS Setup utility may vary from the illustration below. www.gateway.com 239 BIOS Setup Utility Main Advanced Security Power Boot Exit BIOS Version Processor Type Processor Speed Front Side Bus Speed Cache Ram System Memory Memory Bank 0 Memory Bank 1 Memory Bank 2 Language: Cache ...
Your BIOS Setup utility may vary from the illustration below. www.gateway.com 239 BIOS Setup Utility Main Advanced Security Power Boot Exit BIOS Version Processor Type Processor Speed Front Side Bus Speed Cache Ram System Memory Memory Bank 0 Memory Bank 1 Memory Bank 2 Language: Cache ...

User Guide
Page 248
...9632; See the troubleshooting section of this chapter. Chapter 12: Troubleshooting Telephone support Before calling Gateway Technical Support If you have a technical problem with your computer, follow appropriate troubleshooting steps. 240 www.gateway.com If you use a power strip, make sure that it . If you did ... a keyboard or mouse, does not appear to troubleshoot your computer problem if: ■ Power cords or plugs are plugged in securely. ■ If you have recently installed hardware or software, make sure that is nearby at the time of your computer is supplying power.
...9632; See the troubleshooting section of this chapter. Chapter 12: Troubleshooting Telephone support Before calling Gateway Technical Support If you have a technical problem with your computer, follow appropriate troubleshooting steps. 240 www.gateway.com If you use a power strip, make sure that it . If you did ... a keyboard or mouse, does not appear to troubleshoot your computer problem if: ■ Power cords or plugs are plugged in securely. ■ If you have recently installed hardware or software, make sure that is nearby at the time of your computer is supplying power.