DV-S20 User's Guide
Page 3
Contents Contents i Introducing Your Gateway Digital MPEG4 Camcorder 1 Features 2 Important Safeguards 3 Package contents 5 Accessories 8 Front 9 Back 11 Getting Started 14 Connecting the wrist strap 15 Installing the batteries 16 Installing an optional SD memory card 18 Turning on your camcorder 20 Setting the date and time 20 Using the OSD 21 Using your camcorder 25 Understanding LCD display information 26 Understanding image quality and storage 29 Recording video and still images 32
Contents Contents i Introducing Your Gateway Digital MPEG4 Camcorder 1 Features 2 Important Safeguards 3 Package contents 5 Accessories 8 Front 9 Back 11 Getting Started 14 Connecting the wrist strap 15 Installing the batteries 16 Installing an optional SD memory card 18 Turning on your camcorder 20 Setting the date and time 20 Using the OSD 21 Using your camcorder 25 Understanding LCD display information 26 Understanding image quality and storage 29 Recording video and still images 32

DV-S20 User's Guide
Page 4
Using the flash 33 Using the digital zoom 34 Using the self-timer 35 Viewing images 36 Deleting images 41 Connecting your camcorder 43 Software 45 Troubleshooting 48 Error messages 48 LED indicators and audible beeps 50 Specifications 51 FCC Statement 53 ii
Using the flash 33 Using the digital zoom 34 Using the self-timer 35 Viewing images 36 Deleting images 41 Connecting your camcorder 43 Software 45 Troubleshooting 48 Error messages 48 LED indicators and audible beeps 50 Specifications 51 FCC Statement 53 ii
DV-S20 User's Guide
Page 5
... of their respective companies. 1 Read this section to learn about your Gateway Digital MPEG4 Camcorder. All other countries. Gateway, Gateway Country, the Gateway stylized logo, and the black-and-white spot design are trademarks or registered trademarks of Gateway, Inc. All rights reserved. Introducing Your Gateway Digital MPEG4 Camcorder This section provides basic information about : ■ Features ■ Warnings and...
... of their respective companies. 1 Read this section to learn about your Gateway Digital MPEG4 Camcorder. All other countries. Gateway, Gateway Country, the Gateway stylized logo, and the black-and-white spot design are trademarks or registered trademarks of Gateway, Inc. All rights reserved. Introducing Your Gateway Digital MPEG4 Camcorder This section provides basic information about : ■ Features ■ Warnings and...
DV-S20 User's Guide
Page 7
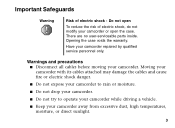
... cables before moving your camcorder repaired by qualified service personnel only. Have your camcorder. Important Safeguards Warning Risk of electric shock, do not modify your camcorder or open the case. There are no user-serviceable parts inside. Moving your camcorder with its cables attached... or electric shock danger. ■ Do not expose your camcorder to rain or moisture. ■ Do not drop your camcorder. ■ Do not try to operate your camcorder while driving a vehicle. ■ Keep your camcorder away from excessive dust, high temperatures, moisture, or direct ...
... cables before moving your camcorder repaired by qualified service personnel only. Have your camcorder. Important Safeguards Warning Risk of electric shock, do not modify your camcorder or open the case. There are no user-serviceable parts inside. Moving your camcorder with its cables attached... or electric shock danger. ■ Do not expose your camcorder to rain or moisture. ■ Do not drop your camcorder. ■ Do not try to operate your camcorder while driving a vehicle. ■ Keep your camcorder away from excessive dust, high temperatures, moisture, or direct ...

DV-S20 User's Guide
Page 8
.... ■ Never place your camcorder on an unstable cart, stand, or table. ■ Disconnect your camcorder and remove the batteries when not used for a long period of time. ■ Do not use any other batteries than ones specified for your camcorder. ■ Never use different types... of batteries together (alkaline and Ni-MH) or mix old and new batteries. ■ Disconnect your camcorder and remove the batteries if your camcorder acts in any way abnormal while following normal operating ...
.... ■ Never place your camcorder on an unstable cart, stand, or table. ■ Disconnect your camcorder and remove the batteries when not used for a long period of time. ■ Do not use any other batteries than ones specified for your camcorder. ■ Never use different types... of batteries together (alkaline and Ni-MH) or mix old and new batteries. ■ Disconnect your camcorder and remove the batteries if your camcorder acts in any way abnormal while following normal operating ...

DV-S20 User's Guide
Page 9
Package contents Along with your camcorder, the packaging box contains the following items: Camcorder strap Two AA batteries 5
Package contents Along with your camcorder, the packaging box contains the following items: Camcorder strap Two AA batteries 5
DV-S20 User's Guide
Page 11
Software User's guide Digital camcorder Driver for: Windows 98/98SE/ME Windows 2000/XP Copyright© 2003 Gateway, Inc. 7
Software User's guide Digital camcorder Driver for: Windows 98/98SE/ME Windows 2000/XP Copyright© 2003 Gateway, Inc. 7
DV-S20 User's Guide
Page 12
Accessories You can purchase these optional accessories for your camcorder: ■ Accessory kit: ■ AC adapter ■ Battery charger and rechargeable batteries ■ Carrying pouch ■ Tripod ■ SD memory cards ■ SD memory card reader Contact Gateway for these and other accessories. 8
Accessories You can purchase these optional accessories for your camcorder: ■ Accessory kit: ■ AC adapter ■ Battery charger and rechargeable batteries ■ Carrying pouch ■ Tripod ■ SD memory cards ■ SD memory card reader Contact Gateway for these and other accessories. 8

DV-S20 User's Guide
Page 14
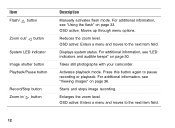
... more information, see "Using the OSD" on -screen display). Records audio. You can also view images previously recorded using playback mode. Lets light into your camcorder on and off and enters the OSD (on page 21. Activates when lighting conditions are recording. Open to install batteries and optional SD memory cards.... Item Power/Menu button (top) Lens Microphone Flash Self-timer LED Battery/Memory card cover LCD display Description Turns your camcorder to view images you are dark.
... more information, see "Using the OSD" on -screen display). Records audio. You can also view images previously recorded using playback mode. Lets light into your camcorder on and off and enters the OSD (on page 21. Activates when lighting conditions are recording. Open to install batteries and optional SD memory cards.... Item Power/Menu button (top) Lens Microphone Flash Self-timer LED Battery/Memory card cover LCD display Description Turns your camcorder to view images you are dark.
DV-S20 User's Guide
Page 16
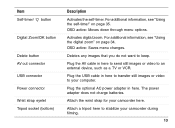
... Record/Stop button Zoom in/ button Description Manually activates flash mode. Starts and stops image recording. Reduces the zoom level. Takes still photographs with your camcorder. Displays system status. OSD active: Enters a menu and moves to the next item field. 12 For additional information, see "Viewing images" on page 50...
... Record/Stop button Zoom in/ button Description Manually activates flash mode. Starts and stops image recording. Reduces the zoom level. Takes still photographs with your camcorder. Displays system status. OSD active: Enters a menu and moves to the next item field. 12 For additional information, see "Viewing images" on page 50...
DV-S20 User's Guide
Page 17
... additional information, see "Using the digital zoom" on page 35. Plug the AV cable in here. Attach the wrist strap for your camcorder during filming. 13 Activates digital zoom. Plug the optional AC power adapter in here to send still images or video to keep. OSD active...Saves menu changes. Attach a tripod here to your computer. Plug the USB cable in here to transfer still images or video to stabilize your camcorder here. The power adapter does not charge batteries. Item Self-timer/ button Digital Zoom/OK button Delete button AV out connector USB connector Power ...
... additional information, see "Using the digital zoom" on page 35. Plug the AV cable in here. Attach the wrist strap for your camcorder during filming. 13 Activates digital zoom. Plug the optional AC power adapter in here to send still images or video to keep. OSD active...Saves menu changes. Attach a tripod here to your computer. Plug the USB cable in here to transfer still images or video to stabilize your camcorder here. The power adapter does not charge batteries. Item Self-timer/ button Digital Zoom/OK button Delete button AV out connector USB connector Power ...
DV-S20 User's Guide
Page 18
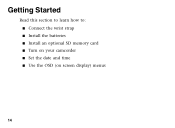
Getting Started Read this section to learn how to: ■ Connect the wrist strap ■ Install the batteries ■ Install an optional SD memory card ■ Turn on your camcorder ■ Set the date and time ■ Use the OSD (on screen display) menus 14
Getting Started Read this section to learn how to: ■ Connect the wrist strap ■ Install the batteries ■ Install an optional SD memory card ■ Turn on your camcorder ■ Set the date and time ■ Use the OSD (on screen display) menus 14

DV-S20 User's Guide
Page 19
Connecting the wrist strap To connect the wrist strap: 1 Find the wrist strap that came with your camcorder. 2 Thread the small looped end of the wrist strap through the wrist strap eyelet on your camcorder. 3 Pull the large looped end of the wrist strap through the small loop until the strap is secure. 15
Connecting the wrist strap To connect the wrist strap: 1 Find the wrist strap that came with your camcorder. 2 Thread the small looped end of the wrist strap through the wrist strap eyelet on your camcorder. 3 Pull the large looped end of the wrist strap through the small loop until the strap is secure. 15
DV-S20 User's Guide
Page 20
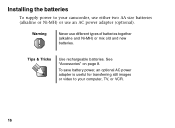
See "Accessories" on page 8. To save battery power, an optional AC power adapter is useful for transferring still images or video to your computer, TV, or VCR. 16 Warning Never use an AC power adapter (optional). Tips & Tricks Use rechargeable batteries. Installing the batteries To supply power to your camcorder, use either two AA size batteries (alkaline or Ni-MH) or use different types of batteries together (alkaline and Ni-MH) or mix old and new batteries.
See "Accessories" on page 8. To save battery power, an optional AC power adapter is useful for transferring still images or video to your computer, TV, or VCR. 16 Warning Never use an AC power adapter (optional). Tips & Tricks Use rechargeable batteries. Installing the batteries To supply power to your camcorder, use either two AA size batteries (alkaline or Ni-MH) or use different types of batteries together (alkaline and Ni-MH) or mix old and new batteries.

DV-S20 User's Guide
Page 21
Warning To protect your camcorder from battery leakage or corrosion, remove the batteries if you match the + and - To install the batteries: 1 Slide open the battery cover. 2 Insert the two AA batteries into your camcorder for an extended period of time. 17 Make sure that you will not be using your camcorder. symbols inside the battery compartment. 3 Close the battery cover. on the batteries with the + and -
Warning To protect your camcorder from battery leakage or corrosion, remove the batteries if you match the + and - To install the batteries: 1 Slide open the battery cover. 2 Insert the two AA batteries into your camcorder for an extended period of time. 17 Make sure that you will not be using your camcorder. symbols inside the battery compartment. 3 Close the battery cover. on the batteries with the + and -

DV-S20 User's Guide
Page 22
Your camcorder uses the SD memory card first, then uses internal memory. The SD memory card is keyed and will only fit in the slot one way. 3 Close the SD memory card cover. 18 To install an SD memory card: 1 Slide open the SD memory card cover. 2 Insert the SD memory card. Installing an optional SD memory card Your camcorder comes with 64 MB of your camcorder using optional SD memory cards. However, you can also expand the memory capacity of internal memory to record video and still images.
Your camcorder uses the SD memory card first, then uses internal memory. The SD memory card is keyed and will only fit in the slot one way. 3 Close the SD memory card cover. 18 To install an SD memory card: 1 Slide open the SD memory card cover. 2 Insert the SD memory card. Installing an optional SD memory card Your camcorder comes with 64 MB of your camcorder using optional SD memory cards. However, you can also expand the memory capacity of internal memory to record video and still images.

DV-S20 User's Guide
Page 23
To remove an SD memory card: 1 Make sure that your camcorder is turned off. 2 Slide open the SD memory card cover. 3 Press in gently on the side of the SD memory card to "LOCK." 19 Tips & Tricks To prevent valuable data from being accidentally erased, slide the write protect tab (on the visible edge of the SD memory card) to eject it.
To remove an SD memory card: 1 Make sure that your camcorder is turned off. 2 Slide open the SD memory card cover. 3 Press in gently on the side of the SD memory card to "LOCK." 19 Tips & Tricks To prevent valuable data from being accidentally erased, slide the write protect tab (on the visible edge of the SD memory card) to eject it.

DV-S20 User's Guide
Page 24
Setting the date and time The date and time setting screen automatically appears: ■ The first time you turn on your camcorder: ■ Press and hold the Power/Menu button on the top of your camcorder. ■ When you replace the batteries. Go to "Using the OSD" on page 21 for two seconds. Turning on your camcorder To turn on your camcorder for more information on making changes to OSD menus. 20
Setting the date and time The date and time setting screen automatically appears: ■ The first time you turn on your camcorder: ■ Press and hold the Power/Menu button on the top of your camcorder. ■ When you replace the batteries. Go to "Using the OSD" on page 21 for two seconds. Turning on your camcorder To turn on your camcorder for more information on making changes to OSD menus. 20
DV-S20 User's Guide
Page 25
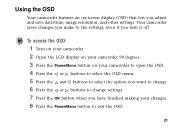
Using the OSD Your camcorder features an on your camcorder to open the OSD. 4 Press the or buttons to select the OSD menu. 5 Press the and buttons to select the option you want to change. 6 ..., even if you adjust and save date/time, image resolution, and other settings. Your camcorder saves changes you make to exit the OSD. 21 To access the OSD: 1 Turn on your camcorder. 2 Open the LCD display on your camcorder 90 degrees. 3 Press the Power/Menu button on -screen display (OSD) that lets you...
Using the OSD Your camcorder features an on your camcorder to open the OSD. 4 Press the or buttons to select the OSD menu. 5 Press the and buttons to select the option you want to change. 6 ..., even if you adjust and save date/time, image resolution, and other settings. Your camcorder saves changes you make to exit the OSD. 21 To access the OSD: 1 Turn on your camcorder. 2 Open the LCD display on your camcorder 90 degrees. 3 Press the Power/Menu button on -screen display (OSD) that lets you...
DV-S20 User's Guide
Page 26
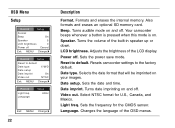
...Date type. Formats and erases the internal memory. Turns audible mode on and off . Reset to the factory default. Date setup. Language. Resets camcorder settings to default. Date imprint. Changes the language of the built-in speaker up or down. Language Setup 60Hz Exit: MENU Change: 22 Description ...Format. Your camcorder beeps whenever a button is pressed when this mode is on your images. Turns the volume of the OSD menus. Sets the power save ...
...Date type. Formats and erases the internal memory. Turns audible mode on and off . Reset to the factory default. Date setup. Language. Resets camcorder settings to default. Date imprint. Changes the language of the built-in speaker up or down. Language Setup 60Hz Exit: MENU Change: 22 Description ...Format. Your camcorder beeps whenever a button is pressed when this mode is on your images. Turns the volume of the OSD menus. Sets the power save ...