
Technical Reference for Garmin NMEA 2000 Products
Page 30
...Selections Are Not Displayed Depending on the version of gauge. Select an option: • For most Garmin chartplotters, select Review > Generic Config. • For other Garmin marine devices, select Config > Rudder Angle Calibration. 4. From the NMEA 2000 Devices list, select the...rudder-angle reading changes with . 1. To change the gauge type. Select an option: • For most Garmin chartplotters, select Review > Rudder Angle Calibration. • For other Garmin marine devices, select Config >Generic Configuration. 4. Select an option: • To automatically detect the gauge ...
...Selections Are Not Displayed Depending on the version of gauge. Select an option: • For most Garmin chartplotters, select Review > Generic Config. • For other Garmin marine devices, select Config > Rudder Angle Calibration. 4. From the NMEA 2000 Devices list, select the...rudder-angle reading changes with . 1. To change the gauge type. Select an option: • For most Garmin chartplotters, select Review > Rudder Angle Calibration. • For other Garmin marine devices, select Config >Generic Configuration. 4. Select an option: • To automatically detect the gauge ...
Technical Reference for Garmin NMEA 2000 Products
Page 31
...less than 0 and greater than 180, in degrees, followed by Done. Select an option: • For most Garmin chartplotters, select Review > Generic Config. • For other Garmin marine devices, select Config >Generic Configuration. 3. For example, GAUGRAYPE=1Done. • To indicate a two-coil ...command, enter one -coil gauge, enter 1, followed by Done. Select an option: • For most Garmin chartplotters, select Review > Engine Tilt Calibration. • For other Garmin marine devices, select Config > Engine Tilt Calibration. 4. Calibrating the Engine Tilt To use the GET 10 ...
...less than 0 and greater than 180, in degrees, followed by Done. Select an option: • For most Garmin chartplotters, select Review > Generic Config. • For other Garmin marine devices, select Config >Generic Configuration. 3. For example, GAUGRAYPE=1Done. • To indicate a two-coil ...command, enter one -coil gauge, enter 1, followed by Done. Select an option: • For most Garmin chartplotters, select Review > Engine Tilt Calibration. • For other Garmin marine devices, select Config > Engine Tilt Calibration. 4. Calibrating the Engine Tilt To use the GET 10 ...

Technical Reference for Garmin NMEA 2000 Products
Page 32
...engine in neutral. 2. If the engine-tilt reading changes with . 4. Select an option: • For most Garmin chartplotters, select Review > Engine Number. • For other Garmin marine devices, select Config > Engine Number. 3. Configuring the GET 10 Adapter if the Engine Tilt Calibration, Engine ...From the NMEA 2000 Devices list, select the GET 10 device. 2. Select an option: • For most Garmin chartplotters, select Review > Gauge Type. • For other Garmin marine devices, select Config >Generic Configuration. 4. Set the engine tilt to increase the engine RPM. Select Done....
...engine in neutral. 2. If the engine-tilt reading changes with . 4. Select an option: • For most Garmin chartplotters, select Review > Engine Number. • For other Garmin marine devices, select Config > Engine Number. 3. Configuring the GET 10 Adapter if the Engine Tilt Calibration, Engine ...From the NMEA 2000 Devices list, select the GET 10 device. 2. Select an option: • For most Garmin chartplotters, select Review > Gauge Type. • For other Garmin marine devices, select Config >Generic Configuration. 4. Set the engine tilt to increase the engine RPM. Select Done....

Technical Reference for Garmin NMEA 2000 Products
Page 33
...8226; To indicate a two-coil gauge, enter 2, followed by Done. Select an option: • For most Garmin chartplotters, select Review > Factory Defaults. • For other Garmin marine devices, select Config >Generic Configuration. 3. Select a fluid type. 4. To configure the gauge type if the ...Technical Reference for the GFL 10 adapter using your display device. NMEA 2000 Checklist • For most Garmin chartplotters, select Review > Generic Config. • For other Garmin marine devices, select Config > N2K Fluid Type. 3. Configuring the NMEA 2000 Fluid Type You can ...
...8226; To indicate a two-coil gauge, enter 2, followed by Done. Select an option: • For most Garmin chartplotters, select Review > Factory Defaults. • For other Garmin marine devices, select Config >Generic Configuration. 3. Select a fluid type. 4. To configure the gauge type if the ...Technical Reference for the GFL 10 adapter using your display device. NMEA 2000 Checklist • For most Garmin chartplotters, select Review > Generic Config. • For other Garmin marine devices, select Config > N2K Fluid Type. 3. Configuring the NMEA 2000 Fluid Type You can ...

Technical Reference for Garmin NMEA 2000 Products
Page 34
... a unique tank number automatically. From the NMEA 2000 Devices list, select the GFL 10 device. 2. Select an option: • For most Garmin chartplotters, select Review > N2K Tank Capacity. • For other Garmin marine devices, select Config > Level Calibration > Add Calibration Point. 4. Select Done. Select Add Calibration Point. 8. For example, if two adapters are...
... a unique tank number automatically. From the NMEA 2000 Devices list, select the GFL 10 device. 2. Select an option: • For most Garmin chartplotters, select Review > N2K Tank Capacity. • For other Garmin marine devices, select Config > Level Calibration > Add Calibration Point. 4. Select Done. Select Add Calibration Point. 8. For example, if two adapters are...

Technical Reference for Garmin NMEA 2000 Products
Page 35
...list, select the GFL 10 device. 2. Calibrate the fluid level. Select an option: • For most Garmin chartplotters, select Review > Gauge Type. • For other Garmin marine devices, select Config >Generic Configuration. 3. After the command, enter a whole number between 0 and ...5 to increase the engine RPM. Select an option: • For most Garmin chartplotters, select Review > Level Calibration. • For other Garmin marine devices, select Config >Generic Configuration. 3. To configure the tank number if the menu option is associated ...
...list, select the GFL 10 device. 2. Calibrate the fluid level. Select an option: • For most Garmin chartplotters, select Review > Gauge Type. • For other Garmin marine devices, select Config >Generic Configuration. 3. After the command, enter a whole number between 0 and ...5 to increase the engine RPM. Select an option: • For most Garmin chartplotters, select Review > Level Calibration. • For other Garmin marine devices, select Config >Generic Configuration. 3. To configure the tank number if the menu option is associated ...
Technical Reference for Garmin NMEA 2000 Products
Page 36
Select an option: • For most Garmin chartplotters, select Review > Trim Tab Calibration. • For other Garmin marine devices, select Config > Factory Defaults. 3. Calibrating the Trim Tab Position To use the GBT 10 adapter, you must calibrate the ... lowest position. From the NMEA 2000 Devices list, select the GFL 10 device. 2. Select an option: • For most Garmin chartplotters, select Review > Factory Defaults. • For other Garmin marine devices, select Config > Trim Tab Calibration. 3. To calibrate the trim tab position if the menu option is not displayed:...
Select an option: • For most Garmin chartplotters, select Review > Trim Tab Calibration. • For other Garmin marine devices, select Config > Factory Defaults. 3. Calibrating the Trim Tab Position To use the GBT 10 adapter, you must calibrate the ... lowest position. From the NMEA 2000 Devices list, select the GFL 10 device. 2. Select an option: • For most Garmin chartplotters, select Review > Factory Defaults. • For other Garmin marine devices, select Config > Trim Tab Calibration. 3. To calibrate the trim tab position if the menu option is not displayed:...
Technical Reference for Garmin NMEA 2000 Products
Page 37
... and select Done. From the NMEA 2000 Devices list, select the GBT 10 device. 2. Select an option: • For most Garmin chartplotters, select Review > N2K Temp. From the NMEA 2000 Devices list, select the GST 10 device. 2. NMEA 2000 Checklist 8. For example, TRIMTABPOS=... 10 adapter, you must select the source for the temperature data. 1. Source. 3. Select an option: • For most Garmin chartplotters, select Review > Calibrate Water Speed. • For other devices, you restore factory default settings. 1. Configuring the Temperature Offset If the temperature...
... and select Done. From the NMEA 2000 Devices list, select the GBT 10 device. 2. Select an option: • For most Garmin chartplotters, select Review > N2K Temp. From the NMEA 2000 Devices list, select the GST 10 device. 2. NMEA 2000 Checklist 8. For example, TRIMTABPOS=... 10 adapter, you must select the source for the temperature data. 1. Source. 3. Select an option: • For most Garmin chartplotters, select Review > Calibrate Water Speed. • For other devices, you restore factory default settings. 1. Configuring the Temperature Offset If the temperature...
Technical Reference for Garmin NMEA 2000 Products
Page 38
...the same NMEA 2000 temperature source, each adapter is stationary; Select an option: • For most Garmin chartplotters, select Review > Generic Config. • For other Garmin marine devices, select Config >Generic Configuration. 3. Enter the following command: "WATERSPEED=0Done" 5. Select Done... the maximum speed, in miles per hour. 6. Select OK. Select an option: • For most Garmin chartplotters, select Review > Generic Config. • For other Garmin marine devices, select Config > Sensor Number. 3. Enter the following command: "TEMPSOURCE=" 4. Enter the following...
...the same NMEA 2000 temperature source, each adapter is stationary; Select an option: • For most Garmin chartplotters, select Review > Generic Config. • For other Garmin marine devices, select Config >Generic Configuration. 3. Enter the following command: "WATERSPEED=0Done" 5. Select Done... the maximum speed, in miles per hour. 6. Select OK. Select an option: • For most Garmin chartplotters, select Review > Generic Config. • For other Garmin marine devices, select Config > Sensor Number. 3. Enter the following command: "TEMPSOURCE=" 4. Enter the following...
Technical Reference for Garmin NMEA 2000 Products
Page 39
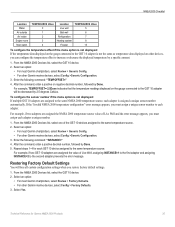
...appears, you restore factory default settings. 1. Select an option: • For most Garmin chartplotters, select Review > Generic Config. • For other Garmin marine devices, select Config >Generic Configuration. 3. Technical Reference for each adapter is ... enter a positive decimal number, followed by a specific amount. 1. Select an option: • For most Garmin chartplotters, select Review > Generic Config. • For other Garmin marine devices, select Config >Generic Configuration. 3. NMEA 2000 Checklist Location Water Air outside Air inside Engine room Main...
...appears, you restore factory default settings. 1. Select an option: • For most Garmin chartplotters, select Review > Generic Config. • For other Garmin marine devices, select Config >Generic Configuration. 3. Technical Reference for each adapter is ... enter a positive decimal number, followed by a specific amount. 1. Select an option: • For most Garmin chartplotters, select Review > Generic Config. • For other Garmin marine devices, select Config >Generic Configuration. 3. NMEA 2000 Checklist Location Water Air outside Air inside Engine room Main...

Owners Manual
Page 10
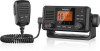
... call and switch to channel 16, select . • To accept the distress call and switch to channel 16, select OK. • To review information about the safety of your call is not listed. Placing Group Calls Before you can select CUSTOM to select a channel that is received, the... 69, 71, 72, 73, and 77. • Canada and International: all USA channels, plus channel 15 DSC channels are transmitted to comply with your Garmin chartplotter. 1 Select DSC > POS. The radio transmits the call on channel 70. You can place a call to the previous channel. The radio transmits the ...
... call and switch to channel 16, select . • To accept the distress call and switch to channel 16, select OK. • To review information about the safety of your call is not listed. Placing Group Calls Before you can select CUSTOM to select a channel that is received, the... 69, 71, 72, 73, and 77. • Canada and International: all USA channels, plus channel 15 DSC channels are transmitted to comply with your Garmin chartplotter. 1 Select DSC > POS. The radio transmits the call on channel 70. You can place a call to the previous channel. The radio transmits the ...

Owners Manual
Page 11
.... Select OK. Receiving Group Calls When you enable position tracking, the radio uses intervalbased position requests to track up to review and approve the incoming requests before you receive a position request with automatic position replies enabled, SENDING ACKNOWLEDGE appears on the ...vessel in the tracking list, but do not want to the requested channel. If the calling station is transmitted with your Garmin chartplotter (Configuring DSC NMEA Transmissions, page 9). A symbol indicates the station type. Symbol Meaning MMSI Number Format Ship station XXXXXXXXX ...
.... Select OK. Receiving Group Calls When you enable position tracking, the radio uses intervalbased position requests to track up to review and approve the incoming requests before you receive a position request with automatic position replies enabled, SENDING ACKNOWLEDGE appears on the ...vessel in the tracking list, but do not want to the requested channel. If the calling station is transmitted with your Garmin chartplotter (Configuring DSC NMEA Transmissions, page 9). A symbol indicates the station type. Symbol Meaning MMSI Number Format Ship station XXXXXXXXX ...