
Owners Manual
Page 3
... Assembly 1 Dimensions and Clearance 1 Cycling Posture 2 Adjusting the Trainer Geometry 3 Tacx NEO Bike Plus Assembly Instructions 4 Order of Assembly 4 Installing the Legs on the Trainer........... 5 Installing Your Pedals 7 Attaching the Bottle Cage 9 Installing the Saddle 10 Installing the Handlebar 12 Installing the Fans with Tablet Mount 14 Attaching Your Tablet to the Trainer....16 Connecting the Power Cable 18 Training 18 Display Data 19 Going for a Ride 20 Tacx Training App 22 Device Information 23 Specifications 23 Device Care and Storage 23 Installing...
... Assembly 1 Dimensions and Clearance 1 Cycling Posture 2 Adjusting the Trainer Geometry 3 Tacx NEO Bike Plus Assembly Instructions 4 Order of Assembly 4 Installing the Legs on the Trainer........... 5 Installing Your Pedals 7 Attaching the Bottle Cage 9 Installing the Saddle 10 Installing the Handlebar 12 Installing the Fans with Tablet Mount 14 Attaching Your Tablet to the Trainer....16 Connecting the Power Cable 18 Training 18 Display Data 19 Going for a Ride 20 Tacx Training App 22 Device Information 23 Specifications 23 Device Care and Storage 23 Installing...
Owners Manual
Page 6
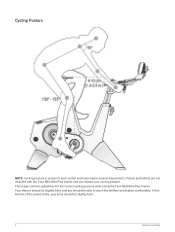
At the bottom of the pedal stroke, your cycling posture. Pedals and tablets are not included with the Tacx NEO Bike Plus trainer and can impact your knee should be slightly bent. 2 Before Assembly Your elbows should be slightly bent, and you should be able to each cyclist and may require several adjustments. The image contains guidelines for the correct cycling posture while using the Tacx NEO Bike Plus trainer. Cycling Posture NOTE: Cycling posture is unique to reach the shifters and brakes comfortably.
At the bottom of the pedal stroke, your cycling posture. Pedals and tablets are not included with the Tacx NEO Bike Plus trainer and can impact your knee should be slightly bent. 2 Before Assembly Your elbows should be slightly bent, and you should be able to each cyclist and may require several adjustments. The image contains guidelines for the correct cycling posture while using the Tacx NEO Bike Plus trainer. Cycling Posture NOTE: Cycling posture is unique to reach the shifters and brakes comfortably.
Owners Manual
Page 7
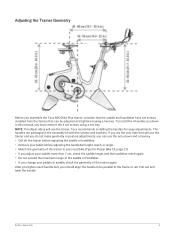
... change your pedals or saddle, check the geometry of the trainer to the frame or rail. To install the 4 handles as shown in the assembly kit with the screws and washers. After you tighten each handle bolt, you should align the handle to be adjusted and tightened using a hex key. Adjusting the Trainer Geometry Before you assemble the Tacx NEO Bike Plus trainer, consider that the saddle and handlebar have set screws using...
... change your pedals or saddle, check the geometry of the trainer to the frame or rail. To install the 4 handles as shown in the assembly kit with the screws and washers. After you tighten each handle bolt, you should align the handle to be adjusted and tightened using a hex key. Adjusting the Trainer Geometry Before you assemble the Tacx NEO Bike Plus trainer, consider that the saddle and handlebar have set screws using...
Owners Manual
Page 9
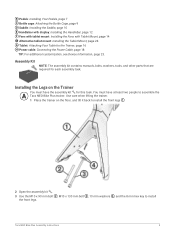
... key to the Trainer, page 16 PHower cable: Connecting the Power Cable, page 18 TIP: For additional customization, see Device Information, page 23. You must have at least two people to assemble the Tacx NEO Bike Plus trainer. Use care when lifting the trainer. 1 Place the trainer on the Trainer AYou must have the assembly kit for each assembly task. Assembly Kit NOTE: The assembly kit contains manuals, bolts, washers, tools, and other parts...
... key to the Trainer, page 16 PHower cable: Connecting the Power Cable, page 18 TIP: For additional customization, see Device Information, page 23. You must have at least two people to assemble the Tacx NEO Bike Plus trainer. Use care when lifting the trainer. 1 Place the trainer on the Trainer AYou must have the assembly kit for each assembly task. Assembly Kit NOTE: The assembly kit contains manuals, bolts, washers, tools, and other parts...

Owners Manual
Page 10
4 Tilt the trainer forward to install the back legs . 5 Use the M10 x 65 mm bolts , 10 mm washers , and the 8 mm hex key to install the back legs. 6 Turn the knobs on the front legs to stabilize and level the trainer (optional). 6 Tacx NEO Bike Plus Assembly Instructions
4 Tilt the trainer forward to install the back legs . 5 Use the M10 x 65 mm bolts , 10 mm washers , and the 8 mm hex key to install the back legs. 6 Turn the knobs on the front legs to stabilize and level the trainer (optional). 6 Tacx NEO Bike Plus Assembly Instructions

Owners Manual
Page 11
Use the same crank length for both pedals. For installation instructions specific to your pedals, see the manufacturer's instructions. 1 Install the right pedal first. 2 Apply a thin layer of grease on the pedal spindle threads. 3 Insert the spindle into the crank arm. Tacx NEO Bike Plus Assembly Instructions 7 There are not included with the Tacx NEO Bike Plus trainer. Installing Your Pedals BPedals are five crank length (mm) options (Crank Length Options, page 27).
Use the same crank length for both pedals. For installation instructions specific to your pedals, see the manufacturer's instructions. 1 Install the right pedal first. 2 Apply a thin layer of grease on the pedal spindle threads. 3 Insert the spindle into the crank arm. Tacx NEO Bike Plus Assembly Instructions 7 There are not included with the Tacx NEO Bike Plus trainer. Installing Your Pedals BPedals are five crank length (mm) options (Crank Length Options, page 27).

Owners Manual
Page 13
The bottle cage is packaged in the gift box. The screws and washers are preinstalled on the frame. 1 Open the assembly kit and the gift box. 2 Use the 2 screws and the 4 mm hex key to the trainer. Tacx NEO Bike Plus Assembly Instructions 9 Attaching the Bottle Cage CYou can attach the optional, standard-sized bottle cage to attach the bottle cage .
The bottle cage is packaged in the gift box. The screws and washers are preinstalled on the frame. 1 Open the assembly kit and the gift box. 2 Use the 2 screws and the 4 mm hex key to the trainer. Tacx NEO Bike Plus Assembly Instructions 9 Attaching the Bottle Cage CYou can attach the optional, standard-sized bottle cage to attach the bottle cage .
Owners Manual
Page 14
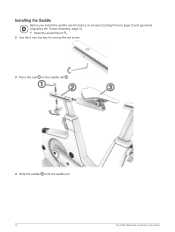
Installing the Saddle DBefore you install the saddle, see the topics on posture (Cycling Posture, page 2) and geometry (Adjusting the Trainer Geometry, page 3). 1 Open the assembly kit . 2 Use the 6 mm hex key to remove the set screw. 3 Place the cap on the saddle rail . 4 Slide the saddle onto the saddle rail. 10 Tacx NEO Bike Plus Assembly Instructions
Installing the Saddle DBefore you install the saddle, see the topics on posture (Cycling Posture, page 2) and geometry (Adjusting the Trainer Geometry, page 3). 1 Open the assembly kit . 2 Use the 6 mm hex key to remove the set screw. 3 Place the cap on the saddle rail . 4 Slide the saddle onto the saddle rail. 10 Tacx NEO Bike Plus Assembly Instructions
Owners Manual
Page 15
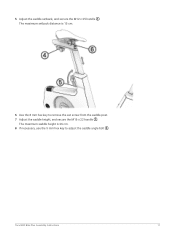
The maximum setback distance is 26 cm. 8 If necessary, use the 5 mm hex key to remove the set screw from the saddle post. 7 Adjust the saddle height, and secure the M16 x 22 handle . The maximum saddle height is 15 cm. 6 Use the 8 mm hex key to adjust the saddle angle bolt . Tacx NEO Bike Plus Assembly Instructions 11 5 Adjust the saddle setback, and secure the M12 x 25 handle .
The maximum setback distance is 26 cm. 8 If necessary, use the 5 mm hex key to remove the set screw from the saddle post. 7 Adjust the saddle height, and secure the M16 x 22 handle . The maximum saddle height is 15 cm. 6 Use the 8 mm hex key to adjust the saddle angle bolt . Tacx NEO Bike Plus Assembly Instructions 11 5 Adjust the saddle setback, and secure the M12 x 25 handle .
Owners Manual
Page 16
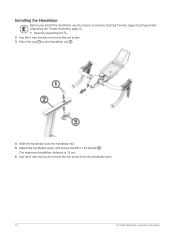
Installing the Handlebar EBefore you install the handlebar, see the topics on the handlebar rail . 4 Slide the handlebar onto the handlebar rail. 5 Adjust the handlebar reach, and secure the M12 x 25 handle . The maximum handlebar distance is 15 cm. 6 Use the 8 mm hex key to remove the set screw. 3 Place the cap on posture (Cycling Posture, page 2) and geometry (Adjusting the Trainer Geometry, page 3). 1 Open the assembly kit . 2 Use the 6 mm hex key to remove the set screw from the handlebar post. 12 Tacx NEO Bike Plus Assembly Instructions
Installing the Handlebar EBefore you install the handlebar, see the topics on the handlebar rail . 4 Slide the handlebar onto the handlebar rail. 5 Adjust the handlebar reach, and secure the M12 x 25 handle . The maximum handlebar distance is 15 cm. 6 Use the 8 mm hex key to remove the set screw. 3 Place the cap on posture (Cycling Posture, page 2) and geometry (Adjusting the Trainer Geometry, page 3). 1 Open the assembly kit . 2 Use the 6 mm hex key to remove the set screw from the handlebar post. 12 Tacx NEO Bike Plus Assembly Instructions
Owners Manual
Page 17
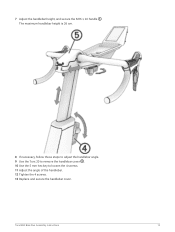
The maximum handlebar height is 26 cm. 8 If necessary, follow these steps to adjust the handlebar angle. 9 Use the Torx 20 to remove the handlebar cover . 10 Use the 5 mm hex key to loosen the 4 screws. 11 Adjust the angle of the handlebar. 12 Tighten the 4 screws. 13 Replace and secure the handlebar cover. 7 Adjust the handlebar height, and secure the M16 x 22 handle . Tacx NEO Bike Plus Assembly Instructions 13
The maximum handlebar height is 26 cm. 8 If necessary, follow these steps to adjust the handlebar angle. 9 Use the Torx 20 to remove the handlebar cover . 10 Use the 5 mm hex key to loosen the 4 screws. 11 Adjust the angle of the handlebar. 12 Tighten the 4 screws. 13 Replace and secure the handlebar cover. 7 Adjust the handlebar height, and secure the M16 x 22 handle . Tacx NEO Bike Plus Assembly Instructions 13
Owners Manual
Page 18
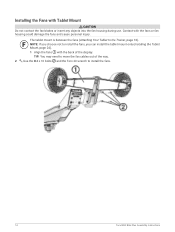
The tablet mount is between the fans (Attaching Your Tablet to install the fans. 14 Tacx NEO Bike Plus Assembly Instructions TIP: You may need to move the fan cables out of the display. FNOTE: If you choose not to install the fans, you can install the tablet mount only (Installing the Tablet Mount, page 24). 1 Align the fans with... contact the fan blades or insert any objects into the fan housing during use. Installing the Fans with the back of the way. 2 Use the M4 x 10 bolts and the Torx 20 wrench to the Trainer, page 16). Contact with the fans or fan housing could damage the ...
The tablet mount is between the fans (Attaching Your Tablet to install the fans. 14 Tacx NEO Bike Plus Assembly Instructions TIP: You may need to move the fan cables out of the display. FNOTE: If you choose not to install the fans, you can install the tablet mount only (Installing the Tablet Mount, page 24). 1 Align the fans with... contact the fan blades or insert any objects into the fan housing during use. Installing the Fans with the back of the way. 2 Use the M4 x 10 bolts and the Torx 20 wrench to the Trainer, page 16). Contact with the fans or fan housing could damage the ...
Owners Manual
Page 19
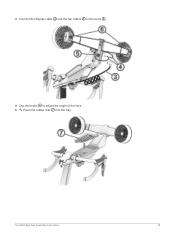
3 Connect the display cable and the fan cables to the ports . 4 Use the knobs to adjust the angle of the fans. 5 Place the rubber mat into the tray. Tacx NEO Bike Plus Assembly Instructions 15
3 Connect the display cable and the fan cables to the ports . 4 Use the knobs to adjust the angle of the fans. 5 Place the rubber mat into the tray. Tacx NEO Bike Plus Assembly Instructions 15
Owners Manual
Page 20
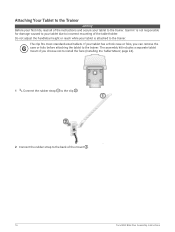
... to incorrect mounting of the mount . 16 Tacx NEO Bike Plus Assembly Instructions If your tablet to the trainer. The clip fits most standard-sized tablets. The assembly kit includes a separate tablet mount if you can remove the Gcase or folio before attaching the tablet to the trainer. Garmin® is attached to the trainer. Attaching Your Tablet to the Trainer NOTICE Before your first ride, read all...
... to incorrect mounting of the mount . 16 Tacx NEO Bike Plus Assembly Instructions If your tablet to the trainer. The clip fits most standard-sized tablets. The assembly kit includes a separate tablet mount if you can remove the Gcase or folio before attaching the tablet to the trainer. Garmin® is attached to the trainer. Attaching Your Tablet to the Trainer NOTICE Before your first ride, read all...
Owners Manual
Page 21
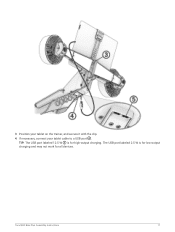
TIP: The USB port labeled 12.5 W is for low-output charging and may not work for high-output charging. Tacx NEO Bike Plus Assembly Instructions 17 3 Position your tablet on the trainer, and secure it with the clip. 4 If necessary, connect your tablet cable to a USB port . The USB port labeled 2.5 W is for all devices.
TIP: The USB port labeled 12.5 W is for low-output charging and may not work for high-output charging. Tacx NEO Bike Plus Assembly Instructions 17 3 Position your tablet on the trainer, and secure it with the clip. 4 If necessary, connect your tablet cable to a USB port . The USB port labeled 2.5 W is for all devices.
Owners Manual
Page 22
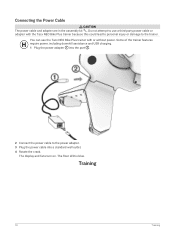
... crank. Do not attempt to use the Tacx NEO Bike Plus trainer with the Tacx NEO Bike Plus trainer because this could lead to personal injury or damage to the power adapter. 3 Plug the power cable into the port . 2 Connect the power cable to the trainer. The floor LED is blue. Connecting the Power Cable CAUTION The power cable and adapter are in the assembly kit . The display and fans turn on. You can use a third-party power cable or adapter with or without power. Training...
... crank. Do not attempt to use the Tacx NEO Bike Plus trainer with the Tacx NEO Bike Plus trainer because this could lead to personal injury or damage to the power adapter. 3 Plug the power cable into the port . 2 Connect the power cable to the trainer. The floor LED is blue. Connecting the Power Cable CAUTION The power cable and adapter are in the assembly kit . The display and fans turn on. You can use a third-party power cable or adapter with or without power. Training...

Owners Manual
Page 25
... you are doing a manual (stand alone) workout on a fixed incline so you can simulate gradients and hills. Symbol Mode Description Slope Training is based on your Tacx NEO Bike Plus trainer. Training is based on 20 possible resistance levels so you can ride without external power connected. Power Training is based on a fixed power output value so you stop . Floor LED The floor LED changes colors during training. External Power Connected: After 5 minutes of...
... you are doing a manual (stand alone) workout on a fixed incline so you can simulate gradients and hills. Symbol Mode Description Slope Training is based on your Tacx NEO Bike Plus trainer. Training is based on 20 possible resistance levels so you can ride without external power connected. Power Training is based on a fixed power output value so you stop . Floor LED The floor LED changes colors during training. External Power Connected: After 5 minutes of...
Owners Manual
Page 26
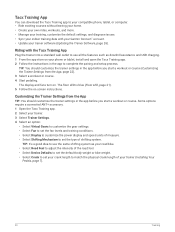
... use all the features such as your trainer (Installing Your Pedals, page 7). 22 Training The display and fans turn on -screen instructions. The floor LED is blue (Floor LED, page 21). 5 Follow the on . Riding with your Garmin Connect™ account. • Update your phone or tablet, install and open the Tacx Training app. 2 Follow the instructions in the app before you start a workout or course (Customizing the Trainer Settings...
... use all the features such as your trainer (Installing Your Pedals, page 7). 22 Training The display and fans turn on -screen instructions. The floor LED is blue (Floor LED, page 21). 5 Follow the on . Riding with your Garmin Connect™ account. • Update your phone or tablet, install and open the Tacx Training app. 2 Follow the instructions in the app before you start a workout or course (Customizing the Trainer Settings...
Owners Manual
Page 27
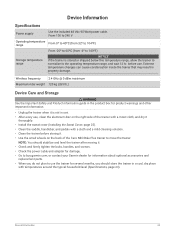
... moving it. • Check and firmly tighten the bolts, handles, and screws. • Check the power cable and adapter for damage. • Go to buy.garmin.com, or contact your Garmin dealer for information about optional accessories and replacement parts. • When you do not plan to use the trainer for product warnings and other important information. • Unplug the trainer when it thoroughly. • Install the sweat cover (Installing...
... moving it. • Check and firmly tighten the bolts, handles, and screws. • Check the power cable and adapter for damage. • Go to buy.garmin.com, or contact your Garmin dealer for information about optional accessories and replacement parts. • When you do not plan to use the trainer for product warnings and other important information. • Unplug the trainer when it thoroughly. • Install the sweat cover (Installing...

Important Safety and Product Information
Page 4
..., use of : a) maintenance work/repair work not carried out by Garmin. This product does not contain any questions or would like to analyze a problem, go to reimburse the market value of purchase can be made by part or product replacement. 3. If you are not original Tacx parts; The original warranty period is the result of parts that the product is defective, follow the instructions...
..., use of : a) maintenance work/repair work not carried out by Garmin. This product does not contain any questions or would like to analyze a problem, go to reimburse the market value of purchase can be made by part or product replacement. 3. If you are not original Tacx parts; The original warranty period is the result of parts that the product is defective, follow the instructions...


