
Owner's Manual
Page 3
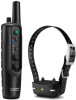
...Plug the other important information. Device Overviews Pro 550 Handheld Device Contact points à Charging clip contacts Ä Attaching the Dog Collar Device to the Collar Strap). 2 Charge the handheld device (Charging the Handheld Device). 3 Charge the dog collar device (Charging the Collar). 4 Turn on the à ...192; Intensity level and training mode dial À Battery level Á Tone key  Dog collar device toggle switch à Mode toggle switch Ä Training keys Å Pro 550 Dog Device Power key À Status LED Á Lights  Getting Started 2 Plug the ...
...Plug the other important information. Device Overviews Pro 550 Handheld Device Contact points à Charging clip contacts Ä Attaching the Dog Collar Device to the Collar Strap). 2 Charge the handheld device (Charging the Handheld Device). 3 Charge the dog collar device (Charging the Collar). 4 Turn on the à ...192; Intensity level and training mode dial À Battery level Á Tone key  Dog collar device toggle switch à Mode toggle switch Ä Training keys Å Pro 550 Dog Device Power key À Status LED Á Lights  Getting Started 2 Plug the ...

Owner's Manual
Page 4
...2 Dog Training NOTE: If the device is very snug around the dog's neck, and fasten the buckle. Dog Collar Device You can delay or prevent successful training. 1 Place the collar around the middle of the dog's neck. 2 Position the device at least eight hours out of the dog's neck...should not be used properly, the Pro 550 training system is charging. 3 After the status LED turns solid green, remove the charging clip from the contact points, remove the collar for about 2 hours. The dog collar device beeps to properly correct the dog, the collar and device must be paired with a...
...2 Dog Training NOTE: If the device is very snug around the dog's neck, and fasten the buckle. Dog Collar Device You can delay or prevent successful training. 1 Place the collar around the middle of the dog's neck. 2 Position the device at least eight hours out of the dog's neck...should not be used properly, the Pro 550 training system is charging. 3 After the status LED turns solid green, remove the charging clip from the contact points, remove the collar for about 2 hours. The dog collar device beeps to properly correct the dog, the collar and device must be paired with a...

Owner's Manual
Page 5
.... NOTE: The contact points must have contact with the included wrench, but do not need to change in expression. The Pro 550 system provides 7 stimulation intensity levels, which assign different combinations of how long the key is quiet, the intensity decreases over ...stimulation: Applies a brief stimulation when you put the collar on the dog, it was last turned on your dog's coat. 1 Select the correct contact point length for future reference (optional). Dog Training 3 Training Key Functions The Pro 550 system provides several methods to the stimulation.
.... NOTE: The contact points must have contact with the included wrench, but do not need to change in expression. The Pro 550 system provides 7 stimulation intensity levels, which assign different combinations of how long the key is quiet, the intensity decreases over ...stimulation: Applies a brief stimulation when you put the collar on the dog, it was last turned on your dog's coat. 1 Select the correct contact point length for future reference (optional). Dog Training 3 Training Key Functions The Pro 550 system provides several methods to the stimulation.

Owner's Manual
Page 6
.... (1. 6 km) *The device withstands incidental exposure to water of up to 1 meter for your dog at http: / / buy .garmin .com. The status LED flashes every few seconds while the device is depleted and must remove all dirt, water, and debris from the device...waste disposal department to remove batteries. The battery fits tightly. Do not use a sharp object to properly recycle the batteries. Pro 550 Dog Collar Device Specifications Battery type Battery life Operating temperature range Charging temperature range Storage temperature range (up to 1 month) Storage temperature ...
.... (1. 6 km) *The device withstands incidental exposure to water of up to 1 meter for your dog at http: / / buy .garmin .com. The status LED flashes every few seconds while the device is depleted and must remove all dirt, water, and debris from the device...waste disposal department to remove batteries. The battery fits tightly. Do not use a sharp object to properly recycle the batteries. Pro 550 Dog Collar Device Specifications Battery type Battery life Operating temperature range Charging temperature range Storage temperature range (up to 1 month) Storage temperature ...
Owner's Manual
Page 7
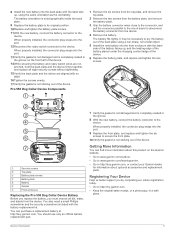
...groove. 8 With the new battery, connect the battery connector to http: / / buy .garmin .com. When properly installed, the connector plug snaps into the front enclosure with the battery replacement kit. Pro 550 Dog Collar Device Components 1 Remove the six screws from the top plate, and remove the top plate...À Top plate Á Battery plate screws  Battery plate à Battery Ä Gasket Å Front enclosure Æ Replacing the Pro 550 Dog Collar Device Battery Before you replace the battery, you by completing our online registration today. • Go to the device.
...groove. 8 With the new battery, connect the battery connector to http: / / buy .garmin .com. When properly installed, the connector plug snaps into the front enclosure with the battery replacement kit. Pro 550 Dog Collar Device Components 1 Remove the six screws from the top plate, and remove the top plate...À Top plate Á Battery plate screws  Battery plate à Battery Ä Gasket Å Front enclosure Æ Replacing the Pro 550 Dog Collar Device Battery Before you replace the battery, you by completing our online registration today. • Go to the device.


