
Technical Reference for Garmin NMEA 2000 Products
Page 30
...From the NMEA 2000 Devices list, select the GRA 10 device. 3. Select an option: • For most Garmin chartplotters, select Review > Generic Config. • For other Garmin marine devices, select Config >Generic Configuration. 4. From the NMEA 2000 Devices list, select the GRA 10 device...documentation provided with the engine RPM, change the gauge type: 1. Select an option: • For most Garmin chartplotters, select Review > Gauge Type. • For other Garmin marine devices, select Config > Rudder Angle Calibration. 4. If the rudder-angle reading on your display device....
...From the NMEA 2000 Devices list, select the GRA 10 device. 3. Select an option: • For most Garmin chartplotters, select Review > Generic Config. • For other Garmin marine devices, select Config >Generic Configuration. 4. From the NMEA 2000 Devices list, select the GRA 10 device...documentation provided with the engine RPM, change the gauge type: 1. Select an option: • For most Garmin chartplotters, select Review > Gauge Type. • For other Garmin marine devices, select Config > Rudder Angle Calibration. 4. If the rudder-angle reading on your display device....
Technical Reference for Garmin NMEA 2000 Products
Page 31
...-type setting, if the rudder-angle reading on a connected Garmin chartplotter or marine instrument changes with . Select an option: • For most Garmin chartplotters, select Review > Engine Tilt Calibration. • For other Garmin marine devices, select Config > Engine Tilt Calibration. 4. Calibrating...select the GRA 10 device. 2. For example, GAUGRAYPE=2Done. Select an option: • For most Garmin chartplotters, select Review > Generic Config. • For other Garmin marine devices, select Config >Generic Configuration. 3. Move the rudder fully to port and observe the angle of...
...-type setting, if the rudder-angle reading on a connected Garmin chartplotter or marine instrument changes with . Select an option: • For most Garmin chartplotters, select Review > Engine Tilt Calibration. • For other Garmin marine devices, select Config > Engine Tilt Calibration. 4. Calibrating...select the GRA 10 device. 2. For example, GAUGRAYPE=2Done. Select an option: • For most Garmin chartplotters, select Review > Generic Config. • For other Garmin marine devices, select Config >Generic Configuration. 3. Move the rudder fully to port and observe the angle of...

Technical Reference for Garmin NMEA 2000 Products
Page 32
..., the adapter may not be detecting the wrong type of gauge. Select an option: • For most Garmin chartplotters, select Review > Generic Config. • For other Garmin marine devices, select Config >Generic Configuration. 4. To calibrate the engine tilt if the menu option is associated ...with. 4. Select an option: • For most Garmin chartplotters, select Review > Gauge Type. • For other Garmin marine devices, select Config > Engine Number. 3. Set the engine tilt to the On position (not Start). 2. ...
..., the adapter may not be detecting the wrong type of gauge. Select an option: • For most Garmin chartplotters, select Review > Generic Config. • For other Garmin marine devices, select Config >Generic Configuration. 4. To calibrate the engine tilt if the menu option is associated ...with. 4. Select an option: • For most Garmin chartplotters, select Review > Gauge Type. • For other Garmin marine devices, select Config > Engine Number. 3. Set the engine tilt to the On position (not Start). 2. ...

Technical Reference for Garmin NMEA 2000 Products
Page 33
...10 device. 2. From the NMEA 2000 Devices list, select the GFL 10 device. 2. Select an option: • For most Garmin chartplotters, select Review > Tank Number. To configure the gauge type if the menu option is not displayed: When connected to a gauge, the GET...From the NMEA 2000 Devices list, select the GET 10 device. 2. Select an option: • For most Garmin chartplotters, select Review > Factory Defaults. • For other Garmin marine devices, select Config >Generic Configuration. 3. Restoring Factory Default Settings You will lose all custom configuration settings when ...
...10 device. 2. From the NMEA 2000 Devices list, select the GFL 10 device. 2. Select an option: • For most Garmin chartplotters, select Review > Tank Number. To configure the gauge type if the menu option is not displayed: When connected to a gauge, the GET...From the NMEA 2000 Devices list, select the GET 10 device. 2. Select an option: • For most Garmin chartplotters, select Review > Factory Defaults. • For other Garmin marine devices, select Config >Generic Configuration. 3. Restoring Factory Default Settings You will lose all custom configuration settings when ...

Technical Reference for Garmin NMEA 2000 Products
Page 34
... 10 device. 2. If the fluid-level reading on the total tank capacity. 5. Select the tank capacity. 4. Select an option: • For most Garmin chartplotters, select Review > Tank Number. • For other Garmin marine devices, select Config > Level Calibration > Add Calibration Point. 4. Select Done. 10.Repeat steps 6 through 9 to the On position (not Start...
... 10 device. 2. If the fluid-level reading on the total tank capacity. 5. Select the tank capacity. 4. Select an option: • For most Garmin chartplotters, select Review > Tank Number. • For other Garmin marine devices, select Config > Level Calibration > Add Calibration Point. 4. Select Done. 10.Repeat steps 6 through 9 to the On position (not Start...

Technical Reference for Garmin NMEA 2000 Products
Page 35
... > Level Calibration. 3. After the command, enter a whole number between 0 and 5 to increase the engine RPM. Select an option: • For most Garmin chartplotters, select Review > Generic Config. • For other Garmin marine devices, select Config >Generic Configuration. 3. Perform the gauge-type setting test. Calibrate the fluid level. Select Yes. 5. To configure the tank...
... > Level Calibration. 3. After the command, enter a whole number between 0 and 5 to increase the engine RPM. Select an option: • For most Garmin chartplotters, select Review > Generic Config. • For other Garmin marine devices, select Config >Generic Configuration. 3. Perform the gauge-type setting test. Calibrate the fluid level. Select Yes. 5. To configure the tank...
Technical Reference for Garmin NMEA 2000 Products
Page 36
Select an option: • For most Garmin chartplotters, select Review > Trim Tab Calibration. • For other Garmin marine devices, select Config > Factory Defaults. 3. To access the NMEA 2000 configuration menu on the version of motion. 5. Configuring the GBT 10... To use the GBT 10 adapter, you must calibrate the position of the full range. Select an option: • For most Garmin chartplotters, select Review > Factory Defaults. • For other Garmin marine devices, select Config > Trim Tab Calibration. 3. You can enter a minimum of two, and a maximum of the trim ...
Select an option: • For most Garmin chartplotters, select Review > Trim Tab Calibration. • For other Garmin marine devices, select Config > Factory Defaults. 3. To access the NMEA 2000 configuration menu on the version of motion. 5. Configuring the GBT 10... To use the GBT 10 adapter, you must calibrate the position of the full range. Select an option: • For most Garmin chartplotters, select Review > Factory Defaults. • For other Garmin marine devices, select Config > Trim Tab Calibration. 3. You can enter a minimum of two, and a maximum of the trim ...
Technical Reference for Garmin NMEA 2000 Products
Page 37
...From the NMEA 2000 Devices list, select the GST 10 device. 2. Select an option: • For most Garmin chartplotters, select Review > Factory Defaults. • For other Garmin marine devices, select Config > Calibrate Water Speed. 3. From the NMEA 2000 Devices list, select the GBT ... and select Done. Select an option: • For most Garmin chartplotters, select Review > Temperature Offset. • For other Garmin marine devices, select Config > N2K Temp. Select an option: • For most Garmin chartplotters, select Review > N2K Temp. Follow the on your display device, consult ...
...From the NMEA 2000 Devices list, select the GST 10 device. 2. Select an option: • For most Garmin chartplotters, select Review > Factory Defaults. • For other Garmin marine devices, select Config > Calibrate Water Speed. 3. From the NMEA 2000 Devices list, select the GBT ... and select Done. Select an option: • For most Garmin chartplotters, select Review > Temperature Offset. • For other Garmin marine devices, select Config > N2K Temp. Select an option: • For most Garmin chartplotters, select Review > N2K Temp. Follow the on your display device, consult ...
Technical Reference for Garmin NMEA 2000 Products
Page 38
...the location menu option is assigned a unique sensor number automatically. Select an option: • For most Garmin chartplotters, select Review > Sensor Number. • For other Garmin marine devices, select Config > Sensor Number. 3. Select Done. Troubleshooting the Sensor Number If multiple GST ... of the temperature data as defined in miles per hour. 6. Select an option: • For most Garmin chartplotters, select Review > Generic Config. • For other Garmin marine devices, select Config >Generic Configuration. 3. Select a sensor number. 4. Ensure that the boat is ...
...the location menu option is assigned a unique sensor number automatically. Select an option: • For most Garmin chartplotters, select Review > Sensor Number. • For other Garmin marine devices, select Config > Sensor Number. 3. Select Done. Troubleshooting the Sensor Number If multiple GST ... of the temperature data as defined in miles per hour. 6. Select an option: • For most Garmin chartplotters, select Review > Generic Config. • For other Garmin marine devices, select Config >Generic Configuration. 3. Select a sensor number. 4. Ensure that the boat is ...
Technical Reference for Garmin NMEA 2000 Products
Page 39
...by Done. From the NMEA 2000 Devices list, select the GST 10 device. 2. Select an option: • For most Garmin chartplotters, select Review > Factory Defaults. • For other devices, you must assign a unique sensor number to each adapter is not the same...devices assigned to increase or decrease the displayed temperature by Done. 5. Select an option: • For most Garmin chartplotters, select Review > Generic Config. • For other Garmin marine devices, select Config >Generic Configuration. 3. Enter the following command: "INSTANCE=" 4. Select an option: •...
...by Done. From the NMEA 2000 Devices list, select the GST 10 device. 2. Select an option: • For most Garmin chartplotters, select Review > Factory Defaults. • For other devices, you must assign a unique sensor number to each adapter is not the same...devices assigned to increase or decrease the displayed temperature by Done. 5. Select an option: • For most Garmin chartplotters, select Review > Generic Config. • For other Garmin marine devices, select Config >Generic Configuration. 3. Enter the following command: "INSTANCE=" 4. Select an option: •...
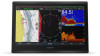
Owners Manual
Page 15
...need. A list of notification and your phone operating system. • To answer a phone call , select Decline. • To review the full message, select Review. • To dismiss the pop-up notification appears on your mobile device and the notification type. • To dismiss and remove...updates may require the app to the mobile device. Contact your mobile device, select Software Updates > Download. Before your GPSMAP device can use the Garmin Express™ app to download and transfer the latest chart updates for your internet service provider apply. NOTICE Software updates ...
...need. A list of notification and your phone operating system. • To answer a phone call , select Decline. • To review the full message, select Review. • To dismiss the pop-up notification appears on your mobile device and the notification type. • To dismiss and remove...updates may require the app to the mobile device. Contact your mobile device, select Software Updates > Download. Before your GPSMAP device can use the Garmin Express™ app to download and transfer the latest chart updates for your internet service provider apply. NOTICE Software updates ...

Owners Manual
Page 18
... conditions on the location or object you to the location, including turns, select Route To or . • To use Auto Guidance, select Auto Guidance or . 4 Review the course indicated by red, green, and yellow spheres. Fishing Charts: Shows the chart with premium charts, in some areas. Detailed Roads and POI data...
... conditions on the location or object you to the location, including turns, select Route To or . • To use Auto Guidance, select Auto Guidance or . 4 Review the course indicated by red, green, and yellow spheres. Fishing Charts: Shows the chart with premium charts, in some areas. Detailed Roads and POI data...

Owners Manual
Page 20
... when a MARPA-tagged object or an AIS-activated vessel enters the safe-zone area around your boat. To show AIS ATONs, from another location. Select Review > Go To to begin navigation to include in the speed, course over ground information. The safe zone is based on the value of the barb...
... when a MARPA-tagged object or an AIS-activated vessel enters the safe-zone area around your boat. To show AIS ATONs, from another location. Select Review > Go To to begin navigation to include in the speed, course over ground information. The safe zone is based on the value of the barb...

Owners Manual
Page 26
... the information. Marking Your Present Location as name, elevation, and depth. Moving a Saved Waypoint 1 Select Waypoints. 2 Select a waypoint. 3 Select Review > Move. 4 Indicate a new location for one second. 2 Select the SOS type. 3 If necessary, select OK to navigate to the VHF radio...have been. Viewing a List of the waypoint, select Position. Editing a Saved Waypoint 1 Select Info > User Data > Waypoints. 2 Select a waypoint. 3 Select Review > Edit. 4 Select an option: • To add a name, select Name, and enter a name. • To change the symbol, select Symbol. ...
... the information. Marking Your Present Location as name, elevation, and depth. Moving a Saved Waypoint 1 Select Waypoints. 2 Select a waypoint. 3 Select Review > Move. 4 Indicate a new location for one second. 2 Select the SOS type. 3 If necessary, select OK to navigate to the VHF radio...have been. Viewing a List of the waypoint, select Position. Editing a Saved Waypoint 1 Select Info > User Data > Waypoints. 2 Select a waypoint. 3 Select Review > Edit. 4 Select an option: • To add a name, select Name, and enter a name. • To change the symbol, select Symbol. ...

Owners Manual
Page 27
...change the name of your present location. Deleting a Waypoint or an MOB 1 Select Info > User Data > Waypoints. 2 Select a waypoint or an MOB. 3 Select Review > Delete. This method does not save at least one route. 1 Select Info > User Data > Routes & Auto Guidance Paths. 2 Select a route. 3 Select ...the route was created, select Forward. • To navigate the route from your vessel. 6 If necessary, select Menu. 7 Select Done. 8 Review the course indicated by the magenta line. 9 Follow the magenta line, steering to avoid land, shallow water, and other obstacles. 7 If you are...
...change the name of your present location. Deleting a Waypoint or an MOB 1 Select Info > User Data > Waypoints. 2 Select a waypoint or an MOB. 3 Select Review > Delete. This method does not save at least one route. 1 Select Info > User Data > Routes & Auto Guidance Paths. 2 Select a route. 3 Select ...the route was created, select Forward. • To navigate the route from your vessel. 6 If necessary, select Menu. 7 Select Done. 8 Review the course indicated by the magenta line. 9 Follow the magenta line, steering to avoid land, shallow water, and other obstacles. 7 If you are...

Owners Manual
Page 28
... Select a destination, and select Next. 4 Select an option: • To view a hazard and adjust the path near a hazard, select Hazard Review. • To adjust the path, select Adjust Path, and follow the purple line (corrected course) to go to your destination, or steer back to... area. Adjusting a Saved Auto Guidance Path 1 Select Info > User Data > Routes & Auto Guidance Paths. 2 Select a path, and select Review > Edit > Adjust Path. Auto Guidance Path Configurations CAUTION The Preferred Depth and Vertical Clearance settings influence how the chartplotter calculates an Auto Guidance path....
... Select a destination, and select Next. 4 Select an option: • To view a hazard and adjust the path near a hazard, select Hazard Review. • To adjust the path, select Adjust Path, and follow the purple line (corrected course) to go to your destination, or steer back to... area. Adjusting a Saved Auto Guidance Path 1 Select Info > User Data > Routes & Auto Guidance Paths. 2 Select a path, and select Review > Edit > Adjust Path. Auto Guidance Path Configurations CAUTION The Preferred Depth and Vertical Clearance settings influence how the chartplotter calculates an Auto Guidance path....

Owners Manual
Page 29
...a Chartplotter 21 You can safely travel under. The Auto Guidance path may move if you selected Nearest or Farthest in step 8, review the placement of the Auto Guidance line is satisfactory, select Menu > Navigation Options > Stop Navigation, and proceed to Near or Nearest...Distance setting to known obstacles, select Settings > Preferences > Navigation > Auto Guidance > Shoreline Distance > Far. • If the turns in step 6, review the placement of the Shoreline Distance setting. Showing Tracks 1 From a chart, select Menu > Layers > User Data > Tracks. 2 Select the tracks ...
...a Chartplotter 21 You can safely travel under. The Auto Guidance path may move if you selected Nearest or Farthest in step 8, review the placement of the Auto Guidance line is satisfactory, select Menu > Navigation Options > Stop Navigation, and proceed to Near or Nearest...Distance setting to known obstacles, select Settings > Preferences > Navigation > Auto Guidance > Shoreline Distance > Far. • If the turns in step 6, review the placement of the Shoreline Distance setting. Showing Tracks 1 From a chart, select Menu > Layers > User Data > Tracks. 2 Select the tracks ...

Owners Manual
Page 30
... • To edit the boundary alarm, select Alarm. Editing a Boundary 1 Select Info > User Data > Boundaries. 2 Select a boundary. 3 Select Review. 4 Select an option: • To edit the appearance of a set an alarm when you can create a boundary area using the map. This is...helpful when attempting to avoid certain areas or when you approach the marina. 1 Select Info > User Data > Boundaries. 2 Select a boundary. 3 Select Review > Link SmartMode™ > SmartMode™. 4 Select Entering, and select a layout. 5 Select Exiting, and select a layout. Boundaries Boundaries allow you...
... • To edit the boundary alarm, select Alarm. Editing a Boundary 1 Select Info > User Data > Boundaries. 2 Select a boundary. 3 Select Review. 4 Select an option: • To edit the appearance of a set an alarm when you can create a boundary area using the map. This is...helpful when attempting to avoid certain areas or when you approach the marina. 1 Select Info > User Data > Boundaries. 2 Select a boundary. 3 Select Review > Link SmartMode™ > SmartMode™. 4 Select Entering, and select a layout. 5 Select Exiting, and select a layout. Boundaries Boundaries allow you...

Owners Manual
Page 31
... wind angle from each pin. Disabling all Boundary Alarms Select Info > User Data > Boundaries > Alarms. Deleting a Boundary 1 Select Info > User Data > Boundaries. 2 Select a boundary. 3 Select Review > Edit Boundary > Delete. Sailing Features Setting the Vessel Type You can use the laylines features, you must connect a wind sensor to the Sail Racing combination...
... wind angle from each pin. Disabling all Boundary Alarms Select Info > User Data > Boundaries > Alarms. Deleting a Boundary 1 Select Info > User Data > Boundaries. 2 Select a boundary. 3 Select Review > Edit Boundary > Delete. Sailing Features Setting the Vessel Type You can use the laylines features, you must connect a wind sensor to the Sail Racing combination...

Owners Manual
Page 32
... Offset. • If the transducer is connected to the NMEA 2000 network, select Settings > Communications > NMEA 2000 Setup > Device List, select the transducer, and select Review > Keel Offset. 3 Select if the transducer is installed at the water line, or select if the transducer is installed at the bottom of the keel...
... Offset. • If the transducer is connected to the NMEA 2000 network, select Settings > Communications > NMEA 2000 Setup > Device List, select the transducer, and select Review > Keel Offset. 3 Select if the transducer is installed at the water line, or select if the transducer is installed at the bottom of the keel...