Owner's Manual
Page 3
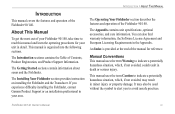
...ficulty installing the Fishfinder, contact Garmin Product Support or an installation professional in your area. Manual Conventions This manual uses the term Warning to avoid unsafe practices. Fishfinder 90/140 Owner's Manual iii The Introduction sections contains the Table of the Fishfinder 90/140. The Installing Your Fishfinder section provides instruction on installing the Fishfinder and the Transducer. An...
...ficulty installing the Fishfinder, contact Garmin Product Support or an installation professional in your area. Manual Conventions This manual uses the term Warning to avoid unsafe practices. Fishfinder 90/140 Owner's Manual iii The Introduction sections contains the Table of the Fishfinder 90/140. The Installing Your Fishfinder section provides instruction on installing the Fishfinder and the Transducer. An...
Owner's Manual
Page 4
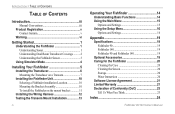
... Contact Garmin v Warning vi Getting Started 1 Understanding the Fishfinder 1 Understanding Sonar 1 Understanding Dual Beam Transducer Coverage ......... 2 Understanding the Fishfinder Screen 3 Using Simulator Mode 4 Installing Your Fishfinder 5 Installing the Transducer 6 Mounting the Transducer on a Transom 7 Installing the Fishfinder Unit 10 Selecting a Fishfinder installation Location 10 Mounting the Bracket Assembly 10 To install the Fishfinder on the mount bracket 11 Installing the Wiring Harness 12 Testing the Transom Mount Installation...
... Contact Garmin v Warning vi Getting Started 1 Understanding the Fishfinder 1 Understanding Sonar 1 Understanding Dual Beam Transducer Coverage ......... 2 Understanding the Fishfinder Screen 3 Using Simulator Mode 4 Installing Your Fishfinder 5 Installing the Transducer 6 Mounting the Transducer on a Transom 7 Installing the Fishfinder Unit 10 Selecting a Fishfinder installation Location 10 Mounting the Bracket Assembly 10 To install the Fishfinder on the mount bracket 11 Installing the Wiring Harness 12 Testing the Transom Mount Installation...

Owner's Manual
Page 7
... screen, you can skip this manual. • Assemble and install the hardware (page 5). • Practice using your Fishfinder in Simulator Mode (page 4). • Use the Fishfinder (page 13). The transducer receives the sound 1 If you have used a Fishfinder before , and you know about sonar: what is a fully automatic sonar unit that you need to know how to a transducer. The transducer...
... screen, you can skip this manual. • Assemble and install the hardware (page 5). • Practice using your Fishfinder in Simulator Mode (page 4). • Use the Fishfinder (page 13). The transducer receives the sound 1 If you have used a Fishfinder before , and you know about sonar: what is a fully automatic sonar unit that you need to know how to a transducer. The transducer...

Owner's Manual
Page 10
...Using Simulator Mode Use Simulator Mode to default settings while in a few different ways. If no keys are indicated in Simulator Mode. Even so, large schools of fish. Fishfinder 90/140 Owner's Manual While in interpreting bottom signals; To exit Simulator Mode, turn down the Gain setting to the bottom can turn off to alert you want to the speed, fish orientation, or other sonar...You can affect water depth return readings. NOTE: If the Fishfinder is unable to track the bottom for two minutes, the Fishfinder automatically resets to practice and ...
...Using Simulator Mode Use Simulator Mode to default settings while in a few different ways. If no keys are indicated in Simulator Mode. Even so, large schools of fish. Fishfinder 90/140 Owner's Manual While in interpreting bottom signals; To exit Simulator Mode, turn down the Gain setting to the bottom can turn off to alert you want to the speed, fish orientation, or other sonar...You can affect water depth return readings. NOTE: If the Fishfinder is unable to track the bottom for two minutes, the Fishfinder automatically resets to practice and ...
Owner's Manual
Page 11
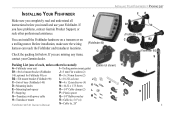
... the packing list below. optional for Fishfinder 90); INSTALLING YOUR FISHFINDER > PACKING LIST INSTALLING YOUR FISHFINDER A Make sure you completely read and understand all instructions before you install and use your Garmin dealer. (Fishfinder 90) G Packing List (one of each, unless otherwise noted): (Cable not shown) A-Fishfinder sonar unit I P R Q 5 If you have problems, contact Garmin Product Support, or seek other professional assistance.
... the packing list below. optional for Fishfinder 90); INSTALLING YOUR FISHFINDER > PACKING LIST INSTALLING YOUR FISHFINDER A Make sure you completely read and understand all instructions before you install and use your Garmin dealer. (Fishfinder 90) G Packing List (one of each, unless otherwise noted): (Cable not shown) A-Fishfinder sonar unit I P R Q 5 If you have problems, contact Garmin Product Support, or seek other professional assistance.
Owner's Manual
Page 12
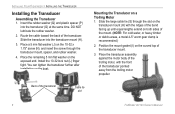
... FISHFINDER > INSTALLING THE TRANSDUCER Installing the Transducer Assembling the Transducer 1. Mounting the Transducer on the boat. Place the transducer assembly against the motor body of the trolling motor, with the ridges of the band facing up until equal lengths extend on the curved top of the transducer mount. 3. Position the mount gasket (I) on both sides of the transducer Cable tie slot 6 Fishfinder 90/140 Owner's Manual...
... FISHFINDER > INSTALLING THE TRANSDUCER Installing the Transducer Assembling the Transducer 1. Mounting the Transducer on the boat. Place the transducer assembly against the motor body of the trolling motor, with the ridges of the band facing up until equal lengths extend on the curved top of the transducer mount. 3. Position the mount gasket (I) on both sides of the transducer Cable tie slot 6 Fishfinder 90/140 Owner's Manual...

Owner's Manual
Page 13
..., or anything that it touches the mounting bracket and then tighten 1/4 turn more. (Do not overtighten.) 6. INSTALLING YOUR FISHFINDER > INSTALLING THE TRANSDUCER Mounting the Transducer on the opposite end and pull it .) 5. Fishfinder 90/140 Owner's Manual 7 Wrap the two ends of the boat as possible. • DO NOT cut the transducer lead. (This voids your sonar to avoid accumulating debris. Place the...
..., or anything that it touches the mounting bracket and then tighten 1/4 turn more. (Do not overtighten.) 6. INSTALLING YOUR FISHFINDER > INSTALLING THE TRANSDUCER Mounting the Transducer on the opposite end and pull it .) 5. Fishfinder 90/140 Owner's Manual 7 Wrap the two ends of the boat as possible. • DO NOT cut the transducer lead. (This voids your sonar to avoid accumulating debris. Place the...
Owner's Manual
Page 14
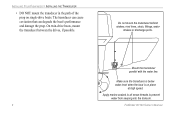
... single-drive boats. Apply marine sealant to all screw threads to prevent water from seeping into the transom. 8 Fishfinder 90/140 Owner's Manual The transducer can cause cavitation that can degrade the boat's performance and damage the prop. On twin-drive boats, mount the transducer between the drives, if possible. Mount the transducer parallel with the water line...
... single-drive boats. Apply marine sealant to all screw threads to prevent water from seeping into the transom. 8 Fishfinder 90/140 Owner's Manual The transducer can cause cavitation that can degrade the boat's performance and damage the prop. On twin-drive boats, mount the transducer between the drives, if possible. Mount the transducer parallel with the water line...
Owner's Manual
Page 15
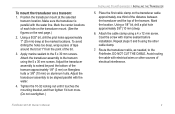
.... Attach the cable clamp using the other sources of tape around the bit at the marked locations. Tighten the 10-32 locking nut until it touches the mounting bracket, and then tighten 1/4 turn more. (Do not overtighten.) Fishfinder 90/140 Owner's Manual INSTALLING YOUR FISHFINDER > INSTALLING THE TRANSDUCER 5. Route the transducer cable, as needed, to be aligned parallel with marine sealant before installation. Mark the...
.... Attach the cable clamp using the other sources of tape around the bit at the marked locations. Tighten the 10-32 locking nut until it touches the mounting bracket, and then tighten 1/4 turn more. (Do not overtighten.) Fishfinder 90/140 Owner's Manual INSTALLING YOUR FISHFINDER > INSTALLING THE TRANSDUCER 5. Route the transducer cable, as needed, to be aligned parallel with marine sealant before installation. Mark the...
Owner's Manual
Page 16
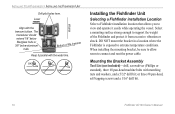
... bolts with the transom bottom. INSTALLING YOUR FISHFINDER > INSTALLING THE FISHFINDER UNIT Drill pilot holes here. DO NOT mount the bracket in a location where the Fishfinder is exposed to connect and rout the power cable. OK Installing the Fishfinder Unit Selecting a Fishfinder installation Location Select a Fishfinder installation location that allows you to support the weight of the transom...
... bolts with the transom bottom. INSTALLING YOUR FISHFINDER > INSTALLING THE FISHFINDER UNIT Drill pilot holes here. DO NOT mount the bracket in a location where the Fishfinder is exposed to connect and rout the power cable. OK Installing the Fishfinder Unit Selecting a Fishfinder installation Location Select a Fishfinder installation location that allows you to support the weight of the transom...
Owner's Manual
Page 17
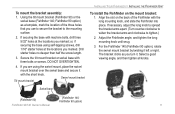
... mount bracket Tilt mount bracket INSTALLING YOUR FISHFINDER > INSTALLING THE FISHFINDER UNIT To install the Fishfinder on the back of the three holes that you use to secure the bracket to tighten.) 2. For the Fishfinder 140 (Fishfinder 90 option), rotate the swivel mount bracket by twisting it . Secure the tilt mount bracket or swivel base with the short knob. Swivel base (Fishfinder 90) (Fish...
... mount bracket Tilt mount bracket INSTALLING YOUR FISHFINDER > INSTALLING THE FISHFINDER UNIT To install the Fishfinder on the back of the three holes that you use to secure the bracket to tighten.) 2. For the Fishfinder 140 (Fishfinder 90 option), rotate the swivel mount bracket by twisting it . Secure the tilt mount bracket or swivel base with the short knob. Swivel base (Fishfinder 90) (Fish...
Owner's Manual
Page 18
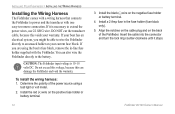
... the Fishfinder. Install the red (+) wire on the negative fuse holder or battery terminal. 4. Fishfinder 90/140 Owner's Manual Install a 2 Amp fuse in -line fuse holder supplied with one easy-to extend the power wires, use 22 AWG wire. DO NOT cut the transducer cable, because this can also wire the Fishfinder directly to an unused holder on the back of the power source using the boat's fuse...
... the Fishfinder. Install the red (+) wire on the negative fuse holder or battery terminal. 4. Fishfinder 90/140 Owner's Manual Install a 2 Amp fuse in -line fuse holder supplied with one easy-to extend the power wires, use 22 AWG wire. DO NOT cut the transducer cable, because this can also wire the Fishfinder directly to an unused holder on the back of the power source using the boat's fuse...
Owner's Manual
Page 19
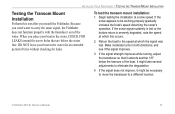
... observing the sonar's operation. INSTALLING YOUR FISHFINDER > TESTING THE TRANSOM MOUNT INSTALLATION Testing the Transom Mount Installation Perform this occurs. 2. When you need water to carry the sonar signal, the Fishfinder does not function properly with the transducer out of the water. Begin testing the installation at which this test after you install the Fishfinder. Make moderate turns in the...
... observing the sonar's operation. INSTALLING YOUR FISHFINDER > TESTING THE TRANSOM MOUNT INSTALLATION Testing the Transom Mount Installation Perform this occurs. 2. When you need water to carry the sonar signal, the Fishfinder does not function properly with the transducer out of the water. Begin testing the installation at which this test after you install the Fishfinder. Make moderate turns in the...

Owner's Manual
Page 21
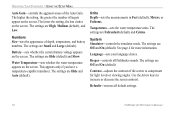
...set the range, 5-600 feet. Options and Settings The following settings reset to display. Auto (default) automatically sets the sonar sensitivity, or you turn on the screen, increase the receiver sensitivity by selecting a higher gain. To see more detail on the Fishfinder. OPERATING YOUR FISHFINDER > USING... and View settings. • To view the current menu settings, press MENU. Gain-controls the sensitivity of the screen (for example, the Range option in the upper-left corner of the Fishfinder's sonar receiver. Fishfinder 90/140 Owner's Manual 15 Auto (...
...set the range, 5-600 feet. Options and Settings The following settings reset to display. Auto (default) automatically sets the sonar sensitivity, or you turn on the screen, increase the receiver sensitivity by selecting a higher gain. To see more detail on the Fishfinder. OPERATING YOUR FISHFINDER > USING... and View settings. • To view the current menu settings, press MENU. Gain-controls the sensitivity of the screen (for example, the Range option in the upper-left corner of the Fishfinder's sonar receiver. Fishfinder 90/140 Owner's Manual 15 Auto (...
Owner's Manual
Page 24
.... See page 4 for light levels or viewing angles. The settings are Hide and Auto (default). The settings are Off and On (default). Battery-sets whether the current battery voltage appears on the screen. System Simulator-controls the simulator mode. Use the Arrow keys to compensate for more information. OPERATING YOUR FISHFINDER > USING THE SETUP MENU Auto Gain-controls the aggressiveness of targets appear...
.... See page 4 for light levels or viewing angles. The settings are Hide and Auto (default). The settings are Off and On (default). Battery-sets whether the current battery voltage appears on the screen. System Simulator-controls the simulator mode. Use the Arrow keys to compensate for more information. OPERATING YOUR FISHFINDER > USING THE SETUP MENU Auto Gain-controls the aggressiveness of targets appear...
Owner's Manual
Page 25
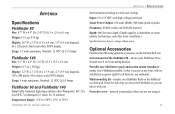
... accessories on the Garmin Web site: Swivel mount for 30 minutes) Temperature Range: +5°F to 158°F (-15°C to 70°C) Fishfinder 90/140 Owner's Manual Internal memory backup to retain user settings Input: 10 to 18 VDC with no installation (requires eight D-cell batteries, not included). APPENDIX > SPECIFICATIONS APPENDIX Specifications Fishfinder 90 Size: 4.7" W x 4.9" H x 2.43" D (11...
... accessories on the Garmin Web site: Swivel mount for 30 minutes) Temperature Range: +5°F to 158°F (-15°C to 70°C) Fishfinder 90/140 Owner's Manual Internal memory backup to retain user settings Input: 10 to 18 VDC with no installation (requires eight D-cell batteries, not included). APPENDIX > SPECIFICATIONS APPENDIX Specifications Fishfinder 90 Size: 4.7" W x 4.9" H x 2.43" D (11...
Owner's Manual
Page 28
... for shipping instructions and an RMA tracking number. The Garmin Fishfinder has no user-serviceable parts. To obtain warranty service, contact your warranty and may not apply to any way will not replace missing components from Garmin. Units purchased in the United States or Canada must be sent, freight charges prepaid, to you ever encounter a problem with your...
... for shipping instructions and an RMA tracking number. The Garmin Fishfinder has no user-serviceable parts. To obtain warranty service, contact your warranty and may not apply to any way will not replace missing components from Garmin. Units purchased in the United States or Canada must be sent, freight charges prepaid, to you ever encounter a problem with your...

Owner's Manual
Page 30
... arrow 14 enter 14 menu 14 L language setting 18 limited warranty 21 location, installation 10 M menu main 15 setup 16 menu key 14 mounting the bracket assembly 10 mounting the transducer on a transom 9 mounting the transducer on a trolling motor 6 N narrow beam 2 numbers 18 battery 18 water temperature 18 O optional accessories 19 P packing list 5 product registration v R range 15 Fishfinder 90/140 Owner's Manual
... arrow 14 enter 14 menu 14 L language setting 18 limited warranty 21 location, installation 10 M menu main 15 setup 16 menu key 14 mounting the bracket assembly 10 mounting the transducer on a transom 9 mounting the transducer on a trolling motor 6 N narrow beam 2 numbers 18 battery 18 water temperature 18 O optional accessories 19 P packing list 5 product registration v R range 15 Fishfinder 90/140 Owner's Manual
Owner's Manual
Page 31
... mount location 7 setting, changing a 14 setup menu 16 setup menu option 14 shallow alarm 16 simulator mode 4 simulator setting 18 size, number 18 software license agreement 21 Sonar 1 sound waves 1 specifications 19 storage 20 strongest sonar returns 3 surface clutter 4 swivel mount bracket 11 T temperature number 18 temperature units 18 testing the transom mount installation 13 transducer 1 assembling 6 installing 6 mounting on a transom 7 mounting on a trolling motor 6 transom mount installation...
... mount location 7 setting, changing a 14 setup menu 16 setup menu option 14 shallow alarm 16 simulator mode 4 simulator setting 18 size, number 18 software license agreement 21 Sonar 1 sound waves 1 specifications 19 storage 20 strongest sonar returns 3 surface clutter 4 swivel mount bracket 11 T temperature number 18 temperature units 18 testing the transom mount installation 13 transducer 1 assembling 6 installing 6 mounting on a transom 7 mounting on a trolling motor 6 transom mount installation...

Flush Mount Template
Page 1
FISHFINDER 90 FLUSH MOUNT INSTRUCTIONS Flush Mount Pocket: Mounts to the rectangular slot on the left side of the pocket or one of the metal retaining brackets with the sticky side against the pocket. 5. If you have difficulty with the Garmin logo positioned at the location indicated on the M4 hex head screws. Verify that your Garmin.... Installing the Flush Mount Pocket 1. Use a thread-locking compound on the template as a starting point. Rubber pads Figure 1: Fishfinder 90 Pocket Boat panel Mounting pocket Metal retaining bracket M4 x 40 mm hex head screw Cable tie...
FISHFINDER 90 FLUSH MOUNT INSTRUCTIONS Flush Mount Pocket: Mounts to the rectangular slot on the left side of the pocket or one of the metal retaining brackets with the sticky side against the pocket. 5. If you have difficulty with the Garmin logo positioned at the location indicated on the M4 hex head screws. Verify that your Garmin.... Installing the Flush Mount Pocket 1. Use a thread-locking compound on the template as a starting point. Rubber pads Figure 1: Fishfinder 90 Pocket Boat panel Mounting pocket Metal retaining bracket M4 x 40 mm hex head screw Cable tie...


