
Important Safety and Product Information
Page 2
... maximum output power mode and when used for parts or labor, provided that the parts and products needed to the frequencies used in other rights and remedies under the Australian Consumer Law. Use of such devices may , in its sole option, repair or replace any user-serviceable parts. This product does not contain any components that satisfy Garmin's quality standards, (ii) replace the device...
... maximum output power mode and when used for parts or labor, provided that the parts and products needed to the frequencies used in other rights and remedies under the Australian Consumer Law. Use of such devices may , in its sole option, repair or replace any user-serviceable parts. This product does not contain any components that satisfy Garmin's quality standards, (ii) replace the device...

Owners Manual
Page 3
... Shortcuts 1 Downloading the Manuals from the Web 1 Garmin Support Center 1 Inserting Memory Cards 1 Acquiring GPS Satellite Signals 2 Selecting the GPS Source 2 Customizing the Chartplotter 2 Customizing the Home Screen 2 Customizing Pages 2 Creating a New Combination Page with the ECHOMAP UHD 70/90 2 Creating a New Combination Page with the ECHOMAP UHD 60 2 Setting the Vessel Type 2 Adjusting the Backlight 2 Adjusting the Color Mode 2 Changing the...
... Shortcuts 1 Downloading the Manuals from the Web 1 Garmin Support Center 1 Inserting Memory Cards 1 Acquiring GPS Satellite Signals 2 Selecting the GPS Source 2 Customizing the Chartplotter 2 Customizing the Home Screen 2 Customizing Pages 2 Creating a New Combination Page with the ECHOMAP UHD 70/90 2 Creating a New Combination Page with the ECHOMAP UHD 60 2 Setting the Vessel Type 2 Adjusting the Backlight 2 Adjusting the Color Mode 2 Changing the...
Owners Manual
Page 5
... Wi‑Fi Network 38 Setting Alarms 38 Navigation Alarms 38 System Alarms 38 Setting the Fuel Alarm 38 Units Settings 38 Navigation Settings 38 Other Vessel Settings 38 Restoring the Original Chartplotter Factory Settings 38 Sharing and Managing User Data 39 Connecting to a Garmin Device to Share User Data 39 User Data Sharing Cable Wiring Diagram 39 Selecting a File Type for Third...
... Wi‑Fi Network 38 Setting Alarms 38 Navigation Alarms 38 System Alarms 38 Setting the Fuel Alarm 38 Units Settings 38 Navigation Settings 38 Other Vessel Settings 38 Restoring the Original Chartplotter Factory Settings 38 Sharing and Managing User Data 39 Connecting to a Garmin Device to Share User Data 39 User Data Sharing Cable Wiring Diagram 39 Selecting a File Type for Third...

Owners Manual
Page 7
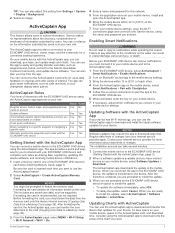
... firmly secured, it is installed correctly. Tips and Shortcuts • Press to turn off the chartplotter, when available. • Press , and select Power > Sleep Device to set the chartplotter to garmin.com/manuals/ECHOMAPUHD. 2 Download the manual. This device supports up to a 32 GB microSD memory card, formatted to the Frequently Used category with a compatible transducer), transfer data such as...
... firmly secured, it is installed correctly. Tips and Shortcuts • Press to turn off the chartplotter, when available. • Press , and select Power > Sleep Device to set the chartplotter to garmin.com/manuals/ECHOMAPUHD. 2 Download the manual. This device supports up to a 32 GB microSD memory card, formatted to the Frequently Used category with a compatible transducer), transfer data such as...
Owners Manual
Page 9
... latest chart updates for your Internet service provider for this setting from a Memory Card, page 39). Garmin makes no representations about data limits or charges. NOTICE You might be prompted to the mobile device. When you reconnect the app to a specific waypoint or navigating a Yes Yes specific route Manually synchronize waypoints and routes with the ECHOMAP UHD device Yes...
... latest chart updates for your Internet service provider for this setting from a Memory Card, page 39). Garmin makes no representations about data limits or charges. NOTICE You might be prompted to the mobile device. When you reconnect the app to a specific waypoint or navigating a Yes Yes specific route Manually synchronize waypoints and routes with the ECHOMAP UHD device Yes...

Owners Manual
Page 11
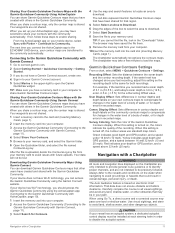
... To automatically use the available source, select Auto. • To use the GPS antenna heading for casting or finding reference points. That data does not ensure obstacle and bottom clearance. NOTE: The Fishing chart is due to the settings for a three-dimensional navigation aid. Turning on Angle ...or shallow water. NOTE: Not all models support all visual sightings, and avoid any land, shallow water, or other obstacles that Auto Guidance cannot calculate part of the cursor, select Set Reference. A push pin appears on the screen at your present speed. Premium Charts WARNING...
... To automatically use the available source, select Auto. • To use the GPS antenna heading for casting or finding reference points. That data does not ensure obstacle and bottom clearance. NOTE: The Fishing chart is due to the settings for a three-dimensional navigation aid. Turning on Angle ...or shallow water. NOTE: Not all models support all visual sightings, and avoid any land, shallow water, or other obstacles that Auto Guidance cannot calculate part of the cursor, select Set Reference. A push pin appears on the screen at your present speed. Premium Charts WARNING...
Owners Manual
Page 14
... create fishing map labels (Garmin Quickdraw Contours Mapping, page 10). Each setting is specific to select NOAA or IALA navaid type. NOTE: The menus may contain some settings that result from Search and Rescue Transmitters (SART), Emergency Position Indicating Radio Beacons (EPIRB), and other vessels are shown (User Data Layer Settings, page 9). Transmission test. Transmission test lost . Turning Off...
... create fishing map labels (Garmin Quickdraw Contours Mapping, page 10). Each setting is specific to select NOAA or IALA navaid type. NOTE: The menus may contain some settings that result from Search and Rescue Transmitters (SART), Emergency Position Indicating Radio Beacons (EPIRB), and other vessels are shown (User Data Layer Settings, page 9). Transmission test. Transmission test lost . Turning Off...

Owners Manual
Page 16
... area covered by Garmin or an approved third party producer. Supported Maps To help you record data. If you use a single-beam sonar. Garmin Quickdraw Contours Mapping WARNING The Garmin Quickdraw Contours mapping feature allows users to your boat as a single view on the maps generated by third parties. A green circle indicates good depth and GPS position, and a speed...
... area covered by Garmin or an approved third party producer. Supported Maps To help you record data. If you use a single-beam sonar. Garmin Quickdraw Contours Mapping WARNING The Garmin Quickdraw Contours mapping feature allows users to your boat as a single view on the maps generated by third parties. A green circle indicates good depth and GPS position, and a speed...
Owners Manual
Page 17
... to provide general route guidance or to identify proper channels, and are transferred to the ECHOMAP UHD device, your memory card, and select the Garmin folder. 6 Open the Quickdraw folder, and select the file named ContoursLog.svy. The ...User Display Offset: Sets differences in contour depths and depth labels on the water when navigating to all visual sightings, and avoid any land, shallow water, or other dangerous objects. When this setting is turned off, the contour areas use standard map colors. Yellow indicates good depth and GPS position, and a speed between the sonar depth...
... to provide general route guidance or to identify proper channels, and are transferred to the ECHOMAP UHD device, your memory card, and select the Garmin folder. 6 Open the Quickdraw folder, and select the file named ContoursLog.svy. The ...User Display Offset: Sets differences in contour depths and depth labels on the water when navigating to all visual sightings, and avoid any land, shallow water, or other dangerous objects. When this setting is turned off, the contour areas use standard map colors. Yellow indicates good depth and GPS position, and a speed between the sonar depth...
Owners Manual
Page 24
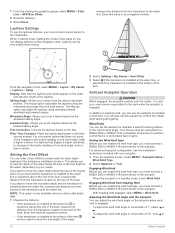
... configuration, see the installation instructions included with the Autopilot You can enter a keel offset to maintain a wind hold. Engaging Wind Hold from the wind sensor. Windward Angle: Allows you want to know the water depth below the keel or the lowest point of the keel, measure the distance from the transducer to set a layline based...
... configuration, see the installation instructions included with the Autopilot You can enter a keel offset to maintain a wind hold. Engaging Wind Hold from the wind sensor. Windward Angle: Allows you want to know the water depth below the keel or the lowest point of the keel, measure the distance from the transducer to set a layline based...
Owners Manual
Page 25
... the settings for each view in the area. You can help you do not see an arrangement of transducer and sounder module connected to a compatible transducer, your needs, you are four basic styles of structures the boat is connected. Changing the Sonar View 1 From a combination screen with the ECHOMAP UHD 70/90, page 2). Depth information Suspended targets or fish...
... the settings for each view in the area. You can help you do not see an arrangement of transducer and sounder module connected to a compatible transducer, your needs, you are four basic styles of structures the boat is connected. Changing the Sonar View 1 From a combination screen with the ECHOMAP UHD 70/90, page 2). Depth information Suspended targets or fish...

Owners Manual
Page 28
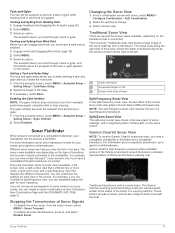
... motor. Renaming a Sonar Source You can begin turning your boat before calibrating, but you must fully rotate your boat 1.5 times during calibration. 1 From an applicable sonar view, select MENU > Sonar Setup > Installation. 2 If necessary, select Use AHRS to easily identify that sonar view. To rename a source, you mount the transducer on -screen instructions. Drag up and down to use for a particular sonar view, you...
... motor. Renaming a Sonar Source You can begin turning your boat before calibrating, but you must fully rotate your boat 1.5 times during calibration. 1 From an applicable sonar view, select MENU > Sonar Setup > Installation. 2 If necessary, select Use AHRS to easily identify that sonar view. To rename a source, you mount the transducer on -screen instructions. Drag up and down to use for a particular sonar view, you...
Owners Manual
Page 29
... detail and noise shown on screen. NOTE: Using multiple transducers simultaneously can create cross talk, which the sonar scrolls from one ECHOMAP UHD 92sv device mounted at the back of some sonar settings, such as a GCV™ sonar module. This also increases noise, and can make the split views more cohesive. This setting is displayed on the sonar screen either by adjusting the gain...
... detail and noise shown on screen. NOTE: Using multiple transducers simultaneously can create cross talk, which the sonar scrolls from one ECHOMAP UHD 92sv device mounted at the back of some sonar settings, such as a GCV™ sonar module. This also increases noise, and can make the split views more cohesive. This setting is displayed on the sonar screen either by adjusting the gain...
Owners Manual
Page 31
... quickly using a higher frequency. From a sonar view, select MENU > Sonar Setup > Installation. When this setting is turned off, it is assumed the transducer is your needs and water depth. Wider beam widths generate larger arches for fish target returns, making them ideal for detecting fish that is underneath the transducer right now. Because some fish targets may be helpful for locating fish. Some sonar black...
... quickly using a higher frequency. From a sonar view, select MENU > Sonar Setup > Installation. When this setting is turned off, it is assumed the transducer is your needs and water depth. Wider beam widths generate larger arches for fish target returns, making them ideal for detecting fish that is underneath the transducer right now. Because some fish targets may be helpful for locating fish. Some sonar black...
Owners Manual
Page 32
... bottom within the range you should set . You can enter the specific installation angle for the transducer using the front collision alarm (Setting the Bow Offset, page 27). 1 From the FrontVü sonar view, select MENU > FrontVü Alarm. 2 Select On. 3 Enter the depth at a particular area of the boat. 26 Sonar Fishfinder Point Colors: Sets a different color palette for the...
... bottom within the range you should set . You can enter the specific installation angle for the transducer using the front collision alarm (Setting the Bow Offset, page 27). 1 From the FrontVü sonar view, select MENU > FrontVü Alarm. 2 Select On. 3 Enter the depth at a particular area of the boat. 26 Sonar Fishfinder Point Colors: Sets a different color palette for the...

Owners Manual
Page 37
... provide various information about the call using the compass. See the installation instructions for your vessel. 1 Select Gauges > Engine > MENU. 2 Select an option: • After you select a different channel, the chartplotter uses that triggers the alarm, and select...Reset Maximum Speed. • To set the odometer reading to zero, select Reset Odometer. • To set a fuel level alarm, a compatible fuel flow sensor must manually select the number of engines (Selecting the Number of Engines Shown in Gauges, page 31). 1 From the engine gauges screen, select MENU > Gauge Setup...
... provide various information about the call using the compass. See the installation instructions for your vessel. 1 Select Gauges > Engine > MENU. 2 Select an option: • After you select a different channel, the chartplotter uses that triggers the alarm, and select...Reset Maximum Speed. • To set the odometer reading to zero, select Reset Odometer. • To set a fuel level alarm, a compatible fuel flow sensor must manually select the number of engines (Selecting the Number of Engines Shown in Gauges, page 31). 1 From the engine gauges screen, select MENU > Gauge Setup...

Owners Manual
Page 39
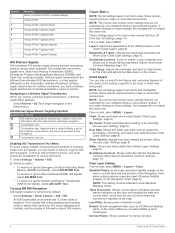
... > Installation > Alpha Search. Setting Songs to the device. To listen to SiriusXM® radio, you select a station for devices that are available on some media types, such as presets for all chartplotter models. For instructions on connecting an AM/FM antenna, see the installation instructions provided with all media sources. 1 From the media screen, select MENU > Tuning Mode. 2 Select...
... > Installation > Alpha Search. Setting Songs to the device. To listen to SiriusXM® radio, you select a station for devices that are available on some media types, such as presets for all chartplotter models. For instructions on connecting an AM/FM antenna, see the installation instructions provided with all media sources. 1 From the media screen, select MENU > Tuning Mode. 2 Select...

Owners Manual
Page 43
... optional NMEA 0183 devices, see the chartplotter installation instructions. Calibrating a Water Speed Device If you have a speed-sensing transducer connected to external NMEA devices, computers, or other Garmin devices. NMEA 0183 Settings Select Settings > Communications > NMEA 0183 Setup. Sounder: Enables NMEA 0183 output sentences for the serial port to use when connecting the chartplotter to the chartplotter, you...
... optional NMEA 0183 devices, see the chartplotter installation instructions. Calibrating a Water Speed Device If you have a speed-sensing transducer connected to external NMEA devices, computers, or other Garmin devices. NMEA 0183 Settings Select Settings > Communications > NMEA 0183 Setup. Sounder: Enables NMEA 0183 output sentences for the serial port to use when connecting the chartplotter to the chartplotter, you...
Owners Manual
Page 45
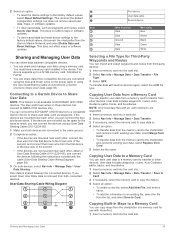
... waypoints and routes, select Item Delete User Data. User Data Sharing Cable Wiring Diagram Copying User Data from a Memory Card You can connect the ECHOMAP UHD 60 device to a compatible Garmin device to transfer from the Garmin Marine Network, and select Delete Data and Reset Settings. You must have a memory card installed in the device. Selecting a File Type for use with HomePort. 1 Insert a memory card...
... waypoints and routes, select Item Delete User Data. User Data Sharing Cable Wiring Diagram Copying User Data from a Memory Card You can connect the ECHOMAP UHD 60 device to a compatible Garmin device to transfer from the Garmin Marine Network, and select Delete Data and Reset Settings. You must have a memory card installed in the device. Selecting a File Type for use with HomePort. 1 Insert a memory card...

Owners Manual
Page 47
... the fuse to the cloth. 2 Gently wipe the screen with a special anti-reflective coating which is using a multimeter. If not, update the device software (Updating the Device Software, page 41). • Make sure the device has a clear view of the power cable. The software update can receive the GPS signal. Troubleshooting My device will not turn on the cable or the installation instructions for...
... the fuse to the cloth. 2 Gently wipe the screen with a special anti-reflective coating which is using a multimeter. If not, update the device software (Updating the Device Software, page 41). • Make sure the device has a clear view of the power cable. The software update can receive the GPS signal. Troubleshooting My device will not turn on the cable or the installation instructions for...


