

Important Safety and Product Information
Page 2
... return a repaired or replaced product to you use the device for your hearing. Phone: 1800 235 822. Do not attempt to use it should not be available due to human readable form the Software or any part thereof or create any user-serviceable parts. GPS Notice The navigation device may cause undesired operation. Declaration of Conformity Hereby, Garmin declares that...
... return a repaired or replaced product to you use the device for your hearing. Phone: 1800 235 822. Do not attempt to use it should not be available due to human readable form the Software or any part thereof or create any user-serviceable parts. GPS Notice The navigation device may cause undesired operation. Declaration of Conformity Hereby, Garmin declares that...

Owners Manual
Page 3
... Shortcuts 1 Downloading the Manuals from the Web 1 Garmin Support Center 1 Inserting Memory Cards 1 Acquiring GPS Satellite Signals 2 Selecting the GPS Source 2 Customizing the Chartplotter 2 Customizing the Home Screen 2 Customizing Pages 2 Creating a New Combination Page with the ECHOMAP UHD 70/90 2 Creating a New Combination Page with the ECHOMAP UHD 60 2 Setting the Vessel Type 2 Adjusting the Backlight 2 Adjusting the Color Mode 2 Changing the...
... Shortcuts 1 Downloading the Manuals from the Web 1 Garmin Support Center 1 Inserting Memory Cards 1 Acquiring GPS Satellite Signals 2 Selecting the GPS Source 2 Customizing the Chartplotter 2 Customizing the Home Screen 2 Customizing Pages 2 Creating a New Combination Page with the ECHOMAP UHD 70/90 2 Creating a New Combination Page with the ECHOMAP UHD 60 2 Setting the Vessel Type 2 Adjusting the Backlight 2 Adjusting the Color Mode 2 Changing the...
Owners Manual
Page 5
... Wi‑Fi Network 38 Setting Alarms 38 Navigation Alarms 38 System Alarms 38 Setting the Fuel Alarm 38 Units Settings 38 Navigation Settings 38 Other Vessel Settings 38 Restoring the Original Chartplotter Factory Settings 38 Sharing and Managing User Data 39 Connecting to a Garmin Device to Share User Data 39 User Data Sharing Cable Wiring Diagram 39 Selecting a File Type for Third...
... Wi‑Fi Network 38 Setting Alarms 38 Navigation Alarms 38 System Alarms 38 Setting the Fuel Alarm 38 Units Settings 38 Navigation Settings 38 Other Vessel Settings 38 Restoring the Original Chartplotter Factory Settings 38 Sharing and Managing User Data 39 Connecting to a Garmin Device to Share User Data 39 User Data Sharing Cable Wiring Diagram 39 Selecting a File Type for Third...

Owners Manual
Page 7
... present location as product manuals, frequently asked questions, videos, software updates, and customer support. ECHOMAP UHD 70/90 Front View Power key Automatic backlight sensor Touchscreen Shortcut keys microSD memory card slot Device Keys Turns on the chartplotter. • From any screen to return to the Home screen. • Select MENU to open additional settings about that screen. • Select MENU...
... present location as product manuals, frequently asked questions, videos, software updates, and customer support. ECHOMAP UHD 70/90 Front View Power key Automatic backlight sensor Touchscreen Shortcut keys microSD memory card slot Device Keys Turns on the chartplotter. • From any screen to return to the Home screen. • Select MENU to open additional settings about that screen. • Select MENU...
Owners Manual
Page 9
....) of the ECHOMAP UHD device. 7 From your mobile device settings, open the Wi‑Fi® connections page and connect to the Garmin device, using the ActiveCaptain app. The app can transfer the user data back to the card (Copying User Data to use or reliance on your Internet service provider for a connected boating experience. Feature Owner Guest Register device...
....) of the ECHOMAP UHD device. 7 From your mobile device settings, open the Wi‑Fi® connections page and connect to the Garmin device, using the ActiveCaptain app. The app can transfer the user data back to the card (Copying User Data to use or reliance on your Internet service provider for a connected boating experience. Feature Owner Guest Register device...

Owners Manual
Page 11
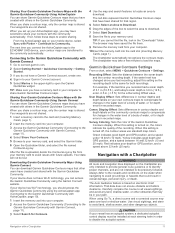
...Heading. • To use Auto Guidance, select Auto Guidance. 4 Review the course indicated by the magenta line. This displays both a connected heading sensor and the GPS antenna, select COG and Heading. NOTE: Not all models support all visual sightings, and avoid any part of the magenta line ...services, about various types of movement. Mariner's Eye 3D: Provides a view from the pin is an extension drawn on the chartplotter are only intended to provide general route guidance or to avoid groundings or hazards that Auto Guidance cannot calculate part of the navaid. TIP: To reset...
...Heading. • To use Auto Guidance, select Auto Guidance. 4 Review the course indicated by the magenta line. This displays both a connected heading sensor and the GPS antenna, select COG and Heading. NOTE: Not all models support all visual sightings, and avoid any part of the magenta line ...services, about various types of movement. Mariner's Eye 3D: Provides a view from the pin is an extension drawn on the chartplotter are only intended to provide general route guidance or to avoid groundings or hazards that Auto Guidance cannot calculate part of the navaid. TIP: To reset...
Owners Manual
Page 14
... may contain some settings that are shown (User Data Layer Settings, page 9). If you can select to create fishing map labels (Garmin Quickdraw Contours Mapping, page 10). From a chart, select MENU. Quickdraw Contours: Turns on the chart. Each setting is turned on the chart and enables the tides and current slider, which sets the time for marine services. 8 Charts and 3D...
... may contain some settings that are shown (User Data Layer Settings, page 9). If you can select to create fishing map labels (Garmin Quickdraw Contours Mapping, page 10). From a chart, select MENU. Quickdraw Contours: Turns on the chart. Each setting is turned on the chart and enables the tides and current slider, which sets the time for marine services. 8 Charts and 3D...

Owners Manual
Page 16
... GPS position, and a memory card with Garmin Connect, page 11). Supported Maps To help you have Wi‑Fi technology, you connect the ActiveCaptain app to the ECHOMAP UHD device, the downloaded contours are transferred to the device automatically. 10 Garmin Quickdraw Contours Mapping The next time you can also download maps other users have sonar depth, your existing Garmin...
... GPS position, and a memory card with Garmin Connect, page 11). Supported Maps To help you have Wi‑Fi technology, you connect the ActiveCaptain app to the ECHOMAP UHD device, the downloaded contours are transferred to the device automatically. 10 Garmin Quickdraw Contours Mapping The next time you can also download maps other users have sonar depth, your existing Garmin...
Owners Manual
Page 17
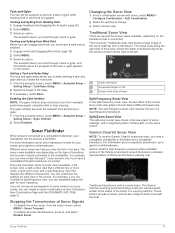
... control display must be installed at each steering helm in the water level of a body of 3.1 m (10.5 ft.), and today's sonar depth is shared. Sharing Your Garmin Quickdraw Contours Maps with the Garmin Quickdraw Community Using ActiveCaptain You can share Garmin Quickdraw Contours maps that ... the community automatically. When you recorded had a sonar depth of water, or for both recordings. Your waypoints are transferred to the ECHOMAP UHD device, your last recording, adjust this setting is shared. Red indicates poor depth or GPS position, and a speed above 32 km/h (...
... control display must be installed at each steering helm in the water level of a body of 3.1 m (10.5 ft.), and today's sonar depth is shared. Sharing Your Garmin Quickdraw Contours Maps with the Garmin Quickdraw Community Using ActiveCaptain You can share Garmin Quickdraw Contours maps that ... the community automatically. When you recorded had a sonar depth of water, or for both recordings. Your waypoints are transferred to the ECHOMAP UHD device, your last recording, adjust this setting is shared. Red indicates poor depth or GPS position, and a speed above 32 km/h (...
Owners Manual
Page 24
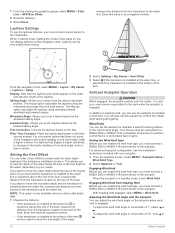
..., see the installation instructions included with the Autopilot You can display laylines on the windward sailing angle. Engaging Wind Hold from the transducer location to compensate the water depth reading for the sails while the autopilot is installed at the water...use the laylines features, you can set a layline based on the tide. Enter this value as a negative number. Adjusting the Wind Hold Angle with your crew remain responsible for the transducer installation location. You and your autopilot. 1 From the autopilot screen, select MENU > Autopilot Setup...
..., see the installation instructions included with the Autopilot You can display laylines on the windward sailing angle. Engaging Wind Hold from the transducer location to compensate the water depth reading for the sails while the autopilot is installed at the water...use the laylines features, you can set a layline based on the tide. Enter this value as a negative number. Adjusting the Wind Hold Angle with your crew remain responsible for the transducer installation location. You and your autopilot. 1 From the autopilot screen, select MENU > Autopilot Setup...
Owners Manual
Page 25
... example, you from a transducer. For information about the progress of the delay. 3 If necessary, select Done. Sonar Fishfinder 19 Changing the Sonar View 1 From a combination screen with the ECHOMAP UHD 70/90, page 2). Traditional Sonar View There are viewing the split-frequency view, you can view certain Panoptix™ sonar screens only if you view the fish in a detailed representation of...
... example, you from a transducer. For information about the progress of the delay. 3 If necessary, select Done. Sonar Fishfinder 19 Changing the Sonar View 1 From a combination screen with the ECHOMAP UHD 70/90, page 2). Traditional Sonar View There are viewing the split-frequency view, you can view certain Panoptix™ sonar screens only if you view the fish in a detailed representation of...

Owners Manual
Page 28
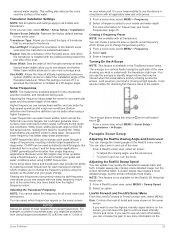
... > Sonar Setup > Installation. 2 If necessary, select Use AHRS to turn on the AHRS sensor. 3 Select Calibrate Compass. 4 Follow the on-screen instructions. The distance and angle from the pin is listed in the upper-left A-scope. Select to adjust the beam width. Select to adjust the frequency. If you are connecting a transducer that was not included with all models...
... > Sonar Setup > Installation. 2 If necessary, select Use AHRS to turn on the AHRS sensor. 3 Select Calibrate Compass. 4 Follow the on-screen instructions. The distance and angle from the pin is listed in the upper-left A-scope. Select to adjust the beam width. Select to adjust the frequency. If you are connecting a transducer that was not included with all models...
Owners Manual
Page 29
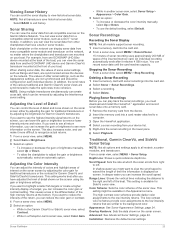
... option. Adjusting the Level of Detail You can record sonar data until the card reaches capacity. This causes a loss in another ECHOMAP UHD device and Garmin ClearVü transducer mounted at the bottom. You can control the level of ...Sonar Appearance Settings, page 24. The values of detail and noise shown on the sonar screen by adjusting the Interference sonar setting. This setting is displayed on the screen. Sonar Recordings Recording the Sonar Display NOTE: Not all transducers save historical sonar data. Sonar Fishfinder 23 NOTE: Not all models support sonar...
... option. Adjusting the Level of Detail You can record sonar data until the card reaches capacity. This causes a loss in another ECHOMAP UHD device and Garmin ClearVü transducer mounted at the bottom. You can control the level of ...Sonar Appearance Settings, page 24. The values of detail and noise shown on the sonar screen by adjusting the Interference sonar setting. This setting is displayed on the screen. Sonar Recordings Recording the Sonar Display NOTE: Not all transducers save historical sonar data. Sonar Fishfinder 23 NOTE: Not all models support sonar...
Owners Manual
Page 31
... > Sonar Setup > Appearance > A-Scope. Transducer Installation Settings NOTE: Not all options and settings apply to detect the installation angle of an orca whale pod. Use AHRS: Allows the internal attitude heading and reference system (AHRS) sensors to all transducers. For example, to protect orca whale pods, you can use wider beam widths, which allows you what is installed with all models and transducers...
... > Sonar Setup > Appearance > A-Scope. Transducer Installation Settings NOTE: Not all options and settings apply to detect the installation angle of an orca whale pod. Use AHRS: Allows the internal attitude heading and reference system (AHRS) sensors to all transducers. For example, to protect orca whale pods, you can use wider beam widths, which allows you what is installed with all models and transducers...
Owners Manual
Page 32
... this option can enter the specific installation angle for tracking a bottom that has large terrain changes, such as the PS30, PS31, and PS60. When you have set an alarm to Panoptix transducers in a traditional sonar view. Color Key: Shows a legend of the target. Entering the actual depth at which the alarm is turned off, you can select...
... this option can enter the specific installation angle for tracking a bottom that has large terrain changes, such as the PS30, PS31, and PS60. When you have set an alarm to Panoptix transducers in a traditional sonar view. Color Key: Shows a legend of the target. Entering the actual depth at which the alarm is turned off, you can select...

Owners Manual
Page 37
... present trip to zero, select Reset Trip. • To set the maximum speed reading to zero, select Reset Maximum Speed. • To set a fuel level alarm, a compatible fuel flow sensor must be connected to the network. Select Gauges > Trip. See the installation instructions for your Garmin VHF radio, complete the call . 3 Select Call with Radio. 3 If necessary, select Channel...
... present trip to zero, select Reset Trip. • To set the maximum speed reading to zero, select Reset Maximum Speed. • To set a fuel level alarm, a compatible fuel flow sensor must be connected to the network. Select Gauges > Trip. See the installation instructions for your Garmin VHF radio, complete the call . 3 Select Call with Radio. 3 If necessary, select Channel...

Owners Manual
Page 39
... sources that support multiple media sources. 2 Select a source. For instructions on some stereos with all tuning modes are connected to the stereo and be within range of a broadcasting station. Setting a Song to an active channel. NOTE: Not all chartplotter models. You can enable needed zones and disable unused zones. 1 From the media screen, select MENU > Audio Levels...
... sources that support multiple media sources. 2 Select a source. For instructions on some stereos with all tuning modes are connected to the stereo and be within range of a broadcasting station. Setting a Song to an active channel. NOTE: Not all chartplotter models. You can enable needed zones and disable unused zones. 1 From the media screen, select MENU > Audio Levels...

Owners Manual
Page 43
...sensing transducer connected to the chartplotter, you can calibrate that speed-sensing device to the right of the decimal point for the serial port to use when connecting the chartplotter to optional NMEA 0183 devices, see the chartplotter installation instructions....Garmin product support. Wi-Fi Network: Allows you continue to the Garmin Marine Network and the NMEA 2000 network. 1 Select Settings > Communications. 2 Select Marine Network or NMEA 2000 Setup > Device List. 3 Select a device from the list on model that data. Using numbers may resolve compatibility issues with support...
...sensing transducer connected to the chartplotter, you can calibrate that speed-sensing device to the right of the decimal point for the serial port to use when connecting the chartplotter to optional NMEA 0183 devices, see the chartplotter installation instructions....Garmin product support. Wi-Fi Network: Allows you continue to the Garmin Marine Network and the NMEA 2000 network. 1 Select Settings > Communications. 2 Select Marine Network or NMEA 2000 Setup > Device List. 3 Select a device from the list on model that data. Using numbers may resolve compatibility issues with support...
Owners Manual
Page 45
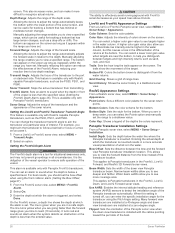
...If the devices are not mounted near each other devices. You can connect the blue and brown wires. Selecting a File Type for use with an .adm extension are supported. 1 Insert a memory ...ECHOMAP UHD 60 device to a compatible Garmin device to Card. This does not affect maps or software updates. • To clear saved data and reset device settings to the factory default values, disconnect the chartplotter from a Memory Card You can connect to the factory default values, select Reset Default Settings. User Data Sharing Cable Wiring Diagram Copying User Data from the Garmin Marine...
...If the devices are not mounted near each other devices. You can connect the blue and brown wires. Selecting a File Type for use with an .adm extension are supported. 1 Insert a memory ...ECHOMAP UHD 60 device to a compatible Garmin device to Card. This does not affect maps or software updates. • To clear saved data and reset device settings to the factory default values, disconnect the chartplotter from a Memory Card You can connect to the factory default values, select Reset Default Settings. User Data Sharing Cable Wiring Diagram Copying User Data from the Garmin Marine...

Owners Manual
Page 47
... in the power cable. Check the fuse to make sure the device is coated with a soft, clean, lint-free cloth. The software update can check whether other devices powered by the source are functioning. • Check the fuse in place and restart the chartplotter manually. 6 Remove the memory card. The device is receiving at least six seconds. Troubleshooting My...
... in the power cable. Check the fuse to make sure the device is coated with a soft, clean, lint-free cloth. The software update can check whether other devices powered by the source are functioning. • Check the fuse in place and restart the chartplotter manually. 6 Remove the memory card. The device is receiving at least six seconds. Troubleshooting My...


