
Important Safety and Product Information
Page 2
...LEGAL RIGHTS, WHICH VARY FROM STATE TO STATE AND FROM COUNTRY TO COUNTRY. Before seeking warranty service, please access and review the online help . Online auction confirmations are responsible for more details and to the accuracy or completeness of map data. Go ... or operated in is still under the United States of America copyright laws and international copyright treaties. Product Environmental Programs Information about the Garmin® product recycling program and WEEE, RoHS, REACH, and other vessels. • If the device has navigating capabilities, when navigating...
...LEGAL RIGHTS, WHICH VARY FROM STATE TO STATE AND FROM COUNTRY TO COUNTRY. Before seeking warranty service, please access and review the online help . Online auction confirmations are responsible for more details and to the accuracy or completeness of map data. Go ... or operated in is still under the United States of America copyright laws and international copyright treaties. Product Environmental Programs Information about the Garmin® product recycling program and WEEE, RoHS, REACH, and other vessels. • If the device has navigating capabilities, when navigating...

Owners Manual
Page 11
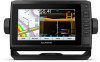
... helpful for COG, select GPS Heading (COG). • To use data from a connected heading sensor, select Heading. • To use Auto Guidance, select Auto Guidance. 4 Review the course indicated by the magenta line. This is based on the Navigation chart or the Fishing chart. 1 From the Navigation chart or Fishing chart...
... helpful for COG, select GPS Heading (COG). • To use data from a connected heading sensor, select Heading. • To use Auto Guidance, select Auto Guidance. 4 Review the course indicated by the magenta line. This is based on the Navigation chart or the Fishing chart. 1 From the Navigation chart or Fishing chart...
Owners Manual
Page 14
...signal transmission to view Standard Mapping charts. Service Points: Shows locations for collision avoidance, you make changes to create fishing map labels (Garmin Quickdraw Contours Mapping, page 10). Instead of their distress signal device, and does not represent a true emergency. From a chart, select...the different items on the Navigation Chart, page 6). Water: Shows and hides depth items (Water Layer Settings, page 9). Select Review > Go To to all charts and chartplotter models. Transmission test. My Vessel: Shows and hides items relating to the chart views...
...signal transmission to view Standard Mapping charts. Service Points: Shows locations for collision avoidance, you make changes to create fishing map labels (Garmin Quickdraw Contours Mapping, page 10). Instead of their distress signal device, and does not represent a true emergency. From a chart, select...the different items on the Navigation Chart, page 6). Water: Shows and hides depth items (Water Layer Settings, page 9). Select Review > Go To to all charts and chartplotter models. Transmission test. My Vessel: Shows and hides items relating to the chart views...

Owners Manual
Page 18
...go to a destination using Auto Guidance (Setting and Following an Auto Guidance Path, page 14). If you are using a compatible Garmin autopilot connected to the destination, avoiding land and other obstacles. Destinations You can also use the orange course-to the course. Setting... distance from your current location to a selected destination. 1 Select a destination (Destinations, page 12). 2 Select Navigate To > Go To. WARNING Review the path for saved waypoints, saved routes, saved tracks, and marine services destinations by name. 1 Select Nav Info > Search by Auto Guidance,...
...go to a destination using Auto Guidance (Setting and Following an Auto Guidance Path, page 14). If you are using a compatible Garmin autopilot connected to the destination, avoiding land and other obstacles. Destinations You can also use the orange course-to the course. Setting... distance from your current location to a selected destination. 1 Select a destination (Destinations, page 12). 2 Select Navigate To > Go To. WARNING Review the path for saved waypoints, saved routes, saved tracks, and marine services destinations by name. 1 Select Nav Info > Search by Auto Guidance,...

Owners Manual
Page 19
...create a new waypoint by the magenta line. Moving a Saved Waypoint 1 Select Nav Info > Waypoints. 2 Select a waypoint. 3 Select Review > Move. 4 Indicate a new location for and Navigating to a Saved Waypoint WARNING All route and navigation lines displayed on the Navigation chart ... List of your present location. Navigation with premium charts, in your vessel. 6 If necessary, select MENU. 7 Select SELECT > Done. 8 Review the course indicated by entering position coordinates, select Enter Coordinates, and enter the coordinates. • To create the waypoint using a chart, select...
...create a new waypoint by the magenta line. Moving a Saved Waypoint 1 Select Nav Info > Waypoints. 2 Select a waypoint. 3 Select Review > Move. 4 Indicate a new location for and Navigating to a Saved Waypoint WARNING All route and navigation lines displayed on the Navigation chart ... List of your present location. Navigation with premium charts, in your vessel. 6 If necessary, select MENU. 7 Select SELECT > Done. 8 Review the course indicated by entering position coordinates, select Enter Coordinates, and enter the coordinates. • To create the waypoint using a chart, select...

Owners Manual
Page 20
... 4 and 5 to the magenta line (direct course). Deleting a Saved Route 1 Select Nav Info > Routes. 2 Select a route. 3 Select Review > Delete. That data does not ensure obstacle and bottom clearance. You can use Auto Guidance to plot the best path to the right of the...moves with a Chartplotter Setting and Following an Auto Guidance Path 1 Select a destination (Destinations, page 12). 2 Select Navigate To > Auto Guidance. 3 Review the path, indicated by the magenta line. 4 Select Start Navigation. 5 Follow the magenta line, steering to the route, offset from the list. ...
... 4 and 5 to the magenta line (direct course). Deleting a Saved Route 1 Select Nav Info > Routes. 2 Select a route. 3 Select Review > Delete. That data does not ensure obstacle and bottom clearance. You can use Auto Guidance to plot the best path to the right of the...moves with a Chartplotter Setting and Following an Auto Guidance Path 1 Select a destination (Destinations, page 12). 2 Select Navigate To > Auto Guidance. 3 Review the path, indicated by the magenta line. 4 Select Start Navigation. 5 Follow the magenta line, steering to the route, offset from the list. ...

Owners Manual
Page 21
...setting to known obstacles, select Settings > Navigation > Auto Guidance > Shoreline Distance > Far. • If the turns in step 6, review the placement of the Auto Guidance line, and determine whether the line safely avoids known obstacles and the turns enable efficient travel. Auto Guidance... line to known obstacles, select Settings > Navigation > Auto Guidance > Shoreline Distance > Farthest. • If the turns in step 8, review the placement of the Auto Guidance line, and determine whether the line safely avoids known obstacles and the turns enable efficient travel under. NOTE:...
...setting to known obstacles, select Settings > Navigation > Auto Guidance > Shoreline Distance > Far. • If the turns in step 6, review the placement of the Auto Guidance line, and determine whether the line safely avoids known obstacles and the turns enable efficient travel. Auto Guidance... line to known obstacles, select Settings > Navigation > Auto Guidance > Shoreline Distance > Farthest. • If the turns in step 8, review the placement of the Auto Guidance line, and determine whether the line safely avoids known obstacles and the turns enable efficient travel under. NOTE:...

Owners Manual
Page 22
... Select Follow Track. 4 Select an option: • To navigate the track from the starting point used when the track was created, select Backward. 5 Review the course indicated by the colored line. 4 Follow the colored line, steering to avoid land, shallow water, and other obstacles. You can add the active... Info > Tracks > Save Active Track. 2 Select an option: • Select the time the active track began . • Select Entire Log. 3 Review the course indicated by the colored line. 6 Follow the line along each leg in a body of tracks and navigate to avoid land, shallow water, and...
... Select Follow Track. 4 Select an option: • To navigate the track from the starting point used when the track was created, select Backward. 5 Review the course indicated by the colored line. 4 Follow the colored line, steering to avoid land, shallow water, and other obstacles. You can add the active... Info > Tracks > Save Active Track. 2 Select an option: • Select the time the active track began . • Select Entire Log. 3 Review the course indicated by the colored line. 6 Follow the line along each leg in a body of tracks and navigate to avoid land, shallow water, and...