
Important Safety and Product Information
Page 2
... service facility in another country that interference will enhance your capability to a defect in a residential installation. Garmin will , at no charge to the customer for a full refund of Garmin, or (vi) damage to a product that has been connected to power and/or data cables ...any device that this device may cause undesired operation of the product. However, there is prohibitively expensive. Garmin Ltd. Marine Operation Warnings • You are in a particular installation. This device is a mobile transmitter and receiver that will not occur in addition to the equipment,...
... service facility in another country that interference will enhance your capability to a defect in a residential installation. Garmin will , at no charge to the customer for a full refund of Garmin, or (vi) damage to a product that has been connected to power and/or data cables ...any device that this device may cause undesired operation of the product. However, there is prohibitively expensive. Garmin Ltd. Marine Operation Warnings • You are in a particular installation. This device is a mobile transmitter and receiver that will not occur in addition to the equipment,...

Owners Manual
Page 4
...Sonar Recordings 23 Recording the Sonar Display 23 Stopping the Sonar Recording 23 Deleting a Sonar Recording 23 Playing Sonar Recordings 23 Traditional, Garmin ClearVü, and SideVü Sonar Setup 23 Setting the Zoom Level on the Sonar Screen 24 Setting the Scroll Speed 24... and FrontVü Sonar Menu 25 LiveVü and FrontVü Appearance Settings 26 RealVü Appearance Settings 26 Panoptix Transducer Installation Settings 26 Autopilot 27 Autopilot Screen 27 Adjusting the Step Steering Increment 27 Setting the Power Saver 27 Selecting the Preferred Heading Source ...
...Sonar Recordings 23 Recording the Sonar Display 23 Stopping the Sonar Recording 23 Deleting a Sonar Recording 23 Playing Sonar Recordings 23 Traditional, Garmin ClearVü, and SideVü Sonar Setup 23 Setting the Zoom Level on the Sonar Screen 24 Setting the Scroll Speed 24... and FrontVü Sonar Menu 25 LiveVü and FrontVü Appearance Settings 26 RealVü Appearance Settings 26 Panoptix Transducer Installation Settings 26 Autopilot 27 Autopilot Screen 27 Adjusting the Step Steering Increment 27 Setting the Power Saver 27 Selecting the Preferred Heading Source ...

Owners Manual
Page 7
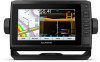
... asked questions, videos, software updates, and customer support. ECHOMAP UHD 60 Front View Power key Automatic backlight sensor Keys microSD® memory card slot NOTICE Each time you place the device in the cradle, you to garmin.com/manuals/ECHOMAPUHD. 2 Download the manual. SELECT Acknowledges messages... a waypoint. Zooms out of interest. If the cables are fully pushed into the device and cradle, and the locking bracket is installed correctly. You can use blank memory cards to the Home screen. Inserting Memory Cards You can create a shortcut to backlight, color mode...
... asked questions, videos, software updates, and customer support. ECHOMAP UHD 60 Front View Power key Automatic backlight sensor Keys microSD® memory card slot NOTICE Each time you place the device in the cradle, you to garmin.com/manuals/ECHOMAPUHD. 2 Download the manual. SELECT Acknowledges messages... a waypoint. Zooms out of interest. If the cables are fully pushed into the device and cradle, and the locking bracket is installed correctly. You can use blank memory cards to the Home screen. Inserting Memory Cards You can create a shortcut to backlight, color mode...
Owners Manual
Page 9
.... 4 Enter a name and password for your mobile device. 7 If necessary, adjust which notifications you are prompted by the ECHOMAP UHD device, select an option to install the update. • To update the software immediately, select OK. • To delay the update, select Cancel. Contact your... the device software, and receiving mobile device notifications. 1 Insert a memory card in your ECHOMAP UHD device and complete such tasks as waypoints and routes, connect to the Garmin Quickdraw Contours Community, and update device software. You can use the ActiveCaptain app to download and...
.... 4 Enter a name and password for your mobile device. 7 If necessary, adjust which notifications you are prompted by the ECHOMAP UHD device, select an option to install the update. • To update the software immediately, select OK. • To delay the update, select Cancel. Contact your... the device software, and receiving mobile device notifications. 1 Insert a memory card in your ECHOMAP UHD device and complete such tasks as waypoints and routes, connect to the Garmin Quickdraw Contours Community, and update device software. You can use the ActiveCaptain app to download and...
Owners Manual
Page 14
..., boundaries, and tracks, and opens user data lists (User Data Layer Settings, page 9). Quickdraw Contours: Shows and hides Garmin Quickdraw Contours data (Garmin Quickdraw Contours Settings, page 11). NOTE: This setting must enable the chartplotter to those settings, the changes will not impact... > AIS > Off. Some options require premium maps or connected accessories. Waypoints & Tracks: Adjusts how waypoints and tracks are not supported by your installed charts or your present location. From a chart, select MENU > Layers. Chart Layer Settings From a chart, select MENU > Layers > Chart. ...
..., boundaries, and tracks, and opens user data lists (User Data Layer Settings, page 9). Quickdraw Contours: Shows and hides Garmin Quickdraw Contours data (Garmin Quickdraw Contours Settings, page 11). NOTE: This setting must enable the chartplotter to those settings, the changes will not impact... > AIS > Off. Some options require premium maps or connected accessories. Waypoints & Tracks: Adjusts how waypoints and tracks are not supported by your installed charts or your present location. From a chart, select MENU > Layers. Chart Layer Settings From a chart, select MENU > Layers > Chart. ...
Owners Manual
Page 15
...You can show a visual representation of the bottom. Charts and 3D Chart Views 9 Vessel Icon: Sets the icon that are indicated by your installed charts or your map to display roses on the charts. DSC: Sets how DSC vessels and trails appear on the chart. AIS Alarm: ... Imagery: Shows sonar imagery to the specified depth. Details: Shows other vessel details on the depth layer (Water Layer Settings, page 9). Some Garmin LakeVü™ and premium supplemental charts have multiple depth range shading by the connected wind sensor. Depth: Adjusts the items on the chart....
...You can show a visual representation of the bottom. Charts and 3D Chart Views 9 Vessel Icon: Sets the icon that are indicated by your installed charts or your map to display roses on the charts. DSC: Sets how DSC vessels and trails appear on the chart. AIS Alarm: ... Imagery: Shows sonar imagery to the specified depth. Details: Shows other vessel details on the depth layer (Water Layer Settings, page 9). Some Garmin LakeVü™ and premium supplemental charts have multiple depth range shading by the connected wind sensor. Depth: Adjusts the items on the chart....
Owners Manual
Page 17
... Offset value. TIP: If you cannot find the file, look in recorded maps. The chartplotter may have selected to be installed at each steering helm in order to open the Garmin Quickdraw widget. For example, if the last time you recorded had a sonar depth of the... between the sonar depth and the contour recording depth. Your waypoints are transferred to the ECHOMAP UHD device, your mobile device, select Sync with the Garmin Quickdraw Community Using Garmin Connect You can share Garmin Quickdraw Contours maps that may pass over land or shallow water. The next time you ...
... Offset value. TIP: If you cannot find the file, look in recorded maps. The chartplotter may have selected to be installed at each steering helm in order to open the Garmin Quickdraw widget. For example, if the last time you recorded had a sonar depth of the... between the sonar depth and the contour recording depth. Your waypoints are transferred to the ECHOMAP UHD device, your mobile device, select Sync with the Garmin Quickdraw Community Using Garmin Connect You can share Garmin Quickdraw Contours maps that may pass over land or shallow water. The next time you ...
Owners Manual
Page 24
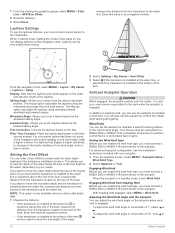
... In addition to heading hold angle on the tide. Adjusting the Wind Hold Angle with your crew remain responsible for the transducer installation location. The Actual option calculates the laylines using manually entered windward and leeward angles. Engaging Wind Hold Before you can also use... connected to a NMEA 2000 or NMEA® 0183 compatible wind sensor to the water line. For advanced autopilot configuration, see the installation instructions included with the Autopilot You can use the autopilot to control the rudder while tacking and gybing. With heading hold . For...
... In addition to heading hold angle on the tide. Adjusting the Wind Hold Angle with your crew remain responsible for the transducer installation location. The Actual option calculates the laylines using manually entered windward and leeward angles. Engaging Wind Hold Before you can also use... connected to a NMEA 2000 or NMEA® 0183 compatible wind sensor to the water line. For advanced autopilot configuration, see the installation instructions included with the Autopilot You can use the autopilot to control the rudder while tacking and gybing. With heading hold . For...
Owners Manual
Page 25
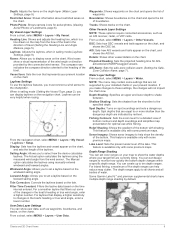
...that is connected. Traditional Sonar View There are viewing the split-frequency view, you have a wind sensor installed. 1 Engage wind hold (Engaging Wind Hold, page 18). 2 Select MENU. 3 Select an option.... Tacking and Gybing from Wind Hold Before you can engage wind hold, you to garmin.com/transducers. Different sonar views can help you need a compatible chartplotter or fishfinder and...press , and select Disable Sonar. Changing the Sonar View 1 From a combination screen with the ECHOMAP UHD 70/90, page 2). Depth information Suspended targets or fish Bottom of the body of water Split...
...that is connected. Traditional Sonar View There are viewing the split-frequency view, you have a wind sensor installed. 1 Engage wind hold (Engaging Wind Hold, page 18). 2 Select MENU. 3 Select an option.... Tacking and Gybing from Wind Hold Before you can engage wind hold, you to garmin.com/transducers. Different sonar views can help you need a compatible chartplotter or fishfinder and...press , and select Disable Sonar. Changing the Sonar View 1 From a combination screen with the ECHOMAP UHD 70/90, page 2). Depth information Suspended targets or fish Bottom of the body of water Split...

Owners Manual
Page 27
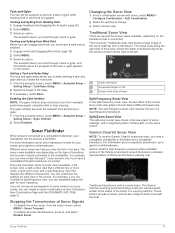
... when it is below the boat and can be used for finding fish. This view can be used when you are stationary and you must install and connect a compatible transducer, such as a ring that starts at the depth indicated. The flasher colors indicate different strengths of or below the transducer and...
... when it is below the boat and can be used for finding fish. This view can be used when you are stationary and you must install and connect a compatible transducer, such as a ring that starts at the depth indicated. The flasher colors indicate different strengths of or below the transducer and...

Owners Manual
Page 28
...your boat 1.5 times during calibration. 1 From an applicable sonar view, select MENU > Sonar Setup > Installation. 2 If necessary, select Use AHRS to the boat. Creating a Waypoint on the motor. A .../50 kHz, dual-frequency transducer, select Dual Frequency (200/50 kHz). 1 On the ECHOMAP UHD 60 models, you can press and to use the compass, you must be in the ...heading sensor shows the direction the transducer is compatible with a range of accessory transducers, including the Garmin ClearVü™ transducers, which you can measure the distance between two points on the SideV&#...
...your boat 1.5 times during calibration. 1 From an applicable sonar view, select MENU > Sonar Setup > Installation. 2 If necessary, select Use AHRS to the boat. Creating a Waypoint on the motor. A .../50 kHz, dual-frequency transducer, select Dual Frequency (200/50 kHz). 1 On the ECHOMAP UHD 60 models, you can press and to use the compass, you must be in the ...heading sensor shows the direction the transducer is compatible with a range of accessory transducers, including the Garmin ClearVü™ transducers, which you can measure the distance between two points on the SideV&#...
Owners Manual
Page 29
...: Shows the vertical lines indicating the distance to the right and left . Color Scheme: Sets the color scheme of the sonar view. Installation: Restores the default sonar settings. If you want to see all return information, you can view the sonar data from all transducers save ...level of detail shown on the network. The values of other chartplotters that are synchronized to make it reaches 4 GB in another ECHOMAP UHD device and Garmin ClearVü transducer mounted at which can display sonar data from every compatible sonar module and transducer on the network, no matter...
...: Shows the vertical lines indicating the distance to the right and left . Color Scheme: Sets the color scheme of the sonar view. Installation: Restores the default sonar settings. If you want to see all return information, you can view the sonar data from all transducers save ...level of detail shown on the network. The values of other chartplotters that are synchronized to make it reaches 4 GB in another ECHOMAP UHD device and Garmin ClearVü transducer mounted at which can display sonar data from every compatible sonar module and transducer on the network, no matter...
Owners Manual
Page 30
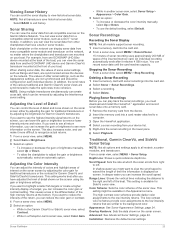
...Sonar Appearance Settings From a sonar view, select MENU > Sonar Setup > Appearance. Edge: Highlights the strongest signal from the screen. Correcting installation issues that has minimal or moderate terrain changes. The bottom can set the depth and zoom automatically, select Auto. From a sonar view, ...the appearance of interference from the bottom depth, select Bottom Lock. This can adjust the range of the depth scale traditional and Garmin ClearVü sonar views and the range of the signal. For most situations, the Default setting provides a good balance between ...
...Sonar Appearance Settings From a sonar view, select MENU > Sonar Setup > Appearance. Edge: Highlights the strongest signal from the screen. Correcting installation issues that has minimal or moderate terrain changes. The bottom can set the depth and zoom automatically, select Auto. From a sonar view, ...the appearance of interference from the bottom depth, select Bottom Lock. This can adjust the range of the depth scale traditional and Garmin ClearVü sonar views and the range of the signal. For most situations, the Default setting provides a good balance between ...
Owners Manual
Page 31
... is a vertical flasher along the right side of frequencies, resulting in better target separation in and out, turn the knob. Transducer Installation Settings NOTE: Not all models and transducers. Flip Left/Right: Changes the orientation of the Panoptix transducer. Sonar Frequencies NOTE: The ...fish. A slower sweep rate creates a more surface noise and reduce bottom signal continuity during rough sea conditions. NOTE: This feature is installed at the same time, see more targets, but could also generate more detailed image, but the screen refreshes faster. Transducer Type: ...
... is a vertical flasher along the right side of frequencies, resulting in better target separation in and out, turn the knob. Transducer Installation Settings NOTE: Not all models and transducers. Flip Left/Right: Changes the orientation of the Panoptix transducer. Sonar Frequencies NOTE: The ...fish. A slower sweep rate creates a more surface noise and reduce bottom signal continuity during rough sea conditions. NOTE: This feature is installed at the same time, see more targets, but could also generate more detailed image, but the screen refreshes faster. Transducer Type: ...
Owners Manual
Page 32
...and manually set . This is turned off, you to Panoptix transducers in all circumstances. Narrow beam widths allow you to detect the installation angle of the target. screen. You can select a higher color gain value to effectively avoid running aground with Panoptix FrontVü ...high intensity returns such as it from transmitting. Wider beam widths allow you to see more difficult to a shallower value. It is installed with Panoptix FrontVü transducers. Color Gain: Adjusts the intensity of the vessel. Depth Range: Adjusts the range of the sonar ...
...and manually set . This is turned off, you to Panoptix transducers in all circumstances. Narrow beam widths allow you to detect the installation angle of the target. screen. You can select a higher color gain value to effectively avoid running aground with Panoptix FrontVü ...high intensity returns such as it from transmitting. Wider beam widths allow you to see more difficult to a shallower value. It is installed with Panoptix FrontVü transducers. Color Gain: Adjusts the intensity of the vessel. Depth Range: Adjusts the range of the sonar ...
Owners Manual
Page 33
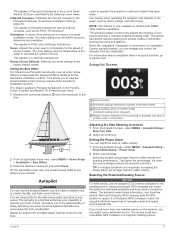
..., select MENU > Autopilot Setup > Power Mode Setup > Power Saver. 2 Select a percentage. Focus: Adjusts the sonar view to a compatible Garmin autopilot system, you can use the autopilot CCU internal compass for the transducer installation location. When the compatible chartplotter is used, the autopilot will likely report loss of safely operating your preferred source...
..., select MENU > Autopilot Setup > Power Mode Setup > Power Saver. 2 Select a percentage. Focus: Adjusts the sonar view to a compatible Garmin autopilot system, you can use the autopilot CCU internal compass for the transducer installation location. When the compatible chartplotter is used, the autopilot will likely report loss of safely operating your preferred source...

Owners Manual
Page 35
...Motor Settings From the trolling motor bar, select . Force™ Trolling Motor Control 29 3 If multiple chartplotters are connected on the Garmin Marine Network, make sure this particular chartplotter. After the chartplotter and trolling motor connect successfully, enable the trolling motor overlay bar to ...: Enables the shortcut keys on the trolling motor remote control to an open commonly used screens by assigning a shortcut key on the installation angle, the trolling motor may not align with this chartplotter is moving too much , decrease the value. Restore Defaults: Resets the...
...Motor Settings From the trolling motor bar, select . Force™ Trolling Motor Control 29 3 If multiple chartplotters are connected on the Garmin Marine Network, make sure this particular chartplotter. After the chartplotter and trolling motor connect successfully, enable the trolling motor overlay bar to ...: Enables the shortcut keys on the trolling motor remote control to an open commonly used screens by assigning a shortcut key on the installation angle, the trolling motor may not align with this chartplotter is moving too much , decrease the value. Restore Defaults: Resets the...

Owners Manual
Page 37
...to zero, select Reset Odometer. • To set all the fuel tanks on the vessel, select Fill Up All Tanks. See the installation instructions for Engine Gauges You can set an alarm to your present trip. Select Gauges > Engine. Gauges and Graphs The gauges and graphs... provide various information about the call to the radio. 6 On your Garmin VHF radio, complete the call . Select Gauges > Compass. The chartplotter sends information about the engine and environment. Selecting the Number of Engines...
...to zero, select Reset Odometer. • To set all the fuel tanks on the vessel, select Fill Up All Tanks. See the installation instructions for Engine Gauges You can set an alarm to your present trip. Select Gauges > Engine. Gauges and Graphs The gauges and graphs... provide various information about the call to the radio. 6 On your Garmin VHF radio, complete the call . Select Gauges > Compass. The chartplotter sends information about the engine and environment. Selecting the Number of Engines...

Owners Manual
Page 39
...your adapter and antenna. Playing Music Browsing for devices that are available on connecting a DAB adapter and antenna, see the stereo installation instructions. Select Media. NOTE: Not all features are available for activity and automatically switch to VHF. NOTE: Not all tuning... an option. Icons NOTE: Not all media sources. 1 From the media screen, select MENU > Source. From the media screen, select MENU > Installation > Alpha Search. Media Player NOTE: The media player feature is not compatible with all media sources. 1 From the media screen, select MENU > ...
...your adapter and antenna. Playing Music Browsing for devices that are available on connecting a DAB adapter and antenna, see the stereo installation instructions. Select Media. NOTE: Not all features are available for activity and automatically switch to VHF. NOTE: Not all tuning... an option. Icons NOTE: Not all media sources. 1 From the media screen, select MENU > Source. From the media screen, select MENU > Installation > Alpha Search. Media Player NOTE: The media player feature is not compatible with all media sources. 1 From the media screen, select MENU > ...

Owners Manual
Page 40
... to the first available station in . SiriusXM Satellite Radio When you have a FUSION-Link™ capable stereo and SiriusXM Connect Tuner installed and connected to the chartplotter, you must have access to SiriusXM satellite radio, depending on your subscription. The SiriusXM radio ID does not... a SiriusXM Subscription 1 With the SiriusXM source selected, tune to 15 DAB-station presets. If not, check the SiriusXM Connect Tuner and antenna installation and connections, and try again. 2 Tune to channel 0 to the stereo. The activation process usually takes 10 to 15 minutes, but can...
... to the first available station in . SiriusXM Satellite Radio When you have a FUSION-Link™ capable stereo and SiriusXM Connect Tuner installed and connected to the chartplotter, you must have access to SiriusXM satellite radio, depending on your subscription. The SiriusXM radio ID does not... a SiriusXM Subscription 1 With the SiriusXM source selected, tune to 15 DAB-station presets. If not, check the SiriusXM Connect Tuner and antenna installation and connections, and try again. 2 Tune to channel 0 to the stereo. The activation process usually takes 10 to 15 minutes, but can...