
Hardware Guide
Page 7
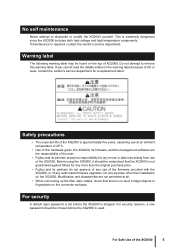
... a replacement label. Before using the XG2000, it should be chosen before the XG2000 is required, contact the vendor's service department. For Safe Use of the XG2000 5 This is used. Modification and disassemble are the responsibility of the user. • Fujitsu and its partners accept no dust,... from use of the firmware provided with the XG2000, or of any authorized firmware upgrades, for any use of the XG2000. If maintenance is shipped. No self maintenance Never attempt to remove this hardware guide, the XG2000, its firmware, and the management software are ...
... a replacement label. Before using the XG2000, it should be chosen before the XG2000 is required, contact the vendor's service department. For Safe Use of the XG2000 5 This is used. Modification and disassemble are the responsibility of the user. • Fujitsu and its partners accept no dust,... from use of the firmware provided with the XG2000, or of any authorized firmware upgrades, for any use of the XG2000. If maintenance is shipped. No self maintenance Never attempt to remove this hardware guide, the XG2000, its firmware, and the management software are ...
Hardware Guide
Page 10
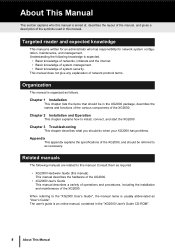
...manual is organized as follows. The user's guide is usually abbreviated as "User's Guide". Related manuals The following knowledge is written for an administrator who this manual) This manual describes the hardware of the XG2000. • XG2000 User's Guide This manual describes a variety of operations... and procedures, including the installation and maintenance of the XG2000. Consult them as necessary. Chapter 1 Installation This chapter ...
...manual is organized as follows. The user's guide is usually abbreviated as "User's Guide". Related manuals The following knowledge is written for an administrator who this manual) This manual describes the hardware of the XG2000. • XG2000 User's Guide This manual describes a variety of operations... and procedures, including the installation and maintenance of the XG2000. Consult them as necessary. Chapter 1 Installation This chapter ...
Hardware Guide
Page 20
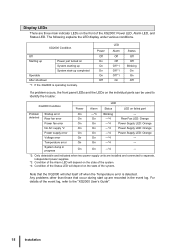
...LED will shut itself off when the Temperature error is operating normally. Note that occur during start -up completed Operable After shutdown *1: If the XG2000 is detected. On On ---*4 Rear Fan LED: Orange Power fan error On On ---*4 Power Supply LED: Orange No AC supply *2 On... recorded in progress On On ---*4 --- *2: Only detectable and indicated when two power supply units are installed and connected to the "XG2000 User's Guide". 18 Installation System dump in the event log. Display LEDs There are three main indicator LEDs on the state of the system. Any...
...LED will shut itself off when the Temperature error is operating normally. Note that occur during start -up completed Operable After shutdown *1: If the XG2000 is detected. On On ---*4 Rear Fan LED: Orange Power fan error On On ---*4 Power Supply LED: Orange No AC supply *2 On... recorded in progress On On ---*4 --- *2: Only detectable and indicated when two power supply units are installed and connected to the "XG2000 User's Guide". 18 Installation System dump in the event log. Display LEDs There are three main indicator LEDs on the state of the system. Any...

Hardware Guide
Page 27
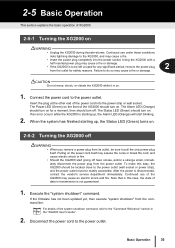
... described below. The following figures indicate examples of installation space is necessary. When installing in any other 19-inch rack, refer to the user guide provided with the rack. [540mm (W) X 850mm (D) 19-inch rack] (Unit: mm) 540 Front Service area (Front) Rack (Top... (Unit: mm) Front Service area (Front) Rack (Top) 800 950 Service area (Rear) 800 CAUTION The XG2000 may be reserved as a service area. Installation Procedure 25 Space requirements When installing the XG2000, a certain amount of a 540mm (W) × 850mm (D) 19-inch rack and a 700mm (W) × ...
... described below. The following figures indicate examples of installation space is necessary. When installing in any other 19-inch rack, refer to the user guide provided with the rack. [540mm (W) X 850mm (D) 19-inch rack] (Unit: mm) 540 Front Service area (Front) Rack (Top... (Unit: mm) Front Service area (Front) Rack (Top) 800 950 Service area (Rear) 800 CAUTION The XG2000 may be reserved as a service area. Installation Procedure 25 Space requirements When installing the XG2000, a certain amount of a 540mm (W) × 850mm (D) 19-inch rack and a 700mm (W) × ...
Hardware Guide
Page 37
... Basic Operation This section explains the basic operation of XG2000. 2-5-1 Turning the XG2000 on WARNING • Unplug the XG2000 during thunder-storms. Continued use of the XG2000 may cause an electric shock and fire. For details of data in Refer the "XG2000 User's Guide". 2. Failure to the power outlet (wall socket...) should turn on for safety reasons. Pulling on . To make this case, the state of the system shutdown command, refer to the XG2000, and may cause a fire. • Insert the power plug completely into the power strip or wall socket. Execute the "system shutdown"...
... Basic Operation This section explains the basic operation of XG2000. 2-5-1 Turning the XG2000 on WARNING • Unplug the XG2000 during thunder-storms. Continued use of the XG2000 may cause an electric shock and fire. For details of data in Refer the "XG2000 User's Guide". 2. Failure to the power outlet (wall socket...) should turn on for safety reasons. Pulling on . To make this case, the state of the system shutdown command, refer to the XG2000, and may cause a fire. • Insert the power plug completely into the power strip or wall socket. Execute the "system shutdown"...