
User Manual
Page 5
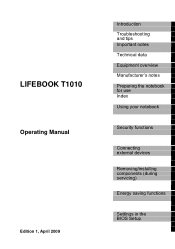
LIFEBOOK T1010 Operating Manual Edition 1, April 2009 Introduction Troubleshooting and tips Important notes Technical data Equipment overview Manufacturer's notes Preparing the notebook for use Index Using your notebook Security functions Connecting external devices Removing/installing components (during servicing) Energy saving functions Settings in the BIOS Setup
LIFEBOOK T1010 Operating Manual Edition 1, April 2009 Introduction Troubleshooting and tips Important notes Technical data Equipment overview Manufacturer's notes Preparing the notebook for use Index Using your notebook Security functions Connecting external devices Removing/installing components (during servicing) Energy saving functions Settings in the BIOS Setup
User Manual
Page 7
... notes...3 Additional safety notes for devices with radio components 3 Notes on installing and removing boards and components 4 Travelling with your notebook...5 Before you travel ...5 Transporting your notebook...6 Cleaning ...6 An overview of your notebook ...7 Notebook open ...7 Left side ...8 Rear...9 Right side...9 Underside ...10 Ports on the port replicator (accessory for LIFEBOOK T1010 11 Preparing the...
... notes...3 Additional safety notes for devices with radio components 3 Notes on installing and removing boards and components 4 Travelling with your notebook...5 Before you travel ...5 Transporting your notebook...6 Cleaning ...6 An overview of your notebook ...7 Notebook open ...7 Left side ...8 Rear...9 Right side...9 Underside ...10 Ports on the port replicator (accessory for LIFEBOOK T1010 11 Preparing the...
User Manual
Page 8
... ...57 Setting up the Port Replicator ...57 Connecting the notebook to the Port Replicator 58 Switching on the notebook via the Port Replicator 59 Switching off the notebook via the Port Replicator 59 Disconnecting the notebook from the port replicator 60 Security functions ...61 Brief overview...for starting the operating system 65 Password protection for hard disk 66 Connecting external devices...69 Connecting an external monitor to the notebook 69 Connecting an external monitor to the Port Replicator 70 Connecting USB devices ...70 Connecting external audio devices ...71 Memory ...
... ...57 Setting up the Port Replicator ...57 Connecting the notebook to the Port Replicator 58 Switching on the notebook via the Port Replicator 59 Switching off the notebook via the Port Replicator 59 Disconnecting the notebook from the port replicator 60 Security functions ...61 Brief overview...for starting the operating system 65 Password protection for hard disk 66 Connecting external devices...69 Connecting an external monitor to the notebook 69 Connecting an external monitor to the Port Replicator 70 Connecting USB devices ...70 Connecting external audio devices ...71 Memory ...
User Manual
Page 9
...messages...92 Error messages on the screen 92 Restore operating system (Recovery CD/DVD can be ordered separately 94 Technical data...95 Notebook ...95 Port Replicator (optional)...97 Battery ...98 Mains adapter...98 Manufacturer's notes ...99 Energy Star...99 Recycling and disposal...99... CE marking...99 Regulatory notices...100 Regulatory information for notebooks without radio device 100 FCC Regulatory information for notebooks with radio device 104 Index ...107 A26391-K220-Z227-1-7619, edition 1 3 Contents The printer does not ...
...messages...92 Error messages on the screen 92 Restore operating system (Recovery CD/DVD can be ordered separately 94 Technical data...95 Notebook ...95 Port Replicator (optional)...97 Battery ...98 Mains adapter...98 Manufacturer's notes ...99 Energy Star...99 Recycling and disposal...99... CE marking...99 Regulatory notices...100 Regulatory information for notebooks without radio device 100 FCC Regulatory information for notebooks with radio device 104 Index ...107 A26391-K220-Z227-1-7619, edition 1 3 Contents The printer does not ...
User Manual
Page 11
..., or mouse. The additional memory guarantees that your notebook may be found on the "Drivers & Utilities" CD/DVD and on the move. The convertible notebook is available to ensure that are working on the i Internet at: http://ts.fujitsu.com/support. Depending on the display with the new... technology "Turbo Memory" from Intel®. This allows you connect the notebook to a port replicator (which works just as well and reliably as a notebook as it in daily use. If you...
..., or mouse. The additional memory guarantees that your notebook may be found on the "Drivers & Utilities" CD/DVD and on the move. The convertible notebook is available to ensure that are working on the i Internet at: http://ts.fujitsu.com/support. Depending on the display with the new... technology "Turbo Memory" from Intel®. This allows you connect the notebook to a port replicator (which works just as well and reliably as a notebook as it in daily use. If you...

User Manual
Page 12
... programme names, commands, or menu items. "Quotation marks" indicate names of your warranty. Indicates information which is important for your health, the operability of your notebook or the safety of chapters, data carriers, and terms that are used in this symbol describe activities that must be performed. This font indicates screen...
... programme names, commands, or menu items. "Quotation marks" indicate names of your warranty. Indicates information which is important for your health, the operability of your notebook or the safety of chapters, data carriers, and terms that are used in this symbol describe activities that must be performed. This font indicates screen...
User Manual
Page 13
... observe the relevant notes in the section "Cleaning". ● If you have questions about using your notebook in a particular area, please contact your notebook. This notebook complies with radio components ● Switch off the radio components (the ON/OFF switch for radio components...following safety notes. Pay attention to flammable gases or into hazardous environments (e.g. If you will find essential safety information regarding your notebook. Important notes Here you have a device with radio components, please also note the information in the "Additional safety notes ...
... observe the relevant notes in the section "Cleaning". ● If you have questions about using your notebook in a particular area, please contact your notebook. This notebook complies with radio components ● Switch off the radio components (the ON/OFF switch for radio components...following safety notes. Pay attention to flammable gases or into hazardous environments (e.g. If you will find essential safety information regarding your notebook. Important notes Here you have a device with radio components, please also note the information in the "Additional safety notes ...
User Manual
Page 14
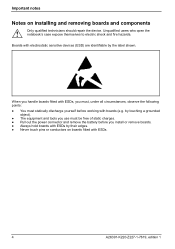
Unqualified users who open the notebook's case expose themselves to electric shock and fire hazards. Important notes Notes on boards fitted with electrostatic sensitive devices (ESD) are identifiable by touching a grounded ...
Unqualified users who open the notebook's case expose themselves to electric shock and fire hazards. Important notes Notes on boards fitted with electrostatic sensitive devices (ESD) are identifiable by touching a grounded ...
User Manual
Page 15
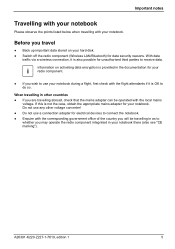
... the radio component (Wireless LAN/Bluetooth) for data security reasons. If this is not the case, obtain the appropriate mains adapter for your notebook. With data traffic via a wireless connection, it is OK to do so. Before you travel ● Back up important data stored on...of the country you will be travelling in other voltage converter! ● Do not use your notebook during a flight, first check with your notebook. Important notes Travelling with your notebook Please observe the points listed below when travelling with the flight attendants if it is also possible ...
... the radio component (Wireless LAN/Bluetooth) for data security reasons. If this is not the case, obtain the appropriate mains adapter for your notebook. With data traffic via a wireless connection, it is OK to do so. Before you travel ● Back up important data stored on...of the country you will be travelling in other voltage converter! ● Do not use your notebook during a flight, first check with your notebook. Important notes Travelling with your notebook Please observe the points listed below when travelling with the flight attendants if it is also possible ...
User Manual
Page 16
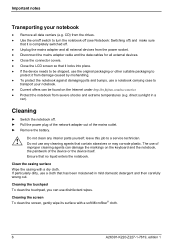
...LCD screen so that it locks into place. ● If the device needs to be found on the Internet under http://ts.fujitsu.com/accessories ● Protect the notebook from severe shocks and extreme temperatures (e.g. Cleaning the screen To clean the screen, gently wipe its surface with a dry cloth. ... abrasives or may corrode plastic. Cleaning the touchpad To clean the touchpad, you can damage the markings on /off switch to turn the notebook off (see Notebook: Switching off . ► Pull the power plug of the network adapter out of the device or the device itself. If particularly dirty...
...LCD screen so that it locks into place. ● If the device needs to be found on the Internet under http://ts.fujitsu.com/accessories ● Protect the notebook from severe shocks and extreme temperatures (e.g. Cleaning the screen To clean the screen, gently wipe its surface with a dry cloth. ... abrasives or may corrode plastic. Cleaning the touchpad To clean the touchpad, you can damage the markings on /off switch to turn the notebook off (see Notebook: Switching off . ► Pull the power plug of the network adapter out of the device or the device itself. If particularly dirty...
User Manual
Page 17
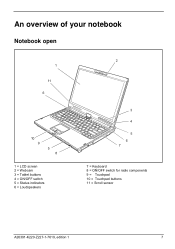
An overview of your notebook Notebook open 1 11 6 10 9 5 8 1 = LCD screen 2 = Webcam 3 = Tablet buttons 4 = ON/OFF switch 5 = Status indicators 6 = Loudspeakers 2 3 4 5 6 7 7 = Keyboard 8 = ON/OFF switch for radio components 9 = Touchpad 10 = Touchpad buttons 11 = Scroll sensor A26391-K220-Z227-1-7619, edition 1 7
An overview of your notebook Notebook open 1 11 6 10 9 5 8 1 = LCD screen 2 = Webcam 3 = Tablet buttons 4 = ON/OFF switch 5 = Status indicators 6 = Loudspeakers 2 3 4 5 6 7 7 = Keyboard 8 = ON/OFF switch for radio components 9 = Touchpad 10 = Touchpad buttons 11 = Scroll sensor A26391-K220-Z227-1-7619, edition 1 7
User Manual
Page 18
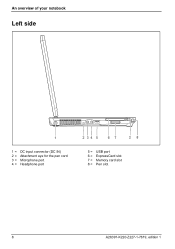
An overview of your notebook Left side 1 1 = DC input connector (DC IN) 2 = Attachment eye for the pen cord 3 = Microphone port 4 = Headphone port 2 34 5 67 2 8 5 = USB port 6 = ExpressCard slot 7 = Memory card slot 8 = Pen slot 8 A26391-K220-Z227-1-7619, edition 1
An overview of your notebook Left side 1 1 = DC input connector (DC IN) 2 = Attachment eye for the pen cord 3 = Microphone port 4 = Headphone port 2 34 5 67 2 8 5 = USB port 6 = ExpressCard slot 7 = Memory card slot 8 = Pen slot 8 A26391-K220-Z227-1-7619, edition 1
User Manual
Page 19
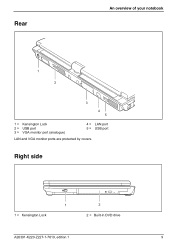
Right side 1 1 = Kensington Lock 2 2 = Built-in DVD drive A26391-K220-Z227-1-7619, edition 1 9 Rear An overview of your notebook 1 2 3 4 5 1 = Kensington Lock 2 = USB port 3 = VGA monitor port (analogue) 4 = LAN port 5 = USB port LAN and VGA monitor ports are protected by covers.
Right side 1 1 = Kensington Lock 2 2 = Built-in DVD drive A26391-K220-Z227-1-7619, edition 1 9 Rear An overview of your notebook 1 2 3 4 5 1 = Kensington Lock 2 = USB port 3 = VGA monitor port (analogue) 4 = LAN port 5 = USB port LAN and VGA monitor ports are protected by covers.
User Manual
Page 21
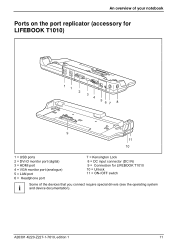
An overview of your notebook Ports on the port replicator (accessory for LIFEBOOK T1010) 11 2 3 4 5 6 7 8 9 11 10 1 = USB ports 2 = DVI-D monitor port (digital) 3 = HDMI port 4 = VGA monitor port (analogue) 5 = LAN port 6 = Headphone port 7 = Kensington Lock 8 = DC input connector (DC IN) 9 = Connection for LIFEBOOK T1010 10 = Unlock 11 = ON-/OFF switch Some of the devices that you connect require special drivers (see the operating system i and device documentation). A26391-K220-Z227-1-7619, edition 1 11
An overview of your notebook Ports on the port replicator (accessory for LIFEBOOK T1010) 11 2 3 4 5 6 7 8 9 11 10 1 = USB ports 2 = DVI-D monitor port (digital) 3 = HDMI port 4 = VGA monitor port (analogue) 5 = LAN port 6 = Headphone port 7 = Kensington Lock 8 = DC input connector (DC IN) 9 = Connection for LIFEBOOK T1010 10 = Unlock 11 = ON-/OFF switch Some of the devices that you connect require special drivers (see the operating system i and device documentation). A26391-K220-Z227-1-7619, edition 1 11

User Manual
Page 22
An overview of your notebook 12 A26391-K220-Z227-1-7619, edition 1
An overview of your notebook 12 A26391-K220-Z227-1-7619, edition 1
User Manual
Page 23
..., run it from the mains using the mains adapter. A26391-K220-Z227-1-7619, edition 1 13 When not plugged into a mains outlet, the notebook runs on how to connect external devices such as a mouse or a printer to transport your device. Do not discard the original packing material of... in battery. Please refer to "Connecting external devices" for instructions on its built-in the delivery note. Should you need to the notebook. You must charge the battery and install the application programmes before you use ! The operating system and drivers required are included in the...
..., run it from the mains using the mains adapter. A26391-K220-Z227-1-7619, edition 1 13 When not plugged into a mains outlet, the notebook runs on how to connect external devices such as a mouse or a printer to transport your device. Do not discard the original packing material of... in battery. Please refer to "Connecting external devices" for instructions on its built-in the delivery note. Should you need to the notebook. You must charge the battery and install the application programmes before you use ! The operating system and drivers required are included in the...
User Manual
Page 24
...Z227-1-7619, edition 1 Select a suitable location for a location: ● Never place the notebook on a stable, flat, nonslippery surface. Consider the following points when looking for the notebook before setting it up during normal operation. Please note that the rubber feet may mark certain types... of surfaces. ● Never place the notebook and the mains adapter on your legs for use Selecting a location ! Preparing the notebook for a long period of time. carpeting, upholstered furniture, bed). Long periods of contact...
...Z227-1-7619, edition 1 Select a suitable location for a location: ● Never place the notebook on a stable, flat, nonslippery surface. Consider the following points when looking for the notebook before setting it up during normal operation. Please note that the rubber feet may mark certain types... of surfaces. ● Never place the notebook and the mains adapter on your legs for use Selecting a location ! Preparing the notebook for a long period of time. carpeting, upholstered furniture, bed). Long periods of contact...
User Manual
Page 25
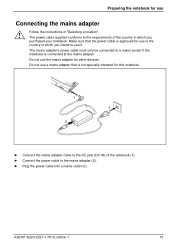
... the mains adapter cable to the DC jack (DC IN) of the country in which you purchased your notebook. The mains adapter's power cable must only be connected to a mains socket if the notebook is approved for use in the country in "Selecting a location". A26391-K220-Z227-1-7619, edition 1 15 ...is connected to the mains adapter (2). ► Plug the power cable into a mains outlet (3). The power cable supplied conforms to the requirements of the notebook (1). ► Connect the power cable to the mains adapter. Do not use it. Do not use Connecting the mains adapter !
... the mains adapter cable to the DC jack (DC IN) of the country in which you purchased your notebook. The mains adapter's power cable must only be connected to a mains socket if the notebook is approved for use in the country in "Selecting a location". A26391-K220-Z227-1-7619, edition 1 15 ...is connected to the mains adapter (2). ► Plug the power cable into a mains outlet (3). The power cable supplied conforms to the requirements of the notebook (1). ► Connect the power cable to the mains adapter. Do not use it. Do not use Connecting the mains adapter !
User Manual
Page 26
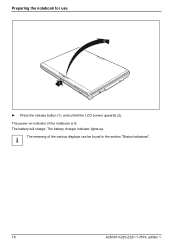
i 16 A26391-K220-Z227-1-7619, edition 1 The battery charger indicator lights up. The meaning of the notebook is lit. The power-on indicator of the various displays can be found in the section "Status indicators". The battery will charge. Preparing the notebook for use 2 1 ► Press the release button (1), and unfold the LCD screen upwards (2).
i 16 A26391-K220-Z227-1-7619, edition 1 The battery charger indicator lights up. The meaning of the notebook is lit. The power-on indicator of the various displays can be found in the section "Status indicators". The battery will charge. Preparing the notebook for use 2 1 ► Press the release button (1), and unfold the LCD screen upwards (2).
User Manual
Page 27
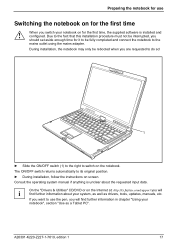
...CD/DVD or on the Internet at: http://ts.fujitsu.com/support you want to its original position. ► During installation, follow the instructions on the notebook. During installation, the notebook may only be fully completed and connect the notebook to switch on screen. If you will find ... data. When you will i find further information in chapter "Using your notebook", section "Use as drivers, tools, updates, manuals, etc. The ON/OFF switch returns automatically to use Switching the notebook on for the first time, the supplied software is unclear about your system...
...CD/DVD or on the Internet at: http://ts.fujitsu.com/support you want to its original position. ► During installation, follow the instructions on the notebook. During installation, the notebook may only be fully completed and connect the notebook to switch on screen. If you will find ... data. When you will i find further information in chapter "Using your notebook", section "Use as drivers, tools, updates, manuals, etc. The ON/OFF switch returns automatically to use Switching the notebook on for the first time, the supplied software is unclear about your system...