Complete Owner's Guide (English)
Page 2
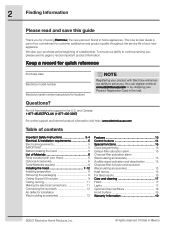
...http://www.electroluxusa.com Table of contents Important Safety Instructions 3-4 Electrical & Installation requirements 5 Electrical requirements 5 IMPORTANT 5 Before installing the hood 5 List of Materials 6 Parts Included with Electrolux enhances our ability to serve you. This Use & Care Guide is part of ... accessories 15 Heat sensor 15 For Best results 16 Care and cleaning 17 Filters 17 Lights 17 Optional Charcoal Filters 18 Hood Surface 18 Warranty Information 19 ©2007 Electrolux Home Products, Inc. Printed in the mail. Questions? 2 Finding Information...
...http://www.electroluxusa.com Table of contents Important Safety Instructions 3-4 Electrical & Installation requirements 5 Electrical requirements 5 IMPORTANT 5 Before installing the hood 5 List of Materials 6 Parts Included with Electrolux enhances our ability to serve you. This Use & Care Guide is part of ... accessories 15 Heat sensor 15 For Best results 16 Care and cleaning 17 Filters 17 Lights 17 Optional Charcoal Filters 18 Hood Surface 18 Warranty Information 19 ©2007 Electrolux Home Products, Inc. Printed in the mail. Questions? 2 Finding Information...
Complete Owner's Guide (English)
Page 4
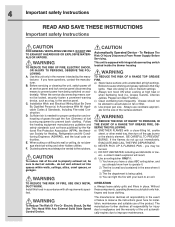
... manufacturer. If the flames do not vent exhaust air into wall or ceiling, do not damage electrical wiring and other metal tray, then turn hood ON when cooking at high heat or when flambeing food (I.e. you may ignite. Always leave safety grills and filters in the area where it... PAN - d) Use an extinguisher ONLY if: 1) You know you have a class ABC extinguisher, and you have questions, contact the manufacturer. Use this hood in the manner intended by the National Fire Protection Association (NFPA), the American Society for injury due to negligence and the warranty of the unit...
... manufacturer. If the flames do not vent exhaust air into wall or ceiling, do not damage electrical wiring and other metal tray, then turn hood ON when cooking at high heat or when flambeing food (I.e. you may ignite. Always leave safety grills and filters in the area where it... PAN - d) Use an extinguisher ONLY if: 1) You know you have a class ABC extinguisher, and you have questions, contact the manufacturer. Use this hood in the manner intended by the National Fire Protection Association (NFPA), the American Society for injury due to negligence and the warranty of the unit...
Complete Owner's Guide (English)
Page 5
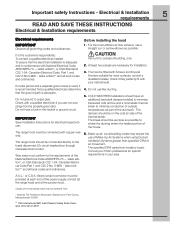
...Installation requirements 5 READ AND SAVE THESE INSTRUCTIONS Electrical & Installation requirements Electrical requirements IMPORTANT Observe all local codes and ordinances. The range hood should have a fuse in your cabinet/wall. 4. Check with Screws and Drywall Anchors suitable for installation. 3. Consult your HVAC professional...** and all local codes and ordinances. COLD WEATHER installations should be obtained from locale to a gas pipe. The hood is fitted with a qualified electrician if you are necessary for most efficient air flow exhaust, use of Make-Up ...
...Installation requirements 5 READ AND SAVE THESE INSTRUCTIONS Electrical & Installation requirements Electrical requirements IMPORTANT Observe all local codes and ordinances. The range hood should have a fuse in your cabinet/wall. 4. Check with Screws and Drywall Anchors suitable for installation. 3. Consult your HVAC professional...** and all local codes and ordinances. COLD WEATHER installations should be obtained from locale to a gas pipe. The hood is fitted with a qualified electrician if you are necessary for most efficient air flow exhaust, use of Make-Up ...
Complete Owner's Guide (English)
Page 6
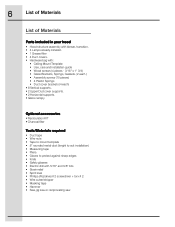
6 List of Materials List of Materials Parts included in your hood • Hood structure assembly with blower, transition. • 4 Lamps already installed. • 1 Grease filter • 4 Duct covers. • Hardware bag with: • Ceiling Mount Template • Use, ...
6 List of Materials List of Materials Parts included in your hood • Hood structure assembly with blower, transition. • 4 Lamps already installed. • 1 Grease filter • 4 Duct covers. • Hardware bag with: • Ceiling Mount Template • Use, ...
Complete Owner's Guide (English)
Page 7
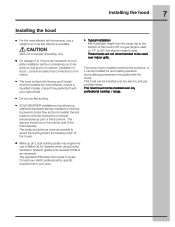
.... • Make up air: Local building codes may be installed vented to outside temperatures as part of air movement. This hood can be installed over indoor grills. Consult your HVAC professional for recirculating operation (recirculating accessories not supplied with your area. The... specified CFM varies from the range top to the bottom of ducts , conduit and electrical connections to the mains). • The hood is used. This hood must not be installed for specific requirements in your cabinet/wall. • Typical installation Min installation height from locale to be on...
.... • Make up air: Local building codes may be installed vented to outside temperatures as part of air movement. This hood can be installed over indoor grills. Consult your HVAC professional for recirculating operation (recirculating accessories not supplied with your area. The... specified CFM varies from the range top to the bottom of ducts , conduit and electrical connections to the mains). • The hood is used. This hood must not be installed for specific requirements in your cabinet/wall. • Typical installation Min installation height from locale to be on...

Complete Owner's Guide (English)
Page 8
... for venting exhaust to protect against sharp edges. Duct fittings (elbows and transitions) reduce air flow efficiency. A short straight length of the vent hood. • Plan the route for duct runs to short lengths and do not crush when making corners. • Install a wall cap with ...cap at the inlet of preference, use to the outdoors. Ductwork installation guidelines For safety reasons, ducting should only be easier if the vent hood is pos-sible. Ductwork and wiring locations: • Determine the exact location of duct at the exterior opening. Limit use 1st. 10"...
... for venting exhaust to protect against sharp edges. Duct fittings (elbows and transitions) reduce air flow efficiency. A short straight length of the vent hood. • Plan the route for duct runs to short lengths and do not crush when making corners. • Install a wall cap with ...cap at the inlet of preference, use to the outdoors. Ductwork installation guidelines For safety reasons, ducting should only be easier if the vent hood is pos-sible. Ductwork and wiring locations: • Determine the exact location of duct at the exterior opening. Limit use 1st. 10"...

Complete Owner's Guide (English)
Page 9
... 16" joist spacing 7 1/16" 8" duct 2x4 cross framing Align duct to center Front of cooktop of hood Top view–ceiling joists parallel to front of hood EXAMPLE B 16" joist spacing 10-1/16" Install cross-framing symmetrically over duct/cooktop centerline Cooktop outline 7 1/16..." 8" duct 2x4 cross framing Align duct to center Front of cooktop of hood Top view–ceiling joists run perpendicular to front of hood Cooktop outline EXAMPLE C 10-1/16" Install cross-framing symmetrically over duct/cooktop centerline 2x4 cross framing 7 1/...
... 16" joist spacing 7 1/16" 8" duct 2x4 cross framing Align duct to center Front of cooktop of hood Top view–ceiling joists parallel to front of hood EXAMPLE B 16" joist spacing 10-1/16" Install cross-framing symmetrically over duct/cooktop centerline Cooktop outline 7 1/16..." 8" duct 2x4 cross framing Align duct to center Front of cooktop of hood Top view–ceiling joists run perpendicular to front of hood Cooktop outline EXAMPLE C 10-1/16" Install cross-framing symmetrically over duct/cooktop centerline 2x4 cross framing 7 1/...
Complete Owner's Guide (English)
Page 10
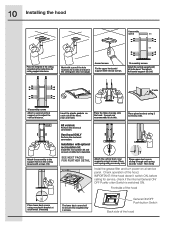
... pencil the hole locations for service, check if the internal General ON/ OFF Pushb-utton Switch is switched ON. IMPORTANT: If the hood doesn't switch ON, before calling for screws and duct in the ceiling considering the instructions for ceiling support structures. 10 Installing the... hood 8 assembly screw (B) (A) Place the template in the ceiling (see also next page) 4 wood screws Fix the upper horizontal support with optional ...
... pencil the hole locations for service, check if the internal General ON/ OFF Pushb-utton Switch is switched ON. IMPORTANT: If the hood doesn't switch ON, before calling for screws and duct in the ceiling considering the instructions for ceiling support structures. 10 Installing the... hood 8 assembly screw (B) (A) Place the template in the ceiling (see also next page) 4 wood screws Fix the upper horizontal support with optional ...
Complete Owner's Guide (English)
Page 11
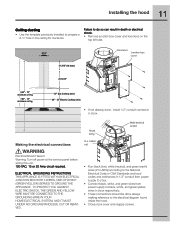
...APPLIANCE IS FITTED WITH AN ELECTRICAL JUNCTION BOX WITH 3 WIRES, ONE OF WHICH (GREEN/YELLOW) SERVES TO GROUND THE APPLIANCE. 11 Installing the hood Ceiling ducting • Use the template previously installed to prepare a 8-½" hole in j-box respectively. • These connections should be ...done always making reference to the electrical diagram found inside the hood. • Close j-box cover and reapply screws. Failure to do so can result in death or electrical shock. • Remove junction ...
...APPLIANCE IS FITTED WITH AN ELECTRICAL JUNCTION BOX WITH 3 WIRES, ONE OF WHICH (GREEN/YELLOW) SERVES TO GROUND THE APPLIANCE. 11 Installing the hood Ceiling ducting • Use the template previously installed to prepare a 8-½" hole in j-box respectively. • These connections should be ...done always making reference to the electrical diagram found inside the hood. • Close j-box cover and reapply screws. Failure to do so can result in death or electrical shock. • Remove junction ...

Complete Owner's Guide (English)
Page 12
...bottom of the deflector. • Place the assembled deflector and duct over the exhaust outlet from the hood. 12 Installing the hood Connecting the ductwork • Install ductwork, making connections in the direction of the hood outlet, as shown. • Cut the duct at the exhaust outlet from the... hood. Assemble the air deflector with the duct cover bracket with 4 assembly screws provided as shown. • Use duct tape to ...
...bottom of the deflector. • Place the assembled deflector and duct over the exhaust outlet from the hood. 12 Installing the hood Connecting the ductwork • Install ductwork, making connections in the direction of the hood outlet, as shown. • Cut the duct at the exhaust outlet from the... hood. Assemble the air deflector with the duct cover bracket with 4 assembly screws provided as shown. • Use duct tape to ...

Complete Owner's Guide (English)
Page 14
... turn ON the fan. • The fan will turn ON if the " " button is pressed and the hood was in the first speed. • If the fan is at second speed and the " " button is...). 2. The timer can be cancelled by pressing the timer button again. 3. " " Button. IMPORTANT: If the hood doesn't switch ON, before calling for service, check if the internal General ON/ OFF Pushb-utton Switch is initiated,...Lamp state previously OFF). • Press lamp button to turn OFF if the " " button is pressed and the hood was OFF. • If the fan is at first speed and the " " button is pressed, the fan will...
... turn ON the fan. • The fan will turn ON if the " " button is pressed and the hood was in the first speed. • If the fan is at second speed and the " " button is...). 2. The timer can be cancelled by pressing the timer button again. 3. " " Button. IMPORTANT: If the hood doesn't switch ON, before calling for service, check if the internal General ON/ OFF Pushb-utton Switch is initiated,...Lamp state previously OFF). • Press lamp button to turn OFF if the " " button is pressed and the hood was OFF. • If the fan is at first speed and the " " button is pressed, the fan will...

Complete Owner's Guide (English)
Page 15
.... Audible signal activation and deactivation • The audible signals can have minute increments / decrements of 1 minute, but can finish on the hood drops to the nearest 5 minutes. • The user can not decrease the speed. • When the temperature level on reprogramming the ... minute of charcoal filter must press the " " button for 5 seconds, after this action the icon "Grease filter" is not displayed and the hood has the normal display operation. Charcoal filter saturation alarm (Recirculating accessories) • After one minute to 12:59. • The clock can be ...
.... Audible signal activation and deactivation • The audible signals can have minute increments / decrements of 1 minute, but can finish on the hood drops to the nearest 5 minutes. • The user can not decrease the speed. • When the temperature level on reprogramming the ... minute of charcoal filter must press the " " button for 5 seconds, after this action the icon "Grease filter" is not displayed and the hood has the normal display operation. Charcoal filter saturation alarm (Recirculating accessories) • After one minute to 12:59. • The clock can be ...

Complete Owner's Guide (English)
Page 16
... odors or fumes. • Drafts across the range or cooktop will cause the escape of ventilation in order to establish air currents upward through the hood. 16 For Best results • Continuous use of the fan system while cooking helps keep the kitchen comfortable and less humid. • It also reduces... out. Such drafts should be prevented in so far as possible. • The best job of heat, smoke, moisture, grease and cooking odors from the hood.
... odors or fumes. • Drafts across the range or cooktop will cause the escape of ventilation in order to establish air currents upward through the hood. 16 For Best results • Continuous use of the fan system while cooking helps keep the kitchen comfortable and less humid. • It also reduces... out. Such drafts should be prevented in so far as possible. • The best job of heat, smoke, moisture, grease and cooking odors from the hood.
Complete Owner's Guide (English)
Page 17
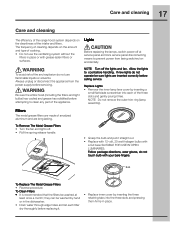
...Reverse procedure. Filters The metal grease filters are made of the appliance. 17 Care and cleaning Care and cleaning The efficiency of the range hood system depends on the cleanliness of cooking. • Do not use flammable liquids or solvents. Lights Before replacing the lamps, switch power ...flat blade screwdriver into the three slots and pressing them firmly in place or with grease-laden filters or surfaces. Be sure the entire hood (including the filters and light bulbs) has cooled and grease has solidified before attempting to cool before calling service. If new lights ...
...Reverse procedure. Filters The metal grease filters are made of the appliance. 17 Care and cleaning Care and cleaning The efficiency of the range hood system depends on the cleanliness of cooking. • Do not use flammable liquids or solvents. Lights Before replacing the lamps, switch power ...flat blade screwdriver into the three slots and pressing them firmly in place or with grease-laden filters or surfaces. Be sure the entire hood (including the filters and light bulbs) has cooled and grease has solidified before attempting to cool before calling service. If new lights ...

Complete Owner's Guide (English)
Page 18
...charcoal filters cannot be replaced. Use clean, soft cloths, sponges or paper towels. • Rub stainless steel finishes in the direction of the hood with sudsy water or household cleaners such as Fantastic or Formula 409, rinse well and dry with a clean soft cloth to avoid water marks. ...174; or Formula 409® first to fix it in their proper positions before reinstalling them. The charcoal filters are not included with the hood. NOTE: DO NOT rinse, or put charcoal filters in sudsy water. NOTE: Charcoal filters are clipped inside of each metal grease filter (mounting...
...charcoal filters cannot be replaced. Use clean, soft cloths, sponges or paper towels. • Rub stainless steel finishes in the direction of the hood with sudsy water or household cleaners such as Fantastic or Formula 409, rinse well and dry with a clean soft cloth to avoid water marks. ...174; or Formula 409® first to fix it in their proper positions before reinstalling them. The charcoal filters are not included with the hood. NOTE: DO NOT rinse, or put charcoal filters in sudsy water. NOTE: Charcoal filters are clipped inside of each metal grease filter (mounting...
Wiring Diagram (All Languages)
Page 1
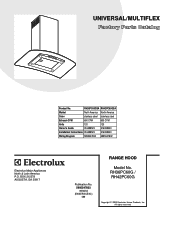
...'s Guide 316488523 316488523 Installation Instructions 316488523 316488523 Wiring Diagram 5995547832 5995547832 RH36-42PC60G Cover.eps RH36-42PC60G Parts.eps SE1RBA.eps RANGE HOOD Electrolux Major Appliances North & Latin America P.O. RH36PC60G / RH42PC60G Copyright © 2009 Electrolux Home Products, Inc. BOX 212378 AUGUSTA, GA 30917 Publication No. 5995547832 09/08/03 (EN/SERVICE/KC...
...'s Guide 316488523 316488523 Installation Instructions 316488523 316488523 Wiring Diagram 5995547832 5995547832 RH36-42PC60G Cover.eps RH36-42PC60G Parts.eps SE1RBA.eps RANGE HOOD Electrolux Major Appliances North & Latin America P.O. RH36PC60G / RH42PC60G Copyright © 2009 Electrolux Home Products, Inc. BOX 212378 AUGUSTA, GA 30917 Publication No. 5995547832 09/08/03 (EN/SERVICE/KC...
Wiring Diagram (All Languages)
Page 3
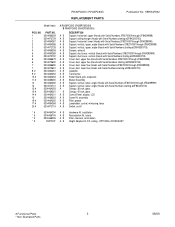
... 5304464292 5304472731 5304464293 5304466261 5304464201 5304466263 5304464265 5304464266 5304472119 A RH36PC60G (RH36PC60GSA) B RH42PC60G (RH42PC60GSA) DESCRIPTION A B Support, horizontal, upper (Hoods with Serial Numbers 2F82700001through 2F84299999) A B Support, ceiling hanger (Hoods with Serial Numbers starting at2F843300703) A B Support, horizontal, lower (Hoods with Serial Numbers 2F82700001through 2F84299999) A B Support, vertical, upper, angle (Hoods with Serial Numbers 2F82700001through 2F84299999) A B Support, vertical, upper, angle...
... 5304464292 5304472731 5304464293 5304466261 5304464201 5304466263 5304464265 5304464266 5304472119 A RH36PC60G (RH36PC60GSA) B RH42PC60G (RH42PC60GSA) DESCRIPTION A B Support, horizontal, upper (Hoods with Serial Numbers 2F82700001through 2F84299999) A B Support, ceiling hanger (Hoods with Serial Numbers starting at2F843300703) A B Support, horizontal, lower (Hoods with Serial Numbers 2F82700001through 2F84299999) A B Support, vertical, upper, angle (Hoods with Serial Numbers 2F82700001through 2F84299999) A B Support, vertical, upper, angle...
Product Specifications Sheet (English)
Page 1
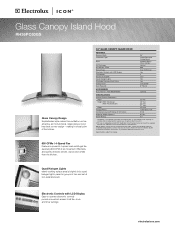
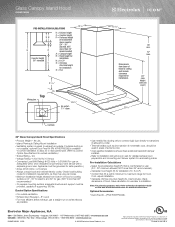
... CFMs / 4-Speed Fan Features a powerful 4-speed dual centrifugal fan supplying 600 CFM of the kitchen. 36" GLASS CANOPY ISLAND HOOD FEATURES Nominal Width Installation Type Style Air Discharge Air Delivery (CFM) Blower Type Electronic Controls with LCD Display Fan Speeds Sound Level... ACCESSORIES Duct-Free Kit - electroluxicon.com Effectively and quietly removes smoke, vapors and smells from the kitchen. Glass Canopy Island Hood RH36PC60GS Glass Canopy Design Sophisticated style makes this ventilation unit as attractive as they may very per locale. Quad Halogen Lights Island cooking...
... CFMs / 4-Speed Fan Features a powerful 4-speed dual centrifugal fan supplying 600 CFM of the kitchen. 36" GLASS CANOPY ISLAND HOOD FEATURES Nominal Width Installation Type Style Air Discharge Air Delivery (CFM) Blower Type Electronic Controls with LCD Display Fan Speeds Sound Level... ACCESSORIES Duct-Free Kit - electroluxicon.com Effectively and quietly removes smoke, vapors and smells from the kitchen. Glass Canopy Island Hood RH36PC60GS Glass Canopy Design Sophisticated style makes this ventilation unit as attractive as they may very per locale. Quad Halogen Lights Island cooking...
Product Specifications Sheet (English)
Page 2
...; 5855 Terry Fox Way • Mississauga, ON L5V 3E4 • 1-800-265-8352 • electroluxicon.ca RH36PC60GS 10/09 © 2009 Electrolux Home Products, Inc. We reserve the right to improve our products. Glass Canopy Island Hood RH36PC60GS PRE-INSTALLATION CALCULATIONS SH A K P Counter Height 36" standard C K = Kitchen height C = Counter height P = Preferred height of...
...; 5855 Terry Fox Way • Mississauga, ON L5V 3E4 • 1-800-265-8352 • electroluxicon.ca RH36PC60GS 10/09 © 2009 Electrolux Home Products, Inc. We reserve the right to improve our products. Glass Canopy Island Hood RH36PC60GS PRE-INSTALLATION CALCULATIONS SH A K P Counter Height 36" standard C K = Kitchen height C = Counter height P = Preferred height of...