Complete Owner's Guide (English)
Page 2
... Installing preparation 8 Removing the packaging 8 Ceiling Support Structures 9 Ceiling ducting 11 Making the electrical connections 11 Connecting the ductwork 12 Air deflector installation (Recirculating accessories 12 Features 13 Control buttons 14 Special functions 15 Clock programming 15 Grease filter saturation alarm 15 Charcoal filter saturation alarm (Recirculating accessories 15 Audible signal activation and deactivation 15 Charcoal filter inclusion and exclusion (Recirculating accessories 15 Heat sensor 15 For Best results 16 Care and cleaning 17 Filters 17 Lights...
... Installing preparation 8 Removing the packaging 8 Ceiling Support Structures 9 Ceiling ducting 11 Making the electrical connections 11 Connecting the ductwork 12 Air deflector installation (Recirculating accessories 12 Features 13 Control buttons 14 Special functions 15 Clock programming 15 Grease filter saturation alarm 15 Charcoal filter saturation alarm (Recirculating accessories 15 Audible signal activation and deactivation 15 Charcoal filter inclusion and exclusion (Recirculating accessories 15 Heat sensor 15 For Best results 16 Care and cleaning 17 Filters 17 Lights...
Complete Owner's Guide (English)
Page 3
... CODES. INSTALLER: Please leave these instructions for the Local Electrical Inspector's use only Do not attempt to situations that may cause bodily injury or property damage. Requirement: 120 V AC, 60 Hz. 15 or 20 A Branch Circuit Save these Instructions for future reference. IMPORTANT: Save these instructions for residential appliances For residential use . Safety Warning: Turn off power circuit at service panel and lock out panel, before using...
... CODES. INSTALLER: Please leave these instructions for the Local Electrical Inspector's use only Do not attempt to situations that may cause bodily injury or property damage. Requirement: 120 V AC, 60 Hz. 15 or 20 A Branch Circuit Save these Instructions for future reference. IMPORTANT: Save these instructions for residential appliances For residential use . Safety Warning: Turn off power circuit at service panel and lock out panel, before using...
Complete Owner's Guide (English)
Page 4
... cleaning the unit, switch power off the gas burner or the electric element. D. do not vent exhaust air into wall or ceiling, do not go out immediately, EVACUATE AND CALL THE FIRE DEPARTMENT. This unit is small and contained in place. c) Clean ventilating fans frequently. a violent steam explosion will result. To Reduce The Risk Of Fire Or Electric Shock, Do Not Use This Hood With Any External Solid State Speed Control...
... cleaning the unit, switch power off the gas burner or the electric element. D. do not vent exhaust air into wall or ceiling, do not go out immediately, EVACUATE AND CALL THE FIRE DEPARTMENT. This unit is small and contained in place. c) Clean ventilating fans frequently. a violent steam explosion will result. To Reduce The Risk Of Fire Or Electric Shock, Do Not Use This Hood With Any External Solid State Speed Control...
Complete Owner's Guide (English)
Page 5
... air flow exhaust, use of Make-Up Air Systems when using Ducted Ventilation Systems greater than specified CFM of the standards listed may require the use a straight run or as few elbows as possible to the fused disconnect (Or circuit breaker) box through metal electrical conduit. A U.L.- Copies of air movement. IMPORTANT Save Installation Instructions for specific requirements in your cabinet/wall. 4. At least two people are not sure range hood is properly grounded. Make up air: Local building codes...
... air flow exhaust, use of Make-Up Air Systems when using Ducted Ventilation Systems greater than specified CFM of the standards listed may require the use a straight run or as few elbows as possible to the fused disconnect (Or circuit breaker) box through metal electrical conduit. A U.L.- Copies of air movement. IMPORTANT Save Installation Instructions for specific requirements in your cabinet/wall. 4. At least two people are not sure range hood is properly grounded. Make up air: Local building codes...
Complete Owner's Guide (English)
Page 6
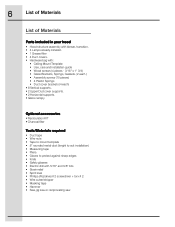
...; 4 Lamps already installed. • 1 Grease filter • 4 Duct covers. • Hardware bag with: • Ceiling Mount Template • Use, care and installation guide • Wood screws (4 pieces - 3/16" x 1" 3/4) • Glass Brackets, Springs, Gaskets ( 2 each ) • Assembly screws (70 pieces) • 4 Plastic Springs • Duct cover brackets (4 each) • 8 Vertical supports. • 2 Upper Ductcover supports. • 2 Horizontal supports. • Glass canopy Optional accessories • Recirculation KIT • Charcoal filter Tools/Materials required • Duct...
...; 4 Lamps already installed. • 1 Grease filter • 4 Duct covers. • Hardware bag with: • Ceiling Mount Template • Use, care and installation guide • Wood screws (4 pieces - 3/16" x 1" 3/4) • Glass Brackets, Springs, Gaskets ( 2 each ) • Assembly screws (70 pieces) • 4 Plastic Springs • Duct cover brackets (4 each) • 8 Vertical supports. • 2 Upper Ductcover supports. • 2 Horizontal supports. • Glass canopy Optional accessories • Recirculation KIT • Charcoal filter Tools/Materials required • Duct...
Complete Owner's Guide (English)
Page 7
... your cabinet/wall. • Typical installation Min installation height from locale to locale. This hood can be installed for recirculating operation (recirculating accessories not supplied with Screws and Drywall Anchors suitable for specific requirements in your area. Vent unit to the mains). • The hood is fitted with the hood). The break should be as close as possible. The damper should be on cabinet, installation of ducts , conduit and electrical connections to outside temperatures as part...
... your cabinet/wall. • Typical installation Min installation height from locale to locale. This hood can be installed for recirculating operation (recirculating accessories not supplied with Screws and Drywall Anchors suitable for specific requirements in your area. Vent unit to the mains). • The hood is fitted with the hood). The break should be as close as possible. The damper should be on cabinet, installation of ducts , conduit and electrical connections to outside temperatures as part...

Complete Owner's Guide (English)
Page 8
... delivery and are installed. Duct fittings (elbows and transitions) reduce air flow efficiency. Keep duct runs as short and straight as close to accurately locate the duct work and electrical service. • Installation will be easier if the vent hood is pos-sible. Remove the protective film covering the product before putting into any transition needed in advance. • Use 8" round metal ductwork only. Order the wall or roof cap and any...
... delivery and are installed. Duct fittings (elbows and transitions) reduce air flow efficiency. Keep duct runs as short and straight as close to accurately locate the duct work and electrical service. • Installation will be easier if the vent hood is pos-sible. Remove the protective film covering the product before putting into any transition needed in advance. • Use 8" round metal ductwork only. Order the wall or roof cap and any...

Complete Owner's Guide (English)
Page 9
... installations. • At the hood location, install 2"x 4" cross framing between ceiling joists as shown. (2"x 4" are required to support the weight of the hood.) • Arrange cross framing in the ceiling to Centerline 49-80406 Printed Italy 04-06JR NOTE: Do not cut the duct opening shown on the template for the recirculating installation. Wire Access Dia. 8-1/2 FRONTOFHOOD Cut Dia. Wire Access Drill3/16” Pilot Approx.1 1/2” Deep...
... installations. • At the hood location, install 2"x 4" cross framing between ceiling joists as shown. (2"x 4" are required to support the weight of the hood.) • Arrange cross framing in the ceiling to Centerline 49-80406 Printed Italy 04-06JR NOTE: Do not cut the duct opening shown on the template for the recirculating installation. Wire Access Dia. 8-1/2 FRONTOFHOOD Cut Dia. Wire Access Drill3/16” Pilot Approx.1 1/2” Deep...
Complete Owner's Guide (English)
Page 10
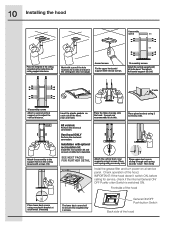
click ! Attach the assembly to rangehood by side. Place glass brackets using a screw by side. Installation with screws (16) Insert the plastic gaskets on at each vertex. (4 needed) The lower duct cover shall be secured to the support fixed on the ceiling Assure with optional recirculation kit. Then verify Instal the grease filter and turn power on each spring using 2 screws by 4 screws. General ON/OFF Push button Switch Back side of the hood. Mark with a pencil...
click ! Attach the assembly to rangehood by side. Place glass brackets using a screw by side. Installation with screws (16) Insert the plastic gaskets on at each vertex. (4 needed) The lower duct cover shall be secured to the support fixed on the ceiling Assure with optional recirculation kit. Then verify Instal the grease filter and turn power on each spring using 2 screws by 4 screws. General ON/OFF Push button Switch Back side of the hood. Mark with a pencil...
Complete Owner's Guide (English)
Page 11
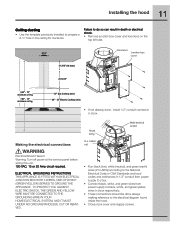
ELECTRICAL GROUNDING INSTRUCTIONS THIS APPLIANCE IS FITTED WITH AN ELECTRICAL JUNCTION BOX WITH 3 WIRES, ONE OF WHICH (GREEN/YELLOW) SERVES TO GROUND THE APPLIANCE. 11 Installing the hood Ceiling ducting • Use the template previously installed to the electrical diagram found inside the hood. • Close j-box cover and reapply screws. listed nut Metal electrical conduit Electrical Shock Hazard Warning: Turn off power at the service panel before wiring this unit. 120 VAC, 15 or 20 Amp circuit required. TO PROTECT...
ELECTRICAL GROUNDING INSTRUCTIONS THIS APPLIANCE IS FITTED WITH AN ELECTRICAL JUNCTION BOX WITH 3 WIRES, ONE OF WHICH (GREEN/YELLOW) SERVES TO GROUND THE APPLIANCE. 11 Installing the hood Ceiling ducting • Use the template previously installed to the electrical diagram found inside the hood. • Close j-box cover and reapply screws. listed nut Metal electrical conduit Electrical Shock Hazard Warning: Turn off power at the service panel before wiring this unit. 120 VAC, 15 or 20 Amp circuit required. TO PROTECT...

Complete Owner's Guide (English)
Page 12
... flange connections with duct tape for an airtight seal. • Make the same connection in the wall or ceiling vent exit. Assemble the air deflector with the duct cover bracket with 4 assembly screws provided as shown. Airflow • Measure from the bottom of the air deflector to the bottom of the hood outlet, as shown. • Use duct tape to seal the deflector and at the measured size. • Uninstall the air deflector removing the 4 assembly screws...
... flange connections with duct tape for an airtight seal. • Make the same connection in the wall or ceiling vent exit. Assemble the air deflector with the duct cover bracket with 4 assembly screws provided as shown. Airflow • Measure from the bottom of the air deflector to the bottom of the hood outlet, as shown. • Use duct tape to seal the deflector and at the measured size. • Uninstall the air deflector removing the 4 assembly screws...

Complete Owner's Guide (English)
Page 15
... appear on the hood drops to the set by the user before the alarm occured. Heat sensor • The control is not displayed and the hood has the normal display operation. Charcoal filter saturation alarm (Recirculating accessories) • After one minute to normal, the blower will show "Grease Filter" if the fan is not displayed, and the hood has the normal display operation. Audible signal activation...
... appear on the hood drops to the set by the user before the alarm occured. Heat sensor • The control is not displayed and the hood has the normal display operation. Charcoal filter saturation alarm (Recirculating accessories) • After one minute to normal, the blower will show "Grease Filter" if the fan is not displayed, and the hood has the normal display operation. Audible signal activation...

Complete Owner's Guide (English)
Page 16
.... • The best job of ventilation in order to establish air currents upward through the hood. 16 For Best results • Continuous use of the fan system while cooking helps keep the kitchen comfortable and less humid. • It also reduces cooking odors and soiling moisture that create a frequent need for strong odors or fumes. • Drafts across the range or cooktop will cause...
.... • The best job of ventilation in order to establish air currents upward through the hood. 16 For Best results • Continuous use of the fan system while cooking helps keep the kitchen comfortable and less humid. • It also reduces cooking odors and soiling moisture that create a frequent need for strong odors or fumes. • Drafts across the range or cooktop will cause...
Complete Owner's Guide (English)
Page 17
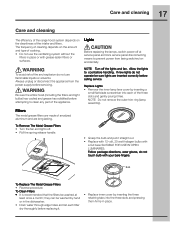
.... Filters The metal grease filters are inserted correctly before calling service. Be sure the entire hood (including the filters and light bulbs) has cooled and grease has solidified before replacing it free. NOTE: Do not remove the outer trim ring (lamp assembly). Replace Lights • Remove the inner lamp lens cover by inserting the three retaining tabs into each filter dry thoroughly before attempting to prevent power from the power supply before handling. NOTE: Turn...
.... Filters The metal grease filters are inserted correctly before calling service. Be sure the entire hood (including the filters and light bulbs) has cooled and grease has solidified before replacing it free. NOTE: Do not remove the outer trim ring (lamp assembly). Replace Lights • Remove the inner lamp lens cover by inserting the three retaining tabs into each filter dry thoroughly before attempting to prevent power from the power supply before handling. NOTE: Turn...

Complete Owner's Guide (English)
Page 18
..., sponges or paper towels. • Rub stainless steel finishes in the fine mesh. Use all parts in sudsy water. The charcoal filters cannot be replaced. Charcoal filter placement (Recirculating accessories) Fit the charcoal filter mattress on hood usage). Wipe area dry to avoid water marks. • After cleaning, place all products according to package directions. 18 Care and cleaning Optional Charcoal Filters If the model is not vented to the outside of each grease filter.
..., sponges or paper towels. • Rub stainless steel finishes in the fine mesh. Use all parts in sudsy water. The charcoal filters cannot be replaced. Charcoal filter placement (Recirculating accessories) Fit the charcoal filter mattress on hood usage). Wipe area dry to avoid water marks. • After cleaning, place all products according to package directions. 18 Care and cleaning Optional Charcoal Filters If the model is not vented to the outside of each grease filter.
Complete Owner's Guide (English)
Page 19
... serial numbers that have other appropriate payment record. or external causes such as removal of trim, cupboards, shelves, etc., which prove to the home and any Costs of service calls that are listed WARRANTY original purchase parts of this warranty must be obtained by Electrolux Canada Corp. IF YOU NEED SERVICE Keep your best interest to grounded power supply of sufficient voltage, replacement of blown fuses, repair...
... serial numbers that have other appropriate payment record. or external causes such as removal of trim, cupboards, shelves, etc., which prove to the home and any Costs of service calls that are listed WARRANTY original purchase parts of this warranty must be obtained by Electrolux Canada Corp. IF YOU NEED SERVICE Keep your best interest to grounded power supply of sufficient voltage, replacement of blown fuses, repair...
Wiring Diagram (All Languages)
Page 1
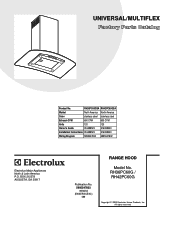
.../03 (EN/SERVICE/KC) 099 Model No. UNIVERSAL/MULTIFLEX Product No. All rights reserved. RH36PC60G / RH42PC60G Copyright © 2009 Electrolux Home Products, Inc. RH36PC60GSA RH42PC60GSA Market North America North America Color stainless steel stainless steel Exhaust-CFM 600 CFM 600 CFM Volts 120 120 Owner's Guide 316488523 316488523 Installation Instructions 316488523 316488523 Wiring Diagram 5995547832 5995547832 RH36-42PC60G Cover.eps RH36-42PC60G Parts.eps SE1RBA.eps RANGE HOOD Electrolux Major Appliances...
.../03 (EN/SERVICE/KC) 099 Model No. UNIVERSAL/MULTIFLEX Product No. All rights reserved. RH36PC60G / RH42PC60G Copyright © 2009 Electrolux Home Products, Inc. RH36PC60GSA RH42PC60GSA Market North America North America Color stainless steel stainless steel Exhaust-CFM 600 CFM 600 CFM Volts 120 120 Owner's Guide 316488523 316488523 Installation Instructions 316488523 316488523 Wiring Diagram 5995547832 5995547832 RH36-42PC60G Cover.eps RH36-42PC60G Parts.eps SE1RBA.eps RANGE HOOD Electrolux Major Appliances...
Wiring Diagram (All Languages)
Page 3
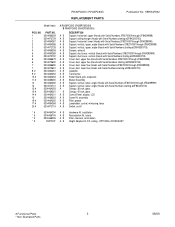
..., duct, upper flue (Hoods with Serial Numbers starting at2F843300703) A B Cover, duct, lower flue (Hoods with Serial Numbers 2F82700001through 2F84299999) A B Cover, duct, lower flue (Hoods with Serial Numbers starting at2F843300703) A B Capacitor A B Transformer A B Power Board, pcb, w/spacers A B Blower Assembly A B Support, vertical, lower, angle (Hoods with Serial Numbers 2F82700001through 2F84299999) A B Support, vertical, lower, angle (Hoods with Serial Numbers starting at2F843300703) A - RH36PC60G / RH42PC60G REPLACEMENT PARTS Publication No: 5995547832 Model Index: POS. ceiling...
..., duct, upper flue (Hoods with Serial Numbers starting at2F843300703) A B Cover, duct, lower flue (Hoods with Serial Numbers 2F82700001through 2F84299999) A B Cover, duct, lower flue (Hoods with Serial Numbers starting at2F843300703) A B Capacitor A B Transformer A B Power Board, pcb, w/spacers A B Blower Assembly A B Support, vertical, lower, angle (Hoods with Serial Numbers 2F82700001through 2F84299999) A B Support, vertical, lower, angle (Hoods with Serial Numbers starting at2F843300703) A - RH36PC60G / RH42PC60G REPLACEMENT PARTS Publication No: 5995547832 Model Index: POS. ceiling...
Product Specifications Sheet (English)
Page 1
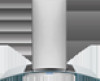
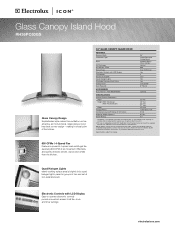
...the kitchen. Electronic Controls with LCD Display Fan Speeds Sound Level (dBA) Quad Halogen Lights Washable Stainless Steel Filters Exhaust Duct Duct Required 36" Island / Peninsula Ceiling Mount Stainless Steel / Glass Canopy Vertical 600 Dual Centrifugal Yes 4 73.8 Yes Yes Convertible* 8" Round ACCESSORIES Duct-Free Kit - Glass Canopy Island Hood RH36PC60GS Glass Canopy Design Sophisticated style makes this ventilation unit as attractive as they may very per locale. electroluxicon.com NOTE: Always consult local and national electric codes. Specifications subject to all fan, clock...
...the kitchen. Electronic Controls with LCD Display Fan Speeds Sound Level (dBA) Quad Halogen Lights Washable Stainless Steel Filters Exhaust Duct Duct Required 36" Island / Peninsula Ceiling Mount Stainless Steel / Glass Canopy Vertical 600 Dual Centrifugal Yes 4 73.8 Yes Yes Convertible* 8" Round ACCESSORIES Duct-Free Kit - Glass Canopy Island Hood RH36PC60GS Glass Canopy Design Sophisticated style makes this ventilation unit as attractive as they may very per locale. electroluxicon.com NOTE: Always consult local and national electric codes. Specifications subject to all fan, clock...
Product Specifications Sheet (English)
Page 2
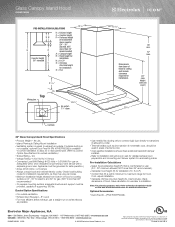
... Major Appliances, N.A. height with a separate ground wire. Check local building codes for installation requirements, as short section of nonmetallic duct, should be used in areas of extreme cold. • Cold weather installations should have additional backdraft damper installed. • Refer to installation instructions on adequately wired 120V, dedicated circuit having 2-wire service with one cover) 25 3/16" Controls 36" Glass Canopy Island Hood Specifications • Product Weight - 84 Lbs. • Island / Peninsula Ceiling-Mount Installation • Ventilation system is...
... Major Appliances, N.A. height with a separate ground wire. Check local building codes for installation requirements, as short section of nonmetallic duct, should be used in areas of extreme cold. • Cold weather installations should have additional backdraft damper installed. • Refer to installation instructions on adequately wired 120V, dedicated circuit having 2-wire service with one cover) 25 3/16" Controls 36" Glass Canopy Island Hood Specifications • Product Weight - 84 Lbs. • Island / Peninsula Ceiling-Mount Installation • Ventilation system is...


