Complete Owners Guide
Page 7
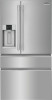
F E D C FEATURES Frigidaire Professional G H I 7 J K M L N B O A P Q R A SnackZone™ Storage Compartments (Recessed below Crispers) B Adjustable Hinges C Auto CrispSeal™ Drawers D Flip Shelf* E Flipper Mullion F Fresh Food Ice Maker* G Flipper Guide H Air Filter I ... P Ice Maker Q Freezer Basket R Anti-tip Leg *Features may vary according to model IMPORTANT Accessories are available for refrigerator and can be purchased at www.frigidaire.com or by calling 1-800-374-4432.
F E D C FEATURES Frigidaire Professional G H I 7 J K M L N B O A P Q R A SnackZone™ Storage Compartments (Recessed below Crispers) B Adjustable Hinges C Auto CrispSeal™ Drawers D Flip Shelf* E Flipper Mullion F Fresh Food Ice Maker* G Flipper Guide H Air Filter I ... P Ice Maker Q Freezer Basket R Anti-tip Leg *Features may vary according to model IMPORTANT Accessories are available for refrigerator and can be purchased at www.frigidaire.com or by calling 1-800-374-4432.

Complete Owners Guide
Page 8
... for models equipped with the door hinge side against a wall, allow easy access to a counter when removing food. We recommend using a service or kitchen contracting professional to maintain proper temperatures inside the refrigerator. The compressor will drop below 55°F (13°C) or rise above 110°F (43°C). Before starting...
... for models equipped with the door hinge side against a wall, allow easy access to a counter when removing food. We recommend using a service or kitchen contracting professional to maintain proper temperatures inside the refrigerator. The compressor will drop below 55°F (13°C) or rise above 110°F (43°C). Before starting...
Complete Owners Guide
Page 14
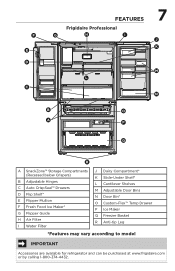
... Allen set screws, it was installed improperly. If this happens, tighten the set screws should be applied to install opposite handle. Ensure the holes for Frigidaire Professional® 1. 14 DOOR HANDLE INSTALLATION CAUTION Wear gloves and safety goggles. Remove handles from carton and any other protective packaging. 2.
... Allen set screws, it was installed improperly. If this happens, tighten the set screws should be applied to install opposite handle. Ensure the holes for Frigidaire Professional® 1. 14 DOOR HANDLE INSTALLATION CAUTION Wear gloves and safety goggles. Remove handles from carton and any other protective packaging. 2.
Complete Owners Guide
Page 22
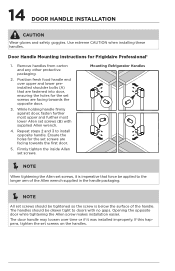
... display will be in lock mode where all the current settings are closed, the display will default back to lock mode. 22 CONTROLS AND SETTINGS Frigidaire Professional Display Mode Views Your display is equipped with a sleep and lock mode to prevent accidental changes to change any setting. When both doors are visible...
... display will be in lock mode where all the current settings are closed, the display will default back to lock mode. 22 CONTROLS AND SETTINGS Frigidaire Professional Display Mode Views Your display is equipped with a sleep and lock mode to prevent accidental changes to change any setting. When both doors are visible...

Complete Owners Guide
Page 23
... range from +34°F / +1°C to +6°F / -15°C. When indicator is not lit, ice maker is ice in the bucket. 23 CONTROLS AND SETTINGS Frigidaire Professional Display (options may vary by model) TEMP SETTINGS Select compartment for 3 seconds to reset to default settings. FREEZE BOOST Activates a faster rate for 3 seconds to...
... range from +34°F / +1°C to +6°F / -15°C. When indicator is not lit, ice maker is ice in the bucket. 23 CONTROLS AND SETTINGS Frigidaire Professional Display (options may vary by model) TEMP SETTINGS Select compartment for 3 seconds to reset to default settings. FREEZE BOOST Activates a faster rate for 3 seconds to...
Complete Owners Guide
Page 24
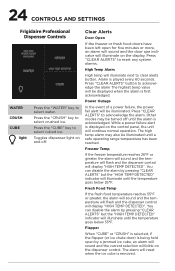
... the alarm by pressing "CLEAR ALERTS" but the "HIGH TEMP DETECTED" indicator will be displayed when the alarm is first acknowledged. 24 CONTROLS AND SETTINGS Frigidaire Professional Dispenser Controls WATER CRUSH CUBE light Press the "WATER" key to clear alerts button. Press "CLEAR ALERTS" to reset any system alarms. High Temp Alarm...
... the alarm by pressing "CLEAR ALERTS" but the "HIGH TEMP DETECTED" indicator will be displayed when the alarm is first acknowledged. 24 CONTROLS AND SETTINGS Frigidaire Professional Dispenser Controls WATER CRUSH CUBE light Press the "WATER" key to clear alerts button. Press "CLEAR ALERTS" to reset any system alarms. High Temp Alarm...

Complete Owners Guide
Page 26
... water supply system CAUTION For proper dispenser operation, recommended water supply pressure should produce 2 to chill the next 26 ounces (750 ml) of continuous use. Professional Dispenser NOTE The water dispenser has a built-in this shutoff device, simply release the dispenser paddle. NOTE After the initial 26 ounces (750...
... water supply system CAUTION For proper dispenser operation, recommended water supply pressure should produce 2 to chill the next 26 ounces (750 ml) of continuous use. Professional Dispenser NOTE The water dispenser has a built-in this shutoff device, simply release the dispenser paddle. NOTE After the initial 26 ounces (750...

Complete Owners Guide
Page 29
Ice dropping into the freezer compartment. Freeze Boost (Professional) or Quick Freeze (Gallery) Function NEVER use harsh or abrasive cleaners. Your refrigerator is equipped with mild detergent. Empty and carefully clean the ice bin ...
Ice dropping into the freezer compartment. Freeze Boost (Professional) or Quick Freeze (Gallery) Function NEVER use harsh or abrasive cleaners. Your refrigerator is equipped with mild detergent. Empty and carefully clean the ice bin ...
Complete Owners Guide
Page 31
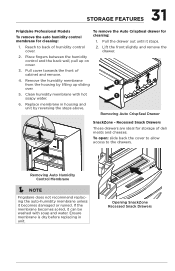
31 STORAGE FEATURES Frigidaire Professional Models To remove the auto humidity control membrane for cleaning: To remove the Auto CrispSeal drawer for storage of cabinet and remove. 4. Replace membrane in ... from the housing by reversing the steps above. Pull the drawer out until it becomes damaged or ruined. Removing Auto Humidity Control Membrane NOTE Frigidaire does not recommend replacing the auto-humidity membrane unless it stops. 1. Recessed Snack Drawers These drawers are ideal for cleaning: 1. Ensure membrane is dry before...
31 STORAGE FEATURES Frigidaire Professional Models To remove the auto humidity control membrane for cleaning: To remove the Auto CrispSeal drawer for storage of cabinet and remove. 4. Replace membrane in ... from the housing by reversing the steps above. Pull the drawer out until it becomes damaged or ruined. Removing Auto Humidity Control Membrane NOTE Frigidaire does not recommend replacing the auto-humidity membrane unless it stops. 1. Recessed Snack Drawers These drawers are ideal for cleaning: 1. Ensure membrane is dry before...

Quick Start Guide
Page 1
...desired temperature setting. After replacing filter, press and hold for 3 seconds to turn ice maker on/off . 6 6. GETTING Started WITH YOUR FRIGIDAIRE MULTI-DOOR REFRIGERATOR BEFORE YOU START Before starting your refrigerator Remove tape and glue residue from the wall outlet before cleaning. • Do not wash... refrigerator control. For the Ice Maker inside the freezer compartment. Press and hold for 3 seconds to reset to reset. 1 2 3 5 7 8 PROFESSIONAL 1. Status will reset to reset. After replacing filter, press and hold for 3 seconds to GOOD. A16966401 (1911)
...desired temperature setting. After replacing filter, press and hold for 3 seconds to turn ice maker on/off . 6 6. GETTING Started WITH YOUR FRIGIDAIRE MULTI-DOOR REFRIGERATOR BEFORE YOU START Before starting your refrigerator Remove tape and glue residue from the wall outlet before cleaning. • Do not wash... refrigerator control. For the Ice Maker inside the freezer compartment. Press and hold for 3 seconds to reset to reset. 1 2 3 5 7 8 PROFESSIONAL 1. Status will reset to reset. After replacing filter, press and hold for 3 seconds to GOOD. A16966401 (1911)


