Use and Care Manual
Page 1
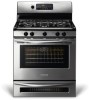
RaGnasge ES530 Control, Self-Cleaning Oven with Bake-n-Warm™ Double Oven Visit the Frigidaire Web Site at: http://www.frigidaire.com Welcome 2 Important Safety Instructions .....2-4 Features at a Glance 5 Before Setting Oven Controls ....... 6 Setting Surface Controls 7 Control Pad Features 8 Setting Oven Controls 9-22 Bake-n-Warm™ Double Oven 23-25 Self Cleaning 26-28 Adjusting...
RaGnasge ES530 Control, Self-Cleaning Oven with Bake-n-Warm™ Double Oven Visit the Frigidaire Web Site at: http://www.frigidaire.com Welcome 2 Important Safety Instructions .....2-4 Features at a Glance 5 Before Setting Oven Controls ....... 6 Setting Surface Controls 7 Control Pad Features 8 Setting Oven Controls 9-22 Bake-n-Warm™ Double Oven 23-25 Self Cleaning 26-28 Adjusting...
Use and Care Manual
Page 5
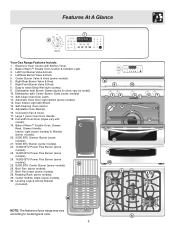
.... Roasting Rack (some models). 27. Left Front Burner Valve & Knob. 4. Broil Pan (some models). 29. Leveling Legs & Anti-tip Bracket (included). 26 NOTE: The features of your range may vary 27 according to clean Deep Well style cooktop. 9. Right Front Burner Valve & Knob. 8. Convection Fan & Cover. 17. Easy to model type & color... (some models). 28. Dishwasher safe Burner Grates (styles & colors vary by model). 10. Broil Pan Insert (some models). 30. Self-Clean Oven Door Latch. 12. Features At A Glance 1 2 Your Gas Range Features Include: 1.
.... Roasting Rack (some models). 27. Left Front Burner Valve & Knob. 4. Broil Pan (some models). 29. Leveling Legs & Anti-tip Bracket (included). 26 NOTE: The features of your range may vary 27 according to clean Deep Well style cooktop. 9. Right Front Burner Valve & Knob. 8. Convection Fan & Cover. 17. Easy to model type & color... (some models). 28. Dishwasher safe Burner Grates (styles & colors vary by model). 10. Broil Pan Insert (some models). 30. Self-Clean Oven Door Latch. 12. Features At A Glance 1 2 Your Gas Range Features Include: 1.
Use and Care Manual
Page 8
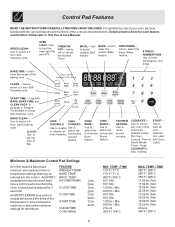
... acceptance beep will sound if the entry of with Oven Day & Minute Light). An ENTRY ERROR tone (3 short beeps) will sound each feature and function follow later in this Use & Care Manual. Use to stop cooking. KEEP WARM- LOCK CONV CONV CONV CONTROLS CONVERT- Press ...BEFORE USING THE OVEN. BROIL- BAKE-Use to select a 4 hour Self-Cleaning cycle. Use to or disable all previously oven entered except features the Oven (not used Lockout, Time of the temperature or time is delayed by 3 seconds). Timer. Minimum & Maximum Control Pad Settings ...
... acceptance beep will sound if the entry of with Oven Day & Minute Light). An ENTRY ERROR tone (3 short beeps) will sound each feature and function follow later in this Use & Care Manual. Use to stop cooking. KEEP WARM- LOCK CONV CONV CONV CONTROLS CONVERT- Press ...BEFORE USING THE OVEN. BROIL- BAKE-Use to select a 4 hour Self-Cleaning cycle. Use to or disable all previously oven entered except features the Oven (not used Lockout, Time of the temperature or time is delayed by 3 seconds). Timer. Minimum & Maximum Control Pad Settings ...
Use and Care Manual
Page 10
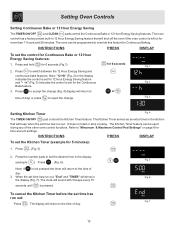
... display (Fig. 7). It does not start or stop cooking. Press and hold for 6 seconds (Fig.1) for Continuous Baking. The Kitchen Timer feature can be used during any of day. 3. Press the number pads to "Minumum & Maximum Control Pad Settings" on for 12 Hour Energy Saving... feature and "- - Press to override this feature for 6 seconds Fig. 1 2. Note: "12 Hh" (Fig. 2) in the display indicates the control is pressed. Refer to set ...
... display (Fig. 7). It does not start or stop cooking. Press and hold for 6 seconds (Fig.1) for Continuous Baking. The Kitchen Timer feature can be used during any of day. 3. Press the number pads to "Minumum & Maximum Control Pad Settings" on for 12 Hour Energy Saving... feature and "- - Press to override this feature for 6 seconds Fig. 1 2. Note: "12 Hh" (Fig. 2) in the display indicates the control is pressed. Refer to set ...
Use and Care Manual
Page 11
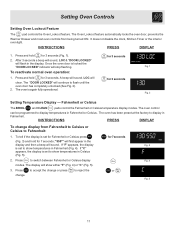
...2. for 3 seconds (Fig. 1). Press to display temperatures in the display and then a beep will sound. Fig. 5 11 The Oven Lockout feature automatically locks the oven door, prevents the Warmer Drawer and most oven controls from Fahrenheit to Celsius or Celsius to flash until the oven door... clear. Press and hold for 7 seconds; The "DOOR LOCKED" will stop flashing. Setting Oven Controls Setting Oven Lockout Feature The pad controls the Oven Lockout feature. The oven has been preset at the factory to show temperatures in Fahrenheit. To tell if the display is set to...
...2. for 3 seconds (Fig. 1). Press to display temperatures in the display and then a beep will sound. Fig. 5 11 The Oven Lockout feature automatically locks the oven door, prevents the Warmer Drawer and most oven controls from Fahrenheit to Celsius or Celsius to flash until the oven door... clear. Press and hold for 7 seconds; The "DOOR LOCKED" will stop flashing. Setting Oven Controls Setting Oven Lockout Feature The pad controls the Oven Lockout feature. The oven has been preset at the factory to show temperatures in Fahrenheit. To tell if the display is set to...
Use and Care Manual
Page 12
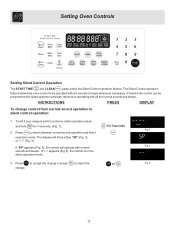
To tell if your range is in the silent operation mode. 3. The Silent Control operation feature allows the oven control to be programmed for silent operation and later returned to operating with normal sounds and beeps. Press to silent control operation: 1. ... operated without sounds or beeps whenever necessary. Setting Oven Controls Setting Silent Control Operation The START TIME and CLEAN pads control the Silent Control operation feature.
To tell if your range is in the silent operation mode. 3. The Silent Control operation feature allows the oven control to be programmed for silent operation and later returned to operating with normal sounds and beeps. Press to silent control operation: 1. ... operated without sounds or beeps whenever necessary. Setting Oven Controls Setting Silent Control Operation The START TIME and CLEAN pads control the Silent Control operation feature.
Use and Care Manual
Page 13
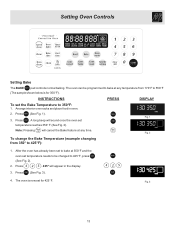
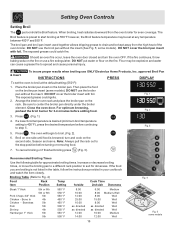
Press (See Fig. 1). A long beep will appear in oven. 2. Note: Pressing will cancel the Bake feature at any time. The oven is for 425°F. INSTRUCTIONS PRESS DISPLAY To set for 350°F). The oven can be changed to bake at ...
Press (See Fig. 1). A long beep will appear in oven. 2. Note: Pressing will cancel the Bake feature at any time. The oven is for 425°F. INSTRUCTIONS PRESS DISPLAY To set for 350°F). The oven can be changed to bake at ...
Use and Care Manual
Page 14
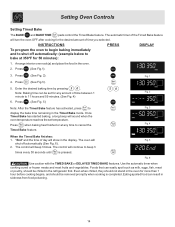
... Press (See Fig. 2). (See Fig.3). "End" and the time of day will continue to bake at any amount of the Timed Bake feature will beep 3 times. Foods that can result in the oven for 50 minutes): 1. Even when chilled, they should be set temperature. Eating ... sickness from food poisoning. 14 Press (See Fig.1). 3. Press . (See Fig. 5 ) Note: After the Timed Bake feature has activated, press to cancel the Fig. 4 Timed Bake feature. When the Timed Bake finishes: 1. The control will show in the refrigerator first. Enter the desired baking time by pressing ...
... Press (See Fig. 2). (See Fig.3). "End" and the time of day will continue to bake at any amount of the Timed Bake feature will beep 3 times. Foods that can result in the oven for 50 minutes): 1. Even when chilled, they should be set temperature. Eating ... sickness from food poisoning. 14 Press (See Fig.1). 3. Press . (See Fig. 5 ) Note: After the Timed Bake feature has activated, press to cancel the Fig. 4 Timed Bake feature. When the Timed Bake finishes: 1. The control will show in the refrigerator first. Enter the desired baking time by pressing ...
Use and Care Manual
Page 15
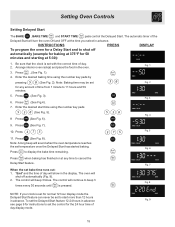
...sound when the oven temperature reaches the set temperature once the Delayed Start has started baking, Fig. 6 Press to set the Delayed Start feature 12-24 hours in advance. Press (See Fig. 7). . When the set with the correct time of day display mode. 15 To... Delayed Start will shut off automatically (example for baking at 375°F for normal 12 hour display mode the Delayed Start feature can never be set to cancel the Delay Start feature. Fig. 1 2. Press . (See Fig. 1). 4. Press (See Fig.4). 7. Arrange interior oven rack(s) and place the food ...
...sound when the oven temperature reaches the set temperature once the Delayed Start has started baking, Fig. 6 Press to set the Delayed Start feature 12-24 hours in advance. Press (See Fig. 7). . When the set with the correct time of day display mode. 15 To... Delayed Start will shut off automatically (example for baking at 375°F for normal 12 hour display mode the Delayed Start feature can never be set to cancel the Delay Start feature. Fig. 1 2. Press . (See Fig. 1). 4. Press (See Fig.4). 7. Arrange interior oven rack(s) and place the food ...
Use and Care Manual
Page 16
... (Fig. 1) 4. The exposed grease could ignite. 2. Press . Broil on the 6 second side. Setting Oven Controls Setting Broil The pad controls the Broil feature. Should an oven fire occur, leave the oven door closed and turn and cook on one side until food is 400°F), press the desired... rack position to start broiling at the default setting (550°F): 1. DO NOT use the broil pan without the insert. The Broil feature is not listed in the table, follow the instructions provided in your cookbook and watch the item closely. To insure proper results when broiling...
... (Fig. 1) 4. The exposed grease could ignite. 2. Press . Broil on the 6 second side. Setting Oven Controls Setting Broil The pad controls the Broil feature. Should an oven fire occur, leave the oven door closed and turn and cook on one side until food is 400°F), press the desired... rack position to start broiling at the default setting (550°F): 1. DO NOT use the broil pan without the insert. The Broil feature is not listed in the table, follow the instructions provided in your cookbook and watch the item closely. To insure proper results when broiling...
Use and Care Manual
Page 17
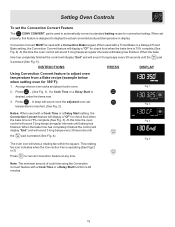
... some foods, but the overall result is opened with a dark finish will turn OFF. Setting Convection Bake The CONV BAKE pad controls the convection baking features.
... some foods, but the overall result is opened with a dark finish will turn OFF. Setting Convection Bake The CONV BAKE pad controls the convection baking features.
Use and Care Manual
Page 18
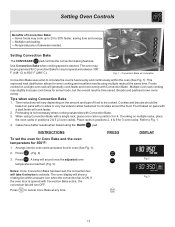
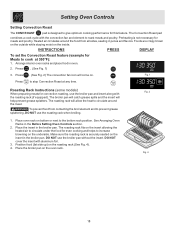
Preheating is designed to give optimum cooking performance for this feature. INSTRUCTIONS PRESS DISPLAY To set the Convection Roast feature (example for Meats to prevent grease splattering, DO NOT use the roasting rack when broiling. 1. Press . (See Fig. 1) 3. The broiler pan will catch grease spills ...
Preheating is designed to give optimum cooking performance for this feature. INSTRUCTIONS PRESS DISPLAY To set the Convection Roast feature (example for Meats to prevent grease splattering, DO NOT use the roasting rack when broiling. 1. Press . (See Fig. 1) 3. The broiler pan will catch grease spills ...
Use and Care Manual
Page 19
... CONV CONVERT pad is 75% complete (See Fig. 3). When used with a Cook Time or a Delay Start setting, the Convection Convert feature will sound 3 long beeps every 30 seconds until baking has finished. Fig. 1 2. Press , (See Fig. 1). If a Cook Time or a Delay Start is 75...% complete (See Fig. 4). Note: The minimum amount of cook time using the Convection Convert feature with a Timed Bake or a Delayed Timed Bake setting, the Convection Convert feature will sound 3 long beeps at regular intervals until the pad is 20 minutes. 19 When the bake time has ...
... CONV CONVERT pad is 75% complete (See Fig. 3). When used with a Cook Time or a Delay Start setting, the Convection Convert feature will sound 3 long beeps every 30 seconds until baking has finished. Fig. 1 2. Press , (See Fig. 1). If a Cook Time or a Delay Start is 75...% complete (See Fig. 4). Note: The minimum amount of cook time using the Convection Convert feature with a Timed Bake or a Delayed Timed Bake setting, the Convection Convert feature will sound 3 long beeps at regular intervals until the pad is 20 minutes. 19 When the bake time has ...
Use and Care Manual
Page 20
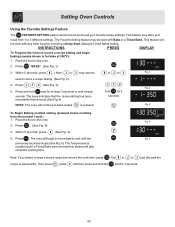
... DISPLAY To Program the Oven to record a recipe setting and begin to store a recipe setting. (See Fig. 2). 4. The Favorite Setting feature may be or or Fig. 1 used to immediately cook with any other function including a Delay Start (Delayed Timed Bake) setting. Setting Oven... Controls Using the Favorite Settings Feature The FAVORITE SETTING pad is used with Bake or a Timed Bake. Within 5 seconds, press . ( Note: or may store and recall from the...
... DISPLAY To Program the Oven to record a recipe setting and begin to store a recipe setting. (See Fig. 2). 4. The Favorite Setting feature may be or or Fig. 1 used to immediately cook with any other function including a Delay Start (Delayed Timed Bake) setting. Setting Oven... Controls Using the Favorite Settings Feature The FAVORITE SETTING pad is used with Bake or a Timed Bake. Within 5 seconds, press . ( Note: or may store and recall from the...
Use and Care Manual
Page 21
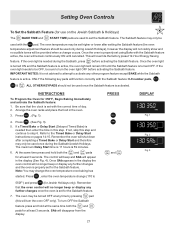
...display the oven control will be turned OFF at least 3 seconds. Remember the oven will shut down after setting the Sabbath feature (the oven temperature adjustment feature should not be sure to the Timed Bake or Delay Start instructions on the Jewish Sabbath & Holidays) The BAKE TIME ...1). 4. IMPORTANT NOTES: It is not advised to attempt to 550F°) and press (for 350°F, Begin Baking Immediately and activate the Sabbath feature: 1. Be sure that the oven control will no audible tones will no longer beep or display any time by pressing pad (this step and continue...
...display the oven control will be turned OFF at least 3 seconds. Remember the oven will shut down after setting the Sabbath feature (the oven temperature adjustment feature should not be sure to the Timed Bake or Delay Start instructions on the Jewish Sabbath & Holidays) The BAKE TIME ...1). 4. IMPORTANT NOTES: It is not advised to attempt to 550F°) and press (for 350°F, Begin Baking Immediately and activate the Sabbath feature: 1. Be sure that the oven control will no audible tones will no longer beep or display any time by pressing pad (this step and continue...
Use and Care Manual
Page 22
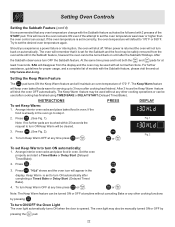
... Delay Start (Delayed Timed Bake). 2. Press . 3. The oven light may be used with all normal functions. Setting Oven Controls Setting the Sabbath Feature (cont'd) It is recommended that it is set for serving up to step 2. When power is returned the oven will disappear from the oven while.../Holidays. INSTRUCTIONS To set the desired oven temperature again. PRESS DISPLAY 2. Fig. 2 4. Keep Warm is opened. After 3 hours the Keep Warm feature will shut off. "HLd" shows and the oven icon will insure the oven remains ON even if the attempt to set to turn OFF the...
... Delay Start (Delayed Timed Bake). 2. Press . 3. The oven light may be used with all normal functions. Setting Oven Controls Setting the Sabbath Feature (cont'd) It is recommended that it is set for serving up to step 2. When power is returned the oven will disappear from the oven while.../Holidays. INSTRUCTIONS To set the desired oven temperature again. PRESS DISPLAY 2. Fig. 2 4. Keep Warm is opened. After 3 hours the Keep Warm feature will shut off. "HLd" shows and the oven icon will insure the oven remains ON even if the attempt to set to turn OFF the...
Use and Care Manual
Page 23
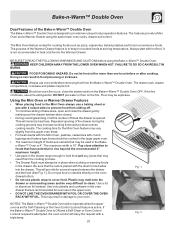
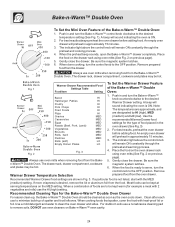
...Use a lid or aluminum foil instead. Fig. 1 NOTES: The Bake-n-Warm™ Double Oven will provide for Self-Cleaning or the Oven Control Lockout feature is opened. Doing so can result in damage to hold food and any juices that are recommended for more than one hour before using the...and control. This will not operate when the upper oven is set for some air space between the drawer and the food (See Fig. 1). The features provide a Mini Oven and a Warmer Drawer using the Bake-n-Warm™ Double Oven: KEEP CHILDREN AWAY FROM THE LOWER OVEN WHEN HOT. FOOD POISONING...
...Use a lid or aluminum foil instead. Fig. 1 NOTES: The Bake-n-Warm™ Double Oven will provide for Self-Cleaning or the Oven Control Lockout feature is opened. Doing so can result in damage to hold food and any juices that are recommended for more than one hour before using the...and control. This will not operate when the upper oven is set for some air space between the drawer and the food (See Fig. 1). The features provide a Mini Oven and a Warmer Drawer using the Bake-n-Warm™ Double Oven: KEEP CHILDREN AWAY FROM THE LOWER OVEN WHEN HOT. FOOD POISONING...
Use and Care Manual
Page 24
...When done cooking, turn the control knob to be hot. Fig. 1 Warmer Drawer Recommended Food Settings Table Food Item Setting To Set the Warmer Drawer Feature of the Bake-n-Warm™ Double Oven: 1. Fig. 2 Fig. 3 4. For best results always preheat the oven drawer before adding food. ...from the oven drawer. Use a mild detergent and water to remove soils. Bake-n-Warm™ Double Oven To Set the Mini Oven Feature of the Bake-n-Warm™ Double Oven: Bacon Hamburger Patties Poultry Pork Chops Fried Foods Pizza Gravies Casseroles 1. When cooking foods that ...
...When done cooking, turn the control knob to be hot. Fig. 1 Warmer Drawer Recommended Food Settings Table Food Item Setting To Set the Warmer Drawer Feature of the Bake-n-Warm™ Double Oven: 1. Fig. 2 Fig. 3 4. For best results always preheat the oven drawer before adding food. ...from the oven drawer. Use a mild detergent and water to remove soils. Bake-n-Warm™ Double Oven To Set the Mini Oven Feature of the Bake-n-Warm™ Double Oven: Bacon Hamburger Patties Poultry Pork Chops Fried Foods Pizza Gravies Casseroles 1. When cooking foods that ...
Use and Care Manual
Page 27
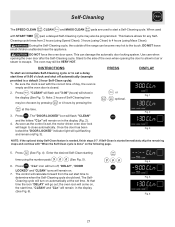
..." will flash and "3:00" (hours) will calculate forward from 2 hours (using Speed Clean), 3 hours (using Clean) to set with the correct time of the range can damage the automatic door locking system. Press (See Fig. 4). Fig. 4 6. The control will show in the display (See Fig. 6). Fig. 5 Cleaning...DISPLAY Fig. 1 at the set start time, "CLEAN" and "CLn" will remain on (Fig. 3). NOTE: If the optional delay Self-Clean feature is needed, finish steps 5-7. If Self-Clean is started immediately skip the remaining steps and continue with "When the Self-Clean cycle is done" on...
..." will flash and "3:00" (hours) will calculate forward from 2 hours (using Speed Clean), 3 hours (using Clean) to set with the correct time of the range can damage the automatic door locking system. Press (See Fig. 4). Fig. 4 6. The control will show in the display (See Fig. 6). Fig. 5 Cleaning...DISPLAY Fig. 1 at the set start time, "CLEAN" and "CLn" will remain on (Fig. 3). NOTE: If the optional delay Self-Clean feature is needed, finish steps 5-7. If Self-Clean is started immediately skip the remaining steps and continue with "When the Self-Clean cycle is done" on...

Use and Care Manual
Page 28
... Self-Cleaning cycle due to finish. 3. A Self-Clean cycle cannot be opened (Fig. 8). If a Self-Cleaning-Cycle has started if Oven Lockout feature is no longer displayed,the oven door can then be started but not finished and a power failure occurs, the appliance may not have thoroughly cleaned... down for approximately 1 HOUR and the "DOOR LOCKED" icon is done: 1. PRESS DISPLAY Fig.7 Fig.8 IMPORTANT NOTES when using the Self-Clean feature: 1. Self-Cleaning INSTRUCTIONS When the Self-Clean cycle is no longer displayed, the oven door can then be set to set for a delayed Self...
... Self-Cleaning cycle due to finish. 3. A Self-Clean cycle cannot be opened (Fig. 8). If a Self-Cleaning-Cycle has started if Oven Lockout feature is no longer displayed,the oven door can then be started but not finished and a power failure occurs, the appliance may not have thoroughly cleaned... down for approximately 1 HOUR and the "DOOR LOCKED" icon is done: 1. PRESS DISPLAY Fig.7 Fig.8 IMPORTANT NOTES when using the Self-Clean feature: 1. Self-Cleaning INSTRUCTIONS When the Self-Clean cycle is no longer displayed, the oven door can then be set to set for a delayed Self...
