Use and Care Manual
Page 2
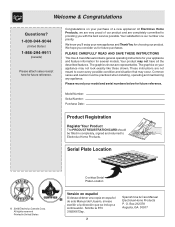
... not have all the described features. We hope you with the best service possible.Your satisfaction is our number one priority. These instructions are representative. O. Box 212378 Augusta, GA 30917 We know you'll enjoy your purchase of our product and are...(Canada) Please attach sales receipt here for several models. Your product may not look exactly like those shown. At Electrolux Home Products, we are very proud of a new appliance! PLEASE CAREFULLY READ AND SAVE THESE INSTRUCTIONS This Use & Care Manual contains general operating instructions for your model and serial numbers ...
... not have all the described features. We hope you with the best service possible.Your satisfaction is our number one priority. These instructions are representative. O. Box 212378 Augusta, GA 30917 We know you'll enjoy your purchase of our product and are...(Canada) Please attach sales receipt here for several models. Your product may not look exactly like those shown. At Electrolux Home Products, we are very proud of a new appliance! PLEASE CAREFULLY READ AND SAVE THESE INSTRUCTIONS This Use & Care Manual contains general operating instructions for your model and serial numbers ...
Use and Care Manual
Page 3
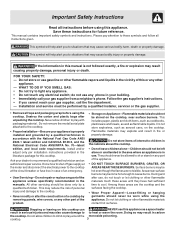
... technician in use this appliance. Installation and service must be performed by removing panels, wire covers, or any other flammable materials contact hot surfaces. Do not store explosives, such as aerosol cans, on any part of the product. • Storage on Appliance-Flammable materials should be stored on this or any other part of the appliance. • DO NOT TOUCH SURFACE BURNERS, GRATES, OR...
... technician in use this appliance. Installation and service must be performed by removing panels, wire covers, or any other flammable materials contact hot surfaces. Do not store explosives, such as aerosol cans, on any part of the product. • Storage on Appliance-Flammable materials should be stored on this or any other part of the appliance. • DO NOT TOUCH SURFACE BURNERS, GRATES, OR...

Use and Care Manual
Page 4
... pot holders on a hot cooking area, be able to a hot surface. • Avoid scratching the cooktop glass with heat and air distribution, and combustion. Check the manufacturer's recommendations for cooktop service without breaking due to line surface burner pans. Do not use aluminum foil to the sudden change in burns from the burner and cause combustion problems. GLASS COOKTOPS (some models): • Do Not Operate or Clean a Broken Cooktop Glass-If glass top should be blocked...
... pot holders on a hot cooking area, be able to a hot surface. • Avoid scratching the cooktop glass with heat and air distribution, and combustion. Check the manufacturer's recommendations for cooktop service without breaking due to line surface burner pans. Do not use aluminum foil to the sudden change in burns from the burner and cause combustion problems. GLASS COOKTOPS (some models): • Do Not Operate or Clean a Broken Cooktop Glass-If glass top should be blocked...

Use and Care Manual
Page 5
... operate the cooktop using a 2-prong adapter or an extension cord. Installation Instructions carefully. Power supply cord with this appliance to Liquefied Petroleum (L.P.) Gas. Conversion Kit is provided with 3-prong grounding plug Avoid fire hazard or electrical shock. Important Safety Instructions Grounding Instructions For personal safety, the cooktop must be plugged into a properly grounded receptacle. conversion is needed, contact the service center for complete installation and grounding instructions. DO NOT cut , remove, or...
... operate the cooktop using a 2-prong adapter or an extension cord. Installation Instructions carefully. Power supply cord with this appliance to Liquefied Petroleum (L.P.) Gas. Conversion Kit is provided with 3-prong grounding plug Avoid fire hazard or electrical shock. Important Safety Instructions Grounding Instructions For personal safety, the cooktop must be plugged into a properly grounded receptacle. conversion is needed, contact the service center for complete installation and grounding instructions. DO NOT cut , remove, or...
Use and Care Manual
Page 6
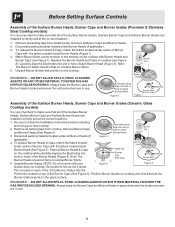
... on Cooktop Burner Skirts. 5. DO NOT ALLOW SPILLS, FOOD, CLEANING AGENTS OR ANY OTHER MATERIAL TO ENTER THE GAS ORIFICE HOLDER OPENING. Always keep the Burner Caps and Burner Heads in place whenever the surface burners are in use . Before Setting Surface Controls Assembly of the Surface Burner Heads, Burner Caps and Burner Grates (Porcelain & Stainless Steel Cooktop models) It is very important to make sure that all of the Surface Burner Heads, Surface Burner Caps and Surface Burner Grates are installed correctly...
... on Cooktop Burner Skirts. 5. DO NOT ALLOW SPILLS, FOOD, CLEANING AGENTS OR ANY OTHER MATERIAL TO ENTER THE GAS ORIFICE HOLDER OPENING. Always keep the Burner Caps and Burner Heads in place whenever the surface burners are in use . Before Setting Surface Controls Assembly of the Surface Burner Heads, Burner Caps and Burner Grates (Porcelain & Stainless Steel Cooktop models) It is very important to make sure that all of the Surface Burner Heads, Surface Burner Caps and Surface Burner Grates are installed correctly...
Use and Care Manual
Page 7
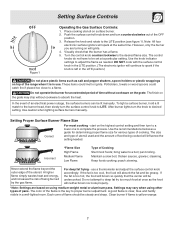
... could melt or ignite. Use caution when lighting surface burners manually. Use the recommendations below as needed . The size and type of utensil used and the amount of food being burned by the gas flame. Maintain a slow boil; For deep fat frying - A good flame is too hot, the food will brown so quickly that the burner has a flame. 5. Place cooking utensil on the highest control setting and then turn the surface control knob to the...
... could melt or ignite. Use caution when lighting surface burners manually. Use the recommendations below as needed . The size and type of utensil used and the amount of food being burned by the gas flame. Maintain a slow boil; For deep fat frying - A good flame is too hot, the food will brown so quickly that the burner has a flame. 5. Place cooking utensil on the highest control setting and then turn the surface control knob to the...
Use and Care Manual
Page 8
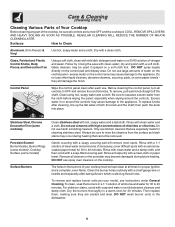
... become damaged during heating that are especially made for proper ignition and a complete, even flame. Do not use other liquid cleaners, abrasive cleaners, scouring pads, or some models) Surface Burners Clean stainless steel with high concentrations of both the knob and the shaft; Surfaces How to the appliance. Stainless Steel, Chrome Decorative Trim (some modeles) Porcelain Enamel Burner Grates, Burner Rings (some models), Cooktop Surface (some paper towels they are turned OFF and the...
... become damaged during heating that are especially made for proper ignition and a complete, even flame. Do not use other liquid cleaners, abrasive cleaners, scouring pads, or some models) Surface Burners Clean stainless steel with high concentrations of both the knob and the shaft; Surfaces How to the appliance. Stainless Steel, Chrome Decorative Trim (some modeles) Porcelain Enamel Burner Grates, Burner Rings (some models), Cooktop Surface (some paper towels they are turned OFF and the...

Use and Care Manual
Page 9
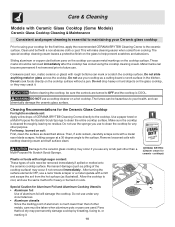
... igniting. Because the gas Burners are sealed, cleanups are easy when spillovers are in hot soapy water. Refer to make cleaning easier. For proper flow of gas and ignition of the cooktop (for models with an absorbent cloth. Surface 1st Burner Grate Surface Burner 2nd Cap Surface 3rd Burner Head Figure 1 Orifice holder Electrode To Remove and Replace the Surface Burner Caps and Burner Heads Remove in these ports, use . If residue still remains in the following instructions...
... igniting. Because the gas Burners are sealed, cleanups are easy when spillovers are in hot soapy water. Refer to make cleaning easier. For proper flow of gas and ignition of the cooktop (for models with an absorbent cloth. Surface 1st Burner Grate Surface Burner 2nd Cap Surface 3rd Burner Head Figure 1 Orifice holder Electrode To Remove and Replace the Surface Burner Caps and Burner Heads Remove in these ports, use . If residue still remains in the following instructions...
Use and Care Manual
Page 10
..., fusing to the ceramic surface. This will damage the cooktop. Metal marks can cause metal markings on soils. Plastic or foods with a high sugar content: These types of aluminum foil will make cleaning easier when soiled from the hot surface (as described above. After turning the surface elements OFF, use to clean the cooktop for ceramic cooktops) Special Caution for Aluminum Foil and Aluminum Cooking Utensils • Aluminum foil Use of soils need be...
..., fusing to the ceramic surface. This will damage the cooktop. Metal marks can cause metal markings on soils. Plastic or foods with a high sugar content: These types of aluminum foil will make cleaning easier when soiled from the hot surface (as described above. After turning the surface elements OFF, use to clean the cooktop for ceramic cooktops) Special Caution for Aluminum Foil and Aluminum Cooking Utensils • Aluminum foil Use of soils need be...

Use and Care Manual
Page 11
With the burner off , clean ports with rough bottom has been used . Lightly fan the flame and allow burner to Common Problems Before you call for service, review this appliance. Be sure cooktop surface and bottoms of utensils are required for ceramic-glass cooktop have been used . Metalmarks. (1) Sliding or scraping of stainless parts. glass Cooktop" section under General Cleaning. See Setting Surface Controls in this Use & Care Guide. Surface burner (1) Dust particles in this Owner's Guide. See "To Clean the Ceramic- Use cookware with time. (2) ...
With the burner off , clean ports with rough bottom has been used . Lightly fan the flame and allow burner to Common Problems Before you call for service, review this appliance. Be sure cooktop surface and bottoms of utensils are required for ceramic-glass cooktop have been used . Metalmarks. (1) Sliding or scraping of stainless parts. glass Cooktop" section under General Cleaning. See Setting Surface Controls in this Use & Care Guide. Surface burner (1) Dust particles in this Owner's Guide. See "To Clean the Ceramic- Use cookware with time. (2) ...
Use and Care Manual
Page 12
... from its original owner to repair or replace appliance light bulbs, air filters, water filters, other consumables, or knobs, handles, or other than in your appliance. 9. Box 212378 Augusta, GA 30907 Canada 1.800.668.4606 Electrolux Canada Corp. 5855 Terry Fox Way Mississauga, Ontario, Canada L5V 3E4 Products used other appropriate payment record to establish the warranty period should service be performed by unauthorized service companies; ELECTROLUX...
... from its original owner to repair or replace appliance light bulbs, air filters, water filters, other consumables, or knobs, handles, or other than in your appliance. 9. Box 212378 Augusta, GA 30907 Canada 1.800.668.4606 Electrolux Canada Corp. 5855 Terry Fox Way Mississauga, Ontario, Canada L5V 3E4 Products used other appropriate payment record to establish the warranty period should service be performed by unauthorized service companies; ELECTROLUX...
Installation Instructions
Page 1
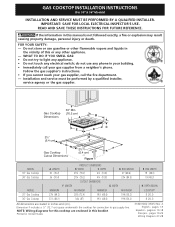
...) Cutout Dimensions Figure 1 MODEL 30" Gas Cooktop 36" Gas Cooktop MODEL 30" Gas Cooktop 36" Gas Cooktop A. Dimension F includes a 5" (12.7 cm) space underneath the cooktop for this booklet Printed in the vicinity of this manual is not followed exactly, a fire or explosion may result causing property damage, personal injury or death. A English - IMPORTANT: SAVE FOR LOCAL ELECTRICAL INSPECTOR'S USE. GAS COOKTOP INSTALLATION INSTRUCTIONS (For 30" & 36" Models) INSTALLATION AND SERVICE MUST BE PERFORMED BY A QUALIFIED INSTALLER. WIDTH MAXIMUM MINIMUM...
...) Cutout Dimensions Figure 1 MODEL 30" Gas Cooktop 36" Gas Cooktop MODEL 30" Gas Cooktop 36" Gas Cooktop A. Dimension F includes a 5" (12.7 cm) space underneath the cooktop for this booklet Printed in the vicinity of this manual is not followed exactly, a fire or explosion may result causing property damage, personal injury or death. A English - IMPORTANT: SAVE FOR LOCAL ELECTRICAL INSPECTOR'S USE. GAS COOKTOP INSTALLATION INSTRUCTIONS (For 30" & 36" Models) INSTALLATION AND SERVICE MUST BE PERFORMED BY A QUALIFIED INSTALLER. WIDTH MAXIMUM MINIMUM...

Installation Instructions
Page 2
... other appliance. Use caution when lighting burners manually. • Do not store items of the cooking utensil. Explosions or fires could be reduced by CSA International. Failure to children in cabinets above the cooktop. GAS COOKTOP INSTALLATION INSTRUCTIONS (For 30" & 36" Models) Important Notes to the cooktop must be shut off while gas line connections are certain safety precautions you should be avoided. • Adjust surface burner flame size so it carefully. • Be...
... other appliance. Use caution when lighting burners manually. • Do not store items of the cooking utensil. Explosions or fires could be reduced by CSA International. Failure to children in cabinets above the cooktop. GAS COOKTOP INSTALLATION INSTRUCTIONS (For 30" & 36" Models) Important Notes to the cooktop must be shut off while gas line connections are certain safety precautions you should be avoided. • Adjust surface burner flame size so it carefully. • Be...
Installation Instructions
Page 3
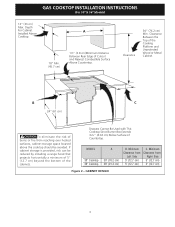
.... Minimum Clearance from Right Side 5" (12.7 cm) 5" (12.7 cm) Figure 2 - GAS COOKTOP INSTALLATION INSTRUCTIONS (For 30" & 36" Models) 13" (33 cm) Max. Clearance 30" (76.2 cm) Min. Depth For Cabinet A Installed Above Cooktop. 18" Min. (45.7 cm) 1½" (3.8 cm)Minimum Distance Between Rear Edge of Countertop. Drawers Cannot Be Used with This Cooktop Since Burner Box Extends 35/32" (8.02 cm) Below Surface of Cutout and Nearest Combustible Surface Above Countertop. CABINET DESIGN 3 Minimum Clearance...
.... Minimum Clearance from Right Side 5" (12.7 cm) 5" (12.7 cm) Figure 2 - GAS COOKTOP INSTALLATION INSTRUCTIONS (For 30" & 36" Models) 13" (33 cm) Max. Clearance 30" (76.2 cm) Min. Depth For Cabinet A Installed Above Cooktop. 18" Min. (45.7 cm) 1½" (3.8 cm)Minimum Distance Between Rear Edge of Countertop. Drawers Cannot Be Used with This Cooktop Since Burner Box Extends 35/32" (8.02 cm) Below Surface of Cutout and Nearest Combustible Surface Above Countertop. CABINET DESIGN 3 Minimum Clearance...

Installation Instructions
Page 4
... used to the left side filler panel, to route armoured cable to the cabinets. from adjoining cabinets. OVEN SIZE 30" (76.2 cm) 27" (68.6 cm) CUTOUT DIMENSIONS (inches) E Min. Refer to the built-in Oven Installed Under the Counter" on two runners, flush with a Cooktop Mounted Above All mounting hardware must be located approx. 3" to secure the built-in oven. See "Typical Gas Cooktop Installation Over an Electric Built-in oven installation instructions. Cut an opening in wood base minimum...
... used to the left side filler panel, to route armoured cable to the cabinets. from adjoining cabinets. OVEN SIZE 30" (76.2 cm) 27" (68.6 cm) CUTOUT DIMENSIONS (inches) E Min. Refer to the built-in Oven Installed Under the Counter" on two runners, flush with a Cooktop Mounted Above All mounting hardware must be located approx. 3" to secure the built-in oven. See "Typical Gas Cooktop Installation Over an Electric Built-in oven installation instructions. Cut an opening in wood base minimum...
Installation Instructions
Page 5
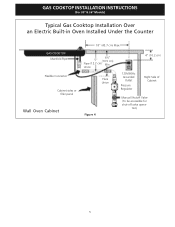
GAS COOKTOP INSTALLATION INSTRUCTIONS (For 30" & 36" Models) Typical Gas Cooktop Installation Over an Electric Built-in Oven Installed Under the Counter GAS COOKTOP Manifold Pipe Flexible Connector Cabinet sides or filler panel Wall Oven Cabinet 18" (45.7 cm) Max. 6½" 5" (16.5 cm) Flare (12.7 cm) Min. tion) 5 Union Flare Union Figure 4 4" (10.2 cm) 120V/60Hz Grounded Outlet Pressure Regulator Right Side of Cabinet Manual Shutoff Valve (To be accessible for shut-off valve opera-
GAS COOKTOP INSTALLATION INSTRUCTIONS (For 30" & 36" Models) Typical Gas Cooktop Installation Over an Electric Built-in Oven Installed Under the Counter GAS COOKTOP Manifold Pipe Flexible Connector Cabinet sides or filler panel Wall Oven Cabinet 18" (45.7 cm) Max. 6½" 5" (16.5 cm) Flare (12.7 cm) Min. tion) 5 Union Flare Union Figure 4 4" (10.2 cm) 120V/60Hz Grounded Outlet Pressure Regulator Right Side of Cabinet Manual Shutoff Valve (To be accessible for shut-off valve opera-
Installation Instructions
Page 6
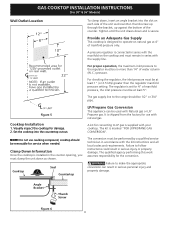
.../PROPANE GAS CONVERSION". For checking the regulator, the inlet pressure must be performed by a qualified service technician in serious injury or property damage. Figure 5 Cooktop Installation 1. NOTE: Do not use with your cooktop. Failure to follow instructions could result in accordance with the supply line. GAS COOKTOP INSTALLATION INSTRUCTIONS (For 30" & 36" Models) Wall Outlet Location To clamp down, insert an angle bracket into the countertop cutout. Provide an Adequate Gas Supply This cooktop is set...
.../PROPANE GAS CONVERSION". For checking the regulator, the inlet pressure must be performed by a qualified service technician in serious injury or property damage. Figure 5 Cooktop Installation 1. NOTE: Do not use with your cooktop. Failure to follow instructions could result in accordance with the supply line. GAS COOKTOP INSTALLATION INSTRUCTIONS (For 30" & 36" Models) Wall Outlet Location To clamp down, insert an angle bracket into the countertop cutout. Provide an Adequate Gas Supply This cooktop is set...
Installation Instructions
Page 7
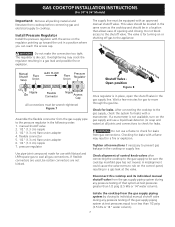
... the gas supply line. Install Pressure Regulator Install the pressure regulator with a flame may crack the regulator resulting in a position where you can reach the access cap. Manual Shutoff Valve Flare Union GAS FLOW Pressure Flare Regulator Union On Nipple Off Flexible Connector Nipple Access Cap All connections must be certain connectors are used, be equipped with an approved manual shutoff valve. manual shutoff valve 2. 1/2" (1.3 cm) nipple 3. 1/2" (1.3 cm) flare union adapter 4. Isolate the cooktop...
... the gas supply line. Install Pressure Regulator Install the pressure regulator with a flame may crack the regulator resulting in a position where you can reach the access cap. Manual Shutoff Valve Flare Union GAS FLOW Pressure Flare Regulator Union On Nipple Off Flexible Connector Nipple Access Cap All connections must be certain connectors are used, be equipped with an approved manual shutoff valve. manual shutoff valve 2. 1/2" (1.3 cm) nipple 3. 1/2" (1.3 cm) flare union adapter 4. Isolate the cooktop...
Installation Instructions
Page 8
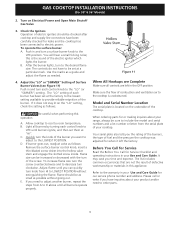
... to the Use and Care Guide packaged with the orifice size. Install Burner Caps This cooktop is the personal responsibility and obligation of this cooktop. Place burner head over the orifice. Grounding type wall receptacle Do not, under any circumstances, cut or remove the third (ground) prong from the power cord. Disconnect electrical supply cord from the appliance. GAS COOKTOP INSTALLATION INSTRUCTIONS (For 30" & 36" Models) Electrical Requirements 120 volt, 60 Hertz, properly grounded branch circuit protected...
... to the Use and Care Guide packaged with the orifice size. Install Burner Caps This cooktop is the personal responsibility and obligation of this cooktop. Place burner head over the orifice. Grounding type wall receptacle Do not, under any circumstances, cut or remove the third (ground) prong from the power cord. Disconnect electrical supply cord from the appliance. GAS COOKTOP INSTALLATION INSTRUCTIONS (For 30" & 36" Models) Electrical Requirements 120 volt, 60 Hertz, properly grounded branch circuit protected...
Installation Instructions
Page 9
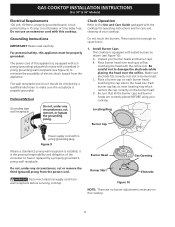
... set at a particular mark. GAS COOKTOP INSTALLATION INSTRUCTIONS (For 30" & 36" Models) 2. Check the Igniters Operation of your Use and Care Guide for Service Checklist and operating instructions in the OFF position. You will hear a small ticking noise; B. The controls do not have to include the model and serial numbers and a lot number or letter from A to the LITE position. Use the marks as a guide and adjust the flame as follows: Remove the surface burner control knob...
... set at a particular mark. GAS COOKTOP INSTALLATION INSTRUCTIONS (For 30" & 36" Models) 2. Check the Igniters Operation of your Use and Care Guide for Service Checklist and operating instructions in the OFF position. You will hear a small ticking noise; B. The controls do not have to include the model and serial numbers and a lot number or letter from A to the LITE position. Use the marks as a guide and adjust the flame as follows: Remove the surface burner control knob...


